TravelMate 6291/6292/6231 User's Guide EN
Page 12
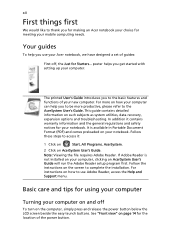
... subjects as system utilities, data recovery, expansion options and troubleshooting. In addition it : 1 Click on Start, All Programs, AcerSystem. 2 Click on page 14 for the location of the power button. Basic care and tips for using your computer Turning your notebook. Your guides To help you to be more on how your new computer. poster helps you get started with setting up your notebook. xii First...
... subjects as system utilities, data recovery, expansion options and troubleshooting. In addition it : 1 Click on Start, All Programs, AcerSystem. 2 Click on page 14 for the location of the power button. Basic care and tips for using your computer Turning your notebook. Your guides To help you to be more on how your new computer. poster helps you get started with setting up your notebook. xii First...

TravelMate 6291/6292/6231 User's Guide EN
Page 16
... lock 34 Audio 35 Adjusting the volume 35 Acer PureZone 35 Using the system utilities 36 Acer Bio-Protection (for selected models) 36 Acer GridVista (dual-display compatible) 37 Launch Manager 38 Norton Internet Security 38 Frequently asked questions 40 Requesting service 43 International Travelers Warranty (ITW) 43 Before you call 43 Battery pack 44 Battery pack characteristics 44 Maximizing the battery's life 44 Installing and removing the battery pack 45 Charging the battery...
... lock 34 Audio 35 Adjusting the volume 35 Acer PureZone 35 Using the system utilities 36 Acer Bio-Protection (for selected models) 36 Acer GridVista (dual-display compatible) 37 Launch Manager 38 Norton Internet Security 38 Frequently asked questions 40 Requesting service 43 International Travelers Warranty (ITW) 43 Before you call 43 Battery pack 44 Battery pack characteristics 44 Maximizing the battery's life 44 Installing and removing the battery pack 45 Charging the battery...
TravelMate 6291/6292/6231 User's Guide EN
Page 17
... Index 77 Expanding through options 54 Connectivity options 54 Fax/data modem 54 Built-in network feature 55 Fast Infrared (FIR) 55 Universal Serial Bus (USB) 56 IEEE 1394 port 56 PC Card slot 57 Installing memory 58 BIOS utility 58 Boot sequence 58 Enable disk-to-disk recovery 59 Password 59 Using software 59 Playing DVD movies 59 Acer eRecovery Management 60 Create backup 60 Burn backup disc 61 Restore and recovery 61 Troubleshooting 62 Troubleshooting tips 62 Error messages 62 Regulations...
... Index 77 Expanding through options 54 Connectivity options 54 Fax/data modem 54 Built-in network feature 55 Fast Infrared (FIR) 55 Universal Serial Bus (USB) 56 IEEE 1394 port 56 PC Card slot 57 Installing memory 58 BIOS utility 58 Boot sequence 58 Enable disk-to-disk recovery 59 Password 59 Using software 59 Playing DVD movies 59 Acer eRecovery Management 60 Create backup 60 Burn backup disc 61 Restore and recovery 61 Troubleshooting 62 Troubleshooting tips 62 Error messages 62 Regulations...
TravelMate 6291/6292/6231 User's Guide EN
Page 21
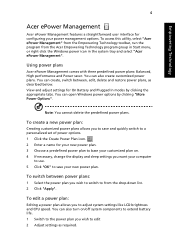
... "Acer ePower Management". You can create, switch between power plans: 1 Select the power plan you wish to save and quickly switch to a personalized set of power options. 1 Click the Create Power Plan icon. 2 Enter a name for your new power plan. 3 Choose a predefined power plan to base your customized plan on /off system components to extend battery life. 1 Switch to the power plan you wish to switch to adjust system settings like LCD brightness and CPU speed. Using power...
... "Acer ePower Management". You can create, switch between power plans: 1 Select the power plan you wish to save and quickly switch to a personalized set of power options. 1 Click the Create Power Plan icon. 2 Enter a name for your new power plan. 3 Choose a predefined power plan to base your customized plan on /off system components to extend battery life. 1 Switch to the power plan you wish to switch to adjust system settings like LCD brightness and CPU speed. Using power...
TravelMate 6291/6292/6231 User's Guide EN
Page 34
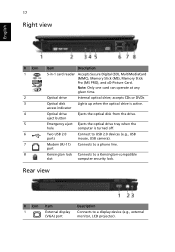
...), Memory Stick Pro (MS PRO), and xD-Picture Card. access indicator Optical drive eject button Ejects the optical disk from the drive. Two USB 2.0 ports Connect to a phone line. Emergency eject Ejects the optical drive tray when the hole computer is active. Modem (RJ-11) port Connects to USB 2.0 devices (e.g., USB mouse, USB camera). Optical drive Internal optical drive; Note: Only one card can operate at any given time. accepts CDs or DVDs Optical disk Lights up when the optical drive is turned...
...), Memory Stick Pro (MS PRO), and xD-Picture Card. access indicator Optical drive eject button Ejects the optical disk from the drive. Two USB 2.0 ports Connect to a phone line. Emergency eject Ejects the optical drive tray when the hole computer is active. Modem (RJ-11) port Connects to USB 2.0 devices (e.g., USB mouse, USB camera). Optical drive Internal optical drive; Note: Only one card can operate at any given time. accepts CDs or DVDs Optical disk Lights up when the optical drive is turned...
TravelMate 6291/6292/6231 User's Guide EN
Page 57
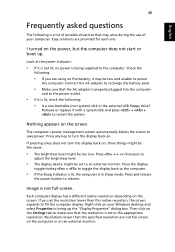
... a key does not turn the display back on your computer. Press and release the power button to an external monitor. Press + (increase) to adjust the brightness level. • The display device might be set to resume. If you are using on an external monitor. Look at the power indicator: • If it is being supplied to the computer. The computer's power management system automatically blanks the screen to the power outlet...
... a key does not turn the display back on your computer. Press and release the power button to an external monitor. Press + (increase) to adjust the brightness level. • The display device might be set to resume. If you are using on an external monitor. Look at the power indicator: • If it is being supplied to the computer. The computer's power management system automatically blanks the screen to the power outlet...
TravelMate 6291/6292/6231 User's Guide EN
Page 78
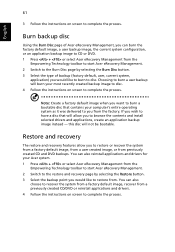
... toolbar to start Acer eRecovery Management. 2 Switch to the Burn Disc page by selecting the Restore button. 3 Select the backup point you would like to burn to recover the system from a factory default image, recover from previously created CD and DVD backups. Burn backup disc Using the Burn Disc page of backup (factory default, user, current system, application) you would like to browse the contents and install selected drivers and applications, create an application backup image instead...
... toolbar to start Acer eRecovery Management. 2 Switch to the Burn Disc page by selecting the Restore button. 3 Select the backup point you would like to burn to recover the system from a factory default image, recover from previously created CD and DVD backups. Burn backup disc Using the Burn Disc page of backup (factory default, user, current system, application) you would like to browse the contents and install selected drivers and applications, create an application backup image instead...
Service Guide for TravelMate 6291, 6292, 6231
Page 18
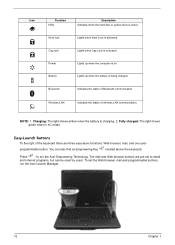
... the Acer Launch Manager. 12 Chapter 1 Bluetooth Indicates the status of wireless LAN communication. Easy-Launch Buttons To the right of the keyboard there are pre-set the Web browser, mail and programmable buttons, run the Acer Empowering Technology. Cap lock Lights when Cap Lock is activated Power Lights up when the battery is being charged. NOTE: 1. Icon Function HDD Description Indicates when the hard disc or optical drive is activated. Num lock Lights when Num Lock is active. Battery Lights up...
... the Acer Launch Manager. 12 Chapter 1 Bluetooth Indicates the status of wireless LAN communication. Easy-Launch Buttons To the right of the keyboard there are pre-set the Web browser, mail and programmable buttons, run the Acer Empowering Technology. Cap lock Lights when Cap Lock is activated Power Lights up when the battery is being charged. NOTE: 1. Icon Function HDD Description Indicates when the hard disc or optical drive is activated. Num lock Lights when Num Lock is active. Battery Lights up...
Service Guide for TravelMate 6291, 6292, 6231
Page 35
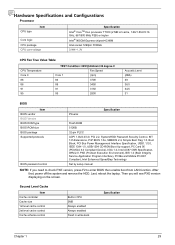
... 2.2, System/HDD Password Security Control, INT 13h Extensions, PnP BIOS 1.0a, SMBIOS 2.4, Simple Boot Flag 1.0, Boot Block, PCI Bus Power Management Interface Specification, USB1.1/2.0, IEEE 1394 1.0, USB/1394 CD-ROM Boot Up support, PC Card 95 (PCMCIA 3.0 Compliant Device), IrDA 1.0, Intel AC97 CNR Specification, WfM 2.0, PXE (Preboot Execution Environment), BIS 1.0 (Boot Integrity Service Application Program Interface), PC99a and Mobile PC2001 Compliant, Intel Enhanced SpeedStep Technology Set by setup manual NOTE: If...
... 2.2, System/HDD Password Security Control, INT 13h Extensions, PnP BIOS 1.0a, SMBIOS 2.4, Simple Boot Flag 1.0, Boot Block, PCI Bus Power Management Interface Specification, USB1.1/2.0, IEEE 1394 1.0, USB/1394 CD-ROM Boot Up support, PC Card 95 (PCMCIA 3.0 Compliant Device), IrDA 1.0, Intel AC97 CNR Specification, WfM 2.0, PXE (Preboot Execution Environment), BIS 1.0 (Boot Integrity Service Application Program Interface), PC99a and Mobile PC2001 Compliant, Intel Enhanced SpeedStep Technology Set by setup manual NOTE: If...
Service Guide for TravelMate 6291, 6292, 6231
Page 36
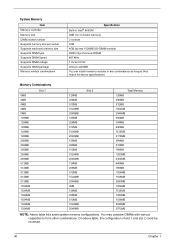
... system memory configurations. On above specifications. System Memory Item Memory controller Memory size DIMM socket number Supports memory size per socket Supports maximum memory size Supports DIMM type Supports DIMM Speed Supports DIMM voltage Supports DIMM package Memory module combinations Specification Built-in Intel® 965GM 0MB (no on-board memory) 2 sockets 2GB 4GB (by two 1024MB SO-DIMM module) DDR 2 Synchronous DRAM 667 MHz 1.8V and 0.9V 200-pin soDIMM You can install memory modules...
... system memory configurations. On above specifications. System Memory Item Memory controller Memory size DIMM socket number Supports memory size per socket Supports maximum memory size Supports DIMM type Supports DIMM Speed Supports DIMM voltage Supports DIMM package Memory module combinations Specification Built-in Intel® 965GM 0MB (no on-board memory) 2 sockets 2GB 4GB (by two 1024MB SO-DIMM module) DDR 2 Synchronous DRAM 667 MHz 1.8V and 0.9V 200-pin soDIMM You can install memory modules...
Service Guide for TravelMate 6291, 6292, 6231
Page 49
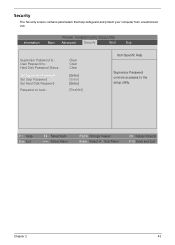
... Menu F5/F6 Change Values Enter Select Sub-Menu F9 Setup Defaults F10 Save and Exit Chapter 2 43 Security The Security screen contains parameters that help safeguard and protect your computer from unauthorized use. Phoenix TrustedCore(tm) Setup Utility Information Main Advanced Security Boot Exit Supervisor Password Is : User Password Is : Hard Disk Password Status : Set Supervisor Password Set User Password Set Hard Disk Password Password on boot : Clear Clear Clear [Enter] [Enter] [Enter] [Disabled] Item Specific Help Supervisor Password controls accesses to the setup utility...
... Menu F5/F6 Change Values Enter Select Sub-Menu F9 Setup Defaults F10 Save and Exit Chapter 2 43 Security The Security screen contains parameters that help safeguard and protect your computer from unauthorized use. Phoenix TrustedCore(tm) Setup Utility Information Main Advanced Security Boot Exit Supervisor Password Is : User Password Is : Hard Disk Password Status : Set Supervisor Password Set User Password Set Hard Disk Password Password on boot : Clear Clear Clear [Enter] [Enter] [Enter] [Disabled] Item Specific Help Supervisor Password controls accesses to the setup utility...
Service Guide for TravelMate 6291, 6292, 6231
Page 50
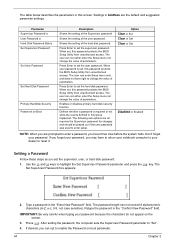
... events defined in this screen. Parameter Supervisor Password is User Password is Hard Disk Password Status Set Supervisor Password Set User Password Set Hard Disk Password Primary HardDisk Security Password on the screen. 3. The password length can enter Setup menu only and does not have to return your notebook computer to change the value of parameters. Shows the setting of the user password. Press Enter to set , this password protects the BIOS Setup Utility from unauthorized access. Type a password in the "Confirm New Password" field. The table below...
... events defined in this screen. Parameter Supervisor Password is User Password is Hard Disk Password Status Set Supervisor Password Set User Password Set Hard Disk Password Primary HardDisk Security Password on the screen. 3. The password length can enter Setup menu only and does not have to return your notebook computer to change the value of parameters. Shows the setting of the user password. Press Enter to set , this password protects the BIOS Setup Utility from unauthorized access. Type a password in the "Confirm New Password" field. The table below...
Service Guide for TravelMate 6291, 6292, 6231
Page 51
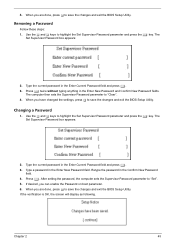
... screen will display as following. Removing a Password Follow these steps: 1. Use the w and y keys to save the changes and exit the BIOS Setup Utility. Retype the password in the Enter Current Password field and press e. 3. If desired, you are done, press u to "Clear". 4. 5. When you are done, press u to save the changes and exit the BIOS Setup Utility. When you can enable the Password on boot parameter. 6. Press e. Type the current password in...
... screen will display as following. Removing a Password Follow these steps: 1. Use the w and y keys to save the changes and exit the BIOS Setup Utility. Retype the password in the Enter Current Password field and press e. 3. If desired, you are done, press u to "Clear". 4. 5. When you are done, press u to save the changes and exit the BIOS Setup Utility. When you can enable the Password on boot parameter. 6. Press e. Type the current password in...
Service Guide for TravelMate 6291, 6292, 6231
Page 54
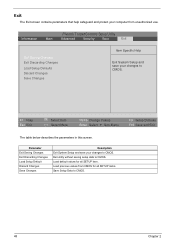
... use. F1 Help Esc Exit Select Item Select Menu F5/F6 Change Values Enter Select Sub-Menu F9 Setup Defaults F10 Save and Exit The table below describes the parameters in this screen. Load default values for all SETUP item. Exit utility without saving setup data to CMOS. Information Main Phoenix TrustedCore(tm) Setup Utility Advanced Security Boot Exit Exit Saving Changes Exit Discarding Changes Load Setup Defaults Discard Changes Save Changes...
... use. F1 Help Esc Exit Select Item Select Menu F5/F6 Change Values Enter Select Sub-Menu F9 Setup Defaults F10 Save and Exit The table below describes the parameters in this screen. Load default values for all SETUP item. Exit utility without saving setup data to CMOS. Information Main Phoenix TrustedCore(tm) Setup Utility Advanced Security Boot Exit Exit Saving Changes Exit Discarding Changes Load Setup Defaults Discard Changes Save Changes...
Service Guide for TravelMate 6291, 6292, 6231
Page 79
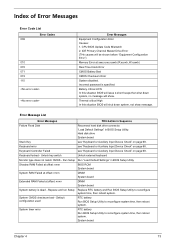
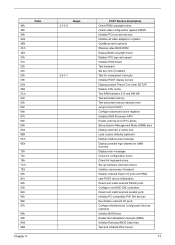
... in Sequence Failure Fixed Disk Reconnect hard disk drive connector. System timer error RTC battery Run BIOS Setup Utility to reconfigure system time, then reboot system. Unlock key switch Unlock external keyboard Monitor type does not match CMOS - Incorrect password is dead - Index of Error Messages Error Code List Error Codes 006 010 070 071 072 110 Error Messages Equipment Configuration Error Causes: 1. CPU BIOS Update Code Mismatch 2. Keyboard error see "Keyboard or Auxiliary Input Device Check" on page 68. Keyboard Controller Failed see "Keyboard or Auxiliary...
... in Sequence Failure Fixed Disk Reconnect hard disk drive connector. System timer error RTC battery Run BIOS Setup Utility to reconfigure system time, then reboot system. Unlock key switch Unlock external keyboard Monitor type does not match CMOS - Incorrect password is dead - Index of Error Messages Error Code List Error Codes 006 010 070 071 072 110 Error Messages Equipment Configuration Error Causes: 1. CPU BIOS Update Code Mismatch 2. Keyboard error see "Keyboard or Auxiliary Input Device Check" on page 68. Keyboard Controller Failed see "Keyboard or Auxiliary...
Service Guide for TravelMate 6291, 6292, 6231
Page 80
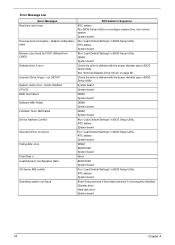
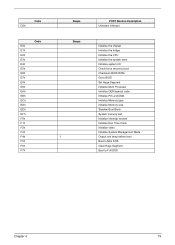
... battery System board Enter Setup and see if fixed disk and drive A: are properly identified. Default configuration used Memory size found FRU/Action in BIOS Setup Utility. Cache disabled CPU ID: DMA Test Failed Software NMI Failed Fail-Safe Timer NMI Failed Device Address Conflict Allocation Error for device Failing Bits: nnnn Fixed Disk n Invalid System Configuration Data I/O device IRQ conflict Operating system not found by POST differed from CMOS Diskette drive A error Incorrect Drive A type - RTC battery System board Run "Load Default Settings" in BIOS Setup Utility...
... battery System board Enter Setup and see if fixed disk and drive A: are properly identified. Default configuration used Memory size found FRU/Action in BIOS Setup Utility. Cache disabled CPU ID: DMA Test Failed Software NMI Failed Fail-Safe Timer NMI Failed Device Address Conflict Allocation Error for device Failing Bits: nnnn Fixed Disk n Invalid System Configuration Data I/O device IRQ conflict Operating system not found by POST differed from CMOS Diskette drive A error Incorrect Drive A type - RTC battery System board Run "Load Default Settings" in BIOS Setup Utility...
Service Guide for TravelMate 6291, 6292, 6231
Page 83
... devices Initialize all video adapters in system QuietBoot start (optional) Shadow video BIOS ROM Display BIOS copyright notice Display CPU type and speed Initialize EISA board Test keyboard Set key click if enabled Test for unexpected interrupts Initialize POST display service Display prompt "Press F2 to enter SETUP" Disable CPU cache Test RAM between 512 and 640 KB Test extended memory Test extended memory address lines Jump to User Patch1 Configure advanced cache registers Initialize Multi Processor APIC Enable external and CPU caches Setup...
... devices Initialize all video adapters in system QuietBoot start (optional) Shadow video BIOS ROM Display BIOS copyright notice Display CPU type and speed Initialize EISA board Test keyboard Set key click if enabled Test for unexpected interrupts Initialize POST display service Display prompt "Press F2 to enter SETUP" Disable CPU cache Test RAM between 512 and 640 KB Test extended memory Test extended memory address lines Jump to User Patch1 Configure advanced cache registers Initialize Multi Processor APIC Enable external and CPU caches Setup...
Service Guide for TravelMate 6291, 6292, 6231
Page 85
... the CPU Initialize the system timer Initialize system I/O Check force recovery boot Checksum BIOS ROM Go to BIOS Set Huge Segment Initialize Multi Processor Initialize OEM special code Initialize PIC and DMA Initialize Memory type Initialize Memory size Shadow Boot Block System memory test Initialize interrupt vectors Initialize Run Time Clock Initialize video Initialize System Management Mode Output one beep before boot Boot to Mini DOS Clear Huge Segment Boot...
... the CPU Initialize the system timer Initialize system I/O Check force recovery boot Checksum BIOS ROM Go to BIOS Set Huge Segment Initialize Multi Processor Initialize OEM special code Initialize PIC and DMA Initialize Memory type Initialize Memory size Shadow Boot Block System memory test Initialize interrupt vectors Initialize Run Time Clock Initialize video Initialize System Management Mode Output one beep before boot Boot to Mini DOS Clear Huge Segment Boot...
Service Guide for TravelMate 6291, 6292, 6231
Page 86
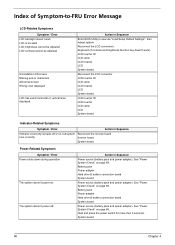
... Reconnect the inverter board Inverter board System board Power-Related Symptoms Symptom / Error Power shuts down during operation The system doesn't power-on page 69. See "Power System Check" on page 69. Action in Sequence Enter BIOS Utility to -FRU Error Message LCD-Related Symptoms Symptom / Error LCD backlight doesn't work ). Index of Symptom-to execute "Load Setup Default Settings", then reboot system. Reconnect the LCD connectors. Battery pack Power adapter Hard drive & battery connection board System board Power source (battery pack and power adapter).
... Reconnect the inverter board Inverter board System board Power-Related Symptoms Symptom / Error Power shuts down during operation The system doesn't power-on page 69. See "Power System Check" on page 69. Action in Sequence Enter BIOS Utility to -FRU Error Message LCD-Related Symptoms Symptom / Error LCD backlight doesn't work ). Index of Symptom-to execute "Load Setup Default Settings", then reboot system. Reconnect the LCD connectors. Battery pack Power adapter Hard drive & battery connection board System board Power source (battery pack and power adapter).

Service Guide for TravelMate 6291, 6292, 6231
Page 87
... The system doesn't enter hibernation mode and four short beeps every minute. LCD cover switch System board See "Save to execute "Load Default Settings, then reboot system. Audio driver Speaker System board Speaker System board Action in Sequence See "Check the Battery Pack" on page 45. Keyboard (if control is damaged. LCD cover switch System board Chapter 4 81 The system doesn't enter standby mode after opening the LCD. Action in Sequence Enter BIOS Setup Utility to Disk (S4)" on...
... The system doesn't enter hibernation mode and four short beeps every minute. LCD cover switch System board See "Save to execute "Load Default Settings, then reboot system. Audio driver Speaker System board Speaker System board Action in Sequence See "Check the Battery Pack" on page 45. Keyboard (if control is damaged. LCD cover switch System board Chapter 4 81 The system doesn't enter standby mode after opening the LCD. Action in Sequence Enter BIOS Setup Utility to Disk (S4)" on...


