
User Manual
Page 28
Using passwords 65 Entering passwords 66 Setting passwords 67 BIOS utility 68 Boot sequence 68 Enable disk-to-disk recovery 68 Setting passwords 68 Connecting to a network 69 Connectivity options 69 Built-in network feature 69 Playing DVD movies 71 Upgrading memory 73 Universal Serial Bus (USB) 75 Battery pack 76 Battery pack characteristics 76 28
Using passwords 65 Entering passwords 66 Setting passwords 67 BIOS utility 68 Boot sequence 68 Enable disk-to-disk recovery 68 Setting passwords 68 Connecting to a network 69 Connectivity options 69 Built-in network feature 69 Playing DVD movies 71 Upgrading memory 73 Universal Serial Bus (USB) 75 Battery pack 76 Battery pack characteristics 76 28

User Manual
Page 65
... table or handle of protection for a security lock. Securing your computer from unauthorized access. Once set, you need to take care of . See "BIOS utility" on page 13. Security features include hardware and software locks - USING PASSWORDS Passwords protect your computer - 65 Learn how to protect and take care... entry into the notch and turn the key to secure the lock. Some keyless models are also available. Insert the lock into the BIOS utility. SECURING YOUR COMPUTER Your computer is a valuable investment that you must enter this password to gain access to the...
... table or handle of protection for a security lock. Securing your computer from unauthorized access. Once set, you need to take care of . See "BIOS utility" on page 13. Security features include hardware and software locks - USING PASSWORDS Passwords protect your computer - 65 Learn how to protect and take care... entry into the notch and turn the key to secure the lock. Some keyless models are also available. Insert the lock into the BIOS utility. SECURING YOUR COMPUTER Your computer is a valuable investment that you must enter this password to gain access to the...

User Manual
Page 66
... computer against unauthorized use. Important! If you fail to use the computer. Try again and press . You have three chances to access the BIOS utility. Try again and press . • When the User Password is set, a password prompt appears in touch with password checkpoints on bootup...warning message appears. Combine the use of this password with your dealer or an authorized service center. If you press to enter the BIOS utility at boot-up . • Type the Supervisor Password and press to enter a password. • User Password secures your computer against unauthorized...
... computer against unauthorized use. Important! If you fail to use the computer. Try again and press . You have three chances to access the BIOS utility. Try again and press . • When the User Password is set, a password prompt appears in touch with password checkpoints on bootup...warning message appears. Combine the use of this password with your dealer or an authorized service center. If you press to enter the BIOS utility at boot-up . • Type the Supervisor Password and press to enter a password. • User Password secures your computer against unauthorized...

User Manual
Page 67
Securing your computer - 67 Setting passwords You can set passwords using the BIOS utility. Then turn on the computer again, and try again. halts. Press and hold the power button for four seconds to shut down the computer.
Securing your computer - 67 Setting passwords You can set passwords using the BIOS utility. Then turn on the computer again, and try again. halts. Press and hold the power button for four seconds to shut down the computer.

User Manual
Page 68
Your computer is already properly configured and optimized, and you may need to run it. Find Password on boot, activate the BIOS utility, then select Security from the categories listed at the bottom of the screen. However, if you encounter configuration problems, you do not need to ... value to run this feature. 68 Find D2D Recovery at the top of the screen. SETTING PASSWORDS To set the boot sequence in the BIOS utility, activate the BIOS utility, then select Boot from the categories listed at the top of the screen and use the and keys to -disk recovery (hard...
Your computer is already properly configured and optimized, and you may need to run it. Find Password on boot, activate the BIOS utility, then select Security from the categories listed at the bottom of the screen. However, if you encounter configuration problems, you do not need to ... value to run this feature. 68 Find D2D Recovery at the top of the screen. SETTING PASSWORDS To set the boot sequence in the BIOS utility, activate the BIOS utility, then select Boot from the categories listed at the top of the screen and use the and keys to -disk recovery (hard...

User Manual
Page 83
... is enabled or not. 2. Note: If your dealer or an authorized service center as the internal keyboard cable may be loose. Check to see if Acer disk-to a USB port and the corresponding port on the system will be the only option for future recovery operations. Frequently asked questions - 83 Try... steps below to back up all data will be erased.) It is Enabled. The printer does not work. Before performing a restore operation, please check the BIOS settings. 1. Make sure the D2D Recovery setting in Main is important to rebuild your notebook.
... is enabled or not. 2. Note: If your dealer or an authorized service center as the internal keyboard cable may be loose. Check to see if Acer disk-to a USB port and the corresponding port on the system will be the only option for future recovery operations. Frequently asked questions - 83 Try... steps below to back up all data will be erased.) It is Enabled. The printer does not work. Before performing a restore operation, please check the BIOS settings. 1. Make sure the D2D Recovery setting in Main is important to rebuild your notebook.
User Manual
Page 84
...front cover of available, authorized service centers is in a hidden partition on hand, especially when you need to perform system recovery. While the Acer logo is backed by an International Travelers Warranty (ITW) that gives you a helping hand. Refer to the onscreen instructions to know about .... 84 Important! Always have an Acer-authorized ITW service site, you can still get in contact with your computer. An ITW passport comes with our offices worldwide. Exit the BIOS utility and save changes. The system will reboot. This feature occupies 15 GB in this passport thoroughly....
...front cover of available, authorized service centers is in a hidden partition on hand, especially when you need to perform system recovery. While the Acer logo is backed by an International Travelers Warranty (ITW) that gives you a helping hand. Refer to the onscreen instructions to know about .... 84 Important! Always have an Acer-authorized ITW service site, you can still get in contact with your computer. An ITW passport comes with our offices worldwide. Exit the BIOS utility and save changes. The system will reboot. This feature occupies 15 GB in this passport thoroughly....
User Manual
Page 87
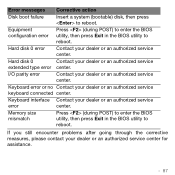
Contact your dealer or an authorized service center. Press (during POST) to enter the BIOS utility, then press Exit in the BIOS utility to reboot. Contact your dealer or an authorized service center. Keyboard error or no Contact your dealer or an authorized service center for assistance. - ... (bootable) disk, then press to reboot. Equipment configuration error Hard disk 0 error Hard disk 0 extended type error I/O parity error Press (during POST) to enter the BIOS utility, then press Exit in the...
Contact your dealer or an authorized service center. Press (during POST) to enter the BIOS utility, then press Exit in the BIOS utility to reboot. Contact your dealer or an authorized service center. Keyboard error or no Contact your dealer or an authorized service center for assistance. - ... (bootable) disk, then press to reboot. Equipment configuration error Hard disk 0 error Hard disk 0 extended type error I/O parity error Press (during POST) to enter the BIOS utility, then press Exit in the...


