Acer TravelMate 5742 Research
View Results Below
Free Acer TravelMate 5742 manuals!
Problems with Acer TravelMate 5742?
Ask a Question
Free Acer TravelMate 5742 manuals!
Problems with Acer TravelMate 5742?
Ask a Question
Related Manual Pages


Related Videos

Acer Travelmate 5742 laptop
Duration: 2:11
Total Views: 5,301
Duration: 2:11
Total Views: 5,301
Restaurar como nuevo Acer travelmate 5742
Duration: 7:04
Total Views: 7,921
Duration: 7:04
Total Views: 7,921
ACER-TravelMate-5742
Duration: :30
Total Views: 342
Duration: :30
Total Views: 342
Hmizati com Acer TravelMate 5742 Rabat Ordinateurs portables Rabat Visitez Hmizati com 1661
Duration: :11
Total Views: 16
Duration: :11
Total Views: 16
Similar Questions

Is There A Manual Restore To Factory Settings Switch On An Acer Aspire 3680
(Posted by williamobrien631 10 years ago)


How Do I Take Off The Keyboard?
Acer Travelmate 5742-7159
coffee was spilled on laptop, and I am trying to remove keyboard. I powered it off and removed batte...
coffee was spilled on laptop, and I am trying to remove keyboard. I powered it off and removed batte...
(Posted by rfarmer01 11 years ago)
I Broke My Acer Aspire 5742-6838. How Do I Open Monitor Physically For New Led?
(Posted by giorgioerrico 11 years ago)

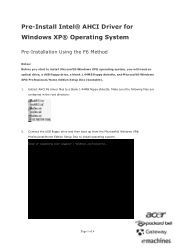
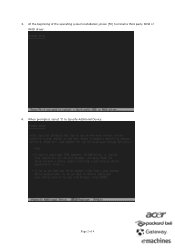
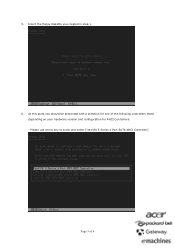
Installattion Of Windows7 On Acer Travelmate 5742g Notebook
how to install windows7 on Acer TravelMate 5742G Notebook for a clean new installation
how to install windows7 on Acer TravelMate 5742G Notebook for a clean new installation
(Posted by khaledaschour 12 years ago)
Related Terms
The following terms were also used when searching for Acer TravelMate 5742 Research:- travelmate 5742
- acer travelmate 5742
- travelmate 5742g
- travelmate 5742 price
- travelmate 5742z
- acer travelmate 5742 notebook
- acer travelmate 5742 price
- travelmate 5742 7159
- travelmate 5742 drivers
- travelmate 5742 i3
- travelmate 5742 i5
- travelmate 5742 notebook review
- travelmate 5742 price in india
- travelmate 5742 restore
- travelmate 5742 review
- travelmate 5742 specs
- acer travelmate 5742 17
- acer travelmate 5742 7159
- acer travelmate 5742 a/c adapter
- acer travelmate 5742 battery
- acer travelmate 5742 bios update
- acer travelmate 5742 bluetooth
- acer travelmate 5742 bluetooth driver
- acer travelmate 5742 charger
- acer travelmate 5742 core i3
- acer travelmate 5742 core i3 laptop
- acer travelmate 5742 core i5
- acer travelmate 5742 core i5 laptop
- acer travelmate 5742 disassembly
- acer travelmate 5742 docking station
- acer travelmate 5742 driver
- acer travelmate 5742 drivers
- acer travelmate 5742 drivers download
- acer travelmate 5742 drivers network card
- acer travelmate 5742 drivers windows 7
- acer travelmate 5742 ethernet driver
- acer travelmate 5742 hd drivers download
- acer travelmate 5742 i3
- acer travelmate 5742 i5
- acer travelmate 5742 keyboard
- acer travelmate 5742 keyboard removal
- acer travelmate 5742 laptop
- acer travelmate 5742 laptop price
- acer travelmate 5742 manual
- acer travelmate 5742 memory
- acer travelmate 5742 memory upgrade
- acer travelmate 5742 motherboard
- acer travelmate 5742 not booting
- acer travelmate 5742 notebook review
- acer travelmate 5742 power adapter
- acer travelmate 5742 power supply
- acer travelmate 5742 price in india
- acer travelmate 5742 ram
- acer travelmate 5742 recovery
- acer travelmate 5742 restore
- acer travelmate 5742 review
- acer travelmate 5742 reviews
- acer travelmate 5742 series
- acer travelmate 5742 series charger
- acer travelmate 5742 service manual
- acer travelmate 5742 specifications
- acer travelmate 5742 specs
- acer travelmate 5742 support
- acer travelmate 5742 user guide
- acer travelmate 5742 warranty
- acer travelmate 5742 wireless
- acer travelmate 5742 wireless adapter problem
- acer travelmate 5742 wireless driver
- acer travelmate 5742g
- acer travelmate 5742g battery
- acer travelmate 5742z
- prices for acer travelmate 5742
- prices for travelmate 5742
- travelmate 5742 17
- travelmate 5742 a/c adapter
- travelmate 5742 acer
- travelmate 5742 battery
- travelmate 5742 bios
- travelmate 5742 bios update
- travelmate 5742 bluetooth
- travelmate 5742 bluetooth driver
- travelmate 5742 charger
- travelmate 5742 core i3
- travelmate 5742 core i3 laptop
- travelmate 5742 core i5
- travelmate 5742 core i5 laptop
- travelmate 5742 critical drivers
- travelmate 5742 disassembly
- travelmate 5742 docking station
- travelmate 5742 driver
- travelmate 5742 drivers download
- travelmate 5742 drivers network card
- travelmate 5742 drivers windows 7
- travelmate 5742 ethernet driver
- travelmate 5742 hd drivers download
- travelmate 5742 hdd cover
- travelmate 5742 keyboard
- travelmate 5742 keyboard removal
- travelmate 5742 lan drivers
- travelmate 5742 laptop
- travelmate 5742 laptop price
- travelmate 5742 manual
- travelmate 5742 memory
- travelmate 5742 memory upgrade
- travelmate 5742 motherboard
- travelmate 5742 not booting
- travelmate 5742 notebook
- travelmate 5742 power adapter
- travelmate 5742 power supply
- travelmate 5742 price india
- travelmate 5742 ram
- travelmate 5742 recovery
- travelmate 5742 reviews
- travelmate 5742 series
- travelmate 5742 series charger
- travelmate 5742 service manual
- travelmate 5742 specification
- travelmate 5742 specifications
- travelmate 5742 support
- travelmate 5742 user guide
- travelmate 5742 user manual
- travelmate 5742 warranty
- travelmate 5742 wireless
- travelmate 5742 wireless adapter problem
- travelmate 5742 wireless driver
- travelmate 5742g battery