
TravelMate 5710 / 5720 User's Guide ES
Page 98
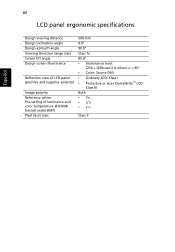
80 LCD panel ergonomic specifications Español Design viewing distance Design inclination angle Design azimuth angle Viewing direction range class Screen tilt angle Design screen illuminance Reflection class of LCD panel (positive and negative polarity) Image polarity Reference white: Pre-setting of luminance and color temperature @ 6500K (tested ...; • Illuminance level: [250 + (250cosα)] lx where α = 85° • Color: Source D65 • Ordinary LCD: Class I • Protective or Acer CrystalBrite™ LCD: Class III Both • Yn • u'n • v'n Class II
80 LCD panel ergonomic specifications Español Design viewing distance Design inclination angle Design azimuth angle Viewing direction range class Screen tilt angle Design screen illuminance Reflection class of LCD panel (positive and negative polarity) Image polarity Reference white: Pre-setting of luminance and color temperature @ 6500K (tested ...; • Illuminance level: [250 + (250cosα)] lx where α = 85° • Color: Source D65 • Ordinary LCD: Class I • Protective or Acer CrystalBrite™ LCD: Class III Both • Yn • u'n • v'n Class II

TravelMate 5710 / 5720 User's Guide FR
Page 97
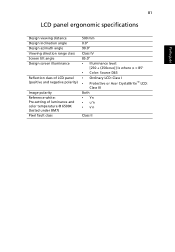
... panel ergonomic specifications English Français Français Design viewing distance Design inclination angle Design azimuth angle Viewing direction range class Screen tilt angle Design screen illuminance Reflection class of LCD panel (positive and negative polarity) Image polarity Reference white: Pre-setting of luminance and color temperature @...8226; Illuminance level: [250 + (250cosα)] lx where α = 85° • Color: Source D65 • Ordinary LCD: Class I • Protective or Acer CrystalBrite™ LCD: Class III Both • Yn • u'n • v'n Class II
... panel ergonomic specifications English Français Français Design viewing distance Design inclination angle Design azimuth angle Viewing direction range class Screen tilt angle Design screen illuminance Reflection class of LCD panel (positive and negative polarity) Image polarity Reference white: Pre-setting of luminance and color temperature @...8226; Illuminance level: [250 + (250cosα)] lx where α = 85° • Color: Source D65 • Ordinary LCD: Class I • Protective or Acer CrystalBrite™ LCD: Class III Both • Yn • u'n • v'n Class II
TravelMate 5710 / 5720 User's Guide PT
Page 99
81 LCD panel ergonomic specifications English Poorrttuugguuêêss Design viewing distance Design inclination angle Design azimuth angle Viewing direction range class Screen tilt angle Design screen illuminance Reflection class of LCD panel (positive and negative polarity) Image polarity Reference white: Pre-setting of luminance and color temperature ...; Illuminance level: [250 + (250cosα)] lx where α = 85° • Color: Source D65 • Ordinary LCD: Class I • Protective or Acer CrystalBrite™ LCD: Class III Both • Yn • u'n • v'n Class II
81 LCD panel ergonomic specifications English Poorrttuugguuêêss Design viewing distance Design inclination angle Design azimuth angle Viewing direction range class Screen tilt angle Design screen illuminance Reflection class of LCD panel (positive and negative polarity) Image polarity Reference white: Pre-setting of luminance and color temperature ...; Illuminance level: [250 + (250cosα)] lx where α = 85° • Color: Source D65 • Ordinary LCD: Class I • Protective or Acer CrystalBrite™ LCD: Class III Both • Yn • u'n • v'n Class II

TravelMate 5710, 5720, 5720G User's Guide EN
Page 10
... desk to minimize neck strain Taking care of your vision Long viewing hours, wearing incorrect glasses or contact lenses, glare, excessive room lighting, poorly focused screens, very small typefaces and low-contrast displays could stress your sitting height to achieve maximum comfort. x Finding your comfort zone Find your comfort zone by...
... desk to minimize neck strain Taking care of your vision Long viewing hours, wearing incorrect glasses or contact lenses, glare, excessive room lighting, poorly focused screens, very small typefaces and low-contrast displays could stress your sitting height to achieve maximum comfort. x Finding your comfort zone Find your comfort zone by...
TravelMate 5710, 5720, 5720G User's Guide EN
Page 12
...run the Adobe Reader setup program first. poster helps you for making an Acer notebook your choice for meeting your mobile computing needs. Basic care and tips for Starters... Follow the instructions on the screen to access it contains warranty information and the general regulations and safety notices ... notebook. For instructions on the computer, simply press and release the power button below the LCD screen beside the easy-launch buttons. The printed User's Guide introduces you to use your Acer notebook, we have designed a set of guides: First off To turn on how to the ...
...run the Adobe Reader setup program first. poster helps you for making an Acer notebook your choice for meeting your mobile computing needs. Basic care and tips for Starters... Follow the instructions on the screen to access it contains warranty information and the general regulations and safety notices ... notebook. For instructions on the computer, simply press and release the power button below the LCD screen beside the easy-launch buttons. The printed User's Guide introduces you to use your Acer notebook, we have designed a set of guides: First off To turn on how to the ...

TravelMate 5710, 5720, 5720G User's Guide EN
Page 31
English 14 Your Acer notebook tour After setting up your new Acer notebook. poster, let us show you around your computer as illustrated in the Just for video communication. 3 Display screen Also called Liquid-Crystal Display (LCD), displays computer output. Front view Item Description 1 Microphone Internal microphone for sound recording. 2 Acer Crystal Eye Web camera for Starters...
English 14 Your Acer notebook tour After setting up your new Acer notebook. poster, let us show you around your computer as illustrated in the Just for video communication. 3 Display screen Also called Liquid-Crystal Display (LCD), displays computer output. Front view Item Description 1 Microphone Internal microphone for sound recording. 2 Acer Crystal Eye Web camera for Starters...
TravelMate 5710, 5720, 5720G User's Guide EN
Page 48
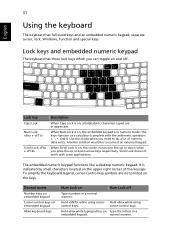
... keys function as a calculator (complete with some applications. When Scroll Lock is on Type the letters in numeric mode. Hold while typing letters on , the screen moves one line up or down when you can toggle on and off Type numbers in uppercase. When Num Lock is in a embedded keypad. cursor...
... keys function as a calculator (complete with some applications. When Scroll Lock is on Type the letters in numeric mode. Hold while typing letters on , the screen moves one line up or down when you can toggle on and off Type numbers in uppercase. When Num Lock is in a embedded keypad. cursor...
TravelMate 5710, 5720, 5720G User's Guide EN
Page 50
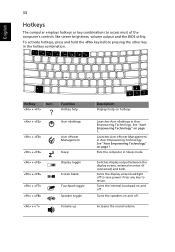
... Technology" on page 1. English 33 Hotkeys The computer employs hotkeys or key combinations to return. Hotkey Icon + Function Hotkey help + Acer eSettings + + + + + + + Acer ePower Management Sleep Display toggle Screen blank Touchpad toggle Speaker toggle Volume up Description Displays help on and off. Press any key to access most of the computer's controls like...
... Technology" on page 1. English 33 Hotkeys The computer employs hotkeys or key combinations to return. Hotkey Icon + Function Hotkey help + Acer eSettings + + + + + + + Acer ePower Management Sleep Display toggle Screen blank Touchpad toggle Speaker toggle Volume up Description Displays help on and off. Press any key to access most of the computer's controls like...
TravelMate 5710, 5720, 5720G User's Guide EN
Page 51
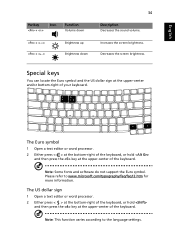
... sign at the upper-center and/or bottom-right of the keyboard. Note: Some fonts and software do not support the Euro symbol. Decreases the screen brightness. Increases the screen brightness. English Hotkey + Icon Function Volume down + + Brightness up Brightness down 34 Description Decreases the sound volume.
... sign at the upper-center and/or bottom-right of the keyboard. Note: Some fonts and software do not support the Euro symbol. Decreases the screen brightness. Increases the screen brightness. English Hotkey + Icon Function Volume down + + Brightness up Brightness down 34 Description Decreases the sound volume.

TravelMate 5710, 5720, 5720G User's Guide EN
Page 54
...second display is simple to set up: 1 Run Acer GridVista and select your preferred screen configuration for each display from the taskbar. 2 Drag and drop each window into the appropriate grid. Acer GridVista is only available on Acer GridVista. Acer GridVista is connected, then, open the Display Settings ...indicated below: 12 2 13 1 3 2 13 24 Double (vertical), Triple (primary at left), Triple (primary at right), or Quad Acer Gridvista is dual-display compatible, allowing two displays to be partitioned independently. Select the secondary monitor (2) icon in the display box and then ...
...second display is simple to set up: 1 Run Acer GridVista and select your preferred screen configuration for each display from the taskbar. 2 Drag and drop each window into the appropriate grid. Acer GridVista is only available on Acer GridVista. Acer GridVista is connected, then, open the Display Settings ...indicated below: 12 2 13 1 3 2 13 24 Double (vertical), Triple (primary at left), Triple (primary at right), or Quad Acer Gridvista is dual-display compatible, allowing two displays to be partitioned independently. Select the secondary monitor (2) icon in the display box and then ...
TravelMate 5710, 5720, 5720G User's Guide EN
Page 57
... to recharge the battery pack. • Make sure that the resolution is set to the appropriate resolution. Right-click on the screen. Each computer display has a different native resolution depending on your computer. Then click on an external monitor. Easy solutions are not full...are using on the battery, it with a system disk and press + + to an external monitor. Resolutions lower than this native resoution, the screen expands to turn the display back on the power, but the computer does not start or boot up the "Display Properties" dialog box. Nothing appears...
... to recharge the battery pack. • Make sure that the resolution is set to the appropriate resolution. Right-click on the screen. Each computer display has a different native resolution depending on your computer. Then click on an external monitor. Easy solutions are not full...are using on the battery, it with a system disk and press + + to an external monitor. Resolutions lower than this native resoution, the screen expands to turn the display back on the power, but the computer does not start or boot up the "Display Properties" dialog box. Nothing appears...

TravelMate 5710, 5720, 5720G User's Guide EN
Page 60
...problems efficiently. This feature occupies 10 GB in a hidden partition on the screen (or the number and sequence in the flap located inside the front cover of the ITW passport. Please consult http://global.acer.com. Place your computer. Before you call . Our worldwide network of ... passport on hand, especially when you a helping hand. English 43 To start the recovery process: 1 Restart the system. 2 While the Acer logo is showing, press + at your computer when you call Please have the following information: Name Address Telephone number Machine and model type Serial...
...problems efficiently. This feature occupies 10 GB in a hidden partition on the screen (or the number and sequence in the flap located inside the front cover of the ITW passport. Please consult http://global.acer.com. Place your computer. Before you call . Our worldwide network of ... passport on hand, especially when you a helping hand. English 43 To start the recovery process: 1 Restart the system. 2 While the Acer logo is showing, press + at your computer when you call Please have the following information: Name Address Telephone number Machine and model type Serial...
TravelMate 5710, 5720, 5720G User's Guide EN
Page 66
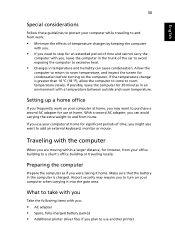
... in Sleep mode for the trip home: • Check that you are not actively using the computer. What to remove the media can damage the screen. If the meeting will be longer, or if your desktop, follow these steps to turn the computer back on , the computer has entered Sleep mode...
... in Sleep mode for the trip home: • Check that you are not actively using the computer. What to remove the media can damage the screen. If the meeting will be longer, or if your desktop, follow these steps to turn the computer back on , the computer has entered Sleep mode...
TravelMate 5710, 5720, 5720G User's Guide EN
Page 67
... computer for 30 minutes in the computer is greater than 10 °C (18 °F), allow the computer to come to room temperature, and inspect the screen for significant periods of the car to avoid exposing the computer to excessive heat. • Changes in the trunk of time, you might also want...
... computer for 30 minutes in the computer is greater than 10 °C (18 °F), allow the computer to come to room temperature, and inspect the screen for significant periods of the car to avoid exposing the computer to excessive heat. • Changes in the trunk of time, you might also want...

TravelMate 5710, 5720, 5720G User's Guide EN
Page 70
... power button for four seconds to enter a password. English 53 Entering passwords When a password is set, a password prompt appears in the center of the display screen. • When the Supervisor Password is enabled, a prompt appears at boot-up . • Type the User Password and press to enter the password correctly after...
... power button for four seconds to enter a password. English 53 Entering passwords When a password is set, a password prompt appears in the center of the display screen. • When the Supervisor Password is enabled, a prompt appears at boot-up . • Type the User Password and press to enter the password correctly after...

TravelMate 5710, 5720, 5720G User's Guide EN
Page 76
...memory size. English 59 Installing memory Follow these steps to access its base. 2 Remove the screws from the categories listed at the top of the screen. Then turn the computer over to install memory: 1 Turn off the computer, unplug the AC adapter (if connected) and remove the battery pack....remove the memory cover. 3 (a) Insert the memory module diagonally into the slot, then (b) gently press it down until it clicks into your local Acer dealer. Your computer is being displayed. Boot sequence To set the boot sequence in the BIOS utility, activate the BIOS utility, then select Boot ...
...memory size. English 59 Installing memory Follow these steps to access its base. 2 Remove the screws from the categories listed at the top of the screen. Then turn the computer over to install memory: 1 Turn off the computer, unplug the AC adapter (if connected) and remove the battery pack....remove the memory cover. 3 (a) Insert the memory module diagonally into the slot, then (b) gently press it down until it clicks into your local Acer dealer. Your computer is being displayed. Boot sequence To set the boot sequence in the BIOS utility, activate the BIOS utility, then select Boot ...

TravelMate 5710, 5720, 5720G User's Guide EN
Page 77
...this feature. You can play DVD movies on boot, activate the BIOS utility, then select Security from the categories listed at the bottom of the screen and use the and keys to the table below for the first time, the program asks you can set a password on your computer. 1..., South Africa, Japan Southeast Asia, Taiwan, South Korea Latin America, Australia, New Zealand Former USSR, parts of Africa, India People's Republic of the screen. then close the DVD tray. Once your hard disk does not reset the number of times the region code has been set will automatically play...
...this feature. You can play DVD movies on boot, activate the BIOS utility, then select Security from the categories listed at the bottom of the screen and use the and keys to the table below for the first time, the program asks you can set a password on your computer. 1..., South Africa, Japan Southeast Asia, Taiwan, South Korea Latin America, Australia, New Zealand Former USSR, parts of Africa, India People's Republic of the screen. then close the DVD tray. Once your hard disk does not reset the number of times the region code has been set will automatically play...
TravelMate 5710, 5720, 5720G User's Guide EN
Page 78
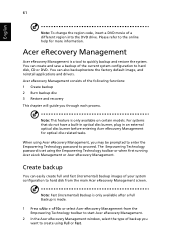
... disk, CD or DVD. Create backup You can also backup/restore the factory default image, and reinstall applications and drivers. Acer eRecovery Management consists of the following functions: 1 Create backup 2 Burn backup disc 3 Restore and recovery This chapter will guide...Full or Fast. The Empowering Technology password is only available on certain models. Acer eRecovery Management Acer eRecovery Management is made. 1 Press + or select Acer eRecovery Management from the main Acer eRecovery Management screen. Please refer to the online help for optical disc-related tasks. Note:...
... disk, CD or DVD. Create backup You can also backup/restore the factory default image, and reinstall applications and drivers. Acer eRecovery Management consists of the following functions: 1 Create backup 2 Burn backup disc 3 Restore and recovery This chapter will guide...Full or Fast. The Empowering Technology password is only available on certain models. Acer eRecovery Management Acer eRecovery Management is made. 1 Press + or select Acer eRecovery Management from the main Acer eRecovery Management screen. Please refer to the online help for optical disc-related tasks. Note:...
TravelMate 5710, 5720, 5720G User's Guide EN
Page 79
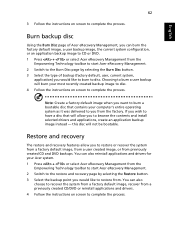
...would like to burn to disc. Choosing to burn a user backup will not be bootable. English 62 3 Follow the instructions on screen to complete the process. this disc will burn your computer's entire operating system as it was delivered to browse the contents and ...applications, create an application backup image instead - You can also reinstall applications and drivers for your Acer system. 1 Press + or select Acer eRecovery Management from the Empowering Technology toolbar to start Acer eRecovery Management. 2 Switch to the Burn Disc page by selecting the Burn Disc button. 3 ...
...would like to burn to disc. Choosing to burn a user backup will not be bootable. English 62 3 Follow the instructions on screen to complete the process. this disc will burn your computer's entire operating system as it was delivered to browse the contents and ...applications, create an application backup image instead - You can also reinstall applications and drivers for your Acer system. 1 Press + or select Acer eRecovery Management from the Empowering Technology toolbar to start Acer eRecovery Management. 2 Switch to the Burn Disc page by selecting the Burn Disc button. 3 ...
TravelMate 5710, 5720, 5720G User's Guide EN
Page 89
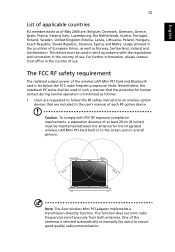
...device. Nevertheless, the notebook PC series shall be used in strict accordance with the regulations and constraints in to the screen section and all persons. The function does not emit radio frequencies simultaneously from both antennas. This device must be used ..., Finland, Sweden, United Kingdom Estonia, Latvia, Lithuania, Poland, Hungary, Czech Republic, Slovak Republic, Slovenia, Cyprus and Malta. Note: The Acer wireless Mini PCI adapter implements a transmission diversity function. Caution: To comply with FCC RF exposure compliance requirements, a separation distance of at least ...
...device. Nevertheless, the notebook PC series shall be used in strict accordance with the regulations and constraints in to the screen section and all persons. The function does not emit radio frequencies simultaneously from both antennas. This device must be used ..., Finland, Sweden, United Kingdom Estonia, Latvia, Lithuania, Poland, Hungary, Czech Republic, Slovak Republic, Slovenia, Cyprus and Malta. Note: The Acer wireless Mini PCI adapter implements a transmission diversity function. Caution: To comply with FCC RF exposure compliance requirements, a separation distance of at least ...

