
User Manual
Page 5
..., indicating a need to qualified service personnel. Follow local regulations when disposing of used batteries. Use of another battery may explode if not handled properly. Warning! If you to normal condition. Unplug this product. • Use the product only with the supplied power supply cord set , make sure that the new power cord meets the following the operating instructions Note: Adjust only those controls that are covered by the operating instructions...
..., indicating a need to qualified service personnel. Follow local regulations when disposing of used batteries. Use of another battery may explode if not handled properly. Warning! If you to normal condition. Unplug this product. • Use the product only with the supplied power supply cord set , make sure that the new power cord meets the following the operating instructions Note: Adjust only those controls that are covered by the operating instructions...
User Manual
Page 12
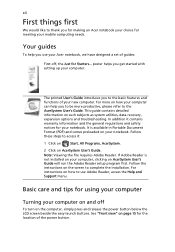
... complete the installation. See "Front view" on such subjects as system utilities, data recovery, expansion options and troubleshooting. For instructions on the screen to use your notebook. This guide contains detailed information on page 15 for the location of the power button. Follow these steps to access it contains warranty information and the general regulations and safety notices for your Acer notebook, we have designed a set of...
... complete the installation. See "Front view" on such subjects as system utilities, data recovery, expansion options and troubleshooting. For instructions on the screen to use your notebook. This guide contains detailed information on page 15 for the location of the power button. Follow these steps to access it contains warranty information and the general regulations and safety notices for your Acer notebook, we have designed a set of...
User Manual
Page 16
Windows keys 31 Hotkeys 32 Special keys 34 Ejecting the optical (CD or DVD) drive tray 35 Using a computer security lock 35 Audio 36 Adjusting the volume 36 Using Acer Bluetooth® VoIP Phone (for selected models) 37 Getting to know your VoIP phone 37 Package contents 37 Layout 37 LED indicators 38 Charging the phone 38 Connecting the phone to your notebook 39 Using the phone 41 Using the system utilities 42 Acer GridVista...
Windows keys 31 Hotkeys 32 Special keys 34 Ejecting the optical (CD or DVD) drive tray 35 Using a computer security lock 35 Audio 36 Adjusting the volume 36 Using Acer Bluetooth® VoIP Phone (for selected models) 37 Getting to know your VoIP phone 37 Package contents 37 Layout 37 LED indicators 38 Charging the phone 38 Connecting the phone to your notebook 39 Using the phone 41 Using the system utilities 42 Acer GridVista...

User Manual
Page 17
... lock 57 Using passwords 57 Entering passwords 58 Setting passwords 58 Expanding through options 59 Connectivity options 59 Fax/data modem 59 Built-in network feature 60 Fast Infrared (FIR) (for selected models) 60 Universal Serial Bus (USB) 61 IEEE 1394 port (for selected models) 61 PC Card slot 62 Installing memory 62 BIOS utility 63 Boot sequence 63 Enable disk-to-disk recovery 64 Password 64 Using software 65 Playing DVD movies 65 Acer eRecovery Management 66 Create backup 66 Burn backup disc 67 Restore and recovery 67 Troubleshooting...
... lock 57 Using passwords 57 Entering passwords 58 Setting passwords 58 Expanding through options 59 Connectivity options 59 Fax/data modem 59 Built-in network feature 60 Fast Infrared (FIR) (for selected models) 60 Universal Serial Bus (USB) 61 IEEE 1394 port (for selected models) 61 PC Card slot 62 Installing memory 62 BIOS utility 63 Boot sequence 63 Enable disk-to-disk recovery 64 Password 64 Using software 65 Playing DVD movies 65 Acer eRecovery Management 66 Create backup 66 Burn backup disc 67 Restore and recovery 67 Troubleshooting...
User Manual
Page 19
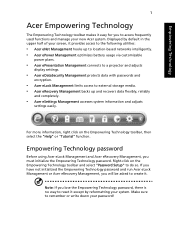
... makes it easy for you to create it. Displayed by reformatting your password! For more information, right click on the Empowering Technology toolbar and select "Password Setup" to external storage media. • Acer eRecovery Management backs up to location-based networks intelligently. • Acer ePower Management optimizes battery usage via customizable power plans. • Acer ePresentation Management connects to a projector and adjusts display settings. • Acer eDataSecurity Management protects data with passwords and encryption. • Acer...
... makes it easy for you to create it. Displayed by reformatting your password! For more information, right click on the Empowering Technology toolbar and select "Password Setup" to external storage media. • Acer eRecovery Management backs up to location-based networks intelligently. • Acer ePower Management optimizes battery usage via customizable power plans. • Acer ePresentation Management connects to a projector and adjusts display settings. • Acer eDataSecurity Management protects data with passwords and encryption. • Acer...
User Manual
Page 22
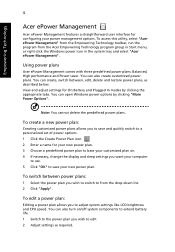
... tray and select "Acer ePower Management". To create a new power plan: Creating customized power plans allows you wish to switch to a personalized set of power options. 1 Click the Create Power Plan icon. 2 Enter a name for configuring your new power plan. To edit a power plan: Editing a power plan allows you wish to adjust system settings like LCD brightness and CPU speed. You can open Windows power options by clicking the appropriate tabs. To access this utility, select "Acer ePower Management" from the Empowering...
... tray and select "Acer ePower Management". To create a new power plan: Creating customized power plans allows you wish to switch to a personalized set of power options. 1 Click the Create Power Plan icon. 2 Enter a name for configuring your new power plan. To edit a power plan: Editing a power plan allows you wish to adjust system settings like LCD brightness and CPU speed. You can open Windows power options by clicking the appropriate tabs. To access this utility, select "Acer ePower Management" from the Empowering...

User Manual
Page 24
..., your system display will be automatically switched out when an external display is not supported by Acer ePresentation Management, adjust your computer's display to an external display device or projector using Display Properties or the utility provided by the graphics vendor. For projectors and external devices that is connected to choose an appropriate display setting. Note: If the restored resolution is not correct after disconnecting a projector, or you project your display settings using the hotkey: + .
..., your system display will be automatically switched out when an external display is not supported by Acer ePresentation Management, adjust your computer's display to an external display device or projector using Display Properties or the utility provided by the graphics vendor. For projectors and external devices that is connected to choose an appropriate display setting. Note: If the restored resolution is not correct after disconnecting a projector, or you project your display settings using the hotkey: + .
User Manual
Page 26
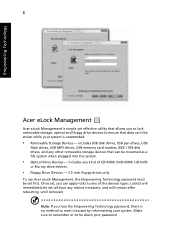
... password. includes USB disk drives, USB pen drives, USB flash drives, USB MP3 drives, USB memory card readers, IEEE 1394 disk drives, and any of CD-ROM, DVD-ROM, HD-DVD or Blu-ray drive devices. • Floppy Drive Devices - 3.5-inch floppy drives only. Make sure to remember or write down your system. includes any reboot necessary, and will remain after rebooting, until removed. Lock(s) will immediately be set first. To use Acer eLock Management, the Empowering Technology password must be set without any kind of the devices types...
... password. includes USB disk drives, USB pen drives, USB flash drives, USB MP3 drives, USB memory card readers, IEEE 1394 disk drives, and any of CD-ROM, DVD-ROM, HD-DVD or Blu-ray drive devices. • Floppy Drive Devices - 3.5-inch floppy drives only. Make sure to remember or write down your system. includes any reboot necessary, and will remain after rebooting, until removed. Lock(s) will immediately be set first. To use Acer eLock Management, the Empowering Technology password must be set without any kind of the devices types...
User Manual
Page 31
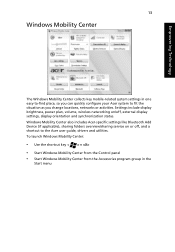
...quickly configure your Acer system to the Acer user guide, drivers and utilities. Settings include display brightness, power plan, volume, wireless networking on or off , external display settings, display orientation and synchronization status. Empowering Technology 13 Windows Mobility Center The Windows Mobility Center collects key mobile-related system settings in the Start menu Windows Mobility Center also includes Acer-specific settings like Bluetooth Add Device (if applicable), sharing folders overview/sharing service on /off , and a shortcut to fit the situation as you change...
...quickly configure your Acer system to the Acer user guide, drivers and utilities. Settings include display brightness, power plan, volume, wireless networking on or off , external display settings, display orientation and synchronization status. Empowering Technology 13 Windows Mobility Center The Windows Mobility Center collects key mobile-related system settings in the Start menu Windows Mobility Center also includes Acer-specific settings like Bluetooth Add Device (if applicable), sharing folders overview/sharing service on /off , and a shortcut to fit the situation as you change...
User Manual
Page 36
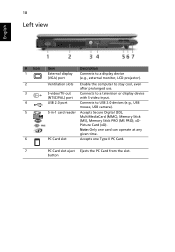
...), Memory Stick PRO (MS PRO), xDPicture Card (xD). Note: Only one Type II PC Card. 7 PC Card slot eject Ejects the PC Card from the slot. Accepts one card can operate at any given time. Ventilation slots S-video/TV-out (NTSC/PAL) port USB 2.0 port 5-in-1 card reader PC Card slot Enable the computer to USB 2.0 devices (e.g., USB mouse, USB camera). Connects to stay cool, even after prolonged use. button Connects to a display device (e.g., external monitor, LCD projector). 18 Left view English # Icon 1 2 3 4 5 6 Item External display (VGA) port Description Connects to...
...), Memory Stick PRO (MS PRO), xDPicture Card (xD). Note: Only one Type II PC Card. 7 PC Card slot eject Ejects the PC Card from the slot. Accepts one card can operate at any given time. Ventilation slots S-video/TV-out (NTSC/PAL) port USB 2.0 port 5-in-1 card reader PC Card slot Enable the computer to USB 2.0 devices (e.g., USB mouse, USB camera). Connects to stay cool, even after prolonged use. button Connects to a display device (e.g., external monitor, LCD projector). 18 Left view English # Icon 1 2 3 4 5 6 Item External display (VGA) port Description Connects to...
User Manual
Page 42
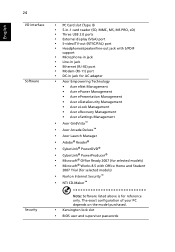
... configuration of your PC depends on the model purchased. • Kensington lock slot • BIOS user and supervisor passwords English 24 I/O interface Software • PC Card slot (Type II) • 5-in-1 card reader (SD, MMC, MS, MS PRO, xD) • Three USB 2.0 ports • External display (VGA) port • S-video/TV-out (NTSC/PAL) port • Headphones/speaker/line-out jack with S/PDIF support • Microphone-in jack • Line-in jack • Ethernet (RJ-45) port...
... configuration of your PC depends on the model purchased. • Kensington lock slot • BIOS user and supervisor passwords English 24 I/O interface Software • PC Card slot (Type II) • 5-in-1 card reader (SD, MMC, MS, MS PRO, xD) • Three USB 2.0 ports • External display (VGA) port • S-video/TV-out (NTSC/PAL) port • Headphones/speaker/line-out jack with S/PDIF support • Microphone-in jack • Line-in jack • Ethernet (RJ-45) port...
User Manual
Page 45
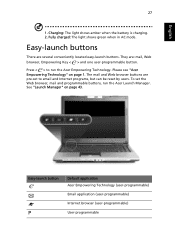
... and programmable buttons, run the Acer Empowering Technology. English 27 1. Please see "Acer Empowering Technology" on page 43. See "Launch Manager" on page 1. Easy-launch buttons There are several conveniently located easy-launch buttons. Press < > to email and Internet programs, but can be reset by users. To set to run the Acer Launch Manager. Charging: The light shows amber when the battery is charging. 2. Fully charged: The light shows...
... and programmable buttons, run the Acer Empowering Technology. English 27 1. Please see "Acer Empowering Technology" on page 43. See "Launch Manager" on page 1. Easy-launch buttons There are several conveniently located easy-launch buttons. Press < > to email and Internet programs, but can be reset by users. To set to run the Acer Launch Manager. Charging: The light shows amber when the battery is charging. 2. Fully charged: The light shows...
User Manual
Page 48
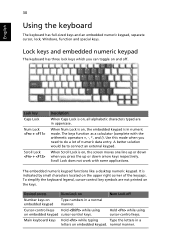
... keypad cursor-control keys. To simplify the keyboard legend, cursor-control key symbols are in a letters on , the screen moves one line up or down when you need to connect an external keypad. Cursor-control keys Hold while using cursor-control keys. English 30 Using the keyboard The keyboard has full-sized keys and an embedded numeric keypad, separate cursor, lock, Windows, function and special keys. Scroll Lock does not work with the arithmetic operators +, -, *, and...
... keypad cursor-control keys. To simplify the keyboard legend, cursor-control key symbols are in a letters on , the screen moves one line up or down when you need to connect an external keypad. Cursor-control keys Hold while using cursor-control keys. English 30 Using the keyboard The keyboard has full-sized keys and an embedded numeric keypad, separate cursor, lock, Windows, function and special keys. Scroll Lock does not work with the arithmetic operators +, -, *, and...
User Manual
Page 50
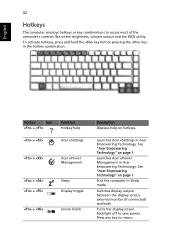
... employs hotkeys or key combinations to save power. Hotkey Icon + Function Hotkey help + Acer eSettings + Acer ePower Management + + Sleep Display toggle + Screen blank Description Displays help on page 1. Turns the display screen backlight off to access most of the computer's controls like screen brightness, volume output and the BIOS utility. See "Acer Empowering Technology" on hotkeys. Puts the computer in Acer Empowering Technology. Launches Acer ePower Management in Sleep mode. Switches display output between the display screen, external monitor...
... employs hotkeys or key combinations to save power. Hotkey Icon + Function Hotkey help + Acer eSettings + Acer ePower Management + + Sleep Display toggle + Screen blank Description Displays help on page 1. Turns the display screen backlight off to access most of the computer's controls like screen brightness, volume output and the BIOS utility. See "Acer Empowering Technology" on hotkeys. Puts the computer in Acer Empowering Technology. Launches Acer ePower Management in Sleep mode. Switches display output between the display screen, external monitor...
User Manual
Page 57
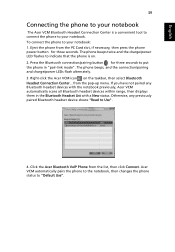
... list, then click Connect. Click the Acer Bluetooth VoIP Phone from the PC Card slot, if necessary, then press the phone power button for three seconds to "Default Use". Acer VCM automatically pairs the phone to the notebook, then changes the phone status to put the phone in the Bluetooth Headset List with a New status. from the pop-up menu. The phone beeps, and the connection/pairing and charge/power LEDs flash...
... list, then click Connect. Click the Acer Bluetooth VoIP Phone from the PC Card slot, if necessary, then press the phone power button for three seconds to "Default Use". Acer VCM automatically pairs the phone to the notebook, then changes the phone status to put the phone in the Bluetooth Headset List with a New status. from the pop-up menu. The phone beeps, and the connection/pairing and charge/power LEDs flash...
User Manual
Page 63
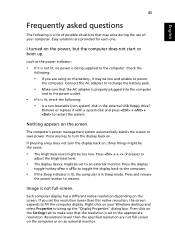
... your Windows desktop and select Properties to fill the computer display. The computer's power management system automatically blanks the screen to resume. Then click on the Settings tab to make sure that the AC adapter is properly plugged into the computer and to the power outlet. • If it is not lit, no power is in the external USB floppy drive? Press any key...
... your Windows desktop and select Properties to fill the computer display. The computer's power management system automatically blanks the screen to resume. Then click on the Settings tab to make sure that the AC adapter is properly plugged into the computer and to the power outlet. • If it is not lit, no power is in the external USB floppy drive? Press any key...
User Manual
Page 64
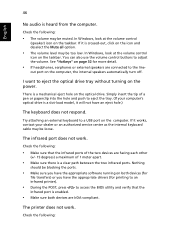
... a slot-load model, it is heard from the computer. In Windows, look at the volume control icon on the computer, the internal speakers automatically turn off. out port on the taskbar. You can also use the volume control buttons to eject the optical drive tray without turning on the power. The infrared port does not work . Nothing should be blocking the ports. • Make sure you have the appropriate drivers...
... a slot-load model, it is heard from the computer. In Windows, look at the volume control icon on the computer, the internal speakers automatically turn off. out port on the taskbar. You can also use the volume control buttons to eject the optical drive tray without turning on the power. The infrared port does not work . Nothing should be blocking the ports. • Make sure you have the appropriate drivers...
User Manual
Page 65
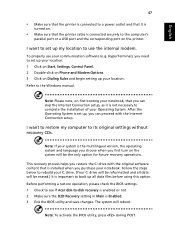
... not necessary to complete the installation of your Operating System. After the Operating System is set up, you need to set up your location: 1 Click on Start, Settings, Control Panel. 2 Double-click on Phone and Modem Options. 3 Click on first booting your communication software (e.g. HyperTerminal), you can skip the Internet Connection setup, as it is turned on. • Make sure that is connected securely to use your notebook, that you can proceed...
... not necessary to complete the installation of your Operating System. After the Operating System is set up, you need to set up your location: 1 Click on Start, Settings, Control Panel. 2 Double-click on Phone and Modem Options. 3 Click on first booting your communication software (e.g. HyperTerminal), you can skip the Internet Connection setup, as it is turned on. • Make sure that is connected securely to use your notebook, that you can proceed...
User Manual
Page 71
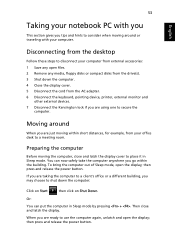
... out of Sleep mode, open files. 2 Remove any media, floppy disks or compact disks from the drive(s). 3 Shut down the computer. 4 Close the display cover. 5 Disconnect the cord from your office desk to shut down the computer: Click on Start then click on Shut Down. Then close and latch the display cover to secure the computer. then press and release the power button. When you...
... out of Sleep mode, open files. 2 Remove any media, floppy disks or compact disks from the drive(s). 3 Shut down the computer. 4 Close the display cover. 5 Disconnect the cord from your office desk to shut down the computer: Click on Start then click on Shut Down. Then close and latch the display cover to secure the computer. then press and release the power button. When you...
User Manual
Page 85
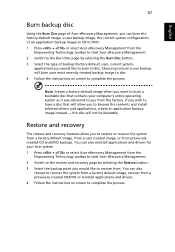
English 67 Burn backup disc Using the Burn Disc page of Acer eRecovery Management, you can burn the factory default image, a user backup image, the current system configuration, or an application backup image to CD or DVD. 1 Press + or select Acer eRecovery Management from the Empowering Technology toolbar to start Acer eRecovery Management. 2 Switch to the restore and recovery page by selecting the Burn Disc button. 3 Select the type of backup (factory default, user, current system, application) you would...
English 67 Burn backup disc Using the Burn Disc page of Acer eRecovery Management, you can burn the factory default image, a user backup image, the current system configuration, or an application backup image to CD or DVD. 1 Press + or select Acer eRecovery Management from the Empowering Technology toolbar to start Acer eRecovery Management. 2 Switch to the restore and recovery page by selecting the Burn Disc button. 3 Select the type of backup (factory default, user, current system, application) you would...


