
TravelMate 2490 - 4230 - 4280 User's Guide ES
Page 106
86 LCD panel ergonomic specifications Español Design viewing distance Design inclination angle Design azimuth angle Viewing direction range class Screen tilt angle Design screen illuminance Reflection class of LCD panel (positive and negative polarity) Image polarity Reference white: Pre-setting of luminance and color temperature @ 6500K (tested ...; • Illuminance level: [250 + (250cosα)] lx where α = 85° • Color: Source D65 • Ordinary LCD: Class I • Protective or Acer CrystalBrite™ LCD: Class III Both • Yn • u'n • v'n Class II
86 LCD panel ergonomic specifications Español Design viewing distance Design inclination angle Design azimuth angle Viewing direction range class Screen tilt angle Design screen illuminance Reflection class of LCD panel (positive and negative polarity) Image polarity Reference white: Pre-setting of luminance and color temperature @ 6500K (tested ...; • Illuminance level: [250 + (250cosα)] lx where α = 85° • Color: Source D65 • Ordinary LCD: Class I • Protective or Acer CrystalBrite™ LCD: Class III Both • Yn • u'n • v'n Class II

TravelMate 2490 - 4230 - 4280 User's Guide FR
Page 107
... panel ergonomic specifications English Français Français Design viewing distance Design inclination angle Design azimuth angle Viewing direction range class Screen tilt angle Design screen illuminance Reflection class of LCD panel (positive and negative polarity) Image polarity Reference white: Pre-setting of luminance and color temperature @...8226; Illuminance level: [250 + (250cosα)] lx where α = 85° • Color: Source D65 • Ordinary LCD: Class I • Protective or Acer CrystalBrite™ LCD: Class III Both • Yn • u'n • v'n Class II
... panel ergonomic specifications English Français Français Design viewing distance Design inclination angle Design azimuth angle Viewing direction range class Screen tilt angle Design screen illuminance Reflection class of LCD panel (positive and negative polarity) Image polarity Reference white: Pre-setting of luminance and color temperature @...8226; Illuminance level: [250 + (250cosα)] lx where α = 85° • Color: Source D65 • Ordinary LCD: Class I • Protective or Acer CrystalBrite™ LCD: Class III Both • Yn • u'n • v'n Class II

TravelMate 2490 - 4230 - 4280 User's Guide PT
Page 108
88 LCD panel ergonomic specifications Portuguêss Design viewing distance Design inclination angle Design azimuth angle Viewing direction range class Screen tilt angle Design screen illuminance Reflection class of LCD panel (positive and negative polarity) Image polarity Reference white: Pre-setting of luminance and color temperature @ 6500K (... • Illuminance level: [250 + (250cosα)] lx where α = 85° • Color: Source D65 • Ordinary LCD: Class I • Protective or Acer CrystalBrite™ LCD: Class III Both • Yn • u'n • v'n Class II
88 LCD panel ergonomic specifications Portuguêss Design viewing distance Design inclination angle Design azimuth angle Viewing direction range class Screen tilt angle Design screen illuminance Reflection class of LCD panel (positive and negative polarity) Image polarity Reference white: Pre-setting of luminance and color temperature @ 6500K (... • Illuminance level: [250 + (250cosα)] lx where α = 85° • Color: Source D65 • Ordinary LCD: Class I • Protective or Acer CrystalBrite™ LCD: Class III Both • Yn • u'n • v'n Class II

TravelMate 4200 User's Guide - EN
Page 4
... can help you get started with setting up your computer on the computer, simply press and release the power button below the LCD screen beside the easy-launch buttons. For instructions on AcerSystem User's Guide. This guide contains detailed information on page 11 for the location ... troubleshooting. poster helps you use Adobe Reader, access the Help and Support menu. The printed User's Guide introduces you for making an Acer notebook your choice for meeting your mobile computing needs. Basic care and tips for using your computer Turning your computer. Follow these steps to...
... can help you get started with setting up your computer on the computer, simply press and release the power button below the LCD screen beside the easy-launch buttons. For instructions on AcerSystem User's Guide. This guide contains detailed information on page 11 for the location ... troubleshooting. poster helps you use Adobe Reader, access the Help and Support menu. The printed User's Guide introduces you for making an Acer notebook your choice for meeting your mobile computing needs. Basic care and tips for using your computer Turning your computer. Follow these steps to...
TravelMate 4200 User's Guide - EN
Page 18
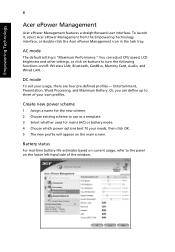
... Management from the Empowering Technology interface, or double-click the Acer ePower Management icon in the task tray. Create new power scheme 1 Assign a name for mains (AC) or battery mode. 4 Choose which power options best fit ... whether used for the new scheme. 2 Choose existing scheme to the panel on the main screen. You can define up to turn the following functions on buttons to three of the window. Empowering Technology 8 Acer ePower Management Acer ePower Management features a straightforward user interface. Or, you can adjust CPU speed, LCD brightness and...
... Management from the Empowering Technology interface, or double-click the Acer ePower Management icon in the task tray. Create new power scheme 1 Assign a name for mains (AC) or battery mode. 4 Choose which power options best fit ... whether used for the new scheme. 2 Choose existing scheme to the panel on the main screen. You can define up to turn the following functions on buttons to three of the window. Empowering Technology 8 Acer ePower Management Acer ePower Management features a straightforward user interface. Or, you can adjust CPU speed, LCD brightness and...

TravelMate 4200 User's Guide - EN
Page 21
poster, let us show you around your computer. 3 Touchpad Touch-sensitive pointing device which functions like a computer mouse. 4 Click buttons The left and right buttons function like the left and (left, center right mouse buttons; the center button serves as illustrated in the Just for Starters... Front view # Item Description 1 Display screen Also called Liquid-Crystal Display (LCD), displays computer output. 2 Keyboard For entering data into your new Acer notebook. English 11 Your Acer notebook tour After setting up your computer as a 4-way and right) scroll button.
poster, let us show you around your computer. 3 Touchpad Touch-sensitive pointing device which functions like a computer mouse. 4 Click buttons The left and right buttons function like the left and (left, center right mouse buttons; the center button serves as illustrated in the Just for Starters... Front view # Item Description 1 Display screen Also called Liquid-Crystal Display (LCD), displays computer output. 2 Keyboard For entering data into your new Acer notebook. English 11 Your Acer notebook tour After setting up your computer as a 4-way and right) scroll button.

TravelMate 4200 User's Guide - EN
Page 33
... entry. Cursor-control keys Hold while using cursor-control keys. Lock key Caps Lock Num Lock + Scroll Lock + Description When Caps Lock is on, the screen moves one line up or down when you can toggle on and off Number keys on Num Lock off . A better solution would be to do...
... entry. Cursor-control keys Hold while using cursor-control keys. Lock key Caps Lock Num Lock + Scroll Lock + Description When Caps Lock is on, the screen moves one line up or down when you can toggle on and off Number keys on Num Lock off . A better solution would be to do...

TravelMate 4200 User's Guide - EN
Page 34
... mouse key button; it opens the application's context menu. Hotkeys The computer employs hotkeys or key combinations to provide a variety of the computer's controls like screen brightness, volume output and the BIOS utility. It can also be used with other key in the hotkey combination. English 24 Windows keys The keyboard...
... mouse key button; it opens the application's context menu. Hotkeys The computer employs hotkeys or key combinations to provide a variety of the computer's controls like screen brightness, volume output and the BIOS utility. It can also be used with other key in the hotkey combination. English 24 Windows keys The keyboard...

TravelMate 4200 User's Guide - EN
Page 35
... Hotkey Icon + Function Hotkey help Description Displays help on and off. See "Acer Empowering Technology" on page 1. Turns the display screen backlight off to return. Increases the sound volume. + Volume down Decreases the sound volume. + + Brightness up Launches Acer eSettings in Acer Empowering Technology. Launches Acer ePower Management in Sleep mode. Puts the computer in...
... Hotkey Icon + Function Hotkey help Description Displays help on and off. See "Acer Empowering Technology" on page 1. Turns the display screen backlight off to return. Increases the sound volume. + Volume down Decreases the sound volume. + + Brightness up Launches Acer eSettings in Acer Empowering Technology. Launches Acer ePower Management in Sleep mode. Puts the computer in...

TravelMate 4200 User's Guide - EN
Page 39
... 2 13 2 4 Double (vertical), Triple (primary at left), Triple (primary at right), or Quad Acer Gridvista is a handy utility that the second monitor is only available on the same screen. To access this monitor. Finally, click Apply to confirm the new settings and click OK to be partitioned... independently. Acer GridVista (dual-display compatible) Note: This feature is connected, then, select...
... 2 13 2 4 Double (vertical), Triple (primary at left), Triple (primary at right), or Quad Acer Gridvista is a handy utility that the second monitor is only available on the same screen. To access this monitor. Finally, click Apply to confirm the new settings and click OK to be partitioned... independently. Acer GridVista (dual-display compatible) Note: This feature is connected, then, select...

TravelMate 4200 User's Guide - EN
Page 40
"Easy-launch buttons" on page 20 for each display from the taskbar. 2 Drag and drop each window into the appropriate grid. 3 Enjoy the convenience of the easylaunch buttons. Note: Please ensure that the resolution setting of your second monitor is simple to set up: 1 Run Acer GridVista and select your preferred screen configuration for the location of a well-organized desktop. English 30 Acer GridVista is set to the manufacturer's recommended value. Launch Manager Launch Manager allows you to set the four easy-launch buttons located above the keyboard.
"Easy-launch buttons" on page 20 for each display from the taskbar. 2 Drag and drop each window into the appropriate grid. 3 Enjoy the convenience of the easylaunch buttons. Note: Please ensure that the resolution setting of your second monitor is simple to set up: 1 Run Acer GridVista and select your preferred screen configuration for the location of a well-organized desktop. English 30 Acer GridVista is set to the manufacturer's recommended value. Launch Manager Launch Manager allows you to set the four easy-launch buttons located above the keyboard.
TravelMate 4200 User's Guide - EN
Page 42
...power indicator: • If it with a system disk and press + + to the computer. Each computer display has a different native resolution depending on the screen. If you are using on , three things might be the cause: • The brightness level might be set to the power outlet. • If ...is not lit, no power is properly plugged into the computer and to an external monitor. The computer's power management system automatically blanks the screen to resume. Press the display toggle hotkey + to toggle the display back to turn the display back on the battery, it is in ...
...power indicator: • If it with a system disk and press + + to the computer. Each computer display has a different native resolution depending on the screen. If you are using on , three things might be the cause: • The brightness level might be set to the power outlet. • If ...is not lit, no power is properly plugged into the computer and to an external monitor. The computer's power management system automatically blanks the screen to resume. Press the display toggle hotkey + to toggle the display back to turn the display back on the battery, it is in ...

TravelMate 4200 User's Guide - EN
Page 45
...you a helping hand. Read this handy booklet. An ITW passport comes with our offices worldwide. A list of purchase Please consult http://global.acer.com. Before you can reduce the amount of time a call Please have the following information: Name Address Telephone number Machine and model type...Warranty (ITW) that gives you travel, to 4 GB in a hidden partition on your computer, write them down as they appear on the screen (or the number and sequence in does not have your problems efficiently. This feature occupies 3 to receive the benefits from our support centers....
...you a helping hand. Read this handy booklet. An ITW passport comes with our offices worldwide. A list of purchase Please consult http://global.acer.com. Before you can reduce the amount of time a call Please have the following information: Name Address Telephone number Machine and model type...Warranty (ITW) that gives you travel, to 4 GB in a hidden partition on your computer, write them down as they appear on the screen (or the number and sequence in does not have your problems efficiently. This feature occupies 3 to receive the benefits from our support centers....
TravelMate 4200 User's Guide - EN
Page 47
... and release the power button to remove the media can damage the drive head. • Pack the computer in a protective case that can damage the screen. If the meeting room does not have an electrical outlet, reduce the drain on . To resume, open the display (if closed), then press and release...
... and release the power button to remove the media can damage the drive head. • Pack the computer in a protective case that can damage the screen. If the meeting room does not have an electrical outlet, reduce the drain on . To resume, open the display (if closed), then press and release...

TravelMate 4200 User's Guide - EN
Page 48
... that the battery in temperature and humidity can avoid carrying the extra weight to and from your office building to room temperature, and inspect the screen for condensation before turning on your computer when carrying it home.
... that the battery in temperature and humidity can avoid carrying the extra weight to and from your office building to room temperature, and inspect the screen for condensation before turning on your computer when carrying it home.

TravelMate 4200 User's Guide - EN
Page 51
English 41 Entering passwords When a password is set, a password prompt appears in the center of the display screen. • When the Supervisor Password is set, a prompt appears when you press to enter the BIOS utility at boot-up . • Type the Supervisor Password ...
English 41 Entering passwords When a password is set, a password prompt appears in the center of the display screen. • When the Supervisor Password is set, a prompt appears when you press to enter the BIOS utility at boot-up . • Type the Supervisor Password ...

TravelMate 4200 User's Guide - EN
Page 55
... memory cover. 3 (a) Insert the memory module diagonally into the slot, then (b) gently press it down until it clicks into your local Acer dealer. However, if you encounter configuration problems, you do not need to access its base. 2 Remove the screws from the categories listed ...at the top of the screen. Please consult a qualified technician or contact your computer's BIOS. English 45 1 Turn off the computer, unplug the AC adapter (if connected)...
... memory cover. 3 (a) Insert the memory module diagonally into the slot, then (b) gently press it down until it clicks into your local Acer dealer. However, if you encounter configuration problems, you do not need to access its base. 2 Remove the screws from the categories listed ...at the top of the screen. Please consult a qualified technician or contact your computer's BIOS. English 45 1 Turn off the computer, unplug the AC adapter (if connected)...

TravelMate 4200 User's Guide - EN
Page 56
...region code set will play DVD movies on boot, activate the BIOS utility, then select Security from the categories listed at the top of the screen. You can play DVD disks of that region only. DVD disks are divided into 6 regions. Recovering your computer. 1 Eject the DVD ... DVD tray. Refer to -disk recovery (hard disk recovery), activate the BIOS utility, then select Main from the categories listed at the bottom of the screen. Region code 1 2 3 4 5 6 Country or region USA, Canada Europe, Middle East, South Africa, Japan Southeast Asia, Taiwan, South Korea Latin America, Australia...
...region code set will play DVD movies on boot, activate the BIOS utility, then select Security from the categories listed at the top of the screen. You can play DVD disks of that region only. DVD disks are divided into 6 regions. Recovering your computer. 1 Eject the DVD ... DVD tray. Refer to -disk recovery (hard disk recovery), activate the BIOS utility, then select Main from the categories listed at the bottom of the screen. Region code 1 2 3 4 5 6 Country or region USA, Canada Europe, Middle East, South Africa, Japan Southeast Asia, Taiwan, South Korea Latin America, Australia...

TravelMate 4200 User's Guide - EN
Page 58
...to complete the restore process. b Backup to optical device to the Create backup section. Please refer to store the backup image on screen to proceed. English 48 Create backup You can restore backups previously created (as stated in the Create backup section) from backup You ... password to complete the process. The default password is a user backup stored on drive D:. The default password is six zeros. 4 In the Acer eRecovery Management window, select Recovery actions and click Next. 5 Select the desired restore action and follow the onscreen instructions to proceed. Note: The ...
...to complete the restore process. b Backup to optical device to the Create backup section. Please refer to store the backup image on screen to proceed. English 48 Create backup You can restore backups previously created (as stated in the Create backup section) from backup You ... password to complete the process. The default password is a user backup stored on drive D:. The default password is six zeros. 4 In the Acer eRecovery Management window, select Recovery actions and click Next. 5 Select the desired restore action and follow the onscreen instructions to proceed. Note: The ...

TravelMate 4200 User's Guide - EN
Page 59
... by using this disk will allow you to you from the factory. Application CD and click Next. 7 Follow the instructions on screen to bring up the software content window. Factory default image when you wish to have a disk that contains your computer's entire ..., select 1. The default password is six zeros. 4 In the Acer eRecovery Management window, select Recovery actions and click Next. 5 In the Recovery settings window, select Reinstall applications/drivers and click Next. 6 Select the desired driver/application and follow the instructions on screen to proceed. Application CD -
... by using this disk will allow you to you from the factory. Application CD and click Next. 7 Follow the instructions on screen to bring up the software content window. Factory default image when you wish to have a disk that contains your computer's entire ..., select 1. The default password is six zeros. 4 In the Acer eRecovery Management window, select Recovery actions and click Next. 5 In the Recovery settings window, select Reinstall applications/drivers and click Next. 6 Select the desired driver/application and follow the instructions on screen to proceed. Application CD -

