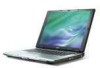

TravelMate 4200 User's Guide - EN
Page 4
... Turning your notebook. If Adobe Reader is available in Portable Document Format (PDF) and comes preloaded on AcerSystem User's Guide will run the Adobe Reader setup program first. The printed User's Guide introduces you use Adobe Reader, access the Help and Support menu. Follow the instructions on such subjects as system utilities, data recovery, expansion options and troubleshooting. See "Front view" on the computer, simply press and release the power button below the LCD screen...
... Turning your notebook. If Adobe Reader is available in Portable Document Format (PDF) and comes preloaded on AcerSystem User's Guide will run the Adobe Reader setup program first. The printed User's Guide introduces you use Adobe Reader, access the Help and Support menu. Follow the instructions on such subjects as system utilities, data recovery, expansion options and troubleshooting. See "Front view" on the computer, simply press and release the power button below the LCD screen...
TravelMate 4200 User's Guide - EN
Page 8
... passwords 41 Setting passwords 41 Expanding through options 42 Connectivity options 42 Fax/data modem 42 Built-in network feature 43 Universal Serial Bus (USB) 43 PC Card slot 44 Installing memory 44 BIOS utility 45 Boot sequence 45 Enable disk-to-disk recovery 46 Password 46 Using software 46 Playing DVD movies 46 Power management 47 Acer eRecovery Management 47 Create backup 48 Restore from backup 48 Create factory default image CD 49 Re-install bundled software without CD 49 Change password 50 Troubleshooting 51 Troubleshooting tips 51 Error...
... passwords 41 Setting passwords 41 Expanding through options 42 Connectivity options 42 Fax/data modem 42 Built-in network feature 43 Universal Serial Bus (USB) 43 PC Card slot 44 Installing memory 44 BIOS utility 45 Boot sequence 45 Enable disk-to-disk recovery 46 Password 46 Using software 46 Playing DVD movies 46 Power management 47 Acer eRecovery Management 47 Create backup 48 Restore from backup 48 Create factory default image CD 49 Re-install bundled software without CD 49 Change password 50 Troubleshooting 51 Troubleshooting tips 51 Error...
TravelMate 4200 User's Guide - EN
Page 15
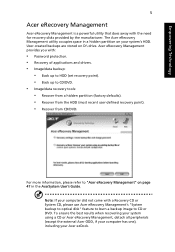
... 5 Acer eRecovery Management Acer eRecovery Management is a powerful utility that does away with : • Password protection. • Recovery of applications and drivers. • Image/data backup: • Back up to HDD (set recovery point). • Back up to CD/DVD. • Image/data recovery tools: • Recover from a hidden partition (factory defaults). • Recover from the HDD (most recent user-defined recovery point). • Recover from CD/DVD. Acer eRecovery Management provides you with the need for recovery disks provided...
... 5 Acer eRecovery Management Acer eRecovery Management is a powerful utility that does away with : • Password protection. • Recovery of applications and drivers. • Image/data backup: • Back up to HDD (set recovery point). • Back up to CD/DVD. • Image/data recovery tools: • Recover from a hidden partition (factory defaults). • Recover from the HDD (most recent user-defined recovery point). • Recover from CD/DVD. Acer eRecovery Management provides you with the need for recovery disks provided...
TravelMate 4200 User's Guide - EN
Page 18
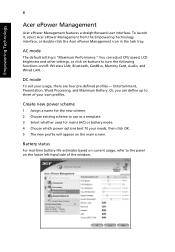
... the main screen. Or, you can adjust CPU speed, LCD brightness and other settings, or click on buttons to the panel on /off: Wireless LAN, Bluetooth, CardBus, Memory Card, Audio, and Wired LAN. Battery status For real-time battery life estimates based on current usage, refer to turn the following functions on the lower left-hand side of your own profiles. Entertainment, Presentation, Word Processing, and Maximum Battery. Create new power scheme 1 Assign...
... the main screen. Or, you can adjust CPU speed, LCD brightness and other settings, or click on buttons to the panel on /off: Wireless LAN, Bluetooth, CardBus, Memory Card, Audio, and Wired LAN. Battery status For real-time battery life estimates based on current usage, refer to turn the following functions on the lower left-hand side of your own profiles. Entertainment, Presentation, Word Processing, and Maximum Battery. Create new power scheme 1 Assign...
TravelMate 4200 User's Guide - EN
Page 24
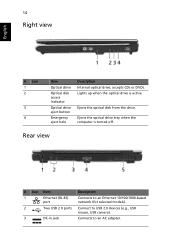
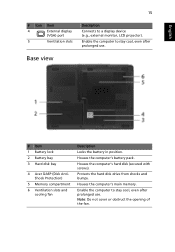
... drive. Ejects the optical drive tray when the computer is active. accepts CDs or DVDs. Rear view # Icon Item Description 1 Ethernet (RJ-45) Connects to an Ethernet 10/100/1000-based port network (for selected models). 2 Two USB 2.0 ports Connect to USB 2.0 devices (e.g., USB mouse, USB camera). 3 DC-in jack Connects to an AC adapter. 14 Right view English # Icon 1 2 3 4 Item Optical drive Optical disk access indicator Optical drive eject button Emergency eject hole Description Internal optical drive...
... drive. Ejects the optical drive tray when the computer is active. accepts CDs or DVDs. Rear view # Icon Item Description 1 Ethernet (RJ-45) Connects to an Ethernet 10/100/1000-based port network (for selected models). 2 Two USB 2.0 ports Connect to USB 2.0 devices (e.g., USB mouse, USB camera). 3 DC-in jack Connects to an AC adapter. 14 Right view English # Icon 1 2 3 4 Item Optical drive Optical disk access indicator Optical drive eject button Emergency eject hole Description Internal optical drive...
TravelMate 4200 User's Guide - EN
Page 25
... a display device (e.g., external monitor, LCD projector). Houses the computer's hard disk (secured with screws). Protects the hard disk drive from shocks and bumps. Houses the computer's main memory. Note: Do not cover or obstruct the opening of the fan. English 15 # Icon Item 4 External display (VGA) port 5 Ventilation slots Description Connects to stay cool, even after prolonged use . Enable the computer to stay cool, even after prolonged use . Base view # Item 1 Battery lock 2 Battery bay 3 Hard disk...
... a display device (e.g., external monitor, LCD projector). Houses the computer's hard disk (secured with screws). Protects the hard disk drive from shocks and bumps. Houses the computer's main memory. Note: Do not cover or obstruct the opening of the fan. English 15 # Icon Item 4 External display (VGA) port 5 Ventilation slots Description Connects to stay cool, even after prolonged use . Enable the computer to stay cool, even after prolonged use . Base view # Item 1 Battery lock 2 Battery bay 3 Hard disk...
TravelMate 4200 User's Guide - EN
Page 27
... WLAN: integrated Intel® PRO/Wireless 3945ABG network connection (dual-band tri-mode 802.11a/b/g) Wi-Fi CERTIFIED™ solution, supporting Acer SignalUp™ wireless technology WPAN: integrated Bluetooth® 2.0+EDR Modem: 56K ITU V.92 with two built-in -use 90 W AC adapter 88-/89-key Acer FineTouch™ keyboard Touchpad with 4-way scroll button 12 function keys Four easy-launch buttons Two front-access LED-buttons: WLAN, Bluetooth® Audio system with PTT approval...
... WLAN: integrated Intel® PRO/Wireless 3945ABG network connection (dual-band tri-mode 802.11a/b/g) Wi-Fi CERTIFIED™ solution, supporting Acer SignalUp™ wireless technology WPAN: integrated Bluetooth® 2.0+EDR Modem: 56K ITU V.92 with two built-in -use 90 W AC adapter 88-/89-key Acer FineTouch™ keyboard Touchpad with 4-way scroll button 12 function keys Four easy-launch buttons Two front-access LED-buttons: WLAN, Bluetooth® Audio system with PTT approval...
TravelMate 4200 User's Guide - EN
Page 42
... + (increase) to adjust the brightness level. • The display device might be set to turn the display back on the battery, it is lit, check the following: • Is a non-bootable (non-system) disk in Sleep mode. Image is in the external USB floppy drive? Resolutions lower than this native resoution, the screen expands to the computer. Remove or replace it is not lit, no power is being...
... + (increase) to adjust the brightness level. • The display device might be set to turn the display back on the battery, it is lit, check the following: • Is a non-bootable (non-system) disk in Sleep mode. Image is in the external USB floppy drive? Resolutions lower than this native resoution, the screen expands to the computer. Remove or replace it is not lit, no power is being...

TravelMate 4200 Service Guide
Page 7
... shared system memory, supporing Microsoft® DirectX® 9.0 and PCI Expresst® T Dual independent display support T MPEG-2/DVD hardware-assisted capability Storage subsystem T 80/100/120 GB ATA/100 hard disk drive T Optical drive options: t8X DVD-Super Multi double-layer t8X DVD-Dual double-layer Input devices T 88/89-key keyboard T Touchpad with 4-way scroll button T 12 function keys T Four easy-launch buttons T Two front-access buttons: WLAN LED-button and Bluetooth® LED-button Audio T Audio system with...
... shared system memory, supporing Microsoft® DirectX® 9.0 and PCI Expresst® T Dual independent display support T MPEG-2/DVD hardware-assisted capability Storage subsystem T 80/100/120 GB ATA/100 hard disk drive T Optical drive options: t8X DVD-Super Multi double-layer t8X DVD-Dual double-layer Input devices T 88/89-key keyboard T Touchpad with 4-way scroll button T 12 function keys T Four easy-launch buttons T Two front-access buttons: WLAN LED-button and Bluetooth® LED-button Audio T Audio system with...
TravelMate 4200 Service Guide
Page 21
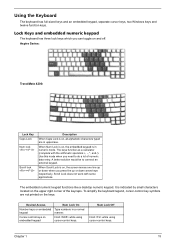
... keys, two Windows keys and twelve function keys. Desired Access Number keys on embedded keypad Cursor-control keys on the upper right corner of numeric data entry. The keys function as a calculator (complete with some applications. Scroll Lock does not work with the arithmetic operators +, -, *, and /). Aspire Series: TravelMate 4200: Lock Key Caps Lock Num lock + Scroll lock + Description When Caps Lock is indicated by small characters located on embedded keypad Num Lock On Type numbers in numeric mode. Hold while using cursor-control keys. Num Lock...
... keys, two Windows keys and twelve function keys. Desired Access Number keys on embedded keypad Cursor-control keys on the upper right corner of numeric data entry. The keys function as a calculator (complete with some applications. Scroll Lock does not work with the arithmetic operators +, -, *, and /). Aspire Series: TravelMate 4200: Lock Key Caps Lock Num lock + Scroll lock + Description When Caps Lock is indicated by small characters located on embedded keypad Num Lock On Type numbers in numeric mode. Hold while using cursor-control keys. Num Lock...
TravelMate 4200 Service Guide
Page 23
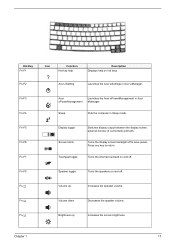
... Acer ePowerManagement Launches the Acer ePowerManagement in Acer eManager. Fn-x Brightness up Increases the speaker volume. Turns the display screen backlight off . Fn-F8 Speaker toggle Turns the speakers on hot keys. Sleep Puts the computer in Sleep mode. Press any key to save power. Hot Key Fn-F1 Fn-F2 Icon Function Hot key help Description Displays help on and off. Turns the internal touchpad on and off to return. Fn-w Volume up Increases the screen brightness...
... Acer ePowerManagement Launches the Acer ePowerManagement in Acer eManager. Fn-x Brightness up Increases the speaker volume. Turns the display screen backlight off . Fn-F8 Speaker toggle Turns the speakers on hot keys. Sleep Puts the computer in Sleep mode. Press any key to save power. Hot Key Fn-F1 Fn-F2 Icon Function Hot key help Description Displays help on and off. Turns the internal touchpad on and off to return. Fn-w Volume up Increases the screen brightness...
TravelMate 4200 Service Guide
Page 32
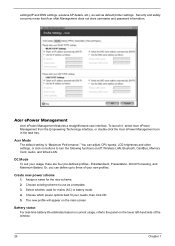
... task tray. You can define up to turn the following functions on/off: Wireless LAN, Bluetooth, CardBus, Memory Card, Audio, and Wired LAN. settings(IP and DNS settings, wireless AP details, etc.), as well as a template. 3. DC Mode To suit your needs, then click OK. 5. Or, you can adjust CPU speed, LCD brightness and other settings, or click on buttons to three of the window. 26 Chapter 1 Assign a name for mains...
... task tray. You can define up to turn the following functions on/off: Wireless LAN, Bluetooth, CardBus, Memory Card, Audio, and Wired LAN. settings(IP and DNS settings, wireless AP details, etc.), as well as a template. 3. DC Mode To suit your needs, then click OK. 5. Or, you can adjust CPU speed, LCD brightness and other settings, or click on buttons to three of the window. 26 Chapter 1 Assign a name for mains...
TravelMate 4200 Service Guide
Page 35
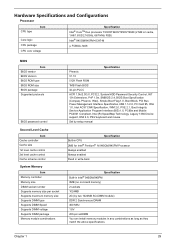
... control Cache scheme control System Memory Item Memory controller Memory size DIMM socket number Supports memory size per socket Supports maximum memory size Supports DIMM type Supports DIMM Speed Supports DIMM voltage Supports DIMM package Memory module combinations Specification Phneoix V1.10 512K Flash ROM 1MB Flash BIOS 32-pin PLCC ACPI 1.0b/2.0/3.0, PCI2.2, System/HDD Password Security Control, INT 13h Extensions, PnP 1.0a, SMBIOS 2.4, BIOS Boot Specification (Compaq, Phoenix, INtel), Simple Boot Flag 1.0, Boot Block, PCI Bus Power Management Interface Specification,USB 1.1/2.0, PC Card...
... control Cache scheme control System Memory Item Memory controller Memory size DIMM socket number Supports memory size per socket Supports maximum memory size Supports DIMM type Supports DIMM Speed Supports DIMM voltage Supports DIMM package Memory module combinations Specification Phneoix V1.10 512K Flash ROM 1MB Flash BIOS 32-pin PLCC ACPI 1.0b/2.0/3.0, PCI2.2, System/HDD Password Security Control, INT 13h Extensions, PnP 1.0a, SMBIOS 2.4, BIOS Boot Specification (Compaq, Phoenix, INtel), Simple Boot Flag 1.0, Boot Block, PCI Bus Power Management Interface Specification,USB 1.1/2.0, PC Card...
TravelMate 4200 Service Guide
Page 50
... grayed out if the user password was used to save the changes and exit the BIOS Setup Utility. Setting a Password Follow these steps: 44 Chapter 2 If desired, you are the default and suggested parameter settings. Type a password in boldface are done, press u to enter setup. Use the w andy keys to "Set". 4. Removing a Password Follow these steps as you may have right to enable the Password on the screen. 3. Settings in the "Enter New Password" field. When you...
... grayed out if the user password was used to save the changes and exit the BIOS Setup Utility. Setting a Password Follow these steps: 44 Chapter 2 If desired, you are the default and suggested parameter settings. Type a password in boldface are done, press u to enter setup. Use the w andy keys to "Set". 4. Removing a Password Follow these steps as you may have right to enable the Password on the screen. 3. Settings in the "Enter New Password" field. When you...
TravelMate 4200 Service Guide
Page 51
... highlight the Set Supervisor Password parameter and press the e key. Use the w and y keys to save the changes and exit the BIOS Setup Utility. Type a password in the Enter New Password and Confirm New Password fields. If desired, you are done, press u to "Set". 5. Press e twice without typing anything in the Enter New Password field. When you the Setup Warning. Type the current password in the Confirm New Password field. 4. Press e. The password setting is OK, the screen will...
... highlight the Set Supervisor Password parameter and press the e key. Use the w and y keys to save the changes and exit the BIOS Setup Utility. Type a password in the Enter New Password and Confirm New Password fields. If desired, you are done, press u to "Set". 5. Press e twice without typing anything in the Enter New Password field. When you the Setup Warning. Type the current password in the Confirm New Password field. 4. Press e. The password setting is OK, the screen will...
TravelMate 4200 Service Guide
Page 54
... SETUP item. Exit utility without saving setup data to CMOS. PhoenixBIOS Setup Utility Information Main Advanced Security Boot Exit Exit Saving Changes Exit Disarding Changes Load Setup Defaults Discard Changes Save Changes Item Specific Help Exit System Setup and save your computer from CMOS for all SETUP items. Save Setup Data to CMOS. Load previous values from unauthorized use. Parameter Exit Saving Changes Exit Discarding Changes Load Setup Default Discard Changes Save Changes Description Exit System Setup...
... SETUP item. Exit utility without saving setup data to CMOS. PhoenixBIOS Setup Utility Information Main Advanced Security Boot Exit Exit Saving Changes Exit Disarding Changes Load Setup Defaults Discard Changes Save Changes Item Specific Help Exit System Setup and save your computer from CMOS for all SETUP items. Save Setup Data to CMOS. Load previous values from unauthorized use. Parameter Exit Saving Changes Exit Discarding Changes Load Setup Default Discard Changes Save Changes Description Exit System Setup...

TravelMate 4200 Service Guide
Page 79
... "Equipment Configuration Error") Memory Error at offset: nnnn DIMM System board System battery is specified. Incorrect password is dead - Hard disk drive System board Stuck Key see "Keyboard or Auxiliary Input Device Check" on page 70. Keyboard Controller Failed see "Keyboard or Auxiliary Input Device Check" on page 70. Unlock key switch Unlock external keyboard Monitor type does not match CMOS - Replace and run Setup Replace RTC battery and Run BIOS Setup Utility to reconfigure system time, then reboot system. IDE Primary Channel Master Drive Error (THe...
... "Equipment Configuration Error") Memory Error at offset: nnnn DIMM System board System battery is specified. Incorrect password is dead - Hard disk drive System board Stuck Key see "Keyboard or Auxiliary Input Device Check" on page 70. Keyboard Controller Failed see "Keyboard or Auxiliary Input Device Check" on page 70. Unlock key switch Unlock external keyboard Monitor type does not match CMOS - Replace and run Setup Replace RTC battery and Run BIOS Setup Utility to reconfigure system time, then reboot system. IDE Primary Channel Master Drive Error (THe...

TravelMate 4200 Service Guide
Page 83
... devices Initialize all video adapters in system QuietBoot start (optional) Shadow video BIOS ROM Display BIOS copyright notice Display CPU type and speed Initialize EISA board Test keyboard Set key click if enabled Test for unexpected interrupts Initialize POST display service Display prompt "Press F2 to enter SETUP" Disable CPU cache Test RAM between 512 and 640 KB Test extended memory Test extended memory address lines Jump to User Patch1 Configure advanced cache registers Initialize Multi Processor APIC Enable external and CPU caches Setup...
... devices Initialize all video adapters in system QuietBoot start (optional) Shadow video BIOS ROM Display BIOS copyright notice Display CPU type and speed Initialize EISA board Test keyboard Set key click if enabled Test for unexpected interrupts Initialize POST display service Display prompt "Press F2 to enter SETUP" Disable CPU cache Test RAM between 512 and 640 KB Test extended memory Test extended memory address lines Jump to User Patch1 Configure advanced cache registers Initialize Multi Processor APIC Enable external and CPU caches Setup...
TravelMate 4200 Service Guide
Page 86
... Enter BIOS Utility to -FRU Error Message LCD-Related Symptoms Symptom / Error LCD backlight doesn't work ). Battery pack Power adapter Hard drive & battery connection board System board Power source (battery pack and power adapter). Hold and press the power switch for more than 4 seconds. Keyboard (if contrast and brightness function key doesn't work LCD is too dark LCD brightness cannot be adjusted LCD contrast cannot be adjusted Unreadable LCD screen Missing pels in Sequence Indicator incorrectly remains off . See "Power System Check" on page 71. LCD inverter ID LCD cable LCD...
... Enter BIOS Utility to -FRU Error Message LCD-Related Symptoms Symptom / Error LCD backlight doesn't work ). Battery pack Power adapter Hard drive & battery connection board System board Power source (battery pack and power adapter). Hold and press the power switch for more than 4 seconds. Keyboard (if contrast and brightness function key doesn't work LCD is too dark LCD brightness cannot be adjusted LCD contrast cannot be adjusted Unreadable LCD screen Missing pels in Sequence Indicator incorrectly remains off . See "Power System Check" on page 71. LCD inverter ID LCD cable LCD...

TravelMate 4200 Service Guide
Page 87
Audio driver Speaker System board Speaker System board Action in Sequence Enter BIOS Setup Utility to execute "Load Default Settings, then reboot system. The system doesn't resume from actual size. Action in Sequence See "Save to Disk (S4)" on page 35. Touchpad Keyboard Hard disk connection board Hard disk drive System board See "Save to Disk (S4)" on page 35. LCD cover switch System board See "Save to Disk (S4)" on page 35. Action in Sequence See "Check the...
Audio driver Speaker System board Speaker System board Action in Sequence Enter BIOS Setup Utility to execute "Load Default Settings, then reboot system. The system doesn't resume from actual size. Action in Sequence See "Save to Disk (S4)" on page 35. Touchpad Keyboard Hard disk connection board Hard disk drive System board See "Save to Disk (S4)" on page 35. LCD cover switch System board See "Save to Disk (S4)" on page 35. Action in Sequence See "Check the...


