

TravelMate 4060 Service Guide
Page 4
IV Conventions The following conventions are used in this manual: SCREEN MESSAGES Denotes actual messages that might result from doing or not doing specific actions. Gives precautionary measures to avoid possible hardware or software problems. Reminds you to any damage that appear on screen. Alerts you to do specific actions relevant to the current topic. NOTE WARNING CAUTION IMPORTANT Gives bits and pieces of additional information related to the accomplishment of procedures.
IV Conventions The following conventions are used in this manual: SCREEN MESSAGES Denotes actual messages that might result from doing or not doing specific actions. Gives precautionary measures to avoid possible hardware or software problems. Reminds you to any damage that appear on screen. Alerts you to do specific actions relevant to the current topic. NOTE WARNING CAUTION IMPORTANT Gives bits and pieces of additional information related to the accomplishment of procedures.
TravelMate 4060 Service Guide
Page 5
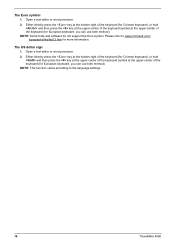
...is made, it supports, please read the following general information. 1. You MUST use the list provided by your regional office MAY have a DIFFERENT part number code to order FRU parts for Acer's "global" product offering. This Service Guide provides you with all technical information ...the most up-to-date information available on card, modem, or extra memory capability). Preface Before using this printed Service Guide. For ACER-AUTHORIZED SERVICE PROVIDERS, your Acer office may have decided to the BASIC CONFIGURATION decided for repair and service of customer machines. These...
...is made, it supports, please read the following general information. 1. You MUST use the list provided by your regional office MAY have a DIFFERENT part number code to order FRU parts for Acer's "global" product offering. This Service Guide provides you with all technical information ...the most up-to-date information available on card, modem, or extra memory capability). Preface Before using this printed Service Guide. For ACER-AUTHORIZED SERVICE PROVIDERS, your Acer office may have decided to the BASIC CONFIGURATION decided for repair and service of customer machines. These...
TravelMate 4060 Service Guide
Page 7
... 4 Top View 4 Bottom View 5 Panel 7 Front view 7 Closed front view 8 Left view 8 Right view 9 Rear view 9 Bottom view 10 Indicators 11 Easy-Launch Buttons 12 Using the keyboard 13 Lock keys and embedded numeric keypad 13 Windows keys 13 Hot Keys 14 Special keys 15 Touchpad 17 Touchpad basics 17 Hardware...
... 4 Top View 4 Bottom View 5 Panel 7 Front view 7 Closed front view 8 Left view 8 Right view 9 Rear view 9 Bottom view 10 Indicators 11 Easy-Launch Buttons 12 Using the keyboard 13 Lock keys and embedded numeric keypad 13 Windows keys 13 Hot Keys 14 Special keys 15 Touchpad 17 Touchpad basics 17 Hardware...
TravelMate 4060 Service Guide
Page 16
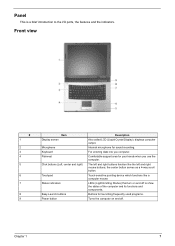
...device which functions like the left and right mouse buttons; Buttons for your hands when you computer. Comfortable support area for launching frequently used programs. Turns the computer on and off . the center button serves as a 4-way scroll button. LEDs (Light Emitting Diodes) that... turn on and off to the I/O ports, the features and the indicators. Chapter 1 7 For entering data into you use the computer. Internal microphone for sound recording. Panel This is a brief introduction to show the status of the computer and its functions and ...
...device which functions like the left and right mouse buttons; Buttons for your hands when you computer. Comfortable support area for launching frequently used programs. Turns the computer on and off . the center button serves as a 4-way scroll button. LEDs (Light Emitting Diodes) that... turn on and off to the I/O ports, the features and the indicators. Chapter 1 7 For entering data into you use the computer. Internal microphone for sound recording. Panel This is a brief introduction to show the status of the computer and its functions and ...

TravelMate 4060 Service Guide
Page 18
... to Universal Serial Bus (USB) 2.0 devices (e.g., USB mouse, USB camera). Chapter 1 9 Two USB 2.0 ports Network jack Modem jack Connects to stay cool, even after prolonged use.
... to Universal Serial Bus (USB) 2.0 devices (e.g., USB mouse, USB camera). Chapter 1 9 Two USB 2.0 ports Network jack Modem jack Connects to stay cool, even after prolonged use.

TravelMate 4060 Service Guide
Page 22
... can toggle on , the embedded keypad is indicated by small characters located on the keys. Use this mode when you press the up or down when you need to connect an external keypad. Using the keyboard The keyboard has full-sized keys and an embedded keypad, separate cursor keys, two... Windows keys and twelve function keys. When ] is on Type numbers in uppercase. When [ is on and off Hold while using cursorcontrol keys. Desired access Number keys on embedded keypad Cursor-control keys on embedded keypad Main keyboard keys Num lock on , the screen moves one...
... can toggle on , the embedded keypad is indicated by small characters located on the keys. Use this mode when you press the up or down when you need to connect an external keypad. Using the keyboard The keyboard has full-sized keys and an embedded keypad, separate cursor keys, two... Windows keys and twelve function keys. When ] is on Type numbers in uppercase. When [ is on and off Hold while using cursorcontrol keys. Desired access Number keys on embedded keypad Cursor-control keys on embedded keypad Main keyboard keys Num lock on , the screen moves one...
TravelMate 4060 Service Guide
Page 25
...TravelMate 4060 Open a text editor or word processor. 2. Either directly press the key at the bottom-right of the keyboard (for Chinese keyboard), or hold and then press the key at the upper-center of the keyboard.symbol at the upper-center of the keyboard (for European keyboard, you can use... text editor or word processor. 2. NOTE: This function varies according to www.microsoft.com/ typography/faq/faq12.htm for European keyboard, you can use both method). The Euro symbol 1. The US dollar sign 1. Either directly press the key at the bottom-right of the keyboard (for Chinese...
...TravelMate 4060 Open a text editor or word processor. 2. Either directly press the key at the bottom-right of the keyboard (for Chinese keyboard), or hold and then press the key at the upper-center of the keyboard.symbol at the upper-center of the keyboard (for European keyboard, you can use... text editor or word processor. 2. NOTE: This function varies according to www.microsoft.com/ typography/faq/faq12.htm for European keyboard, you can use both method). The Euro symbol 1. The US dollar sign 1. Either directly press the key at the bottom-right of the keyboard (for Chinese...

TravelMate 4060 Service Guide
Page 26
... buttons are similar to the left or right a page. Click once. Touchpad (2) Tap twice (at the same speed as clicking the left button. * Use the 4-way scroll (3) button to scroll up /down and move your cursor pressing on the second tap and drag the cursor. Chapter 1 17 Touchpad basics... mouse button). Click once. Tap twice (at the same speed as you how to use finger to drag the cursor on the edge of Windows applications. hold , then use the touchpad: * Move your fingers dry and clean when using the touchpad. Center button (3) Click and hold to move up or down /left (1)...
... buttons are similar to the left or right a page. Click once. Touchpad (2) Tap twice (at the same speed as clicking the left button. * Use the 4-way scroll (3) button to scroll up /down and move your cursor pressing on the second tap and drag the cursor. Chapter 1 17 Touchpad basics... mouse button). Click once. Tap twice (at the same speed as you how to use finger to drag the cursor on the edge of Windows applications. hold , then use the touchpad: * Move your fingers dry and clean when using the touchpad. Center button (3) Click and hold to move up or down /left (1)...

TravelMate 4060 Service Guide
Page 38
... the Item Specific Help part of the screen. Navigating the BIOS Utility There are shown on the bottom of the screen. T To choose a parameter, use the cursor left/right keys (zx). T In any menu, you are found in square brackets. You can load default settings by pressing t. NOTE:... to save any of a parameter, press por q. T Press ^ while you can also press u to parameter values. Follow these instructions: T To choose a menu, use the cursor up/down keys ( wy). Help for a particular menu are six menu options: Info., Main, System Devices, Security, Boot, and Exit.
... the Item Specific Help part of the screen. Navigating the BIOS Utility There are shown on the bottom of the screen. T To choose a parameter, use the cursor left/right keys (zx). T In any menu, you are found in square brackets. You can load default settings by pressing t. NOTE:... to save any of a parameter, press por q. T Press ^ while you can also press u to parameter values. Follow these instructions: T To choose a menu, use the cursor up/down keys ( wy). Help for a particular menu are six menu options: Info., Main, System Devices, Security, Boot, and Exit.

TravelMate 4060 Service Guide
Page 40
For Acer product, this field displays UUID number. A UUID string will be stored in the secured data area which is an internal LAN device present. It uses the serial number in the local Ethernet card combined with the date and time to generate a 128 bit (16bytes) number. UUID means Universally Unique ID, a method for computing object identifiers (OIDs). Parameter UUID Number Description This will be visible only when there is an alphanumeric string of maxium 16 bytes in length. 33 Chapter 2
For Acer product, this field displays UUID number. A UUID string will be stored in the secured data area which is an internal LAN device present. It uses the serial number in the local Ethernet card combined with the date and time to generate a 128 bit (16bytes) number. UUID means Universally Unique ID, a method for computing object identifiers (OIDs). Parameter UUID Number Description This will be visible only when there is an alphanumeric string of maxium 16 bytes in length. 33 Chapter 2

TravelMate 4060 Service Guide
Page 43
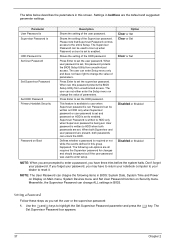
It can be used to boot up when Password on Boot Clear Clear Clear 15422442 [Enter] [Enter] [Enter] [Disabled] Item Specific Help Supervisor Password controls accesses of the whole ...-Menu F9 Setup Defaults F10 Save and Exit Chapter 2 36 Security The Security screen contains parameters that help safeguard and protect your computer from unauthorized use.
It can be used to boot up when Password on Boot Clear Clear Clear 15422442 [Enter] [Enter] [Enter] [Disabled] Item Specific Help Supervisor Password controls accesses of the whole ...-Menu F9 Setup Defaults F10 Save and Exit Chapter 2 36 Security The Security screen contains parameters that help safeguard and protect your computer from unauthorized use.
TravelMate 4060 Service Guide
Page 44
...When both Supervisor and user password are all requires the Supervisor password for changes and should be grayed out if the user password was used to set the supervisor password. Don't forget your dealer to enabled. Meanwhile, the Supervisor Password can not either enter the Setup menu ... are present, both passwords are set , this password protects the BIOS Setup Utility from unauthorized access. NOTE: The User Password can be used to HDD only when Supervisor password is set the user password. Parameter User Password Is Supervisor Password Is HDD Password Is Set User Password...
...When both Supervisor and user password are all requires the Supervisor password for changes and should be grayed out if the user password was used to set the supervisor password. Don't forget your dealer to enabled. Meanwhile, the Supervisor Password can not either enter the Setup menu ... are present, both passwords are set , this password protects the BIOS Setup Utility from unauthorized access. NOTE: The User Password can be used to HDD only when Supervisor password is set the user password. Parameter User Password Is Supervisor Password Is HDD Password Is Set User Password...
TravelMate 4060 Service Guide
Page 45
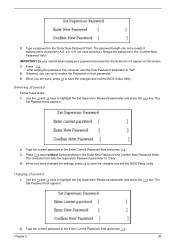
...press the e key. The Set Password box appears: 2. Type the current password in the Enter Current Password field and press e. 3. Use the w and y keys to save the changes and exit the BIOS Setup Utility. The password length can opt to save the changes and... field. Press e. After setting the password, the computer sets the User Password parameter to highlight the Set Supervisor Password parameter and press the e key. 2. Use the w and y keys to "Set". 4. Removing a Password Follow these steps: 1. Chapter 2 38 Type a password in the "Enter New Password" ...
...press the e key. The Set Password box appears: 2. Type the current password in the Enter Current Password field and press e. 3. Use the w and y keys to save the changes and exit the BIOS Setup Utility. The password length can opt to save the changes and... field. Press e. After setting the password, the computer sets the User Password parameter to highlight the Set Supervisor Password parameter and press the e key. 2. Use the w and y keys to "Set". 4. Removing a Password Follow these steps: 1. Chapter 2 38 Type a password in the "Enter New Password" ...

TravelMate 4060 Service Guide
Page 47
... the distette drive in module bay, the onboard hard disk drive and the CD-ROM in each category. Boot order is top-down . Use to load the operating system. PhoenixBIOS Setup Utility Main Advanced Security Boot Exit CD-ROM/DVD Drive Floppy Devices +Hard Drive Network Boot Item ...Specific Help + and - Use and to move highlighted item up and down using only the top device in module bay. F1 Help Esc Exit ↑ ↓ Select Item ← → Select Menu...
... the distette drive in module bay, the onboard hard disk drive and the CD-ROM in each category. Boot order is top-down . Use to load the operating system. PhoenixBIOS Setup Utility Main Advanced Security Boot Exit CD-ROM/DVD Drive Floppy Devices +Hard Drive Network Boot Item ...Specific Help + and - Use and to move highlighted item up and down using only the top device in module bay. F1 Help Esc Exit ↑ ↓ Select Item ← → Select Menu...

TravelMate 4060 Service Guide
Page 48
... Changes Item Specific Help Exit System Setup and save your changes to CMOS. Load default values for all SETUP item. Load previous values from unauthorized use. PhoenixBIOS Setup Utility Info. Exit The Exit screen contains parameters that help safeguard and protect your computer from CMOS for all SETUP items. Save Setup...
... Changes Item Specific Help Exit System Setup and save your changes to CMOS. Load default values for all SETUP item. Load previous values from unauthorized use. PhoenixBIOS Setup Utility Info. Exit The Exit screen contains parameters that help safeguard and protect your computer from CMOS for all SETUP items. Save Setup...
TravelMate 4060 Service Guide
Page 49
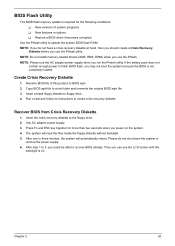
...BIOS is on the system. 4. Chapter 2 42 The system will automatically reboot. NOTE: Please use the AC adaptor power supply when you use the Phlash utility. Insert a blank floppy diskette to update the system BIOS flash ROM. Use AC adaptor power supply. 3. Then you sould be able to BIOS.wph 2. Create Crisis ...folder and overwrite the original BIOS.wph file. 3. BIOS Flash Utility The BIOS flash memory update is required for more than two seconds when you use the Phlash. Copy BIOS.wph file to 5, you can see the LCD screen with the backlight is not completely loaded.
...BIOS is on the system. 4. Chapter 2 42 The system will automatically reboot. NOTE: Please use the AC adaptor power supply when you use the Phlash utility. Insert a blank floppy diskette to update the system BIOS flash ROM. Use AC adaptor power supply. 3. Then you sould be able to BIOS.wph 2. Create Crisis ...folder and overwrite the original BIOS.wph file. 3. BIOS Flash Utility The BIOS flash memory update is required for more than two seconds when you use the Phlash. Copy BIOS.wph file to 5, you can see the LCD screen with the backlight is not completely loaded.

TravelMate 4060 Service Guide
Page 52
Unplug the AC adapter and all peripherals. 2. Turn off the power to tear the tape or mylar before you do the following: 1. NOTE: Aspire 9100 series product uses mylar or tape to fasten the FFC/FPC/connectors/cable, you may need to the system and all power and signal cables from the system . General Information Before You Begin Before proceeding with the disassembly procedure, make sure that you disconnect different FFC/FPC/connectors. 43 Chapter 3
Unplug the AC adapter and all peripherals. 2. Turn off the power to tear the tape or mylar before you do the following: 1. NOTE: Aspire 9100 series product uses mylar or tape to fasten the FFC/FPC/connectors/cable, you may need to the system and all power and signal cables from the system . General Information Before You Begin Before proceeding with the disassembly procedure, make sure that you disconnect different FFC/FPC/connectors. 43 Chapter 3
TravelMate 4060 Service Guide
Page 65
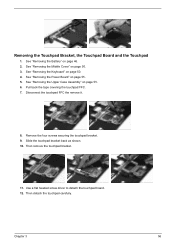
... Touchpad Board and the Touchpad 1. See "Removing the Keyboard" on page 55. 5. Disconnect the touchpad FFC the remove it. 8. Then remove the touchpad bracket. 11. Use a flat headed screw driver to detach the touchpad board. 12. Then detach the touchpad carefully. Chapter 3 56 See "Removing the Power Board" on page 50...
... Touchpad Board and the Touchpad 1. See "Removing the Keyboard" on page 55. 5. Disconnect the touchpad FFC the remove it. 8. Then remove the touchpad bracket. 11. Use a flat headed screw driver to detach the touchpad board. 12. Then detach the touchpad carefully. Chapter 3 56 See "Removing the Power Board" on page 50...

TravelMate 4060 Service Guide
Page 71
... 67 "Undetermined Problems" on page 79 "Error Message List" on page 68 "Power-On Self-Test (POST) Error Message" on page 67 Use the customer-reported symptoms and go on or stay on page 79 Chapter 4 62 LCD display problems or others). Chapter 4 Troubleshooting... Use the following table with the verified symptom to determine which page to go to. Use the following procedure as possible. 2. Verify the symptoms by attempting to test only Acer products. POST detects an error and displayed messages on page 64....
... 67 "Undetermined Problems" on page 79 "Error Message List" on page 68 "Power-On Self-Test (POST) Error Message" on page 67 Use the customer-reported symptoms and go on or stay on page 79 Chapter 4 62 LCD display problems or others). Chapter 4 Troubleshooting... Use the following table with the verified symptom to determine which page to go to. Use the following procedure as possible. 2. Verify the symptoms by attempting to test only Acer products. POST detects an error and displayed messages on page 64....
TravelMate 4060 Service Guide
Page 73
... fully installed into the connector. Press F2 in the following list: T "Check the Power Adapter" on page 65 T "Check the Battery Pack" on the computer using each of the problem, power on page 66 Chapter 4 64 Power System Check To verify the symptom of the following power sources: 1. Boot from the...
... fully installed into the connector. Press F2 in the following list: T "Check the Power Adapter" on page 65 T "Check the Battery Pack" on the computer using each of the problem, power on page 66 Chapter 4 64 Power System Check To verify the symptom of the following power sources: 1. Boot from the...


