
User Manual
Page 5
... route the power cord and any cables away from foot traffic. • When unplugging the power cord, do any of the following: • Use the Windows shutdown command Click on Start, Turn Off Computer, then click on top of the equipment plugged in should not exceed the fuse rating. Note: If...
... route the power cord and any cables away from foot traffic. • When unplugging the power cord, do any of the following: • Use the Windows shutdown command Click on Start, Turn Off Computer, then click on top of the equipment plugged in should not exceed the fuse rating. Note: If...
User Manual
Page 7
... 5 Acer eSettings Management 6 Acer ePower Management 6 Acer ePresentation Management 8 A TravelMate tour 9 Front view 9 Closed front view 10 Left view 11 Right view 12 Rear view 12 Base view 13 Specifications 14 Indicators 17 Easy-launch buttons 18 Touchpad 19 Touchpad basics 19 Using the keyboard 21 Lock keys and embedded numeric keypad 21 Windows keys...
... 5 Acer eSettings Management 6 Acer ePower Management 6 Acer ePresentation Management 8 A TravelMate tour 9 Front view 9 Closed front view 10 Left view 11 Right view 12 Rear view 12 Base view 13 Specifications 14 Indicators 17 Easy-launch buttons 18 Touchpad 19 Touchpad basics 19 Using the keyboard 21 Lock keys and embedded numeric keypad 21 Windows keys...
User Manual
Page 12
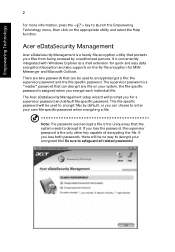
...the file-specific password. Empowering Technology 2 For more information, press the < > key to safeguard all related passwords! Acer eDataSecurity Management Acer eDataSecurity Management is a "master" password that protects your system; The supervisor password is a handy file encryption utility that... can be used encrypt a file is conveniently integrated with Windows Explorer as a shell extension for MSN Messenger...
...the file-specific password. Empowering Technology 2 For more information, press the < > key to safeguard all related passwords! Acer eDataSecurity Management Acer eDataSecurity Management is a "master" password that protects your system; The supervisor password is a handy file encryption utility that... can be used encrypt a file is conveniently integrated with Windows Explorer as a shell extension for MSN Messenger...

User Manual
Page 14
It provides you with the following options to enhance overall system performance: • Memory optimization - remove unneeded items and files. • Speed optimization - release unused memory and check usage. • Disk optimization - improve the usability and performance of your Windows XP system. Empowering Technology 4 Acer ePerformance Management Acer ePerformance Management is a system optimization tool that boosts the performance of your Acer notebook.
It provides you with the following options to enhance overall system performance: • Memory optimization - remove unneeded items and files. • Speed optimization - release unused memory and check usage. • Disk optimization - improve the usability and performance of your Windows XP system. Empowering Technology 4 Acer ePerformance Management Acer ePerformance Management is a system optimization tool that boosts the performance of your Acer notebook.
User Manual
Page 16
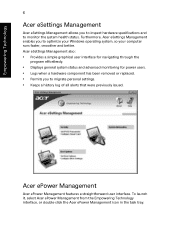
... from the Empowering Technology interface, or double-click the Acer ePower Management icon in the task tray. Empowering Technology 6 Acer eSettings Management Acer eSettings Management allows you to inspect hardware specifications and to optimize your Windows operating system, so your computer runs faster, smoother and better. Acer ePower Management Acer ePower Management features a straightforward user interface.
... from the Empowering Technology interface, or double-click the Acer ePower Management icon in the task tray. Empowering Technology 6 Acer eSettings Management Acer eSettings Management allows you to inspect hardware specifications and to optimize your Windows operating system, so your computer runs faster, smoother and better. Acer ePower Management Acer ePower Management features a straightforward user interface.

User Manual
Page 17
... on the lower left-hand side of your usage, there are four pre-defined profiles - You can also click "Advanced Settings" to three of the window. DC mode To suit your own profiles.
... on the lower left-hand side of your usage, there are four pre-defined profiles - You can also click "Advanced Settings" to three of the window. DC mode To suit your own profiles.
User Manual
Page 24
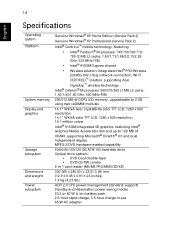
14 English Specifications Operating system Platform System memory Display and graphics Storage subsystem Dimensions and weight Power subsystem Genuine Windows® XP Home Edition (Service Pack 2) Genuine Windows® XP Professional (Service Pack 2) Intel® Centrino™ mobile technology, featuring: • ...chipset • Wireless solution: integrated Intel® PRO/Wireless 2200BG 802.11b/g network connection, Wi-Fi CERTIFIED™ solution, supporting Acer SignalUp™ wireless technology Intel® Celeron® M processor 360/370/380 (1 MB L2 cache, 1.40/1.50/1.60 GHz...
14 English Specifications Operating system Platform System memory Display and graphics Storage subsystem Dimensions and weight Power subsystem Genuine Windows® XP Home Edition (Service Pack 2) Genuine Windows® XP Professional (Service Pack 2) Intel® Centrino™ mobile technology, featuring: • ...chipset • Wireless solution: integrated Intel® PRO/Wireless 2200BG 802.11b/g network connection, Wi-Fi CERTIFIED™ solution, supporting Acer SignalUp™ wireless technology Intel® Celeron® M processor 360/370/380 (1 MB L2 cache, 1.40/1.50/1.60 GHz...
User Manual
Page 29
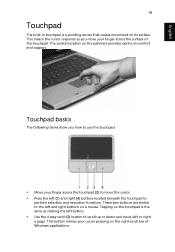
... are similar to the left and right buttons on the palmrest provides optimum comfort and support. This button mimics your finger across the surface of Windows applications. Touchpad basics The following items show you move your finger across the touchpad (2) to move left or right a page. This means the cursor responds...
... are similar to the left and right buttons on the palmrest provides optimum comfort and support. This button mimics your finger across the surface of Windows applications. Touchpad basics The following items show you move your finger across the touchpad (2) to move left or right a page. This means the cursor responds...
User Manual
Page 31
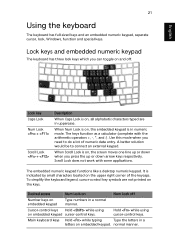
... Hold while using cursor-control keys. English 21 Using the keyboard The keyboard has full-sized keys and an embedded numeric keypad, separate cursor, lock, Windows, function and special keys. A better solution would be to do a lot of the keycaps. Lock keys and embedded numeric keypad The keyboard has three lock...
... Hold while using cursor-control keys. English 21 Using the keyboard The keyboard has full-sized keys and an embedded numeric keypad, separate cursor, lock, Windows, function and special keys. A better solution would be to do a lot of the keycaps. Lock keys and embedded numeric keypad The keyboard has three lock...
User Manual
Page 32
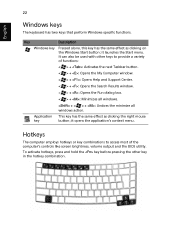
... Taskbar button. < > + : Opens the My Computer window. < > + : Opens Help and Support Center. < > + : Opens the Search Results window. < > + : Opens the Run dialog box. < > + : Minimizes all windows. + < > + : Undoes the minimize all windows action. Key Description Windows key Pressed alone, this key has the same effect as ...key button; Application This key has the same effect as clicking on the Windows Start button; English 22 Windows keys The keyboard has two keys that perform Windows-specific functions. it opens the application's context menu. it launches the Start...
... Taskbar button. < > + : Opens the My Computer window. < > + : Opens Help and Support Center. < > + : Opens the Search Results window. < > + : Opens the Run dialog box. < > + : Minimizes all windows. + < > + : Undoes the minimize all windows action. Key Description Windows key Pressed alone, this key has the same effect as ...key button; Application This key has the same effect as clicking on the Windows Start button; English 22 Windows keys The keyboard has two keys that perform Windows-specific functions. it opens the application's context menu. it launches the Start...
User Manual
Page 37
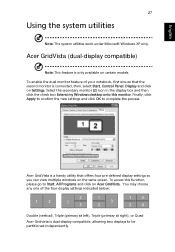
... monitor (2) icon in the display box and then click the check box Extend my Windows desktop onto this function, please go to Start, All Programs and click on the same screen. Acer GridVista (dual-display compatible) Note: This feature is dual-display compatible, allowing two ...displays to complete the process. English 27 Using the system utilities Note: The system utilities work under Microsoft Windows XP only. Finally, click Apply to...
... monitor (2) icon in the display box and then click the check box Extend my Windows desktop onto this function, please go to Start, All Programs and click on the same screen. Acer GridVista (dual-display compatible) Note: This feature is dual-display compatible, allowing two ...displays to complete the process. English 27 Using the system utilities Note: The system utilities work under Microsoft Windows XP only. Finally, click Apply to...

User Manual
Page 38
Note: Please ensure that the resolution setting of your preferred screen configuration for the location of a well-organized desktop. Launch Manager Launch Manager allows you to the manufacturer's recommended value. "Easy-launch buttons" on page 18 for each display from the taskbar. 2 Drag and drop each window into the appropriate grid. 3 Enjoy the convenience of the easylaunch buttons. English 28 Acer GridVista is set to set up: 1 Run Acer GridVista and select your second monitor is simple to set the four easy-launch buttons located above the keyboard.
Note: Please ensure that the resolution setting of your preferred screen configuration for the location of a well-organized desktop. Launch Manager Launch Manager allows you to the manufacturer's recommended value. "Easy-launch buttons" on page 18 for each display from the taskbar. 2 Drag and drop each window into the appropriate grid. 3 Enjoy the convenience of the easylaunch buttons. English 28 Acer GridVista is set to set up: 1 Run Acer GridVista and select your second monitor is simple to set the four easy-launch buttons located above the keyboard.
User Manual
Page 39
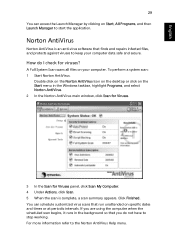
..., All Programs, and then Launch Manager to start the application. If you are using the computer when the scheduled scan begins, it runs in the Windows taskbar, highlight Programs, and select Norton AntiVirus. 2 In the Norton AntiVirus main...
..., All Programs, and then Launch Manager to start the application. If you are using the computer when the scheduled scan begins, it runs in the Windows taskbar, highlight Programs, and select Norton AntiVirus. 2 In the Norton AntiVirus main...

User Manual
Page 40
.... • Make sure that the AC adapter is properly plugged into the computer and to the power outlet. • If it is a list of your Windows desktop and select Properties to bring up . Press + (increase) to adjust the brightness level. • The display device might be low and unable to power...
.... • Make sure that the AC adapter is properly plugged into the computer and to the power outlet. • If it is a list of your Windows desktop and select Properties to bring up . Press + (increase) to adjust the brightness level. • The display device might be low and unable to power...
User Manual
Page 41
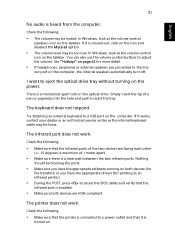
...; If headphones, earphones or external speakers are facing each other (+/- 15 degrees) a maximum of the two devices are connected to eject the tray. In Windows, look at the volume control (speaker) icon on the taskbar. You can also use the volume control buttons to a power outlet and that the printer... speakers automatically turn off. The keyboard does not respond. Check the following : • Make sure that the infrared port is turned on. In Windows, look at the volume control icon on the taskbar. Simply insert the tip of a pen or paperclip into the hole and push to the line...
...; If headphones, earphones or external speakers are facing each other (+/- 15 degrees) a maximum of the two devices are connected to eject the tray. In Windows, look at the volume control (speaker) icon on the taskbar. You can also use the volume control buttons to a power outlet and that the printer... speakers automatically turn off. The keyboard does not respond. Check the following : • Make sure that the infrared port is turned on. In Windows, look at the volume control icon on the taskbar. Simply insert the tip of a pen or paperclip into the hole and push to the line...
User Manual
Page 42
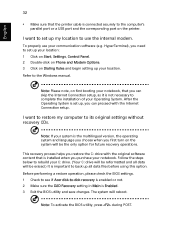
... Rules and begin setting up all data files before using this option. Before performing a restore operation, please check the BIOS settings. 1 Check to see if Acer disk-to-disk recovery is enabled or not. 2 Make sure the D2D Recovery setting in Main is not necessary to set up your location: 1 Click... installed when you purchase your location. This recovery process helps you restore the C: drive with the Internet Connection setup. Follow the steps below to the Windows manual.
... Rules and begin setting up all data files before using this option. Before performing a restore operation, please check the BIOS settings. 1 Check to see if Acer disk-to-disk recovery is enabled or not. 2 Make sure the D2D Recovery setting in Main is not necessary to set up your location: 1 Click... installed when you purchase your location. This recovery process helps you restore the C: drive with the Internet Connection setup. Follow the steps below to the Windows manual.

User Manual
Page 44
... any media, floppy disks or compact disks from the drive(s). 3 Shut down the computer: Click on Start, Turn Off Computer, then click on Turn Off (Windows XP). Or: You can now safely take the computer anywhere you are ready to a meeting room. Then close and latch the display cover to shut...
... any media, floppy disks or compact disks from the drive(s). 3 Shut down the computer: Click on Start, Turn Off Computer, then click on Turn Off (Windows XP). Or: You can now safely take the computer anywhere you are ready to a meeting room. Then close and latch the display cover to shut...

User Manual
Page 56
Windows handles all of the following devices: keyboard, mouse, hard disk, peripherals connected to conserve energy. System activity refers to any activity involving one or more ...
Windows handles all of the following devices: keyboard, mouse, hard disk, peripherals connected to conserve energy. System activity refers to any activity involving one or more ...

User Manual
Page 57
... to optical device to quickly backup and restore the system. Note: This feature is six zeros. 4 In the Acer eRecovery Management window, select Recovery settings and click Next. 5 In the Recovery settings window, select Backup snapshot image and click Next. 6 Select the backup method. The default password is only available on certain... After choosing the backup method, click Next. Create backup You can create and save backup images to hard disk, CD or DVD. 1 Boot to Windows XP 2 Press + to open the Acer eRecovery Management utility. 3 Enter the password to hard disk, CD or DVD.
... to optical device to quickly backup and restore the system. Note: This feature is six zeros. 4 In the Acer eRecovery Management window, select Recovery settings and click Next. 5 In the Recovery settings window, select Backup snapshot image and click Next. 6 Select the backup method. The default password is only available on certain... After choosing the backup method, click Next. Create backup You can create and save backup images to hard disk, CD or DVD. 1 Boot to Windows XP 2 Press + to open the Acer eRecovery Management utility. 3 Enter the password to hard disk, CD or DVD.

User Manual
Page 58
...to disk and click Next. 6 In the Burn image to complete the process. The default password is six zeros. 4 In the Acer eRecovery Management window, select Recovery actions and click Next. Please refer to complete the restore process. Factory default image and click Next. 7 Follow the ...hard disk (D:\). The default password is a user backup stored on screen to disk window, select 01. Note: The "Restore C:" item is enabled only if there is six zeros. 4 In the Acer eRecovery Management window, select Recovery actions and click Next. 5 Select the desired restore action and follow...
...to disk and click Next. 6 In the Burn image to complete the process. The default password is six zeros. 4 In the Acer eRecovery Management window, select Recovery actions and click Next. Please refer to complete the restore process. Factory default image and click Next. 7 Follow the ...hard disk (D:\). The default password is a user backup stored on screen to disk window, select 01. Note: The "Restore C:" item is enabled only if there is six zeros. 4 In the Acer eRecovery Management window, select Recovery actions and click Next. 5 Select the desired restore action and follow...


