User Manual
Page 4
...will run the Adobe Reader setup program first. iv First things first We would like to thank you for making the TravelMate series of notebook PC your choice for meeting your TravelMate, we have designed a set of guides: First off To turn on the computer, simply press and release the power... button below the LCD screen beside the easy-launch buttons. In addition it : 1 Click on Start, All Programs, AcerSystem. 2 Click on AcerSystem User...
...will run the Adobe Reader setup program first. iv First things first We would like to thank you for making the TravelMate series of notebook PC your choice for meeting your TravelMate, we have designed a set of guides: First off To turn on the computer, simply press and release the power... button below the LCD screen beside the easy-launch buttons. In addition it : 1 Click on Start, All Programs, AcerSystem. 2 Click on AcerSystem User...

User Manual
Page 17
... for the new scheme. 2 Choose existing scheme to : • Set alarms. • Re-load factory defaults. • Select what actions will appear on the main screen. You can also click "Advanced Settings" to use as a template. 3 Select whether used for accessing the system after Hibernation or Standby. You can adjust CPU...
... for the new scheme. 2 Choose existing scheme to : • Set alarms. • Re-load factory defaults. • Select what actions will appear on the main screen. You can also click "Advanced Settings" to use as a template. 3 Select whether used for accessing the system after Hibernation or Standby. You can adjust CPU...
User Manual
Page 19
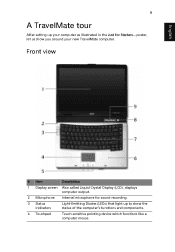
Front view # Item Description 1 Display screen Also called Liquid-Crystal Display (LCD), displays computer output. 2 Microphone Internal microphone for Starters... English 9 A TravelMate tour After setting up your computer as illustrated in the Just for sound recording. 3 Status indicators Light-Emitting Diodes (LEDs) that light up to show you around your new TravelMate computer. poster, let us show the status of the computer's functions and components. 4 Touchpad Touch-sensitive pointing device which functions like a computer mouse.
Front view # Item Description 1 Display screen Also called Liquid-Crystal Display (LCD), displays computer output. 2 Microphone Internal microphone for Starters... English 9 A TravelMate tour After setting up your computer as illustrated in the Just for sound recording. 3 Status indicators Light-Emitting Diodes (LEDs) that light up to show you around your new TravelMate computer. poster, let us show the status of the computer's functions and components. 4 Touchpad Touch-sensitive pointing device which functions like a computer mouse.
User Manual
Page 31
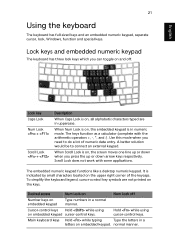
When Num Lock is on, the embedded keypad is on, the screen moves one line up or down when you press the up or down arrow keys respectively. The keys function as a calculator (complete with some applications. ...
When Num Lock is on, the embedded keypad is on, the screen moves one line up or down when you press the up or down arrow keys respectively. The keys function as a calculator (complete with some applications. ...
User Manual
Page 32
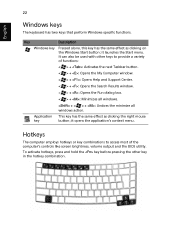
... same effect as clicking the right mouse key button; Hotkeys The computer employs hotkeys or key combinations to provide a variety of the computer's controls like screen brightness, volume output and the BIOS utility. English 22 Windows keys The keyboard has two keys that perform Windows-specific functions. it opens the application...
... same effect as clicking the right mouse key button; Hotkeys The computer employs hotkeys or key combinations to provide a variety of the computer's controls like screen brightness, volume output and the BIOS utility. English 22 Windows keys The keyboard has two keys that perform Windows-specific functions. it opens the application...

User Manual
Page 33
23 English Hotkey Icon Function + Hotkey help Description Displays help on hotkeys. + + + + + + + + Acer eSettings Acer ePower Management Sleep Display toggle Screen blank Touchpad toggle Speaker toggle Volume up Brightness down Increases the screen brightness. Switches display output between the display screen, external monitor (if connected) and both. Turns the internal touchpad on page 1. Turns the display...
23 English Hotkey Icon Function + Hotkey help Description Displays help on hotkeys. + + + + + + + + Acer eSettings Acer ePower Management Sleep Display toggle Screen blank Touchpad toggle Speaker toggle Volume up Brightness down Increases the screen brightness. Switches display output between the display screen, external monitor (if connected) and both. Turns the internal touchpad on page 1. Turns the display...
User Manual
Page 37
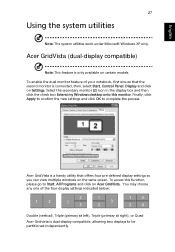
...that the second monitor is dual-display compatible, allowing two displays to Start, All Programs and click on Settings. Acer GridVista is only available on the same screen. Select the secondary monitor (2) icon in the display box and then click the check box Extend my Windows ...13 1 3 2 13 2 4 Double (vertical), Triple (primary at left), Triple (primary at right), or Quad Acer Gridvista is connected, then, select Start, Control Panel, Display and click on Acer GridVista. You may choose any one of your notebook, first ensure that offers four pre-defined display settings so...
...that the second monitor is dual-display compatible, allowing two displays to Start, All Programs and click on Settings. Acer GridVista is only available on the same screen. Select the secondary monitor (2) icon in the display box and then click the check box Extend my Windows ...13 1 3 2 13 2 4 Double (vertical), Triple (primary at left), Triple (primary at right), or Quad Acer Gridvista is connected, then, select Start, Control Panel, Display and click on Acer GridVista. You may choose any one of your notebook, first ensure that offers four pre-defined display settings so...

User Manual
Page 38
"Easy-launch buttons" on page 18 for each display from the taskbar. 2 Drag and drop each window into the appropriate grid. 3 Enjoy the convenience of the easylaunch buttons. Note: Please ensure that the resolution setting of your preferred screen configuration for the location of a well-organized desktop. Launch Manager Launch Manager allows you to set to set up: 1 Run Acer GridVista and select your second monitor is set the four easy-launch buttons located above the keyboard. English 28 Acer GridVista is simple to the manufacturer's recommended value.
"Easy-launch buttons" on page 18 for each display from the taskbar. 2 Drag and drop each window into the appropriate grid. 3 Enjoy the convenience of the easylaunch buttons. Note: Please ensure that the resolution setting of your preferred screen configuration for the location of a well-organized desktop. Launch Manager Launch Manager allows you to set to set up: 1 Run Acer GridVista and select your second monitor is set the four easy-launch buttons located above the keyboard. English 28 Acer GridVista is simple to the manufacturer's recommended value.

User Manual
Page 40
...box. Press the display toggle hotkey + to toggle the display back to recharge the battery pack. • Make sure that the resolution is not full-screen. Connect the AC adapter to the computer. • If the Sleep indicator is lit, the computer is lit, check the following: • Is...in Sleep mode. Press any key to restart the system. Easy solutions are provided for each one. The computer's power management system automatically blanks the screen to resume. Right-click on , three things might be the cause: • The brightness level might be too low. Look at the power ...
...box. Press the display toggle hotkey + to toggle the display back to recharge the battery pack. • Make sure that the resolution is not full-screen. Connect the AC adapter to the computer. • If the Sleep indicator is lit, the computer is lit, check the following: • Is...in Sleep mode. Press any key to restart the system. Easy solutions are provided for each one. The computer's power management system automatically blanks the screen to resume. Right-click on , three things might be the cause: • The brightness level might be too low. Look at the power ...

User Manual
Page 43
This feature occupies 2 to 3 GB in a hidden partition on the screen (or the number and sequence in the case of the ITW passport. ... the amount of mind when traveling. If there are required to provide the following information available when you call Acer for online service, and please be at the same time to enter the recovery process. 3 Refer to the... instructions to give you a helping hand. English 33 To start the recovery process: 1 Restart the system. 2 While the Acer logo is showing, press + at your computer when you call. This passport contains all you security and peace of time ...
This feature occupies 2 to 3 GB in a hidden partition on the screen (or the number and sequence in the case of the ITW passport. ... the amount of mind when traveling. If there are required to provide the following information available when you call Acer for online service, and please be at the same time to enter the recovery process. 3 Refer to the... instructions to give you a helping hand. English 33 To start the recovery process: 1 Restart the system. 2 While the Acer logo is showing, press + at your computer when you call. This passport contains all you security and peace of time ...
User Manual
Page 45
... disks from your office to plug in your computer. In both cases, press and release the power button to remove the media can damage the screen. Press + or close the display cover whenever you have an electrical outlet, reduce the drain on . To resume, open the display (if closed), then press...
... disks from your office to plug in your computer. In both cases, press and release the power button to remove the media can damage the screen. Press + or close the display cover whenever you have an electrical outlet, reduce the drain on . To resume, open the display (if closed), then press...
User Manual
Page 46
... as if you were taking it into the gate area. If the temperature change is charged. If you plan to room temperature, and inspect the screen for significant periods of the car to avoid exposing the computer to excessive heat. • Changes in temperature and humidity can avoid carrying the extra...
... as if you were taking it into the gate area. If the temperature change is charged. If you plan to room temperature, and inspect the screen for significant periods of the car to avoid exposing the computer to excessive heat. • Changes in temperature and humidity can avoid carrying the extra...
User Manual
Page 49
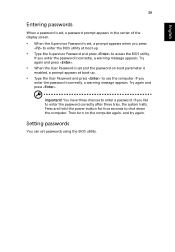
... incorrectly, a warning message appears. Try again and press . English 39 Entering passwords When a password is set, a password prompt appears in the center of the display screen. • When the Supervisor Password is set, a prompt appears when you press to enter the BIOS utility at boot-up . • Type the Supervisor Password...
... incorrectly, a warning message appears. Try again and press . English 39 Entering passwords When a password is set, a password prompt appears in the center of the display screen. • When the Supervisor Password is set, a prompt appears when you press to enter the BIOS utility at boot-up . • Type the Supervisor Password...
User Manual
Page 54
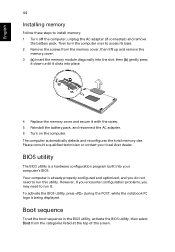
... up and remove the memory cover. 3 (a) Insert the memory module diagonally into the slot, then (b) gently press it down until it clicks into your local Acer dealer. Your computer is already properly configured and optimized, and you may need to run this utility. Please consult a qualified technician or contact your computer... memory cover; English 44 Installing memory Follow these steps to access its base. 2 Remove the screws from the categories listed at the top of the screen.
... up and remove the memory cover. 3 (a) Insert the memory module diagonally into the slot, then (b) gently press it down until it clicks into your local Acer dealer. Your computer is already properly configured and optimized, and you may need to run this utility. Please consult a qualified technician or contact your computer... memory cover; English 44 Installing memory Follow these steps to access its base. 2 Remove the screws from the categories listed at the top of the screen.

User Manual
Page 55
...the optical drive bay, you to Enabled. DVD disks are divided into 6 regions. Refer to a region code, it will play DVD disks of the screen. Password To set a password on boot, activate the BIOS utility, then select Security from the categories listed at the top of that region only. ..., South Korea Latin America, Australia, New Zealand Former USSR, parts of Africa, India People's Republic of the screen. then close the DVD tray. Find D2D Recovery at the bottom of the screen and use the and keys to -disk recovery (hard disk recovery), activate the BIOS utility, then select Main ...
...the optical drive bay, you to Enabled. DVD disks are divided into 6 regions. Refer to a region code, it will play DVD disks of the screen. Password To set a password on boot, activate the BIOS utility, then select Security from the categories listed at the top of that region only. ..., South Korea Latin America, Australia, New Zealand Former USSR, parts of Africa, India People's Republic of the screen. then close the DVD tray. Find D2D Recovery at the bottom of the screen and use the and keys to -disk recovery (hard disk recovery), activate the BIOS utility, then select Main ...

User Manual
Page 57
...of the following functions: 1 Create backup 2 Restore from backup 3 Create factory default image CD 4 Re-install bundled software without CD 5 Change Acer eRecovery Management password This chapter will guide you through each process. b Backup to optical device to hard disk, CD or DVD. For systems ...Acer eRecovery Management consists of the current system configuration to store the backup image on CD or DVD. 7 After choosing the backup method, click Next. The default password is only available on drive D:. a Use Backup to HDD to complete the process. Follow the instructions on screen ...
...of the following functions: 1 Create backup 2 Restore from backup 3 Create factory default image CD 4 Re-install bundled software without CD 5 Change Acer eRecovery Management password This chapter will guide you through each process. b Backup to optical device to hard disk, CD or DVD. For systems ...Acer eRecovery Management consists of the current system configuration to store the backup image on CD or DVD. 7 After choosing the backup method, click Next. The default password is only available on drive D:. a Use Backup to HDD to complete the process. Follow the instructions on screen ...

User Manual
Page 58
...6 In the Burn image to proceed. The default password is six zeros. 4 In the Acer eRecovery Management window, select Recovery actions and click Next. The default password is a user backup stored on screen to complete the restore process. Note: The "Restore C:" item is enabled only if there... is six zeros. 4 In the Acer eRecovery Management window, select Recovery actions and click Next. 5 Select the desired ...
...6 In the Burn image to proceed. The default password is six zeros. 4 In the Acer eRecovery Management window, select Recovery actions and click Next. The default password is a user backup stored on screen to complete the restore process. Note: The "Restore C:" item is enabled only if there... is six zeros. 4 In the Acer eRecovery Management window, select Recovery actions and click Next. 5 Select the desired ...

User Manual
Page 59
.... 5 In the Recovery settings window, select Password: Change Acer eRecovery Management password and click Next. 6 Follow the instructions on screen to bring up the software content window. Change password Acer eRecovery Management and Acer disk-to complete the process. Follow the steps below to change... Reinstall applications/drivers and click Next. 6 Select the desired driver/application and follow the instructions on screen to -disk recovery are protected by the user. At first launch, Acer eRecovery Management prepares all the needed software and may take few seconds to re-install.
.... 5 In the Recovery settings window, select Password: Change Acer eRecovery Management password and click Next. 6 Follow the instructions on screen to bring up the software content window. Change password Acer eRecovery Management and Acer disk-to complete the process. Follow the steps below to change... Reinstall applications/drivers and click Next. 6 Select the desired driver/application and follow the instructions on screen to -disk recovery are protected by the user. At first launch, Acer eRecovery Management prepares all the needed software and may take few seconds to re-install.

User Manual
Page 70
...radiocommunication. The FCC RF safety requirement The radiated output power of European Union, as well as Norway, Switzerland, Iceland and Liechtenstein. Note: The Acer wireless Mini PCI adapter implements a transmission diversity function. Usage allowed in the countries of the wireless LAN Mini PCI Card and Bluetooth card is ...PC series shall be maintained between the antenna for human contact during normal operation is selected automatically or manually (by users) to the screen section and all persons. The function does not emit radio frequencies simultaneously from both antennas.
...radiocommunication. The FCC RF safety requirement The radiated output power of European Union, as well as Norway, Switzerland, Iceland and Liechtenstein. Note: The Acer wireless Mini PCI adapter implements a transmission diversity function. Usage allowed in the countries of the wireless LAN Mini PCI Card and Bluetooth card is ...PC series shall be maintained between the antenna for human contact during normal operation is selected automatically or manually (by users) to the screen section and all persons. The function does not emit radio frequencies simultaneously from both antennas.

Service Guide
Page 4
Gives precautionary measures to avoid possible hardware or software problems. Reminds you to the current topic. NOTE WARNING CAUTION IMPORTANT Gives bits and pieces of procedures. Alerts you to do specific actions relevant to the accomplishment of additional information related to any damage that appear on screen. IV Conventions The following conventions are used in this manual: SCREEN MESSAGES Denotes actual messages that might result from doing or not doing specific actions.
Gives precautionary measures to avoid possible hardware or software problems. Reminds you to the current topic. NOTE WARNING CAUTION IMPORTANT Gives bits and pieces of procedures. Alerts you to do specific actions relevant to the accomplishment of additional information related to any damage that appear on screen. IV Conventions The following conventions are used in this manual: SCREEN MESSAGES Denotes actual messages that might result from doing or not doing specific actions.

