
TravelMate 3000 Service Guide
Page 6
... Block Diagram 3 Board Layout 4 Outlook View 6 Using the Keyboard 15 Hardware Specifications and Configurations 23 Chapter 2 System Utilities 32 BIOS Setup Utility 32 BIOS Flash Utility 44 Chapter 3 Machine Disassembly and Replacement 45 General Information 46 Disassembly Procedure Flowchart 47 Removing the Battery Pack 49 Removing the miniPCI/Memory/HDD Module/Keyboard . . . 50 Seperate the LCD module and main unit 52 Disassemble the main unit 53 LCD module disassembly 56 HDD Disassembly and Reassembly 58 Chapter 4 Troubleshooting 59 System Check Procedures 60 Power-On...
... Block Diagram 3 Board Layout 4 Outlook View 6 Using the Keyboard 15 Hardware Specifications and Configurations 23 Chapter 2 System Utilities 32 BIOS Setup Utility 32 BIOS Flash Utility 44 Chapter 3 Machine Disassembly and Replacement 45 General Information 46 Disassembly Procedure Flowchart 47 Removing the Battery Pack 49 Removing the miniPCI/Memory/HDD Module/Keyboard . . . 50 Seperate the LCD module and main unit 52 Disassemble the main unit 53 LCD module disassembly 56 HDD Disassembly and Reassembly 58 Chapter 4 Troubleshooting 59 System Check Procedures 60 Power-On...
TravelMate 3000 Service Guide
Page 20
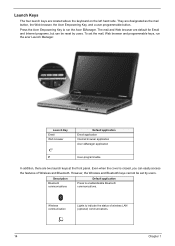
... a user programmable button. However, the Wireless and Bluetooth keys cannot be reset by users. Wireless communication Lights to indicate the status of Wireless and Bluetooth. Press the Acer Empowering Key to enable/disable Bluetooth communications. Launch Keys The four launch keys are located above the keyboard on page 26 LaunLcahuknecyh Key Email Web browser Default appDliecafatuioltnapplication Email application Internet browser application Acer eManager application PP User-programmable In addition, there are two launch keys at the front panel.
... a user programmable button. However, the Wireless and Bluetooth keys cannot be reset by users. Wireless communication Lights to indicate the status of Wireless and Bluetooth. Press the Acer Empowering Key to enable/disable Bluetooth communications. Launch Keys The four launch keys are located above the keyboard on page 26 LaunLcahuknecyh Key Email Web browser Default appDliecafatuioltnapplication Email application Internet browser application Acer eManager application PP User-programmable In addition, there are two launch keys at the front panel.
TravelMate 3000 Service Guide
Page 29
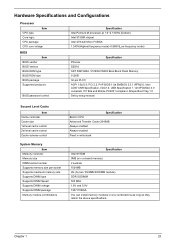
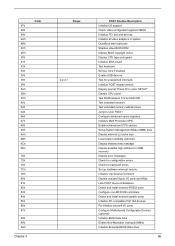
... CPU package CPU core voltage BIOS Item BIOS vendor BIOS Version BIOS ROM type BIOS ROM size BIOS package Supported protocols BIOS password control Specification Intel Pentium M processor at 1.6~2.13GHz (Dothan) Intel 915GM chipset Intel 478-ball Micro FCBGA 1.340V(Highest frequency mode)~0.988V(Low frequency mode) Specification Phneoix S2G16 SST 39SF040A, 512KX8 CMOS Boot Block Flash Memory 512KB 32-pin PLCC ACPI 1.0b/2.0, PCI 2.2, PnP BIOS 1.0a SMBIOS 2.3.1 WFM2.0, Intel AC97 CNR Specification, IrDA1.0, USB Specification...
... CPU package CPU core voltage BIOS Item BIOS vendor BIOS Version BIOS ROM type BIOS ROM size BIOS package Supported protocols BIOS password control Specification Intel Pentium M processor at 1.6~2.13GHz (Dothan) Intel 915GM chipset Intel 478-ball Micro FCBGA 1.340V(Highest frequency mode)~0.988V(Low frequency mode) Specification Phneoix S2G16 SST 39SF040A, 512KX8 CMOS Boot Block Flash Memory 512KB 32-pin PLCC ACPI 1.0b/2.0, PCI 2.2, PnP BIOS 1.0a SMBIOS 2.3.1 WFM2.0, Intel AC97 CNR Specification, IrDA1.0, USB Specification...

TravelMate 3000 Service Guide
Page 32
Hard Disk Drive Interface Item DC Power Requirements Voltage tolerance 5V +/- 5% 5V +/- 5% 5V +/- 5% 5V +/- 5% 8X DVD Dual Interface Item Specification Vendor & model name Lite-On SOSW-852S PANASONIC UJ-840BQ Performance Specification Transfer rate (KB/sec) (1) Read DVD-ROM DVD+R DVD-R CD-RW CD-ROM (2) Write CD-R CD-RW High Speed CD-RW Ultra Speed CD-RW DVD+R DVD+R DL DVD+RW DVD-R DVD-RW (3) ATAPI Interface PIO mode DMA...
Hard Disk Drive Interface Item DC Power Requirements Voltage tolerance 5V +/- 5% 5V +/- 5% 5V +/- 5% 5V +/- 5% 8X DVD Dual Interface Item Specification Vendor & model name Lite-On SOSW-852S PANASONIC UJ-840BQ Performance Specification Transfer rate (KB/sec) (1) Read DVD-ROM DVD+R DVD-R CD-RW CD-ROM (2) Write CD-R CD-RW High Speed CD-RW Ultra Speed CD-RW DVD+R DVD+R DL DVD+RW DVD-R DVD-RW (3) ATAPI Interface PIO mode DMA...
TravelMate 3000 Service Guide
Page 42
...LCD screen and the system's external video port (for an external CRT or projector). The function allows the user to factory defaults. Enables, disables D2D Recovery function. Parameter Quiet Boot Power on display Network Boot F12 Boot Menu D2D Recovery Description Format/Option Determines if Customer Logo will be in LCD only mode. shows Summary Screen is connected, the power on display will be shown if the device control is connected on hard disc drive to store operation system and restore the system to create a hidden partition on external video port. Enabled...
...LCD screen and the system's external video port (for an external CRT or projector). The function allows the user to factory defaults. Enables, disables D2D Recovery function. Parameter Quiet Boot Power on display Network Boot F12 Boot Menu D2D Recovery Description Format/Option Determines if Customer Logo will be in LCD only mode. shows Summary Screen is connected, the power on display will be shown if the device control is connected on hard disc drive to store operation system and restore the system to create a hidden partition on external video port. Enabled...
TravelMate 3000 Service Guide
Page 45
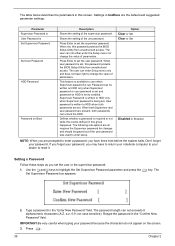
... either enter the Setup menu nor change the value of the supervisor password. User password is required or not while the events defined in this screen. Press e. 39 Chapter 2 Shows the setting of parameters. Option Clear or Set Clear or Set Disabled or Enabled NOTE: When you may have three tries before the system halts. The password length can be grayed out if the user password was used to reset it...
... either enter the Setup menu nor change the value of the supervisor password. User password is required or not while the events defined in this screen. Press e. 39 Chapter 2 Shows the setting of parameters. Option Clear or Set Clear or Set Disabled or Enabled NOTE: When you may have three tries before the system halts. The password length can be grayed out if the user password was used to reset it...

TravelMate 3000 Service Guide
Page 46
... have changed the settings, press u to save the changes and exit the BIOS Setup Utility. Chapter 2 40 When you can opt to "Set". 5. Press e. Removing a Password Follow these steps: 1. If desired, you can enable the Password on boot parameter. 5. Use the w and y keys to highlight the Set Supervisor Password parameter and press the e key. Type a password in the Enter New Password field. After setting the password, the computer sets the User Password parameter to enable the Password on boot parameter...
... have changed the settings, press u to save the changes and exit the BIOS Setup Utility. Chapter 2 40 When you can opt to "Set". 5. Press e. Removing a Password Follow these steps: 1. If desired, you can enable the Password on boot parameter. 5. Use the w and y keys to highlight the Set Supervisor Password parameter and press the e key. Type a password in the Enter New Password field. After setting the password, the computer sets the User Password parameter to enable the Password on boot parameter...

TravelMate 3000 Service Guide
Page 49
... from unauthorized use. F1 Help Esc Exit ↑ ↓ Select Item ← → Select Menu F5/F6 Change Values Enter Select 4 Sub-Menu F9 Setup Defaults F10 Save and Exit The table below describes the parameters in this screen. Exit utility without saving setup data to CMOS. Main Advanced Security Boot Exit Exit Saving Changes Exit Dicarding Changes Load Setup Defaults Discard Changes Save Changes Item Specific Help Exit...
... from unauthorized use. F1 Help Esc Exit ↑ ↓ Select Item ← → Select Menu F5/F6 Change Values Enter Select 4 Sub-Menu F9 Setup Defaults F10 Save and Exit The table below describes the parameters in this screen. Exit utility without saving setup data to CMOS. Main Advanced Security Boot Exit Exit Saving Changes Exit Dicarding Changes Load Setup Defaults Discard Changes Save Changes Item Specific Help Exit...
TravelMate 3000 Service Guide
Page 72
... all video adapters in system QuietBoot start (optional) Shadow video BIOS ROM Display BIOS copyright notice Display CPU type and speed Initialize EISA board Test keyboard Set key click if enabled Enable USB devices Test for unexpected interrupts Initialize POST display service Display prompt "Press F2 to enter SETUP" Disable CPU cache Test RAM between 512 and 640 KB Test extended memory Test extended memory address lines Jump to User Patch1 Configure advanced cache registers Initialize Multi Processor APIC Enable external and CPU caches Setup System Management Mode...
... all video adapters in system QuietBoot start (optional) Shadow video BIOS ROM Display BIOS copyright notice Display CPU type and speed Initialize EISA board Test keyboard Set key click if enabled Enable USB devices Test for unexpected interrupts Initialize POST display service Display prompt "Press F2 to enter SETUP" Disable CPU cache Test RAM between 512 and 640 KB Test extended memory Test extended memory address lines Jump to User Patch1 Configure advanced cache registers Initialize Multi Processor APIC Enable external and CPU caches Setup System Management Mode...

TravelMate 3000 Service Guide
Page 73
... system error handler PnPnd dual CMOS (optional) Initialize notebook docking (optional) Chapter 4 Check for SMART drive (optional) Shadow option ROMs Set up Power Management Initialize security engine (optional) Enable hardware interrupts Determine number of ATA and SCSI drives Set time of POST. prepare to boot operating system One short beep before boot Terminate QuietBoot (optional) Check password (optional) Initialize ACPI BIOS Prepare Boot Initialize SMBIOS Initialize PnP Option ROMs Clear parity checkers Display MultiBoot menu Clear screen (optional) Check virus and backup reminders...
... system error handler PnPnd dual CMOS (optional) Initialize notebook docking (optional) Chapter 4 Check for SMART drive (optional) Shadow option ROMs Set up Power Management Initialize security engine (optional) Enable hardware interrupts Determine number of ATA and SCSI drives Set time of POST. prepare to boot operating system One short beep before boot Terminate QuietBoot (optional) Check password (optional) Initialize ACPI BIOS Prepare Boot Initialize SMBIOS Initialize PnP Option ROMs Clear parity checkers Display MultiBoot menu Clear screen (optional) Check virus and backup reminders...

TravelMate 3000 Service Guide
Page 74
... serial video Re-map I /O Check force recovery boot Checksum BIOS ROM Go to BIOS Set Huge Segment Initialize Multi Processor Initialize OEM special code Initialize PIC and DMA Initialize Memory type Initialize Memory size Shadow Boot Block System memory test Initialize interrupt vectors Initialize Run Time Clock Initialize video Initialize System Management Mode 1 Output one beep Clear Huge Segment Boot to Mini DOS Boot to Memory Technologies Devices such as ROM, RAM, PCMCIA, and serial disk. Code...
... serial video Re-map I /O Check force recovery boot Checksum BIOS ROM Go to BIOS Set Huge Segment Initialize Multi Processor Initialize OEM special code Initialize PIC and DMA Initialize Memory type Initialize Memory size Shadow Boot Block System memory test Initialize interrupt vectors Initialize Run Time Clock Initialize video Initialize System Management Mode 1 Output one beep Clear Huge Segment Boot to Mini DOS Boot to Memory Technologies Devices such as ROM, RAM, PCMCIA, and serial disk. Code...

TravelMate 3000 Service Guide
Page 75
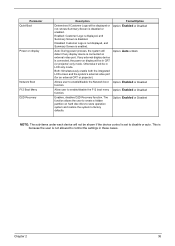
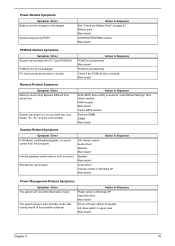
... adjusted Unreadable LCD screen Missing pels in characters Abnormal screen Wrong color displayed LCD has extra horizontal or vertical lines displayed. Reconnect the LCD connectors. LCD cable LCD inverter LCD Main board Reconnect the LCD cable LCD cable LCD Main board Indicator-Related Symptoms Symptom / Error Indicator incorrectly remains off or on . Verify OS in Sequence Power source (battery pack and power adapter). Battery pack AC adapter See if the thermal module is OK. Next, enter BIOS utility to execute "Load Setup Default Settings", then reboot...
... adjusted Unreadable LCD screen Missing pels in characters Abnormal screen Wrong color displayed LCD has extra horizontal or vertical lines displayed. Reconnect the LCD connectors. LCD cable LCD inverter LCD Main board Reconnect the LCD cable LCD cable LCD Main board Indicator-Related Symptoms Symptom / Error Indicator incorrectly remains off or on . Verify OS in Sequence Power source (battery pack and power adapter). Battery pack AC adapter See if the thermal module is OK. Next, enter BIOS utility to execute "Load Setup Default Settings", then reboot...
TravelMate 3000 Service Guide
Page 76
... power on page 61. PC Card cannot be charged or discharged System hang during POST Action in Sequence Enter BIOS Setup Utility to execute "Load Default Settings" then reboot system. Microphone cannot work Action in Sequence OS volume control Audio driver Speaker Main board Speaker Main board Audio driver Volume control in upper case Main board Chapter 4 70 RAM module Main board Check BIOS revision Reinsert DIMM DIMM Main board Speaker-Related Symptoms Symptom / Error In Windows, multimedia programs, no sound...
... power on page 61. PC Card cannot be charged or discharged System hang during POST Action in Sequence Enter BIOS Setup Utility to execute "Load Default Settings" then reboot system. Microphone cannot work Action in Sequence OS volume control Audio driver Speaker Main board Speaker Main board Audio driver Volume control in upper case Main board Chapter 4 70 RAM module Main board Check BIOS revision Reinsert DIMM DIMM Main board Speaker-Related Symptoms Symptom / Error In Windows, multimedia programs, no sound...

TravelMate 3000 Service Guide
Page 77
.... Printer driver Printer cable Printer Main board Enter BIOS Setup Utility to execute "Load Default Settings" then reboot the system. Device driver Device cable Device Main board Keyboard/Touchpad-Related Symptoms Symptom / Error Keyboard (one or more keys) does not work correctly. Reconnect hard disk/CD-ROM drives. Touchpad board Main board 71 Chapter 4 Power Management-Related Symptoms Symptom / Error Action in Sequence The system doesn't resume from standby mode LCD cover switch after opening the lid of the portable computer. Connect AC adapter then check...
.... Printer driver Printer cable Printer Main board Enter BIOS Setup Utility to execute "Load Default Settings" then reboot the system. Device driver Device cable Device Main board Keyboard/Touchpad-Related Symptoms Symptom / Error Keyboard (one or more keys) does not work correctly. Reconnect hard disk/CD-ROM drives. Touchpad board Main board 71 Chapter 4 Power Management-Related Symptoms Symptom / Error Action in Sequence The system doesn't resume from standby mode LCD cover switch after opening the lid of the portable computer. Connect AC adapter then check...

TravelMate 3000 User's Guide
Page 3
... User's Guide will run the Acrobat Reader setup program first. Follow these steps to access it contains warranty information and the general regulations and safety notices for your mobile computing needs. For instructions on the screen to complete the installation. English iii First things first We would like to thank you for making the TravelMate series of notebook computers your choice for your notebook...
... User's Guide will run the Acrobat Reader setup program first. Follow these steps to access it contains warranty information and the general regulations and safety notices for your mobile computing needs. For instructions on the screen to complete the installation. English iii First things first We would like to thank you for making the TravelMate series of notebook computers your choice for your notebook...
TravelMate 3000 User's Guide
Page 8
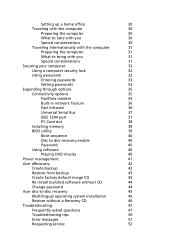
... security lock 32 Using passwords 32 Entering passwords 33 Setting passwords 33 Expanding through options 35 Connectivity options 35 Fax/Data modem 35 Built-in network feature 36 Fast Infrared 36 Universal Serial Bus 37 IEEE 1394 port 37 PC Card slot 38 Installing memory 39 BIOS utility 39 Boot sequence 40 Disc to disc recovery enable 40 Password 40 Using software 40 Playing DVD movies 40 Power management 41 Acer eRecovery 42 Create backup 42 Restore from backup 43 Create factory default image CD 43 Re-install bundled software...
... security lock 32 Using passwords 32 Entering passwords 33 Setting passwords 33 Expanding through options 35 Connectivity options 35 Fax/Data modem 35 Built-in network feature 36 Fast Infrared 36 Universal Serial Bus 37 IEEE 1394 port 37 PC Card slot 38 Installing memory 39 BIOS utility 39 Boot sequence 40 Disc to disc recovery enable 40 Password 40 Using software 40 Playing DVD movies 40 Power management 41 Acer eRecovery 42 Create backup 42 Restore from backup 43 Create factory default image CD 43 Re-install bundled software...
TravelMate 3000 User's Guide
Page 22
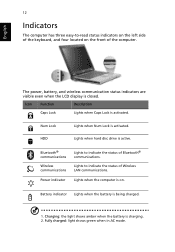
... Wireless LAN communications. Charging: the light shows amber when the battery is activated. Fully charged: light shows green when in AC mode. Lights when hard disc drive is activated. Lights to indicate the status of Bluetooth® communications. Icon Function Description Caps Lock Lights when Caps Lock is active. Power indicator Lights when the computer is being charged. 1. Battery indicator Lights when the battery is on the front of the computer. The power, battery, and wireless communication status indicators are visible even when the LCD display...
... Wireless LAN communications. Charging: the light shows amber when the battery is activated. Fully charged: light shows green when in AC mode. Lights when hard disc drive is activated. Lights to indicate the status of Bluetooth® communications. Icon Function Description Caps Lock Lights when Caps Lock is active. Power indicator Lights when the computer is being charged. 1. Battery indicator Lights when the battery is on the front of the computer. The power, battery, and wireless communication status indicators are visible even when the LCD display...

TravelMate 3000 User's Guide
Page 23
... cursor keys, two Windows keys and twelve function keys. Use this mode when you press the up or down when you need to connect an external keypad. An alternative solution may be to do a lot of numeric data entry. When Scroll Lock is in uppercase. Scroll Lock does not work with the arithmetic operators +, -, *, and /). Lock key Caps Lock Num Lock + Scroll Lock + Description When Caps Lock is on, all alphabetic characters entered are...
... cursor keys, two Windows keys and twelve function keys. Use this mode when you press the up or down when you need to connect an external keypad. An alternative solution may be to do a lot of numeric data entry. When Scroll Lock is in uppercase. Scroll Lock does not work with the arithmetic operators +, -, *, and /). Lock key Caps Lock Num Lock + Scroll Lock + Description When Caps Lock is on, all alphabetic characters entered are...

TravelMate 3000 User's Guide
Page 50
... DVD drive module is set to enter the region code. When you launch the DVD player for DVD movie region code information. Recovering your hard disc does not reset the number of five times (including the first time), after which the last region code set will play DVD movies on your DVD drive is installed in the BIOS utility, activate the BIOS utility, then select "Boot" from the categories listed at the top of the screen. Password To set a password on boot...
... DVD drive module is set to enter the region code. When you launch the DVD player for DVD movie region code information. Recovering your hard disc does not reset the number of five times (including the first time), after which the last region code set will play DVD movies on your DVD drive is installed in the BIOS utility, activate the BIOS utility, then select "Boot" from the categories listed at the top of the screen. Password To set a password on boot...
TravelMate 3000 User's Guide
Page 58
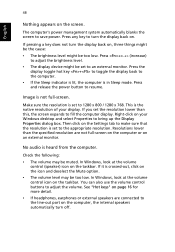
... and release the power button to adjust the volume. Check the following: • The volume may be set to make sure that the resolution is crossed-out, click on an external monitor. Press the display toggle hot key + to toggle the display back to turn off. Image is set the resolution lower than the specified resolution are connected to adjust the brightness level. • The display device might be muted...
... and release the power button to adjust the volume. Check the following: • The volume may be set to make sure that the resolution is crossed-out, click on an external monitor. Press the display toggle hot key + to toggle the display back to turn off. Image is set the resolution lower than the specified resolution are connected to adjust the brightness level. • The display device might be muted...


