
TM 230/280 User Guide
Page 7
... Using the keyboard Special keys Touchpad Touchpad basics Storage Hard disk Optical drive Floppy drive Audio Adjusting the volume Power management Moving around with your TravelMate Disconnecting from the desktop Moving around Taking the computer home Traveling with the computer Traveling internationally with the computer Securing your computer Using a computer security... 27 27 27 28 30 30 32 32 2 Customizing my computer Expanding through options Connectivity options Upgrade options Using system utilities Notebook Manager Launch Manager BIOS Utility 35 37 37 41 44 44 44 45 Contents
... Using the keyboard Special keys Touchpad Touchpad basics Storage Hard disk Optical drive Floppy drive Audio Adjusting the volume Power management Moving around with your TravelMate Disconnecting from the desktop Moving around Taking the computer home Traveling with the computer Traveling internationally with the computer Securing your computer Using a computer security... 27 27 27 28 30 30 32 32 2 Customizing my computer Expanding through options Connectivity options Upgrade options Using system utilities Notebook Manager Launch Manager BIOS Utility 35 37 37 41 44 44 44 45 Contents

TM 230/280 User Guide
Page 23
...-click). Hot keys The computer employs hot keys or key combinations to access most of the computer's controls like screen brightness, volume output and the BIOS Utility. Combinations with this key perform shortcut functions. Key Windows logo key Description Start button. 15 Windows keys The keyboard has two keys that perform...
...-click). Hot keys The computer employs hot keys or key combinations to access most of the computer's controls like screen brightness, volume output and the BIOS Utility. Combinations with this key perform shortcut functions. Key Windows logo key Description Start button. 15 Windows keys The keyboard has two keys that perform...
TM 230/280 User Guide
Page 41
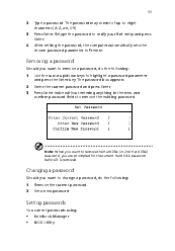
... the new and confirm password fields to verify your first entry and press Enter. Setting passwords You can set passwords using: • • Notebook Manager BIOS Utility 33 2 3 4 Type a password. Press Enter. After setting the password, the computer automatically sets the chosen password parameter to remove the Hard Disk (or 2nd...
... the new and confirm password fields to verify your first entry and press Enter. Setting passwords You can set passwords using: • • Notebook Manager BIOS Utility 33 2 3 4 Type a password. Press Enter. After setting the password, the computer automatically sets the chosen password parameter to remove the Hard Disk (or 2nd...

TM 230/280 User Guide
Page 53
However, if you encounter configuration problems, you to set the other four Launch Keys. 45 you may need to run it. BIOS Utility The BIOS Utility is already properly configured and optimized, and you do not need to start the application. See "Launch Keys" on Start, Programs, and then Launch Manager to run this utility. Your computer is a hardware configuration program built into your computer's BIOS (basic input/ouput system). You can access the Launch Manager by clicking on page 18 for more information.
However, if you encounter configuration problems, you to set the other four Launch Keys. 45 you may need to run it. BIOS Utility The BIOS Utility is already properly configured and optimized, and you do not need to start the application. See "Launch Keys" on Start, Programs, and then Launch Manager to run this utility. Your computer is a hardware configuration program built into your computer's BIOS (basic input/ouput system). You can access the Launch Manager by clicking on page 18 for more information.

TM 230/280 User Guide
Page 54
... -/+ to the main menu Note: You can change the value of a parameter if it is being displayed. Navigating the BIOS Utility These are shown on selftest) while the TravelMate logo is enclosed in any of the menu options to return to change the value of a parameter. Within a menu, navigate... through the BIOS Utility by following these instructions Press the cursor up/down keys (↑↓) to sub-menu. To enter a...
... -/+ to the main menu Note: You can change the value of a parameter if it is being displayed. Navigating the BIOS Utility These are shown on selftest) while the TravelMate logo is enclosed in any of the menu options to return to change the value of a parameter. Within a menu, navigate... through the BIOS Utility by following these instructions Press the cursor up/down keys (↑↓) to sub-menu. To enter a...
TM 230/280 User Guide
Page 55
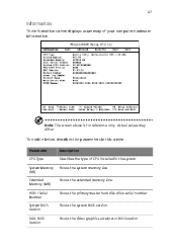
... CPU Type System Memory (KB) Extended Memory (MB) HDD1 Serial Number System BIOS Version VGA BIOS Version Description Describes the type of your computer hardware information. Shows the system BIOS version. Shows the extended memory size. Shows the video graphics accelerator BIOS version. 47 Information The Information screen displays a summary of CPU installed in...
... CPU Type System Memory (KB) Extended Memory (MB) HDD1 Serial Number System BIOS Version VGA BIOS Version Description Describes the type of your computer hardware information. Shows the system BIOS version. Shows the extended memory size. Shows the video graphics accelerator BIOS version. 47 Information The Information screen displays a summary of CPU installed in...

TM 230/280 User Guide
Page 58
Settings in this screen. Press Enter to access the sub-menu. Enables or disables the USB BIOS Legacy Support. Options: Enabled or Disabled The table below describes the parameters in boldface are the default and suggested parameter settings. Press... to access and set the PCI IRQ Routing sub-menu. Press Enter to access and set the I /O Device Configuration PCI IRQ Routing USB BIOS Legacy Support Description Shows the floppy drive information. Parameter Legacy Diskette A: Primary Master Secondary Master I /O Device Configuration sub-menu. Shows the optical drive...
Settings in this screen. Press Enter to access the sub-menu. Enables or disables the USB BIOS Legacy Support. Options: Enabled or Disabled The table below describes the parameters in boldface are the default and suggested parameter settings. Press... to access and set the PCI IRQ Routing sub-menu. Press Enter to access and set the I /O Device Configuration PCI IRQ Routing USB BIOS Legacy Support Description Shows the floppy drive information. Parameter Legacy Diskette A: Primary Master Secondary Master I /O Device Configuration sub-menu. Shows the optical drive...

TM 230/280 User Guide
Page 63
... set this password prevents the primary hard disk from unauthorized access. Press Enter to set , this password. Press Enter to set , this password protects the BIOS Utility from Hibernation mode. It consists of 8 alphanumeric characters. The table below describes the parameters in boldface are the default and suggested parameter settings. 55...
... set this password prevents the primary hard disk from unauthorized access. Press Enter to set , this password. Press Enter to set , this password protects the BIOS Utility from Hibernation mode. It consists of 8 alphanumeric characters. The table below describes the parameters in boldface are the default and suggested parameter settings. 55...

TM 230/280 User Guide
Page 65
Loads default settings for all setup parameters. 57 Exit This menu contains the exit options. Discards your changes. Saves your changes and exits the BIOS Utility. Parameter Exit Saving Changes Exit Discarding Changes Load Setup Defaults Discard Changes Save Changes Description Saves your changes. Discards your changes and exits the BIOS Utility.
Loads default settings for all setup parameters. 57 Exit This menu contains the exit options. Discards your changes. Saves your changes and exits the BIOS Utility. Parameter Exit Saving Changes Exit Discarding Changes Load Setup Defaults Discard Changes Save Changes Description Saves your changes. Discards your changes and exits the BIOS Utility.
TM 230/280 User Guide
Page 71
... with the kit. If it is dirty, clean it using a drive cleaning kit. Check the following Make sure the diskette is connected to access the BIOS Utility and verify that it using a drive cleaning kit. If your dealer or an authorized service center as the internal keyboard cable may be dirty...
... with the kit. If it is dirty, clean it using a drive cleaning kit. Check the following Make sure the diskette is connected to access the BIOS Utility and verify that it using a drive cleaning kit. If your dealer or an authorized service center as the internal keyboard cable may be dirty...
TM 230/280 User Guide
Page 73
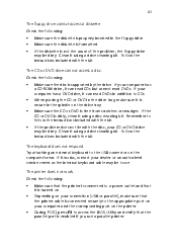
... if the fixed-disk type is a list of memory installed. Most of them display information about a hardware device, e.g., the amount of the messages that the BIOS can display. If your system fails after you have made the changes in the Setup menus, reset the computer, enter Setup and load the Setup...
... if the fixed-disk type is a list of memory installed. Most of them display information about a hardware device, e.g., the amount of the messages that the BIOS can display. If your system fails after you have made the changes in the Setup menus, reset the computer, enter Setup and load the Setup...

TM 230/280 User Guide
Page 74
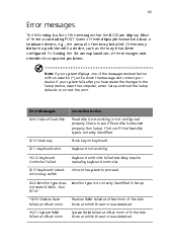
...Error Messages *0232 Extended RAM Failed at offset nnnn. The timer test failed. Requires repair of range and reset the Real-Time Clock. BIOS found date or time out of system board. On systems with the proper diskette type in CMOS. Default configuration used Corrective Action Extended ... CMOS 02B0 Diskette drive A error 02B1 Diskette drive B error Drive A: or B: is booted. Replace and run Setup. Real-Time Clock fails BIOS hardware test. Default configuration used 0281 Memory Size found by incorrect values and they are not corrected, the next boot will likely fail. The CMOS...
...Error Messages *0232 Extended RAM Failed at offset nnnn. The timer test failed. Requires repair of range and reset the Real-Time Clock. BIOS found date or time out of system board. On systems with the proper diskette type in CMOS. Default configuration used Corrective Action Extended ... CMOS 02B0 Diskette drive A error 02B1 Diskette drive B error Drive A: or B: is booted. Replace and run Setup. Real-Time Clock fails BIOS hardware test. Default configuration used 0281 Memory Size found by incorrect values and they are not corrected, the next boot will likely fail. The CMOS...
TM 230/280 User Guide
Page 75
RAM cache failed and BIOS disabled the cache. Run ISA or EISA Configuration Utility to extended DMA (Direct Memory Access) registers. Each 1 (one) in Setup. See errors 230, 231, or ...
RAM cache failed and BIOS disabled the cache. Run ISA or EISA Configuration Utility to extended DMA (Direct Memory Access) registers. Each 1 (one) in Setup. See errors 230, 231, or ...
TM 230/280 User Guide
Page 76
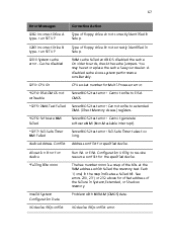
... If you still encounter problems after any recoverable error message. Run an I2O Configuration Utility (e.g. A parity error indicates that some data has been corrupted. BIOS attempts to display the previous screen (usually an initialization error of an Option ROM, i.e., an add-on the screen.... BIOS attempts to display all installed I2O block-storage devices. Write down and follow the information shown on card). Displayed after going through the corrective measures...
... If you still encounter problems after any recoverable error message. Run an I2O Configuration Utility (e.g. A parity error indicates that some data has been corrupted. BIOS attempts to display the previous screen (usually an initialization error of an Option ROM, i.e., an add-on the screen.... BIOS attempts to display all installed I2O block-storage devices. Write down and follow the information shown on card). Displayed after going through the corrective measures...

TM 230/280 User Guide
Page 81
... cache Memory • • • Main memory expandable to 1 GB Dual 144-pin soDIMM socket SDRAM (Synchronous Dynamic Random Access Memory) 512 KB Flash ROM BIOS Data storage • • • One 3.5-inch internal floppy drive One high-capacity, Enhanced-IDE hard disk One 5.25-inch internal CD-ROM, DVD-ROM...
... cache Memory • • • Main memory expandable to 1 GB Dual 144-pin soDIMM socket SDRAM (Synchronous Dynamic Random Access Memory) 512 KB Flash ROM BIOS Data storage • • • One 3.5-inch internal floppy drive One high-capacity, Enhanced-IDE hard disk One 5.25-inch internal CD-ROM, DVD-ROM...
TM 230/280 User Guide
Page 93
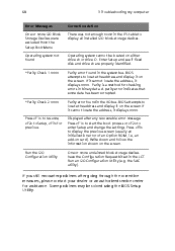
...Index ^ AC adapter caring for ===î audio ===OR adjusting the volume ===OR troubleshooting ===SO _ battery pack caring for ===î charging indicator ===NN BIOS Utility ===QR-===RT Advanced menu áL RP RQ RN RO advanced menu ===RM boot menu ===RS exit menu ===RT main menu ===QU navigating ===QS... security menu ===RR BIOS utility ===QR brightness hotkeys ===NT caps lock ===NP on indicator ===NN care AC adapter ===î battery pack ===î computer ===áî CD ...
...Index ^ AC adapter caring for ===î audio ===OR adjusting the volume ===OR troubleshooting ===SO _ battery pack caring for ===î charging indicator ===NN BIOS Utility ===QR-===RT Advanced menu áL RP RQ RN RO advanced menu ===RM boot menu ===RS exit menu ===RT main menu ===QU navigating ===QS... security menu ===RR BIOS utility ===QR brightness hotkeys ===NT caps lock ===NP on indicator ===NN care AC adapter ===î battery pack ===î computer ===áî CD ...
TM 230/280 User Guide
Page 94
... ===NP on indicator ===NO numeric keypad embedded ===NQ num lock ===NQ l online services ===SV optical drive ===OO options memory upgrade ===QN m parallel port setting in BIOS Utility ===RP PC Card ===QM ejecting ===QM 86 f indicator lights ===NN ITW.
... ===NP on indicator ===NO numeric keypad embedded ===NQ num lock ===NQ l online services ===SV optical drive ===OO options memory upgrade ===QN m parallel port setting in BIOS Utility ===RP PC Card ===QM ejecting ===QM 86 f indicator lights ===NN ITW.
TM 230/280 User Guide
Page 95
87 q time setting in BIOS Utility ===QU touchpad ===OM hotkey ===NT using ===OM-===ON travel international flights ===PM local trips ===PM troubleshooting ===SM universal serial bus ===PV utility BIOS Setup ===QR-===RT s view front ===Q left ===Q rear ===S right ===R volume adjusting ===OR t warranty International Traveler's Warranty ===SV Windows keys ===NR r
87 q time setting in BIOS Utility ===QU touchpad ===OM hotkey ===NT using ===OM-===ON travel international flights ===PM local trips ===PM troubleshooting ===SM universal serial bus ===PV utility BIOS Setup ===QR-===RT s view front ===Q left ===Q rear ===S right ===R volume adjusting ===OR t warranty International Traveler's Warranty ===SV Windows keys ===NR r
TravelMate 230/280 Service Guide
Page 7
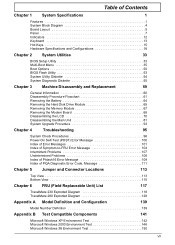
... 12 Keyboard 13 Hot Keys 15 Hardware Specifications and Configurations 18 Chapter 2 System Utilities 33 BIOS Setup Utility 33 Multi-Boot Menu 35 Boot Options 50 BIOS Flash Utility 53 System Utility Diskette 54 System Diagnostic Diskette 55 Chapter 3 Machine Disassembly and... and Connector Locations 113 Top View 113 Bottom View 115 Chapter 6 FRU (Field Replaceable Unit) List 117 TravelMate 230 Exploded Diagram 118 TravelMate 280 Exploded Diagram 128 Appendix A Model Definition and Configuration 139 Model Number Definition 139 Appendix B Test Compatible Components ...
... 12 Keyboard 13 Hot Keys 15 Hardware Specifications and Configurations 18 Chapter 2 System Utilities 33 BIOS Setup Utility 33 Multi-Boot Menu 35 Boot Options 50 BIOS Flash Utility 53 System Utility Diskette 54 System Diagnostic Diskette 55 Chapter 3 Machine Disassembly and... and Connector Locations 113 Top View 113 Bottom View 115 Chapter 6 FRU (Field Replaceable Unit) List 117 TravelMate 230 Exploded Diagram 118 TravelMate 280 Exploded Diagram 128 Appendix A Model Definition and Configuration 139 Model Number Definition 139 Appendix B Test Compatible Components ...
TravelMate 230/280 Service Guide
Page 23
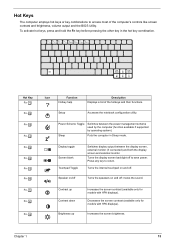
...-r Fn-s Fn-w Fn-y Fn-x Icon Function Hotkey help Setup Description Displays a list of the computer's controls like screen contrast and brightness, volume output and the BIOS Utility. Turns the speakers on and off to return. Chapter 1 15 Contrast up Contrast down Brightness up Increases the screen contrast (available only for models...
...-r Fn-s Fn-w Fn-y Fn-x Icon Function Hotkey help Setup Description Displays a list of the computer's controls like screen contrast and brightness, volume output and the BIOS Utility. Turns the speakers on and off to return. Chapter 1 15 Contrast up Contrast down Brightness up Increases the screen contrast (available only for models...


