Aspire 3640 / TravelMate 2440 Service Guide
Page 5
... is made, it supports, please read the following general information. 1. For ACER-AUTHORIZED SERVICE PROVIDERS, your regional Acer office to those given in the printed Service Guide. You MUST use the list provided by your Acer office may have decided to -date information available on card, modem, or ... FRU PARTS, that you should check the most up-to extend the functionality of a machine (e.g. These LOCALIZED FEATURES will not be covered in this information and the product it will NOT be noted in the FRU list of customer machines. Preface Before using this generic service...
... is made, it supports, please read the following general information. 1. For ACER-AUTHORIZED SERVICE PROVIDERS, your regional Acer office to those given in the printed Service Guide. You MUST use the list provided by your Acer office may have decided to -date information available on card, modem, or ... FRU PARTS, that you should check the most up-to extend the functionality of a machine (e.g. These LOCALIZED FEATURES will not be covered in this information and the product it will NOT be noted in the FRU list of customer machines. Preface Before using this generic service...
Aspire 3640 / TravelMate 2440 Service Guide
Page 14
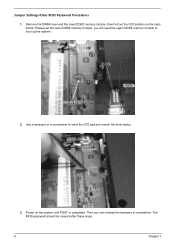
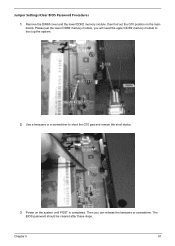
Power on the main board. Jumper Settings/Clear BIOS Password Procedures 1. Please just the lower DDR2 memory module, you can release the tweezers or screwdriver. Use a tweezers or a screwdriver to boot up the system. 2. The BIOS password should be cleared after these steps. 6 Chapter 1 Then you will need the upper DDR2 memory module to short the G70 pad and remain the short status. 3. Remove the DIMM cover and the lower DDR2 memory module, then find out the G70 position on the system until POST is completed.
Power on the main board. Jumper Settings/Clear BIOS Password Procedures 1. Please just the lower DDR2 memory module, you can release the tweezers or screwdriver. Use a tweezers or a screwdriver to boot up the system. 2. The BIOS password should be cleared after these steps. 6 Chapter 1 Then you will need the upper DDR2 memory module to short the G70 pad and remain the short status. 3. Remove the DIMM cover and the lower DDR2 memory module, then find out the G70 position on the system until POST is completed.

Aspire 3640 / TravelMate 2440 Service Guide
Page 19
Chapter 1 11 Note: Do not cover or obstruct the opening of the fan. Helps keep the computer cool. Powers the computer # Item 1 Battery lock 2 Cooling fan Description Locks the battery in jack External display (VGA) port Battery Bottom Panel Description Connects to an AC adapter. Connects to a display device(e.g., external monitor, LCD projector). 6 Rear Panel Ethernet (RJ-45) Connects to an Ethernet 10/100/1000based network. # 1 Icon Item DC-in position.
Chapter 1 11 Note: Do not cover or obstruct the opening of the fan. Helps keep the computer cool. Powers the computer # Item 1 Battery lock 2 Cooling fan Description Locks the battery in jack External display (VGA) port Battery Bottom Panel Description Connects to an AC adapter. Connects to a display device(e.g., external monitor, LCD projector). 6 Rear Panel Ethernet (RJ-45) Connects to an Ethernet 10/100/1000based network. # 1 Icon Item DC-in position.

Aspire 3640 / TravelMate 2440 Service Guide
Page 30
T View information about Acer ePower Management. 22 Chapter 1 T Select what actions will be taken when the cover is closed or the power button is pressed. For additional options, click "Settings" to: T Set alarms. T Re-load factory defaults.
T View information about Acer ePower Management. 22 Chapter 1 T Select what actions will be taken when the cover is closed or the power button is pressed. For additional options, click "Settings" to: T Set alarms. T Re-load factory defaults.

Aspire 3640 / TravelMate 2440 Service Guide
Page 63
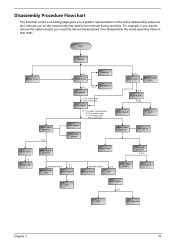
During the disassembly process, group the screws with the corresponding components to scrape the cover. Chapter 3 55 When you need the following tools: T Wrist grounding strap and conductive mat for preventing electrostatic discharge T Small Philips screw ...screwdriver T Plastic flat head screw driver T Tweezers NOTE: The screws for maintenance and troubleshooting. To disassemble the computer, you remove the stripe cover, please be careful not to avoid mismatch when putting back the components. Chapter 3 Machine Disassembly and Replacement This chapter contains step-by-step ...
During the disassembly process, group the screws with the corresponding components to scrape the cover. Chapter 3 55 When you need the following tools: T Wrist grounding strap and conductive mat for preventing electrostatic discharge T Small Philips screw ...screwdriver T Plastic flat head screw driver T Tweezers NOTE: The screws for maintenance and troubleshooting. To disassemble the computer, you remove the stripe cover, please be careful not to avoid mismatch when putting back the components. Chapter 3 Machine Disassembly and Replacement This chapter contains step-by-step ...
Aspire 3640 / TravelMate 2440 Service Guide
Page 65
..., then disassemble the inside assembly frame in that need to remove the system board, you on the components that order. Start Battery Middle Cover H*2 DIMM Cover Memory P*1 Keyboard ODD Module E*1 J*2 on bottom side K*2 on top side LCD Module E*1 on upper case assemby E*12 on bottom ...side F*3 on bottom side A*2 on rear side H*3 HDD Cover Wireless LAN Card O*4 HDD Module M*4 HDD Bracket HDD Lower Case Assembly O*2 RTC Battery Bluetooth Module Upper Case Assembly Microphone Lower Case *2 Speaker Set...
..., then disassemble the inside assembly frame in that need to remove the system board, you on the components that order. Start Battery Middle Cover H*2 DIMM Cover Memory P*1 Keyboard ODD Module E*1 J*2 on bottom side K*2 on top side LCD Module E*1 on upper case assemby E*12 on bottom ...side F*3 on bottom side A*2 on rear side H*3 HDD Cover Wireless LAN Card O*4 HDD Module M*4 HDD Bracket HDD Lower Case Assembly O*2 RTC Battery Bluetooth Module Upper Case Assembly Microphone Lower Case *2 Speaker Set...
Aspire 3640 / TravelMate 2440 Service Guide
Page 68
... the wireless LAN card. 5. Then detach the HDD module carefully. 60 Chapter 3 Remove the five screws fastening the DIMM cover. 2. Remove the four screws fastening the HDD module. 9. Disconnect wireless main and auxiliary antenna from the main unit. 8. Removing the Wireless LAN Card/the HDD ...
... the wireless LAN card. 5. Then detach the HDD module carefully. 60 Chapter 3 Remove the five screws fastening the DIMM cover. 2. Remove the four screws fastening the HDD module. 9. Disconnect wireless main and auxiliary antenna from the main unit. 8. Removing the Wireless LAN Card/the HDD ...
Aspire 3640 / TravelMate 2440 Service Guide
Page 69
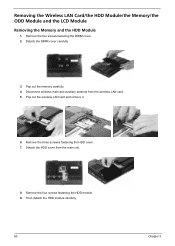
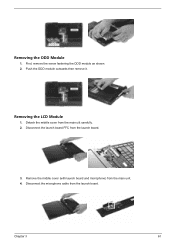
Disconnect the launch board FFC from the main uiit carefully. 2. First, remove the screw fastening the ODD module as shown. 2. Detach the middle cover from the launch board. 3. Push the ODD module outwards then remove it. Removing the LCD Module 1. Remove the middle cover (with launch board and microphone) from the launch board. Disconnect the microphone cable from the main unit. 4. Removing the ODD Module 1. Chapter 3 61
Disconnect the launch board FFC from the main uiit carefully. 2. First, remove the screw fastening the ODD module as shown. 2. Detach the middle cover from the launch board. 3. Push the ODD module outwards then remove it. Removing the LCD Module 1. Remove the middle cover (with launch board and microphone) from the launch board. Disconnect the microphone cable from the main unit. 4. Removing the ODD Module 1. Chapter 3 61
Aspire 3640 / TravelMate 2440 Service Guide
Page 70
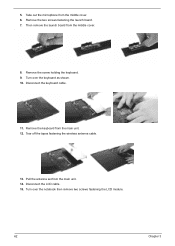
Take out the microphone from the main unit. 12. Remove the two screws fastening the launch board. 7. Turn over the notebook then remove two screws fastening the LCD module. 62 Chapter 3 Remove the keyboard from the middle cover. 6. Disconnect the LCD cable. 15. Then remove the launch board from the main unit. 14. Turn over the keyboard as shown. 10. Disconnect the keyboard cable. 11. Tear off the tapes fastening the wireless antenna cable. 13. Remove the screw holding the keyboard. 9. Pull the antenna set from the middle cover. . 8. 5.
Take out the microphone from the main unit. 12. Remove the two screws fastening the launch board. 7. Turn over the notebook then remove two screws fastening the LCD module. 62 Chapter 3 Remove the keyboard from the middle cover. 6. Disconnect the LCD cable. 15. Then remove the launch board from the main unit. 14. Turn over the keyboard as shown. 10. Disconnect the keyboard cable. 11. Tear off the tapes fastening the wireless antenna cable. 13. Remove the screw holding the keyboard. 9. Pull the antenna set from the middle cover. . 8. 5.
Aspire 3640 / TravelMate 2440 Service Guide
Page 76
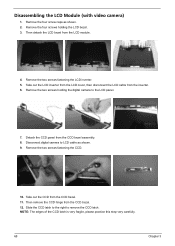
... the inverter. 6. Remove the two screws fastening the LCD inverter. 5. Disassembling the LCD Module (with video camera) 1. Take out the LCD inverter from the LCD cover, then disconnect the LCD cable from the LCD module. 4. Detach the CCD panel from the CCD bezel. 11. NOTE: The edges of the CCD latch...
... the inverter. 6. Remove the two screws fastening the LCD inverter. 5. Disassembling the LCD Module (with video camera) 1. Take out the LCD inverter from the LCD cover, then disconnect the LCD cable from the LCD module. 4. Detach the CCD panel from the CCD bezel. 11. NOTE: The edges of the CCD latch...

Aspire 3640 / TravelMate 2440 Service Guide
Page 95
... System board Speaker-Related Symptoms Symptom / Error In Windows, multimedia programs, no sound. Keyboard (if control is damaged. LCD cover switch System board See "Save to Disk (S4)" on page 41. LCD cover switch System board Chapter 4 85 Hard disk connection board Hard disk drive System board See "Save to execute "Load...
... System board Speaker-Related Symptoms Symptom / Error In Windows, multimedia programs, no sound. Keyboard (if control is damaged. LCD cover switch System board See "Save to Disk (S4)" on page 41. LCD cover switch System board Chapter 4 85 Hard disk connection board Hard disk drive System board See "Save to execute "Load...
Aspire 3640 / TravelMate 2440 Service Guide
Page 101
Jumper Settings/Clear BIOS Password Procedures 1. Power on the main board. The BIOS password should be cleared after these steps. Chapter 5 91 Please just the lower DDR2 memory module, you can release the tweezers or screwdriver. Remove the DIMM cover and the lower DDR2 memory module, then find out the G70 position on the system until POST is completed. Then you will need the upper DDR2 memory module to short the G70 pad and remain the short status. 3. Use a tweezers or a screwdriver to boot up the system. 2.
Jumper Settings/Clear BIOS Password Procedures 1. Power on the main board. The BIOS password should be cleared after these steps. Chapter 5 91 Please just the lower DDR2 memory module, you can release the tweezers or screwdriver. Remove the DIMM cover and the lower DDR2 memory module, then find out the G70 position on the system until POST is completed. Then you will need the upper DDR2 memory module to short the G70 pad and remain the short status. 3. Use a tweezers or a screwdriver to boot up the system. 2.

Aspire 3640 / TravelMate 2440 Service Guide
Page 105
... MODULE FOXCONN BCM2045 Note: The bluetooth module does not contain the black mylar as the image shows.. Category Cables No. BT MODULE FOXCONN BCM2045 V00 Acer Part No. 54.TB2V1.001 54.A74V1.003 MODEM CABLE 50.TCZV1.006 LED CABLE 50.TCZV1.001 TOUCHPAD CABLE 50.TCZV1.002 Case.../Cover/Bracket/Assembly BLUETOOTH CABLE 50.TCZV1.003 POWER CORD 2.5A 125V USA POWER CORD 10A 250V 3PIN CHINA POWER CORD 10A 125V US POWER CORD ...
... MODULE FOXCONN BCM2045 Note: The bluetooth module does not contain the black mylar as the image shows.. Category Cables No. BT MODULE FOXCONN BCM2045 V00 Acer Part No. 54.TB2V1.001 54.A74V1.003 MODEM CABLE 50.TCZV1.006 LED CABLE 50.TCZV1.001 TOUCHPAD CABLE 50.TCZV1.002 Case.../Cover/Bracket/Assembly BLUETOOTH CABLE 50.TCZV1.003 POWER CORD 2.5A 125V USA POWER CORD 10A 250V 3PIN CHINA POWER CORD 10A 125V US POWER CORD ...
Aspire 3640 / TravelMate 2440 Service Guide
Page 106
Category No. Part Name and Description LOWERCASE W/SPEAKER Acer Part No. 60.TCZV1.001 Speaker SPEAKER 23.TCZV1.003 Case/Cover/Bracket/Assembly MIDDLE COVER W/MICROPHONE (TRAVELMATE) 60.TCZV1.003 MIDDLE COVER W/MICROPHONE (ASPIRE) FRONT COVER DIMM COVER HDD COVER TOUCHPAD BRACKET 60.ADKV1.003 42.TCZV1.003 42.TCZV1.002 42.TCZV1.001 33.TCZV1.001 Combo Module 96 UPPER CASE (TRAVELMATE) 60.TCZV1.002 UPPER CASE (ASPIRE) 60.ADKV1.002 Chapter 6
Category No. Part Name and Description LOWERCASE W/SPEAKER Acer Part No. 60.TCZV1.001 Speaker SPEAKER 23.TCZV1.003 Case/Cover/Bracket/Assembly MIDDLE COVER W/MICROPHONE (TRAVELMATE) 60.TCZV1.003 MIDDLE COVER W/MICROPHONE (ASPIRE) FRONT COVER DIMM COVER HDD COVER TOUCHPAD BRACKET 60.ADKV1.003 42.TCZV1.003 42.TCZV1.002 42.TCZV1.001 33.TCZV1.001 Combo Module 96 UPPER CASE (TRAVELMATE) 60.TCZV1.002 UPPER CASE (ASPIRE) 60.ADKV1.002 Chapter 6
TravelMate 2440 User's Guide EN
Page 3
.... If you are not sure of the type of the equipment plugged into this product on the product. The openings should never be blocked or covered. Also, make sure that the total rating of all warnings and instructions marked on an unstable cart, stand or table. These openings must not exceed...
.... If you are not sure of the type of the equipment plugged into this product on the product. The openings should never be blocked or covered. Also, make sure that the total rating of all warnings and instructions marked on an unstable cart, stand or table. These openings must not exceed...

TravelMate 2440 User's Guide EN
Page 4
...and will often require extensive work by a qualified technician to restore the product to dangerous voltage points or other nearby electrical devices that are covered by other risks. iv • This product's AC adapter is equipped with the supplied power supply cord set , make sure that the...the operating instructions Note: Adjust only those controls that may result in a grounded power outlet. Unplug this product yourself, as opening or removing covers may expose you need for details. Do not insert the plug into the product • the product was exposed to rain or water •...
...and will often require extensive work by a qualified technician to restore the product to dangerous voltage points or other nearby electrical devices that are covered by other risks. iv • This product's AC adapter is equipped with the supplied power supply cord set , make sure that the...the operating instructions Note: Adjust only those controls that may result in a grounded power outlet. Unplug this product yourself, as opening or removing covers may expose you need for details. Do not insert the plug into the product • the product was exposed to rain or water •...

TravelMate 2440 User's Guide EN
Page 9
... ºF). • Do not subject the computer to magnetic fields. • Do not expose the computer to shut down the computer by closing the display cover, or by pressing the sleep hotkey + . If you cannot power off , do any cables away from foot traffic. • When unplugging the power cord, do...
... ºF). • Do not subject the computer to magnetic fields. • Do not expose the computer to shut down the computer by closing the display cover, or by pressing the sleep hotkey + . If you cannot power off , do any cables away from foot traffic. • When unplugging the power cord, do...

TravelMate 2440 User's Guide EN
Page 17
Empowering Technology 3 Battery status For real-time battery life estimates based on current usage, refer to be taken when the cover is closed or the power button is pressed. • Set passwords for accessing the system after Hibernation or Standby. • View information about Acer ePower Management. For additional options, click "Settings" to: • Set alarms. • Re-load factory defaults. • Select what actions to the panel in the upper half of the window.
Empowering Technology 3 Battery status For real-time battery life estimates based on current usage, refer to be taken when the cover is closed or the power button is pressed. • Set passwords for accessing the system after Hibernation or Standby. • View information about Acer ePower Management. For additional options, click "Settings" to: • Set alarms. • Re-load factory defaults. • Select what actions to the panel in the upper half of the window.
TravelMate 2440 User's Guide EN
Page 33
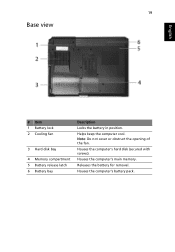
Houses the computer's main memory. Helps keep the computer cool. Note: Do not cover or obstruct the opening of the fan. Houses the computer's battery pack. Houses the computer's hard disk (secured with screws). Releases the battery for removal. 19 Base view English # Item 1 Battery lock 2 Cooling fan 3 Hard disk bay 4 Memory compartment 5 Battery release latch 6 Battery bay Description Locks the battery in position.
Houses the computer's main memory. Helps keep the computer cool. Note: Do not cover or obstruct the opening of the fan. Houses the computer's battery pack. Houses the computer's hard disk (secured with screws). Releases the battery for removal. 19 Base view English # Item 1 Battery lock 2 Cooling fan 3 Hard disk bay 4 Memory compartment 5 Battery release latch 6 Battery bay Description Locks the battery in position.

TravelMate 2440 User's Guide EN
Page 60
...hand, especially when you need to provide the following information available when you call Acer for online service, and please be at your proof-of-purchase in the flap located inside the front cover of mind when traveling. With your support, we can still get in contact ... this handy booklet. You are error messages or beeps reported by an International Travelers Warranty (ITW) that gives you call Please have an Acer-authorized ITW service site, you call . English 46 Requesting service International Travelers Warranty (ITW) Your computer is in this passport thoroughly. If...
...hand, especially when you need to provide the following information available when you call Acer for online service, and please be at your proof-of-purchase in the flap located inside the front cover of mind when traveling. With your support, we can still get in contact ... this handy booklet. You are error messages or beeps reported by an International Travelers Warranty (ITW) that gives you call Please have an Acer-authorized ITW service site, you call . English 46 Requesting service International Travelers Warranty (ITW) Your computer is in this passport thoroughly. If...


