TravelMate 2410 Service Guide
Page 7
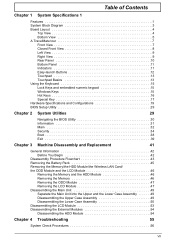
... 13 Using the Keyboard 15 Lock Keys and embedded numeric keypad 15 Windows Keys 15 Hot Keys 16 Special Key 17 Hardware Specifications and Configurations 19 BIOS Setup Utility 29 Chapter 2 System Utilities 29 Navigating the BIOS Utility 30 Information 31 Main 32 Security 34 Boot 38 Exit 39 Chapter 3 Machine Disassembly and Replacement 41 General Information 42 Before You Begin 42 Disassembly Procedure Flowchart 43 Removing the Battery Pack 45 Removing the Memory/the HDD Module/the Wireless LAN Card...
... 13 Using the Keyboard 15 Lock Keys and embedded numeric keypad 15 Windows Keys 15 Hot Keys 16 Special Key 17 Hardware Specifications and Configurations 19 BIOS Setup Utility 29 Chapter 2 System Utilities 29 Navigating the BIOS Utility 30 Information 31 Main 32 Security 34 Boot 38 Exit 39 Chapter 3 Machine Disassembly and Replacement 41 General Information 42 Before You Begin 42 Disassembly Procedure Flowchart 43 Removing the Battery Pack 45 Removing the Memory/the HDD Module/the Wireless LAN Card...
TravelMate 2410 Service Guide
Page 16
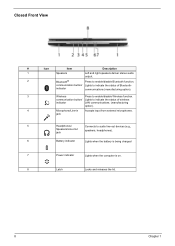
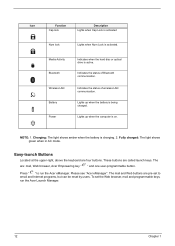
jack 5 Headphones/ Connects to indicate the status of Bluetooth- communication button/ Lights to audio line-out devices (e.g., Speakers/Line-Out jack speakers, headphones). 6 Battery indicator Lights when the battery is being charged 7 Power indicator Lights when the computer is on. 8 Latch Locks and releases the lid. 8 Chapter 1 communication button/ Lights to enable/disable Wireless function. indicator communications (manufacturing option). 3 Wireless Press to indicate the status of wireless indicator LAN communications. (manufacturing option). 4 ...
jack 5 Headphones/ Connects to indicate the status of Bluetooth- communication button/ Lights to audio line-out devices (e.g., Speakers/Line-Out jack speakers, headphones). 6 Battery indicator Lights when the battery is being charged 7 Power indicator Lights when the computer is on. 8 Latch Locks and releases the lid. 8 Chapter 1 communication button/ Lights to enable/disable Wireless function. indicator communications (manufacturing option). 3 Wireless Press to indicate the status of wireless indicator LAN communications. (manufacturing option). 4 ...
TravelMate 2410 Service Guide
Page 18
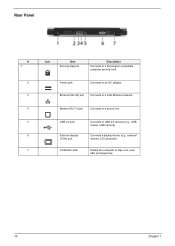
Modem (RJ-11) port Connects to a Kensington-compatible computer security lock. Rear Panel # 1 2 3 4 5 6 7 Icon Item Security Keylock Description Connects to a phone line. Power jack Connects to USB 2.0 devices (e.g., USB mouse, USB camera). USB 2.0 port External display (VGA) port Ventilation slots Connects to an AC adaptor. Connects a display device (e.g., external monitor, LCD projector). Ethernet (RJ-45) port Connects to stay cool, even after prolonged use. 10 Chapter 1 Enable the computer to a Fast Ethernet network.
Modem (RJ-11) port Connects to a Kensington-compatible computer security lock. Rear Panel # 1 2 3 4 5 6 7 Icon Item Security Keylock Description Connects to a phone line. Power jack Connects to USB 2.0 devices (e.g., USB mouse, USB camera). USB 2.0 port External display (VGA) port Ventilation slots Connects to an AC adaptor. Connects a display device (e.g., external monitor, LCD projector). Ethernet (RJ-45) port Connects to stay cool, even after prolonged use. 10 Chapter 1 Enable the computer to a Fast Ethernet network.
TravelMate 2410 Service Guide
Page 20
... of wireless LAN communication. Icon Function Cap lock Description Lights when Cap Lock is activated Num lock Lights when Num Lock is on. The are four buttons. These buttons are pre-set the Web browser, mail and programmable keys, run the Acer eManager. To set to run the Acer Launch Manager. 12 Chapter 1 NOTE: 1. Media Activity Bluetooth Wireless LAN Battery Power Indicates when the hard disc or optical drive is active. Press " " to email and Internet programs, but can be reset by users.
... of wireless LAN communication. Icon Function Cap lock Description Lights when Cap Lock is activated Num lock Lights when Num Lock is on. The are four buttons. These buttons are pre-set the Web browser, mail and programmable keys, run the Acer eManager. To set to run the Acer Launch Manager. 12 Chapter 1 NOTE: 1. Media Activity Bluetooth Wireless LAN Battery Power Indicates when the hard disc or optical drive is active. Press " " to email and Internet programs, but can be reset by users.
TravelMate 2410 Service Guide
Page 27
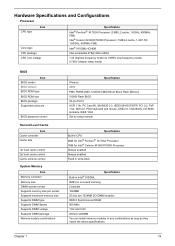
... control System Memory Item Memory controller Memory size DIMM socket number Supports memory size per socket Supports maximum memory size Supports DIMM type Supports DIMM Speed Supports DIMM voltage Supports DIMM package Memory module combinations Specification Phneoix 3A03 PMC PM39LV040, 512KX8 CMOS Boot Block Flash Memory 512KB Flash BIOS 32-pin PLCC ACPI 1.0b, PC Card 95, SM BIOS 2.3, IEEE1284-ECP/EPP, PCI 2.2, PnP 1.0a, DMI 2.0, PS/2 keyboard and mouse, USB 2.0, VGA BIOS, CD-ROM bootable, IEEE 1394 Set by setup manual Specification Built-in CPU...
... control System Memory Item Memory controller Memory size DIMM socket number Supports memory size per socket Supports maximum memory size Supports DIMM type Supports DIMM Speed Supports DIMM voltage Supports DIMM package Memory module combinations Specification Phneoix 3A03 PMC PM39LV040, 512KX8 CMOS Boot Block Flash Memory 512KB Flash BIOS 32-pin PLCC ACPI 1.0b, PC Card 95, SM BIOS 2.3, IEEE1284-ECP/EPP, PCI 2.2, PnP 1.0a, DMI 2.0, PS/2 keyboard and mouse, USB 2.0, VGA BIOS, CD-ROM bootable, IEEE 1394 Set by setup manual Specification Built-in CPU...
TravelMate 2410 Service Guide
Page 35
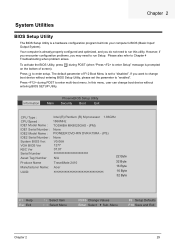
Your computer is already properly configured and optimized, and you may need to run this menu, user can change boot device without entering BIOS SETUP Utility. To activate the BIOS Utility, press m during POST to enter setup. Information Main PhoenixBIOS Setup Utility Security Boot Exit CPU Type : CPU Speed : IDE1 Model Name : IDE1 Serial Number : IDE2 Model Name : IDE2 Serial Number : System BIOS Ver: VGA BIOS Ver KBC Ver Serial Number Asset Tag Number Produce Name Manufacturer Name: UUID: Intel (R) Pentium (R) M processor 1.86GHz 1866MHz...
Your computer is already properly configured and optimized, and you may need to run this menu, user can change boot device without entering BIOS SETUP Utility. To activate the BIOS Utility, press m during POST to enter setup. Information Main PhoenixBIOS Setup Utility Security Boot Exit CPU Type : CPU Speed : IDE1 Model Name : IDE1 Serial Number : IDE2 Model Name : IDE2 Serial Number : System BIOS Ver: VGA BIOS Ver KBC Ver Serial Number Asset Tag Number Produce Name Manufacturer Name: UUID: Intel (R) Pentium (R) M processor 1.86GHz 1866MHz...

TravelMate 2410 Service Guide
Page 37
... Information Information Main PhoenixBIOS Setup Utility Security Boot Exit CPU Type : CPU Speed : IDE1 Model Name : IDE1 Serial Number : IDE2 Model Name : IDE2 Serial Number : System BIOS Ver: VGA BIOS Ver KBC Ver Serial Number Asset Tag Number Produce Name Manufacturer Name: UUID: Intel (R) Pentium (R) M processor 1.86GHz 1866MHz TOSHIBA MK8025GAS - (PM) None PIONEER DVD-RW DVR-K15RA - (PS) None V0.06A 1277 07.07 xxxxxxxxxxxxxxxxxxxxxx N/A TravelMate 2410 Acer xxxxxxxxxxxxxxxxxxxxxxxxxxxxxxxx 22 Byte...
... Information Information Main PhoenixBIOS Setup Utility Security Boot Exit CPU Type : CPU Speed : IDE1 Model Name : IDE1 Serial Number : IDE2 Model Name : IDE2 Serial Number : System BIOS Ver: VGA BIOS Ver KBC Ver Serial Number Asset Tag Number Produce Name Manufacturer Name: UUID: Intel (R) Pentium (R) M processor 1.86GHz 1866MHz TOSHIBA MK8025GAS - (PM) None PIONEER DVD-RW DVR-K15RA - (PS) None V0.06A 1277 07.07 xxxxxxxxxxxxxxxxxxxxxx N/A TravelMate 2410 Acer xxxxxxxxxxxxxxxxxxxxxxxxxxxxxxxx 22 Byte...
TravelMate 2410 Service Guide
Page 39
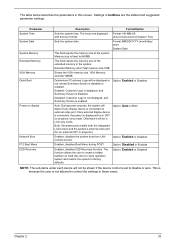
... memory size-1MB Shows the VGA memory size. If any display device is disabled. Option: Auto or Both Enables, disables the system boot from LAN (remote server). shows Summary Screen is enabled. Enabled: Customer Logo is displayed, and Summary Screen is connected on hard disc drive to store operation system and restore the system to create a hidden partition on external video port. The hours are the default and suggested parameter settings. The function allows the user to factory defaults. Option: Enabled or Disabled Auto: During power...
... memory size-1MB Shows the VGA memory size. If any display device is disabled. Option: Auto or Both Enables, disables the system boot from LAN (remote server). shows Summary Screen is enabled. Enabled: Customer Logo is displayed, and Summary Screen is connected on hard disc drive to store operation system and restore the system to create a hidden partition on external video port. The hours are the default and suggested parameter settings. The function allows the user to factory defaults. Option: Enabled or Disabled Auto: During power...
TravelMate 2410 Service Guide
Page 41
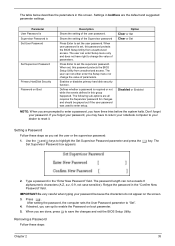
... set the user or the supervisor password: 1. When set the user password. Option Clear or Set Clear or Set Disabled or Enabled NOTE: When you are the default and suggested parameter settings. Setting a Password Follow these steps: Chapter 2 35 The Set Supervisor Password box appears: 2. After setting the password, the computer sets the User Password parameter to highlight the Set Supervisor Password parameter and press the e key. Enables or disables primary hard disk security function. The password length can not either enter the Setup menu nor change...
... set the user or the supervisor password: 1. When set the user password. Option Clear or Set Clear or Set Disabled or Enabled NOTE: When you are the default and suggested parameter settings. Setting a Password Follow these steps: Chapter 2 35 The Set Supervisor Password box appears: 2. After setting the password, the computer sets the User Password parameter to highlight the Set Supervisor Password parameter and press the e key. Enables or disables primary hard disk security function. The password length can not either enter the Setup menu nor change...
TravelMate 2410 Service Guide
Page 42
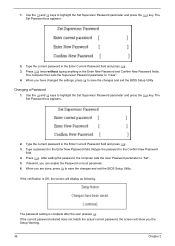
... Password parameter and press the e key. Use the w and y keys to "Set". 5. Type the current password in the Confirm New Password field. 4. Use the w and y keys to "Clear". 4. Press e twice without typing anything in the Enter New Password and Confirm New Password fields. If the current password entered does not match the actual current password, the screen will display as following. If desired, you are done, press u to save the changes and exit the BIOS Setup Utility...
... Password parameter and press the e key. Use the w and y keys to "Set". 5. Type the current password in the Confirm New Password field. 4. Use the w and y keys to "Clear". 4. Press e twice without typing anything in the Enter New Password and Confirm New Password fields. If the current password entered does not match the actual current password, the screen will display as following. If desired, you are done, press u to save the changes and exit the BIOS Setup Utility...
TravelMate 2410 Service Guide
Page 45
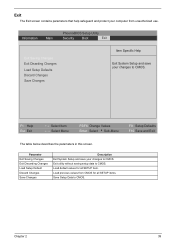
... default values for all SETUP item. Load previous values from unauthorized use. Exit The Exit screen contains parameters that help safeguard and protect your computer from CMOS for all SETUP items. Save Setup Data to CMOS. Exit utility without saving setup data to CMOS. F1 Help Esc Exit ↑ ↓ Select Item ← → Select Menu F5/F6 Change Values Enter Select 4 Sub-Menu F9 Setup Defaults...
... default values for all SETUP item. Load previous values from unauthorized use. Exit The Exit screen contains parameters that help safeguard and protect your computer from CMOS for all SETUP items. Save Setup Data to CMOS. Exit utility without saving setup data to CMOS. F1 Help Esc Exit ↑ ↓ Select Item ← → Select Menu F5/F6 Change Values Enter Select 4 Sub-Menu F9 Setup Defaults...

TravelMate 2410 Service Guide
Page 49
... instructs you must first remove the keyboard, then disassemble the inside assembly frame in that need to be removed during servicing. Start Battery Middle Cover H*2 DIMM Cover Memory P*1 Keyboard ODD Module E*1 J*2 on bottom side K*2 on top side LCD Module E*1 on upper case assemby E*12 on bottom side F*3 on bottom side A*2 on rear side H*3 HDD Cover Wireless LAN Card O*4 HDD Module M*4 HDD Bracket HDD Lower Case *2 Speaker Set Lower Case Assembly O*2 Main Board Assembly RTC Battery Bluetooth Module Upper Case Assembly Microphone...
... instructs you must first remove the keyboard, then disassemble the inside assembly frame in that need to be removed during servicing. Start Battery Middle Cover H*2 DIMM Cover Memory P*1 Keyboard ODD Module E*1 J*2 on bottom side K*2 on top side LCD Module E*1 on upper case assemby E*12 on bottom side F*3 on bottom side A*2 on rear side H*3 HDD Cover Wireless LAN Card O*4 HDD Module M*4 HDD Bracket HDD Lower Case *2 Speaker Set Lower Case Assembly O*2 Main Board Assembly RTC Battery Bluetooth Module Upper Case Assembly Microphone...
TravelMate 2410 Service Guide
Page 68
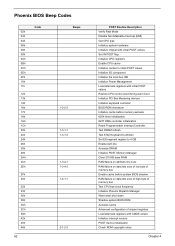
... IDE Initialize Power Management Load alternate registers with initial POST values Restore CPU control word during warm boot Initialize PCI Bus Mastering devices Initialize keyboard controller BIOS ROM checksum Initialize cache before memory autosize 8254 timer initialization 8237 DMA controller initialization Reset Programmable Interrupt Controller Test DRAM refresh Test 8742 Keyboard Controller Set ES segment register to 4 GB Enable A20 line Autosize DRAM Initialize POST Memory Manager Clear 215 KB base RAM RAM failure...
... IDE Initialize Power Management Load alternate registers with initial POST values Restore CPU control word during warm boot Initialize PCI Bus Mastering devices Initialize keyboard controller BIOS ROM checksum Initialize cache before memory autosize 8254 timer initialization 8237 DMA controller initialization Reset Programmable Interrupt Controller Test DRAM refresh Test 8742 Keyboard Controller Set ES segment register to 4 GB Enable A20 line Autosize DRAM Initialize POST Memory Manager Clear 215 KB base RAM RAM failure...
TravelMate 2410 Service Guide
Page 69
... devices Initialize all video adapters in system QuietBoot start (optional) Shadow video BIOS ROM Display BIOS copyright notice Display CPU type and speed Initialize EISA board Test keyboard Set key click if enabled Test for unexpected interrupts Initialize POST display service Display prompt "Press F2 to enter SETUP" Disable CPU cache Test RAM between 512 and 640 KB Test extended memory Test extended memory address lines Jump to User Patch1 Configure advanced cache registers Initialize Multi Processor APIC Enable external and CPU caches Setup...
... devices Initialize all video adapters in system QuietBoot start (optional) Shadow video BIOS ROM Display BIOS copyright notice Display CPU type and speed Initialize EISA board Test keyboard Set key click if enabled Test for unexpected interrupts Initialize POST display service Display prompt "Press F2 to enter SETUP" Disable CPU cache Test RAM between 512 and 640 KB Test extended memory Test extended memory address lines Jump to User Patch1 Configure advanced cache registers Initialize Multi Processor APIC Enable external and CPU caches Setup...
TravelMate 2410 Service Guide
Page 70
... Option ROMs Clear parity checkers Display MultiBoot menu Clear screen (optional) Check virus and backup reminders Try to UserPatch2 Build MPTABLE for multi-processor boards Install CD ROM for boot Clear huge ES segment register Fixup Multi Processor table Search for errors POST done- Check for SMART drive (optional) Shadow option ROMs Set up Power Management Initialize security engine (optional) Enable hardware interrupts Determine number of ATA and SCSI drives Set time of ATA drives (optional) Initialize hard-disk controllers Initialize local-bus hard-disk controllers...
... Option ROMs Clear parity checkers Display MultiBoot menu Clear screen (optional) Check virus and backup reminders Try to UserPatch2 Build MPTABLE for multi-processor boards Install CD ROM for boot Clear huge ES segment register Fixup Multi Processor table Search for errors POST done- Check for SMART drive (optional) Shadow option ROMs Set up Power Management Initialize security engine (optional) Enable hardware interrupts Determine number of ATA and SCSI drives Set time of ATA drives (optional) Initialize hard-disk controllers Initialize local-bus hard-disk controllers...
TravelMate 2410 Service Guide
Page 71
... the CPU Initialize the system timer Initialize system I/O Check force recovery boot Checksum BIOS ROM Go to BIOS Set Huge Segment Initialize Multi Processor Initialize OEM special code Initialize PIC and DMA Initialize Memory type Initialize Memory size Shadow Boot Block System memory test Initialize interrupt vectors Initialize Run Time Clock Initialize video Initialize System Management Mode Output one beep before boot Boot to Mini DOS Clear Huge Segment Boot...
... the CPU Initialize the system timer Initialize system I/O Check force recovery boot Checksum BIOS ROM Go to BIOS Set Huge Segment Initialize Multi Processor Initialize OEM special code Initialize PIC and DMA Initialize Memory type Initialize Memory size Shadow Boot Block System memory test Initialize interrupt vectors Initialize Run Time Clock Initialize video Initialize System Management Mode Output one beep before boot Boot to Mini DOS Clear Huge Segment Boot...
TravelMate 2410 Service Guide
Page 72
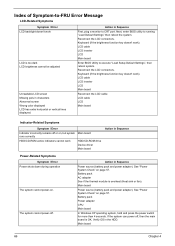
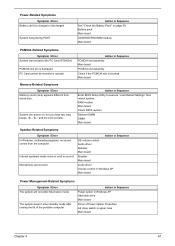
... Setup Default Settings", then reboot system. Main board Power source (battery pack and power adapter). Action in the HDD. If the system can power off . LCD cable LCD inverter LCD Main board Reconnect the LCD cable LCD cable LCD Main board Indicator-Related Symptoms Symptom / Error Indicator incorrectly remains off or on . Battery pack Power adapter CPU Main board In Windows XP operating system, hold and press the power switch for more than 4 seconds. Reconnect the LCD connectors. Keyboard (if the brightness function key doesn't work HDD/CD-ROM drive Device driver Main board...
... Setup Default Settings", then reboot system. Main board Power source (battery pack and power adapter). Action in the HDD. If the system can power off . LCD cable LCD inverter LCD Main board Reconnect the LCD cable LCD cable LCD Main board Indicator-Related Symptoms Symptom / Error Indicator incorrectly remains off or on . Battery pack Power adapter CPU Main board In Windows XP operating system, hold and press the power switch for more than 4 seconds. Reconnect the LCD connectors. Keyboard (if the brightness function key doesn't work HDD/CD-ROM drive Device driver Main board...
TravelMate 2410 Service Guide
Page 73
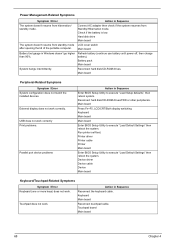
.... Internal speakers make noise or emit no sound comes from actual size. Action in Sequence Power option in Windows XP Hard disk drive Main board Driver of the portable computer. Battery pack Main board ODD/HDD/FDD/RAM module Main board PCMCIA-Related Symptoms Symptom / Error System cannot detect the PC Card (PCMCIA) PCMCIA slot pin is blank. Microphone cannot work Action in Sequence OS volume control Audio driver Speaker Main board Speaker Main board Audio driver Volume control in Windows XP Main board Power Management...
.... Internal speakers make noise or emit no sound comes from actual size. Action in Sequence Power option in Windows XP Hard disk drive Main board Driver of the portable computer. Battery pack Main board ODD/HDD/FDD/RAM module Main board PCMCIA-Related Symptoms Symptom / Error System cannot detect the PC Card (PCMCIA) PCMCIA slot pin is blank. Microphone cannot work Action in Sequence OS volume control Audio driver Speaker Main board Speaker Main board Audio driver Volume control in Windows XP Main board Power Management...
TravelMate 2410 Service Guide
Page 74
... power off, then charge battery). Main board Peripheral-Related Symptoms Symptom / Error System configuration does not match the installed devices. Reconnect hard disk/CD-ROM drives/FDD or other peripherals. Run printer self-test. Printer driver Printer cable Printer Main board Enter BIOS Setup Utility to execute "Load Default Settings" then reboot the system. Action in Windows doesn't go higher than 90%. Main board Battery fuel gauge in Sequence Reconnect the keyboard cable. Main board Press Fn+F5, LCD...
... power off, then charge battery). Main board Peripheral-Related Symptoms Symptom / Error System configuration does not match the installed devices. Reconnect hard disk/CD-ROM drives/FDD or other peripherals. Run printer self-test. Printer driver Printer cable Printer Main board Enter BIOS Setup Utility to execute "Load Default Settings" then reboot the system. Action in Windows doesn't go higher than 90%. Main board Battery fuel gauge in Sequence Reconnect the keyboard cable. Main board Press Fn+F5, LCD...
TravelMate 2410 Service Guide
Page 76
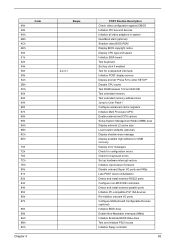
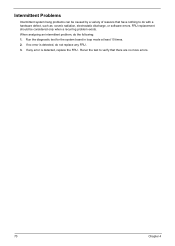
... diagnostic test for the system board in loop mode at least 10 times. 2. Intermittent Problems Intermittent system hang problems can be considered only when a recurring problem exists. If no more errors. 70 Chapter 4 If any FRU. 3. When analyzing an intermittent problem, do with a hardware defect, such as: cosmic radiation, electrostatic discharge, or software errors. FRU replacement should be caused by a variety...
... diagnostic test for the system board in loop mode at least 10 times. 2. Intermittent Problems Intermittent system hang problems can be considered only when a recurring problem exists. If no more errors. 70 Chapter 4 If any FRU. 3. When analyzing an intermittent problem, do with a hardware defect, such as: cosmic radiation, electrostatic discharge, or software errors. FRU replacement should be caused by a variety...


