
Travelmate 2300 User's Guide
Page 58
...content that is only available on the system. 2 Acer multilingual operating system selection menu will install the operating system and language you want. Before performing a restore operation, please check the BIOS settings. a Check to see if "Hard Disk Recovery" function is [Enabled]. The system will be erased...language you choose now will be reformatted and all data files before you use when you use this option. b Make sure the [Hard Disk Recovery] setting in [Advanced] is enabled or not. Note: To activate BIOS Setup Utility, press during POST. c Exit the BIOS Setup ...
...content that is only available on the system. 2 Acer multilingual operating system selection menu will install the operating system and language you want. Before performing a restore operation, please check the BIOS settings. a Check to see if "Hard Disk Recovery" function is [Enabled]. The system will be erased...language you choose now will be reformatted and all data files before you use when you use this option. b Make sure the [Hard Disk Recovery] setting in [Advanced] is enabled or not. Note: To activate BIOS Setup Utility, press during POST. c Exit the BIOS Setup ...
TravelMate 2300/4000/4500 Service Guide
Page 50
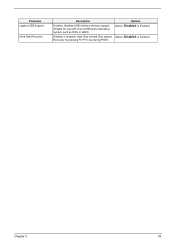
Enables or disables Hard Disk to Hard Disk system Recovery by pressing Fn+F10 key during POST. Parameter Legacy USB Support Hard Disk Recovery Description Enables, disables USB interface devices support. (Enable for use with a non-USB aware Operating System such as DOS or UNIX). Options Option: Disabled or Enabled Option: Disabled or Enabled Chapter 2 43
Enables or disables Hard Disk to Hard Disk system Recovery by pressing Fn+F10 key during POST. Parameter Legacy USB Support Hard Disk Recovery Description Enables, disables USB interface devices support. (Enable for use with a non-USB aware Operating System such as DOS or UNIX). Options Option: Disabled or Enabled Option: Disabled or Enabled Chapter 2 43
TravelMate 2300/4000/4500 Service Guide
Page 93
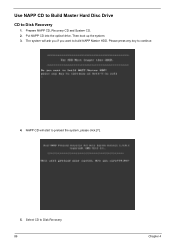
Then boot up the system. 3. Please press any key to Disk Recovery 1. Use NAPP CD to Build Master Hard Disc Drive CD to continue. 4. Prepare NAPP CD, Recovery CD and System CD. 2. The system will start to build NAPP Master HDD. NAPP CD will ask you if you want to preload the system, please click [Y]. 5. Select CD to Disk Revocery. 86 Chapter 4 Put NAPP CD into the optical drive.
Then boot up the system. 3. Please press any key to Disk Recovery 1. Use NAPP CD to Build Master Hard Disc Drive CD to continue. 4. Prepare NAPP CD, Recovery CD and System CD. 2. The system will start to build NAPP Master HDD. NAPP CD will ask you if you want to preload the system, please click [Y]. 5. Select CD to Disk Revocery. 86 Chapter 4 Put NAPP CD into the optical drive.

TravelMate 2300/4000/4500 Service Guide
Page 96
Then boot up the system. 3. Put NAPP CD into the optical drive. Please press any key to preload the system, please click [Y]. NAPP CD will ask you if you want to Disk Recovery 1. Chapter 4 89 The system will start to continue. 4. Disk to build NAPP Master HDD. Prepare NAPP CD, Recovery CD and System CD. 2.
Then boot up the system. 3. Put NAPP CD into the optical drive. Please press any key to preload the system, please click [Y]. NAPP CD will ask you if you want to Disk Recovery 1. Chapter 4 89 The system will start to continue. 4. Disk to build NAPP Master HDD. Prepare NAPP CD, Recovery CD and System CD. 2.
TravelMate 2300/4000/4500 Service Guide
Page 97
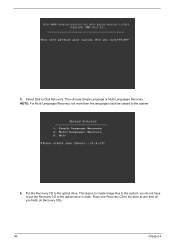
Then choose Single Language or Multi-Languages Recovery. NOTE: For Multi-Languages Recovery, not more than five languages could be loaded to Disk Recovery. Select Disk to the system. 6. This step is to create image files to the system, you finish all Recovery CDs. 90 Chapter 4 Place one Recovery CD to the drive at one time till you do not have to put the Recovery CD to the optical drive. 5. Put the Recovery CD to the optical drive in order.
Then choose Single Language or Multi-Languages Recovery. NOTE: For Multi-Languages Recovery, not more than five languages could be loaded to Disk Recovery. Select Disk to the system. 6. This step is to create image files to the system, you finish all Recovery CDs. 90 Chapter 4 Place one Recovery CD to the drive at one time till you do not have to put the Recovery CD to the optical drive. 5. Put the Recovery CD to the optical drive in order.


