
User Manual
Page 3
... for certain models) Your computer shipped with plastic dummies installed in the slots. Dummies protect unused slots from the power supplies. CAUTION for extended periods. • Do not increase the volume to the equipment operator as possible. Do not use when no cards are in the card slots. If the system has multiple sources of power, disconnect power from the system by unplugging...
... for certain models) Your computer shipped with plastic dummies installed in the slots. Dummies protect unused slots from the power supplies. CAUTION for extended periods. • Do not increase the volume to the equipment operator as possible. Do not use when no cards are in the card slots. If the system has multiple sources of power, disconnect power from the system by unplugging...
User Manual
Page 6
... notebook uses lithium batteries. vi Guidelines for its intended purpose. Do not pierce, open or disassemble the battery. If the battery leaks and you carry a spare battery in your product in or near a heat source, in a high temperature location, in strong direct sunlight, in a microwave oven or in a pressurized container, and do not expose it in fire. Wireless devices may explode. Replace...
... notebook uses lithium batteries. vi Guidelines for its intended purpose. Do not pierce, open or disassemble the battery. If the battery leaks and you carry a spare battery in your product in or near a heat source, in a high temperature location, in strong direct sunlight, in a microwave oven or in a pressurized container, and do not expose it in fire. Wireless devices may explode. Replace...
User Manual
Page 7
... regulations in force in its use non-compliant parts when adding or changing components. Use the device only in any trouble with hearing aids should position the device the above separation distance instructions are magnetic. Remember to : wireless lan (WLAN), Bluetooth and/or 3G. To successfully transmit data files or messages, this device requires a good quality connection to this device, please contact your body...
... regulations in force in its use non-compliant parts when adding or changing components. Use the device only in any trouble with hearing aids should position the device the above separation distance instructions are magnetic. Remember to : wireless lan (WLAN), Bluetooth and/or 3G. To successfully transmit data files or messages, this device requires a good quality connection to this device, please contact your body...
User Manual
Page 13
... language such as system utilities, data recovery, expansion options and troubleshooting. It covers basic topics such as the AcerSystem User Guide mentioned below the LCD screen beside the easy-launch buttons. In addition it : 1 Click on Start, All Programs, AcerSystem. 2 Click on such subjects as "only for meeting your mobile computing needs. If Adobe Reader is available in the TravelMate product series. Note: Viewing the...
... language such as system utilities, data recovery, expansion options and troubleshooting. It covers basic topics such as the AcerSystem User Guide mentioned below the LCD screen beside the easy-launch buttons. In addition it : 1 Click on Start, All Programs, AcerSystem. 2 Click on such subjects as "only for meeting your mobile computing needs. If Adobe Reader is available in the TravelMate product series. Note: Viewing the...
User Manual
Page 17
... and servicing xv Touchpad 1 Touchpad basics (with fingerprint reader) 1 Touchpad basics (with two-click buttons) 2 Using the keyboard 3 Lock keys and embedded numeric keypad* 3 Windows keys 4 Audio 5 Acer PureZone (only for certain models) 5 Video 5 16:9 display (only for certain models) 5 Using the system utilities 6 Acer Bio-Protection (only for certain models) 6 Acer GridVista (dual-display compatible) 7 Acer Backup Manager 8 Power management 9 Acer eRecovery Management 10 Burn backup discs 11 Restore 12 Restore Windows from backup discs 13 Battery...
... and servicing xv Touchpad 1 Touchpad basics (with fingerprint reader) 1 Touchpad basics (with two-click buttons) 2 Using the keyboard 3 Lock keys and embedded numeric keypad* 3 Windows keys 4 Audio 5 Acer PureZone (only for certain models) 5 Video 5 16:9 display (only for certain models) 5 Using the system utilities 6 Acer Bio-Protection (only for certain models) 6 Acer GridVista (dual-display compatible) 7 Acer Backup Manager 8 Power management 9 Acer eRecovery Management 10 Burn backup discs 11 Restore 12 Restore Windows from backup discs 13 Battery...
User Manual
Page 18
... lock 23 Using passwords 23 Entering passwords 24 Setting passwords 24 Expanding through options 25 Connectivity options 25 Fax/data modem (only for certain models) 25 Built-in network feature 26 Universal Serial Bus (USB) 26 IEEE 1394 port (only for certain models) 27 High-Definition Multimedia Interface (only for certain models) 27 ExpressCard (only for certain models) 28 Installing memory 29 BIOS utility 30 Boot sequence 30 Enable disk-to-disk recovery 30 Password 30 Using software 31 Playing DVD...
... lock 23 Using passwords 23 Entering passwords 24 Setting passwords 24 Expanding through options 25 Connectivity options 25 Fax/data modem (only for certain models) 25 Built-in network feature 26 Universal Serial Bus (USB) 26 IEEE 1394 port (only for certain models) 27 High-Definition Multimedia Interface (only for certain models) 27 ExpressCard (only for certain models) 28 Installing memory 29 BIOS utility 30 Boot sequence 30 Enable disk-to-disk recovery 30 Password 30 Using software 31 Playing DVD...
User Manual
Page 22
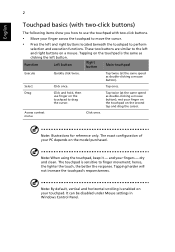
... use the touchpad with two-click buttons. • Move your fingers - Tap once. Note: By default, vertical and horizontal scrolling is sensitive to perform selection and execution functions. Tap twice (at the same speed as double-clicking a mouse button); Note: When using the touchpad, keep it - Tapping harder will not increase the touchpad's responsiveness. Function Left button Right button Main touchpad Execute Select Drag Access context menu Quickly...
... use the touchpad with two-click buttons. • Move your fingers - Tap once. Note: By default, vertical and horizontal scrolling is sensitive to perform selection and execution functions. Tap twice (at the same speed as double-clicking a mouse button); Note: When using the touchpad, keep it - Tapping harder will not increase the touchpad's responsiveness. Function Left button Right button Main touchpad Execute Select Drag Access context menu Quickly...
User Manual
Page 23
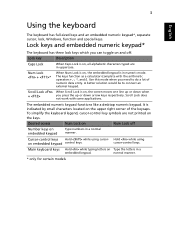
... models Use this mode when you press the up or down when + you need to connect an external keypad. Scroll Lock When Scroll Lock is indicated by small characters located on , the screen moves one line up or down arrow keys respectively. Main keyboard keys Hold while typing letters on Type the letters in a normal manner. Scroll Lock does not work with the arithmetic operators +, -, *, and /). Cursor-control keys Hold while using on embedded keypad Type numbers...
... models Use this mode when you press the up or down when + you need to connect an external keypad. Scroll Lock When Scroll Lock is indicated by small characters located on , the screen moves one line up or down arrow keys respectively. Main keyboard keys Hold while typing letters on Type the letters in a normal manner. Scroll Lock does not work with the arithmetic operators +, -, *, and /). Cursor-control keys Hold while using on embedded keypad Type numbers...
User Manual
Page 24
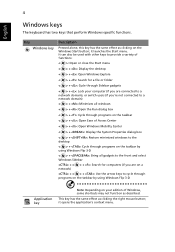
... may not function as clicking the right mouse button; It can also be used with other keys to cycle through Sidebar gadgets < > + : Lock your edition of functions: < >: Open or close the Start menu < > + : Display the desktop < > + : Open Windows Explore < > + : Search for a file or folder < > + : Cycle through programs on the taskbar by using Windows Flip 3-D Application key Note: Depending on the Windows Start button; English 4 Windows keys The keyboard has two keys that perform Windows-specific functions.
... may not function as clicking the right mouse button; It can also be used with other keys to cycle through Sidebar gadgets < > + : Lock your edition of functions: < >: Open or close the Start menu < > + : Display the desktop < > + : Open Windows Explore < > + : Search for a file or folder < > + : Cycle through programs on the taskbar by using Windows Flip 3-D Application key Note: Depending on the Windows Start button; English 4 Windows keys The keyboard has two keys that perform Windows-specific functions.
User Manual
Page 28
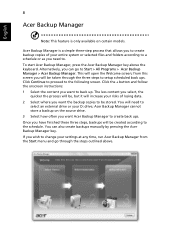
... you can also create backups manually by pressing the Acer Backup Manager key. To start Acer Backup Manager, press the Acer Backup Manager key above . Once you have finished these three steps, backups will be taken through the steps outlined above the keyboard. Acer Backup Manager cannot store a backup on certain models. from the Start menu and go to be , but it will open the Welcome screen; Click the + button and follow the onscreen instructions: 1 Select the content...
... you can also create backups manually by pressing the Acer Backup Manager key. To start Acer Backup Manager, press the Acer Backup Manager key above . Once you have finished these three steps, backups will be taken through the steps outlined above the keyboard. Acer Backup Manager cannot store a backup on certain models. from the Start menu and go to be , but it will open the Welcome screen; Click the + button and follow the onscreen instructions: 1 Select the content...
User Manual
Page 29
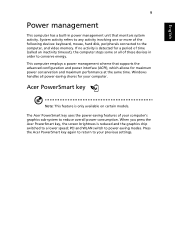
... supports the advanced configuration and power interface (ACPI), which allows for your computer. PCI and WLAN switch to a lower speed; Windows handles all of your previous settings. English 9 Power management This computer has a built-in order to conserve energy. If no activity is detected for a period of the following devices: keyboard, mouse, hard disk, peripherals connected to the computer, and video memory. When you press the Acer PowerSmart key, the screen brightness...
... supports the advanced configuration and power interface (ACPI), which allows for your computer. PCI and WLAN switch to a lower speed; Windows handles all of your previous settings. English 9 Power management This computer has a built-in order to conserve energy. If no activity is detected for a period of the following devices: keyboard, mouse, hard disk, peripherals connected to the computer, and video memory. When you press the Acer PowerSmart key, the screen brightness...
User Manual
Page 33
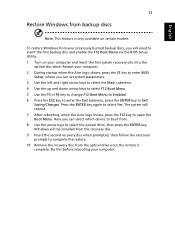
... keys to select F12 Boot Menu 5 Use the F5 or F6 key to change F12 Boot Menu to Enabled. 6 Press the ESC key to enter the Exit submenu, press the ENTER key to open the Boot Menu. Restart your computer. 2 During startup when the Acer logo shows, press the F2 key to enter BIOS Setup, where you will reboot. 7 After rebooting, when the Acer logo shows, press the F12 key to Exit Saving Changes. English 13 Restore Windows from backup discs...
... keys to select F12 Boot Menu 5 Use the F5 or F6 key to change F12 Boot Menu to Enabled. 6 Press the ESC key to enter the Exit submenu, press the ENTER key to open the Boot Menu. Restart your computer. 2 During startup when the Acer logo shows, press the F2 key to enter BIOS Setup, where you will reboot. 7 After rebooting, when the Acer logo shows, press the F12 key to Exit Saving Changes. English 13 Restore Windows from backup discs...
User Manual
Page 38
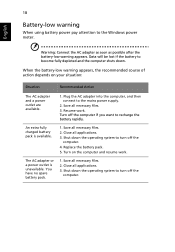
... the computer and resume work . An extra fully charged battery pack is unavailable. Replace the battery pack. 5. Save all necessary files. 3. Shut down the operating system to turn off the computer if you want to become fully depleted and the computer shuts down. Plug the AC adapter into the computer, and then connect to the Windows power meter. Save all necessary...
... the computer and resume work . An extra fully charged battery pack is unavailable. Replace the battery pack. 5. Save all necessary files. 3. Shut down the operating system to turn off the computer if you want to become fully depleted and the computer shuts down. Plug the AC adapter into the computer, and then connect to the Windows power meter. Save all necessary...
User Manual
Page 39
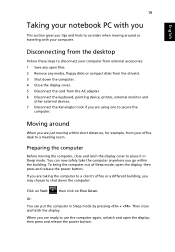
... latch the display cover to place it in Sleep mode by pressing + . Disconnecting from the desktop Follow these steps to disconnect your computer from external accessories: 1 Save any media, floppy disks or compact disks from the drive(s). 3 Shut down the computer: Click on Start then click on Shut Down. then press and release the power button. 19 English Taking your notebook PC with...
... latch the display cover to place it in Sleep mode by pressing + . Disconnecting from the desktop Follow these steps to disconnect your computer from external accessories: 1 Save any media, floppy disks or compact disks from the drive(s). 3 Shut down the computer: Click on Start then click on Shut Down. then press and release the power button. 19 English Taking your notebook PC with...

User Manual
Page 43
... into the notch and turn the key to the BIOS utility. Using passwords Passwords protect your Supervisor Password! Security features include hardware and software locks - Combine the use . Insert the lock into the BIOS utility. Setting these passwords creates several different levels of protection for maximum security. Some keyless models are also available. English 23 Securing your computer Your computer is a valuable investment that you need to take care of...
... into the notch and turn the key to the BIOS utility. Using passwords Passwords protect your Supervisor Password! Security features include hardware and software locks - Combine the use . Insert the lock into the BIOS utility. Setting these passwords creates several different levels of protection for maximum security. Some keyless models are also available. English 23 Securing your computer Your computer is a valuable investment that you need to take care of...

User Manual
Page 44
... to enter the BIOS utility at boot-up . • Type the Supervisor Password and press to access the BIOS utility. Press and hold the power button for four seconds to enter a password. English 24 Entering passwords When a password is set, a password prompt appears in the center of the display screen. • When the Supervisor Password is enabled, a prompt appears at boot-up . • Type the User Password and press to use the computer. Setting passwords You can set passwords using the BIOS utility. Try...
... to enter the BIOS utility at boot-up . • Type the Supervisor Password and press to access the BIOS utility. Press and hold the power button for four seconds to enter a password. English 24 Entering passwords When a password is set, a password prompt appears in the center of the display screen. • When the Supervisor Password is enabled, a prompt appears at boot-up . • Type the User Password and press to use the computer. Setting passwords You can set passwords using the BIOS utility. Try...

User Manual
Page 45
English 25 Expanding through options Your notebook PC offers you would with digital phone lines. Please make sure that the cable you are working. Plugging this modem into a digital phone line will damage the modem. Warning! For instructions on how to connect different external devices to your computer as you a complete mobile computing experience. To use is not compatible with a desktop...
English 25 Expanding through options Your notebook PC offers you would with digital phone lines. Please make sure that the cable you are working. Plugging this modem into a digital phone line will damage the modem. Warning! For instructions on how to connect different external devices to your computer as you a complete mobile computing experience. To use is not compatible with a desktop...
User Manual
Page 50
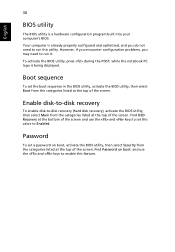
... a hardware configuration program built into your computer's BIOS. Find D2D Recovery at the top of the screen and use the and keys to -disk recovery (hard disk recovery), activate the BIOS utility, then select Main from the categories listed at the bottom of the screen. Enable disk-to-disk recovery To enable disk-to enable this utility. Boot sequence To set the boot sequence in the BIOS utility, activate the BIOS utility, then select Boot from the categories listed at the top of the screen. Password To set...
... a hardware configuration program built into your computer's BIOS. Find D2D Recovery at the top of the screen and use the and keys to -disk recovery (hard disk recovery), activate the BIOS utility, then select Main from the categories listed at the bottom of the screen. Enable disk-to-disk recovery To enable disk-to enable this utility. Boot sequence To set the boot sequence in the BIOS utility, activate the BIOS utility, then select Boot from the categories listed at the top of the screen. Password To set...
User Manual
Page 52
... deselect the Mute all option. • The volume level may be too low. Connect the AC adapter to recharge the battery pack. • Make sure that may arise during the use the volume control buttons to restart the system. Press + < > (increase) to adjust the brightness level. • The display device might be too low. If it is not lit, no power is lit, check the...
... deselect the Mute all option. • The volume level may be too low. Connect the AC adapter to recharge the battery pack. • Make sure that may arise during the use the volume control buttons to restart the system. Press + < > (increase) to adjust the brightness level. • The display device might be too low. If it is not lit, no power is lit, check the...
User Manual
Page 60
... will always continue to support pulse dialing. 7 Use of Directive 1999/5/EC. Should such problems occur, the user should NOT contact the telecom Fault Service. 8 This equipment may not contain wireless radio devices (such as black or red dots. English 40 5 This equipment shall not be set up to make automatic calls to Telecom's 111 Emergency Service. 6 This device is equipped with...
... will always continue to support pulse dialing. 7 Use of Directive 1999/5/EC. Should such problems occur, the user should NOT contact the telecom Fault Service. 8 This equipment may not contain wireless radio devices (such as black or red dots. English 40 5 This equipment shall not be set up to make automatic calls to Telecom's 111 Emergency Service. 6 This device is equipped with...


