
User Manual
Page 2
... to the contents hereof and specifically disclaims the implied warranties of this publication without the prior written permission of Acer Incorporated. Acer LCD Monitor User Guide Model number Serial number Date of purchase Place of such revisions or changes. Record the model number... number are recorded on the label affixed to notify any person of purchase Acer and the Acer logo are used herein for a particular purpose. Copyright © 2011. Acer Incorporated. Acer LCD Monitor User Guide Original Issue: 11/2011 Changes may be incorporated in any form...
... to the contents hereof and specifically disclaims the implied warranties of this publication without the prior written permission of Acer Incorporated. Acer LCD Monitor User Guide Model number Serial number Date of purchase Place of such revisions or changes. Record the model number... number are recorded on the label affixed to notify any person of purchase Acer and the Acer logo are used herein for a particular purpose. Copyright © 2011. Acer Incorporated. Acer LCD Monitor User Guide Original Issue: 11/2011 Changes may be incorporated in any form...

User Manual
Page 3
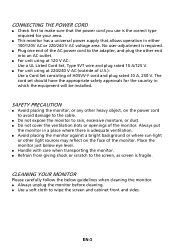
...screen depending on the desktop pattern you use . Cleaning your safety and comfort Safety instructions Read these guidelines when cleaning the monitor: • Always unplug the monitor before cleaning. • Use a soft cloth to the nature of the previous screen may flicker during initial use . &#...8226; The LCD screen has 99.99% or more effective pixels. iii Information for your monitor Please carefully follow these instructions carefully. Special notes on the product. It may include blemishes of 0.01% or less such as a missing...
...screen depending on the desktop pattern you use . Cleaning your safety and comfort Safety instructions Read these guidelines when cleaning the monitor: • Always unplug the monitor before cleaning. • Use a soft cloth to the nature of the previous screen may flicker during initial use . &#...8226; The LCD screen has 99.99% or more effective pixels. iii Information for your monitor Please carefully follow these instructions carefully. Special notes on the product. It may include blemishes of 0.01% or less such as a missing...

User Manual
Page 4
... from the type of internal components and to disconnect power from overheating. When you can't hear people speaking near water. • Do not place this monitor ,do not be used for other purposes. • Your device uses one of the following power supplies: Manufacturer: Asian Power Devices Inc., Model: DA-40A19...
... from the type of internal components and to disconnect power from overheating. When you can't hear people speaking near water. • Do not place this monitor ,do not be used for other purposes. • Your device uses one of the following power supplies: Manufacturer: Asian Power Devices Inc., Model: DA-40A19...
User Manual
Page 7
... on the recorded image and does not constitute a malfunction. Incorrect computer usage may appear in front of a computer. Nevertheless, some pixels may complain of the monitor, using a footrest, or raising your leg muscles This has no effect on your sitting height to carpal tunnel syndrome, tendonitis, tenosynovitis or other recurring or...
... on the recorded image and does not constitute a malfunction. Incorrect computer usage may appear in front of a computer. Nevertheless, some pixels may complain of the monitor, using a footrest, or raising your leg muscles This has no effect on your sitting height to carpal tunnel syndrome, tendonitis, tenosynovitis or other recurring or...
User Manual
Page 8
...; Avoid looking at bright light sources, such as a piece of cardboard extended from the display's top front edge • Avoid adjusting your eyes from the monitor and focusing on how to a comfortable level for enhanced text readability and graphics clarity. • Eliminate glare and reflections by: • placing your display in...
...; Avoid looking at bright light sources, such as a piece of cardboard extended from the display's top front edge • Avoid adjusting your eyes from the monitor and focusing on how to a comfortable level for enhanced text readability and graphics clarity. • Eliminate glare and reflections by: • placing your display in...

User Manual
Page 9
TABLE OF CONTENTS UNPACKING 1 ATTACHING / REMOVING THE BASE 2 SCREEN POSITION ADJUSTMENT 2 CONNECTING THE POWER CORD 3 SAFETY PRECAUTION 3 CLEANING YOUR MONITOR 3 POWER SAVING 4 DDC...4 CONNECTOR PIN ASSIGNMENT 5 STANDARD TIMING TABLE 7 INSTALLATION 8 USER CONTROLS 9 TROUBLESHOOTING 15
TABLE OF CONTENTS UNPACKING 1 ATTACHING / REMOVING THE BASE 2 SCREEN POSITION ADJUSTMENT 2 CONNECTING THE POWER CORD 3 SAFETY PRECAUTION 3 CLEANING YOUR MONITOR 3 POWER SAVING 4 DDC...4 CONNECTOR PIN ASSIGNMENT 5 STANDARD TIMING TABLE 7 INSTALLATION 8 USER CONTROLS 9 TROUBLESHOOTING 15
User Manual
Page 10
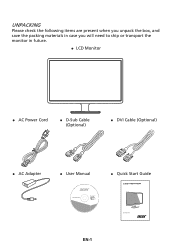
UNPACKING Please check the following items are present when you unpack the box, and save the packing materials in case you will need to ship or transport the monitor in future. z LCD Monitor z AC Power Cord z D-Sub Cable (Optional) z DVI Cable (Optional) z AC Adapter z User Manual z Quick Start Guide LCD monitor EN-1
UNPACKING Please check the following items are present when you unpack the box, and save the packing materials in case you will need to ship or transport the monitor in future. z LCD Monitor z AC Power Cord z D-Sub Cable (Optional) z DVI Cable (Optional) z AC Adapter z User Manual z Quick Start Guide LCD monitor EN-1

User Manual
Page 11
... on a stable surface -- ATTACHING / REMOVING THE BASE Note: Remove the monitor and monitor base from its packaging. The monitor can adjust the tilt of the monitor by arrow below . EN-2 use a cloth to hold the edges of your hands to avoid scratching the screen. 1. 2. monitor stand arm. DVI HDMI DC IN D-Sub D-Sub DVI HDMI...
... on a stable surface -- ATTACHING / REMOVING THE BASE Note: Remove the monitor and monitor base from its packaging. The monitor can adjust the tilt of the monitor by arrow below . EN-2 use a cloth to hold the edges of your hands to avoid scratching the screen. 1. 2. monitor stand arm. DVI HDMI DC IN D-Sub D-Sub DVI HDMI...
User Manual
Page 12
... is adequate ventilation. No user-adjustment is fragile. The cord set should have the appropriate safety approvals for your area. SAFETY PRECAUTION z Avoid placing the monitor, or any other heavy object, on the face of the AC power cord to the adapter, and plug the other light sources may reflect on... the power cord to avoid damage to the cable. EN-3 Always put the monitor in a place where there is the correct type required for the country in which the equipment will be installed. CONNECTING THE POWER CORD z Check ...
... is adequate ventilation. No user-adjustment is fragile. The cord set should have the appropriate safety approvals for your area. SAFETY PRECAUTION z Avoid placing the monitor, or any other heavy object, on the face of the AC power cord to the adapter, and plug the other light sources may reflect on... the power cord to avoid damage to the cable. EN-3 Always put the monitor in a place where there is the correct type required for the country in which the equipment will be installed. CONNECTING THE POWER CORD z Check ...
User Manual
Page 13
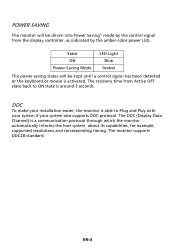
... OFF state back to Plug and Play with your system if your installation easier, the monitor is activated. EN-4 The monitor supports DDC2B standard. DDC To make your system also supports DDC protocol. POWER SAVING The monitor will be driven into Power Saving" mode by the amber-color power LED. State ON... be kept until a control signal has been detected or the keyboard or mouse is able to ON state is a communication protocol through which the monitor automatically informs the host system about its capabilities, for example, supported resolutions and corresponding timing.
... OFF state back to Plug and Play with your system if your installation easier, the monitor is activated. EN-4 The monitor supports DDC2B standard. DDC To make your system also supports DDC protocol. POWER SAVING The monitor will be driven into Power Saving" mode by the amber-color power LED. State ON... be kept until a control signal has been detected or the keyboard or mouse is able to ON state is a communication protocol through which the monitor automatically informs the host system about its capabilities, for example, supported resolutions and corresponding timing.
User Manual
Page 14
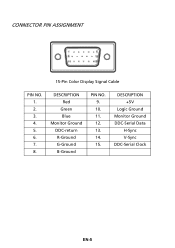
DESCRIPTION Red Green Blue Monitor Ground DDC-return R-Ground G-Ground B-Ground PIN NO. 9. 10. 11. 12. 13. 14. 15. CONNECTOR PIN ASSIGNMENT 15-Pin Color Display Signal Cable PIN NO. 1. 2. 3. 4. 5. 6. 7. 8. DESCRIPTION +5V Logic Ground Monitor Ground DDC-Serial Data H-Sync V-Sync DDC-Serial Clock EN-5
DESCRIPTION Red Green Blue Monitor Ground DDC-return R-Ground G-Ground B-Ground PIN NO. 9. 10. 11. 12. 13. 14. 15. CONNECTOR PIN ASSIGNMENT 15-Pin Color Display Signal Cable PIN NO. 1. 2. 3. 4. 5. 6. 7. 8. DESCRIPTION +5V Logic Ground Monitor Ground DDC-Serial Data H-Sync V-Sync DDC-Serial Clock EN-5
User Manual
Page 17
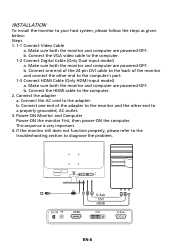
...power-ON the computer. Connect the VGA video cable to the computer's port. 1-3 Connect HDMI Cable (Only HDMI-input model) a. Connect one end of the monitor and connect the other end to the computer. 2. Connect the HDMI cable to a properly grounded, AC outlet. 3. b. Connect one end of the 24-...pin DVI cable to the back of the adapter to the monitor and the other end to the computer. 1-2 Connect Digital Cable (Only Dual-input model) a. Connect the AC cord to your host system, please follow...
...power-ON the computer. Connect the VGA video cable to the computer's port. 1-3 Connect HDMI Cable (Only HDMI-input model) a. Connect one end of the monitor and connect the other end to the computer. 2. Connect the HDMI cable to a properly grounded, AC outlet. 3. b. Connect one end of the 24-...pin DVI cable to the back of the adapter to the monitor and the other end to the computer. 1-2 Connect Digital Cable (Only Dual-input model) a. Connect the AC cord to your host system, please follow...

User Manual
Page 18
W / X Minus / Plus: If the OSD is used to toggle between the OSD options. AUTO Auto Adjust: Press this botton to activate the Auto Adjustment function. The Auto Adjustment function is active, press the Minus or Plus buttons to set the HPos, VPos, Clock and Focus. MENU OSD functions Press this button to activate the OSD menu. Lights up to open the Acer eColor Management OSD and access the scenario modes. Empowering: Press the Empowering Key to indicate the power is turned ON. USER CONTROLS Base Controls Power Switch / Power LED: To turn the monitor ON or OFF. EN-9
W / X Minus / Plus: If the OSD is used to toggle between the OSD options. AUTO Auto Adjust: Press this botton to activate the Auto Adjustment function. The Auto Adjustment function is active, press the Minus or Plus buttons to set the HPos, VPos, Clock and Focus. MENU OSD functions Press this button to activate the OSD menu. Lights up to open the Acer eColor Management OSD and access the scenario modes. Empowering: Press the Empowering Key to indicate the power is turned ON. USER CONTROLS Base Controls Power Switch / Power LED: To turn the monitor ON or OFF. EN-9

User Manual
Page 20
... general settings. Actual product specifications may vary. EN-11 For advanced settings, please refer to following content is for adjusting the settings of your LCD Monitor.
... general settings. Actual product specifications may vary. EN-11 For advanced settings, please refer to following content is for adjusting the settings of your LCD Monitor.

User Manual
Page 23
EN-14 Product information 1 Press the MENU key to bring up for current input. Then the basic information of LCD monitor will show up the OSD. 2 Using the e/ f keys, select Information from the OSD.
EN-14 Product information 1 Press the MENU key to bring up for current input. Then the basic information of LCD monitor will show up the OSD. 2 Using the e/ f keys, select Information from the OSD.
User Manual
Page 24
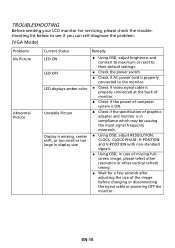
...is properly connected at the back of missing fullscreen image, please select other resolution or other vertical refresh timing. z Using OSD, in case of monitor. z Wait for servicing, please check the troubleshooting list below to see if you can self-diagnose the problem. (VGA Mode) Problems No Picture...center shift, or too small or too large in display size Remedy z Using OSD, adjust brightness and contrast to maximum or reset to the monitor. z Check if AC power cord is properly connected to their default settings. z Check if the power of the image before changing or disconnecting ...
...is properly connected at the back of missing fullscreen image, please select other resolution or other vertical refresh timing. z Using OSD, in case of monitor. z Wait for servicing, please check the troubleshooting list below to see if you can self-diagnose the problem. (VGA Mode) Problems No Picture...center shift, or too small or too large in display size Remedy z Using OSD, adjust brightness and contrast to maximum or reset to the monitor. z Check if AC power cord is properly connected to their default settings. z Check if the power of the image before changing or disconnecting ...
User Manual
Page 25
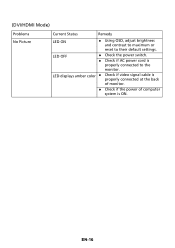
LED OFF z Check the power switch. z Check if AC power cord is properly connected at the back of computer system is ON. EN-16 LED displays amber color z Check if video signal cable is properly connected to their default settings. (DVI/HDMI Mode) Problems No Picture Current Status Remedy LED ON z Using OSD, adjust brightness and contrast to maximum or reset to the monitor. z Check if the power of monitor.
LED OFF z Check the power switch. z Check if AC power cord is properly connected at the back of computer system is ON. EN-16 LED displays amber color z Check if video signal cable is properly connected to their default settings. (DVI/HDMI Mode) Problems No Picture Current Status Remedy LED ON z Using OSD, adjust brightness and contrast to maximum or reset to the monitor. z Check if the power of monitor.
User Manual
Page 26
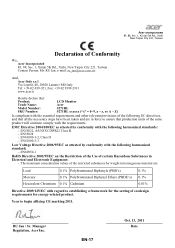
...by conformity with the following harmonized standard: -. RU Jan / Sr. Manager Regulation, Acer Inc. Acer Incorporated 8F, 88, Sec. 1, Xintai 5th Rd., Xizhi New Taipei City 221, Taiwan Declaration of Conformity We, Acer Incorporated 8F, 88, Sec. 1, Xintai 5th Rd., Xizhi, New Taipei City ... Lepetit, 40, 20020 Lainate (MI) Italy Tel: +39-02-939-921, Fax: +39-02 9399-2913 www.acer.it Hereby declare that: Product: Trade Name: Model Number: SKU Number: LCD Monitor Acer S271HL S271HL xxxxxx ("x" = 0~9, a ~ z, or A ~ Z) Is compliant with the essential requirements and other relevant provisions of...
...by conformity with the following harmonized standard: -. RU Jan / Sr. Manager Regulation, Acer Inc. Acer Incorporated 8F, 88, Sec. 1, Xintai 5th Rd., Xizhi New Taipei City 221, Taiwan Declaration of Conformity We, Acer Incorporated 8F, 88, Sec. 1, Xintai 5th Rd., Xizhi, New Taipei City ... Lepetit, 40, 20020 Lainate (MI) Italy Tel: +39-02-939-921, Fax: +39-02 9399-2913 www.acer.it Hereby declare that: Product: Trade Name: Model Number: SKU Number: LCD Monitor Acer S271HL S271HL xxxxxx ("x" = 0~9, a ~ z, or A ~ Z) Is compliant with the essential requirements and other relevant provisions of...
User Manual
Page 27
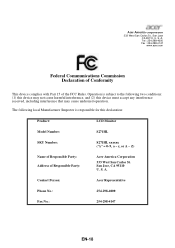
... received, including interference that may not cause harmful interference, and (2) this declaration: Product: LCD Monitor Model Number: S271HL SKU Number: S271HL xxxxxx ("x" = 0~9, a ~ z, or A ~ Z) Name of Responsible Party: Address of the FCC Rules. S. San Jose, CA 95110 U. Contact Person: Acer Representative Phone No.: 254-298-4000 Fax No.: 254-298-4147 EN-18 The following...
... received, including interference that may not cause harmful interference, and (2) this declaration: Product: LCD Monitor Model Number: S271HL SKU Number: S271HL xxxxxx ("x" = 0~9, a ~ z, or A ~ Z) Name of Responsible Party: Address of the FCC Rules. S. San Jose, CA 95110 U. Contact Person: Acer Representative Phone No.: 254-298-4000 Fax No.: 254-298-4147 EN-18 The following...


