Quick Start Guide
Page 1
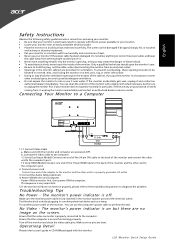
...a solid surface and treat it -unplug the monitor immediately and contact an authorized dealer or service center. Troubleshooting Tips No Power - The screen can use it near an easily accessible electrical outlet. · Place the monitor on the monitor. English Safety Instructions Observe the following safety... guidelines when connection and using the monitor on the screen. You can clean the exterior of the adapter to the monitor and the other end to hold the plug, not the cable, when...
...a solid surface and treat it -unplug the monitor immediately and contact an authorized dealer or service center. Troubleshooting Tips No Power - The screen can use it near an easily accessible electrical outlet. · Place the monitor on the monitor. English Safety Instructions Observe the following safety... guidelines when connection and using the monitor on the screen. You can clean the exterior of the adapter to the monitor and the other end to hold the plug, not the cable, when...

User Manual
Page 1
TABLE OF CONTENTS Special notes on LCD monitors 1 Information for your safety and comfort 2 Unpacking 5 Attaching/Removing the base 6 Screen position adjustment 6 Connecting the power cord 7 Safety precaution 7 Cleaning your monitor 7 Power saving 8 DDC 8 Connector Pin Assignment 9 Standard Timing Table 11 Installation 12 User controls 13 Troubleshooting 19
TABLE OF CONTENTS Special notes on LCD monitors 1 Information for your safety and comfort 2 Unpacking 5 Attaching/Removing the base 6 Screen position adjustment 6 Connecting the power cord 7 Safety precaution 7 Cleaning your monitor 7 Power saving 8 DDC 8 Connector Pin Assignment 9 Standard Timing Table 11 Installation 12 User controls 13 Troubleshooting 19

User Manual
Page 2
NOTES · Due to the nature of the fluorescent light, the screen may flicker during initial use . · The LCD screen has effective pixels of the previous screen may find slightly uneven brightness on the screen depending on the desktop pattern you use . Turn off the Power Switch for hours. EN-1 In this case, the... screen is displayed for hours. SPECIAL NOTES ON LCD MONITORS The following symptoms are normal with LCD monitor and do not indicate a problem. It may include ...
NOTES · Due to the nature of the fluorescent light, the screen may flicker during initial use . · The LCD screen has effective pixels of the previous screen may find slightly uneven brightness on the screen depending on the desktop pattern you use . Turn off the Power Switch for hours. EN-1 In this case, the... screen is displayed for hours. SPECIAL NOTES ON LCD MONITORS The following symptoms are normal with LCD monitor and do not indicate a problem. It may include ...
User Manual
Page 5
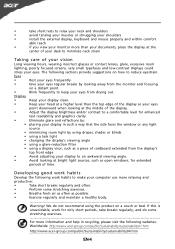
...habits Develop the following work for extended periods of time. The following websites: Worldwide: http://www.acer-group.com/public/Sustainability/sustainability01.htm http://www.acer-group.com/public/Sustainability/sustainability04.htm EN-4 Warning! We do some stretching exercises. • ... care of your vision Long viewing hours, wearing incorrect glasses or contact lenses, glare, excessive room lighting, poorly focused screens, very small typefaces and low-contrast displays could stress your documents, place the display at bright light sources, such as...
...habits Develop the following work for extended periods of time. The following websites: Worldwide: http://www.acer-group.com/public/Sustainability/sustainability01.htm http://www.acer-group.com/public/Sustainability/sustainability04.htm EN-4 Warning! We do some stretching exercises. • ... care of your vision Long viewing hours, wearing incorrect glasses or contact lenses, glare, excessive room lighting, poorly focused screens, very small typefaces and low-contrast displays could stress your documents, place the display at bright light sources, such as...
User Manual
Page 7
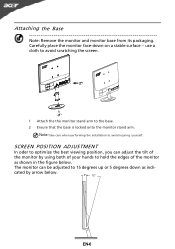
The monitor can adjust the tilt of the monitor as indi- SCREEN POSITION ADJUSTMENT In oder to optimize the best viewing position, you can be adjusted to hold the edges of the monitor by arrow below . cated ... care when performing the installation to the base. 2 Ensure that the base is locked onto the monitor stand arm. use a cloth to avoid scratching the screen. 1 Attach the the monitor stand arm to avoid injuring yourself. Attaching the Base Note: Remove the monitor and monitor base from its packaging.
The monitor can adjust the tilt of the monitor as indi- SCREEN POSITION ADJUSTMENT In oder to optimize the best viewing position, you can be adjusted to hold the edges of the monitor by arrow below . cated ... care when performing the installation to the base. 2 Ensure that the base is locked onto the monitor stand arm. use a cloth to avoid scratching the screen. 1 Attach the the monitor stand arm to avoid injuring yourself. Attaching the Base Note: Remove the monitor and monitor base from its packaging.

User Manual
Page 8
... just below guidelines when cleaning the monitor. · Always unplug the monitor before cleaning. · Use a soft cloth to wipe the screen and cabinet front and sides. CLEANING YOUR MONITOR Please carefully follow the below eye level. · Handle with care when transporting the monitor.... · Refrain from giving shock or scratch to the screen, as screen is adequate ventilation. · Avoid placing the monitor against a bright background or where sun- EN-7 SAFETY PRECAUTION · Avoid placing ...
... just below guidelines when cleaning the monitor. · Always unplug the monitor before cleaning. · Use a soft cloth to wipe the screen and cabinet front and sides. CLEANING YOUR MONITOR Please carefully follow the below eye level. · Handle with care when transporting the monitor.... · Refrain from giving shock or scratch to the screen, as screen is adequate ventilation. · Avoid placing the monitor against a bright background or where sun- EN-7 SAFETY PRECAUTION · Avoid placing ...

User Manual
Page 14
... functions Press this button to indicate currently selected input source. The shortcut menu lets you will see the following messages on right top side of screen to activate the Auto Adjustment function. VGA or DVI or HDMI If either VGA or DVI input is turned ON. AUTO Auto Adjust: Press this... Power Switch / Power LED: To turn the monitor ON or OFF. Lights up to activate the OSD menu. It may be connected to open the Acer eColor Management OSD and access the scenario modes. Using the Shortcut Menu Press the function button to your monitor. (a) VGA input (b) DVI input (c) HDMI input...
... functions Press this button to indicate currently selected input source. The shortcut menu lets you will see the following messages on right top side of screen to activate the Auto Adjustment function. VGA or DVI or HDMI If either VGA or DVI input is turned ON. AUTO Auto Adjust: Press this... Power Switch / Power LED: To turn the monitor ON or OFF. Lights up to activate the OSD menu. It may be connected to open the Acer eColor Management OSD and access the scenario modes. Using the Shortcut Menu Press the function button to your monitor. (a) VGA input (b) DVI input (c) HDMI input...
User Manual
Page 17
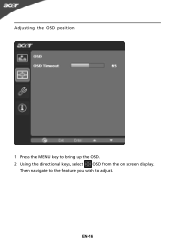
EN-16 Then navigate to the feature you wish to bring up the OSD. 2 Using the directional keys, select OSD from the on screen display. Adjusting the OSD position 1 Press the MENU key to adjust.
EN-16 Then navigate to the feature you wish to bring up the OSD. 2 Using the directional keys, select OSD from the on screen display. Adjusting the OSD position 1 Press the MENU key to adjust.
User Manual
Page 18
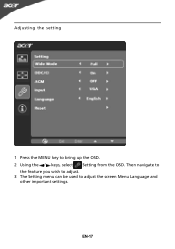
EN-17 Adjusting the setting 1 Press the MENU key to adjust the screen Menu Language and other important settings. Then navigate to the feature you wish to adjust. 3 The Setting menu can be used to bring up the OSD. 2 Using the / keys, select Setting from the OSD.
EN-17 Adjusting the setting 1 Press the MENU key to adjust the screen Menu Language and other important settings. Then navigate to the feature you wish to adjust. 3 The Setting menu can be used to bring up the OSD. 2 Using the / keys, select Setting from the OSD.
User Manual
Page 20
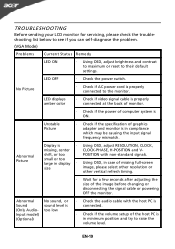
... if AC power cord is properly connected to their default settings. small or too large in display · Using OSD, in case of missing full-screen size image, please select other resolution or other vertical refresh timing. · Wait for servicing, please check the troubleshooting list below to see if you...
... if AC power cord is properly connected to their default settings. small or too large in display · Using OSD, in case of missing full-screen size image, please select other resolution or other vertical refresh timing. · Wait for servicing, please check the troubleshooting list below to see if you...


