User Manual
Page 3
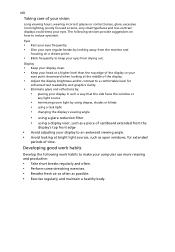
... switching the image, when the same image is recovered slowly by changing the image or turning off the power switch and then turn it on again to the nature of the fluorescent light, the screen may find slightly uneven brightness on the screen depending on the product. Cleaning your safety and comfort Safety instructions Read these guidelines when cleaning the monitor: • Always unplug the monitor before cleaning. • Use...
... switching the image, when the same image is recovered slowly by changing the image or turning off the power switch and then turn it on again to the nature of the fluorescent light, the screen may find slightly uneven brightness on the screen depending on the product. Cleaning your safety and comfort Safety instructions Read these guidelines when cleaning the monitor: • Always unplug the monitor before cleaning. • Use...
User Manual
Page 4
... power supplies: Manufacturer: Delta Electronics Inc., Model: ADP-40PH BB(Q226HQL/Q236HL) Manufacturer: TPV Electronics ( Fujian)CO. .,LTD, Model: ADPC1940 (Q226HQL/Q236HL) (Q226HQL/Q236HL) Manufacturer: TPV Electronics ( Fujian)C.O., LTD, Model: ADPC1965 (Q276HL) ADS-65LSI-19-1 19065G (Q276HL) Using electrical power • This product should never be operated from the type of time listening to music at high volume. • Avoid turning...
... power supplies: Manufacturer: Delta Electronics Inc., Model: ADP-40PH BB(Q226HQL/Q236HL) Manufacturer: TPV Electronics ( Fujian)CO. .,LTD, Model: ADPC1940 (Q226HQL/Q236HL) (Q226HQL/Q236HL) Manufacturer: TPV Electronics ( Fujian)C.O., LTD, Model: ADPC1965 (Q276HL) ADS-65LSI-19-1 19065G (Q276HL) Using electrical power • This product should never be operated from the type of time listening to music at high volume. • Avoid turning...
User Manual
Page 5
... inserting the power cord plug. Using a power outlet that the new power cord meets the following the operating instructions Refer all products plugged into the product • the product was spilled into the wall outlet does not exceed the fuse rating. • Do not overload a power outlet, strip or receptacle by other risks. The plug only fits in performance, indicating a need to replace the power cord set . Contact...
... inserting the power cord plug. Using a power outlet that the new power cord meets the following the operating instructions Refer all products plugged into the product • the product was spilled into the wall outlet does not exceed the fuse rating. • Do not overload a power outlet, strip or receptacle by other risks. The plug only fits in performance, indicating a need to replace the power cord set . Contact...

User Manual
Page 6
... benefits of our other controls may contain small parts. We at service stations. Potentially explosive atmospheres include areas where you would normally be advised to turn off the device near gas pumps at Acer are very conscious of the environmental effects of our business and strive to identify and provide the best working procedures to normal condition...
... benefits of our other controls may contain small parts. We at service stations. Potentially explosive atmospheres include areas where you would normally be advised to turn off the device near gas pumps at Acer are very conscious of the environmental effects of our business and strive to identify and provide the best working procedures to normal condition...

User Manual
Page 7
.... Nevertheless, some pixels may lead to computer use . This product has been shipped enabled for power management: • Activate display's Sleep mode within 15 minutes of user inactivity. • Activate computer's Sleep mode within 30 minutes of physical injury. The following section provides tips for comfortable use . The following tips: • refrain from Sleep mode by adjusting the viewing angle of the monitor, using a footrest, or...
.... Nevertheless, some pixels may lead to computer use . This product has been shipped enabled for power management: • Activate display's Sleep mode within 15 minutes of user inactivity. • Activate computer's Sleep mode within 30 minutes of physical injury. The following section provides tips for comfortable use . The following tips: • refrain from Sleep mode by adjusting the viewing angle of the monitor, using a footrest, or...
User Manual
Page 8
... of the display. • Adjust the display brightness and/or contrast to make your eyes from the monitor and focusing on how to keep your computer use more relaxing and productive: • Take short breaks regularly and often. • Perform some stretching exercises. • Breathe fresh air as often as open windows, for extended periods of your vision Long viewing hours, wearing...
... of the display. • Adjust the display brightness and/or contrast to make your eyes from the monitor and focusing on how to keep your computer use more relaxing and productive: • Take short breaks regularly and often. • Perform some stretching exercises. • Breathe fresh air as often as open windows, for extended periods of your vision Long viewing hours, wearing...

User Manual
Page 9
TABLE OF CONTENTS UNPACKING 1 ATTACHING / REMOVING THE BASE 2 SCREEN POSITION ADJUSTMENT 2 CONNECTING THE POWER CORD 3 SAFETY PRECAUTION 3 CLEANING YOUR MONITOR 3 POWER SAVING 4 DDC...4 CONNECTOR PIN ASSIGNMENT 5 STANDARD TIMING TABLE 7 INSTALLATION 8 USER CONTROLS 10 TROUBLESHOOTING 16
TABLE OF CONTENTS UNPACKING 1 ATTACHING / REMOVING THE BASE 2 SCREEN POSITION ADJUSTMENT 2 CONNECTING THE POWER CORD 3 SAFETY PRECAUTION 3 CLEANING YOUR MONITOR 3 POWER SAVING 4 DDC...4 CONNECTOR PIN ASSIGNMENT 5 STANDARD TIMING TABLE 7 INSTALLATION 8 USER CONTROLS 10 TROUBLESHOOTING 16
User Manual
Page 11
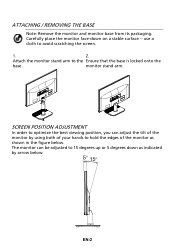
... edges of the monitor by arrow below . use a cloth to the Ensure that the base is locked onto the base. The monitor can adjust the tilt of the monitor as shown in the figure below . SCREEN POSITION ADJUSTMENT In order to optimize the best viewing position, you can be adjusted to 15 degrees up or 5 degrees down on a stable surface -- ATTACHING / REMOVING THE BASE Note: Remove the monitor and monitor base from its...
... edges of the monitor by arrow below . use a cloth to the Ensure that the base is locked onto the base. The monitor can adjust the tilt of the monitor as shown in the figure below . SCREEN POSITION ADJUSTMENT In order to optimize the best viewing position, you can be adjusted to 15 degrees up or 5 degrees down on a stable surface -- ATTACHING / REMOVING THE BASE Note: Remove the monitor and monitor base from its...

User Manual
Page 12
... to the screen, as screen is the correct type required for the country in which the equipment will be installed. Place the monitor just below guidelines when cleaning the monitor. z Plug one end of the monitor. z Always unplug the monitor before cleaning. z This monitor has a universal power supply that the power cord you use is fragile. z Handle with care when transporting the monitor. CONNECTING THE POWER CORD z Check first to make sure...
... to the screen, as screen is the correct type required for the country in which the equipment will be installed. Place the monitor just below guidelines when cleaning the monitor. z Plug one end of the monitor. z Always unplug the monitor before cleaning. z This monitor has a universal power supply that the power cord you use is fragile. z Handle with care when transporting the monitor. CONNECTING THE POWER CORD z Check first to make sure...
User Manual
Page 13
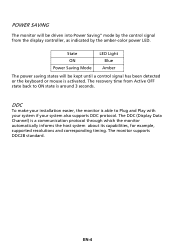
... installation easier, the monitor is able to ON state is around 3 seconds. The recovery time from the display controller, as indicated by the control signal from Active OFF state back to Plug and Play with your system if your system also supports DDC protocol. The DDC (Display Data Channel) is activated. EN-4 The monitor supports DDC2B standard. State ON Power Saving Mode LED Light Blue Amber The power saving...
... installation easier, the monitor is able to ON state is around 3 seconds. The recovery time from the display controller, as indicated by the control signal from Active OFF state back to Plug and Play with your system if your system also supports DDC protocol. The DDC (Display Data Channel) is activated. EN-4 The monitor supports DDC2B standard. State ON Power Saving Mode LED Light Blue Amber The power saving...
User Manual
Page 14
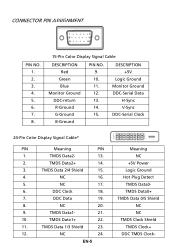
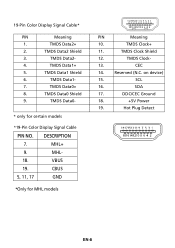
CONNECTOR PIN ASSIGNMENT PIN NO. 1. 2. 3. 4. 5. 6. 7. 8. 15-Pin Color Display Signal Cable DESCRIPTION Red Green Blue Monitor Ground DDC-return R-Ground G-Ground B-Ground PIN NO. 9. 10. 11. 12. 13. 14. 15. TMDS Data 2/4 Shield 15. 4. NC 16. 5. NC 24. DESCRIPTION +5V Logic Ground Monitor Ground DDC-Serial Data H-Sync V-Sync DDC-Serial Clock 24-Pin Color Display Signal Cable* PIN Meaning PIN 1. TMDS Data2- 13. 2. NC 17. 6. TMDS Data1+ 22...
CONNECTOR PIN ASSIGNMENT PIN NO. 1. 2. 3. 4. 5. 6. 7. 8. 15-Pin Color Display Signal Cable DESCRIPTION Red Green Blue Monitor Ground DDC-return R-Ground G-Ground B-Ground PIN NO. 9. 10. 11. 12. 13. 14. 15. TMDS Data 2/4 Shield 15. 4. NC 16. 5. NC 24. DESCRIPTION +5V Logic Ground Monitor Ground DDC-Serial Data H-Sync V-Sync DDC-Serial Clock 24-Pin Color Display Signal Cable* PIN Meaning PIN 1. TMDS Data2- 13. 2. NC 17. 6. TMDS Data1+ 22...
User Manual
Page 15
... Data2+ 2. TMDS Data0- * only for MHL models PIN Meaning 10. VBUS 19. TMDS Clock+ 11. Hot Plug Detect EN-6 TMDS Data1+ 5. TMDS Data0 Shield 9. CEC 14. TMDS Data2- 4. TMDS Data1- 7. DESCRIPTION 7. TMDS Clock Shield 12. Reserved (N.C. DDC/CEC Ground 18. +5V Power 19. MHL- 18. 19-Pin Color Display Signal Cable* PIN Meaning 1. TMDS Data2 Shield 3. TMDS...
... Data2+ 2. TMDS Data0- * only for MHL models PIN Meaning 10. VBUS 19. TMDS Clock+ 11. Hot Plug Detect EN-6 TMDS Data1+ 5. TMDS Data0 Shield 9. CEC 14. TMDS Data2- 4. TMDS Data1- 7. DESCRIPTION 7. TMDS Clock Shield 12. Reserved (N.C. DDC/CEC Ground 18. +5V Power 19. MHL- 18. 19-Pin Color Display Signal Cable* PIN Meaning 1. TMDS Data2 Shield 3. TMDS...
User Manual
Page 17
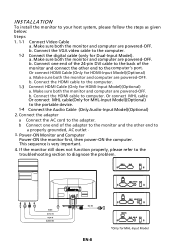
... MHL-Input Model b. Make sure both the monitor and computer are powered-OFF. b. INSTALLATION To install the monitor to diagnose the problem. If the monitor still does not function properly, please refer to the troubleshooting section to your host system, please follow the steps as given below: Steps 1. 1-1 1-2 Connect Video Cable a. Connect the adapter a Connect the AC cord to the computer. b Connect one end of the 24-pin DVI cable to...
... MHL-Input Model b. Make sure both the monitor and computer are powered-OFF. b. INSTALLATION To install the monitor to diagnose the problem. If the monitor still does not function properly, please refer to the troubleshooting section to your host system, please follow the steps as given below: Steps 1. 1-1 1-2 Connect Video Cable a. Connect the adapter a Connect the AC cord to the computer. b Connect one end of the 24-pin DVI cable to...
User Manual
Page 18
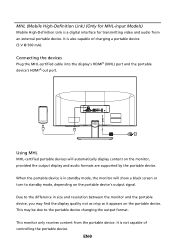
... Using MHL MHL-certified portable devices will show a black screen or turn to standby mode, depending on the monitor, provided the output display and audio formats are supported by the portable device. It is not capable of charging a portable device (5 V @ 500 mA). MHL (Mobile High-Definition Link) (Only for MHL-input Models) Mobile High-Definition Link is a digital interface for transmitting video and audio...
... Using MHL MHL-certified portable devices will show a black screen or turn to standby mode, depending on the monitor, provided the output display and audio formats are supported by the portable device. It is not capable of charging a portable device (5 V @ 500 mA). MHL (Mobile High-Definition Link) (Only for MHL-input Models) Mobile High-Definition Link is a digital interface for transmitting video and audio...
User Manual
Page 19
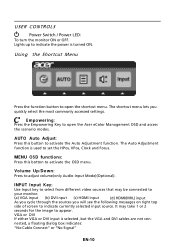
... USER CONTROLS Power Switch / Power LED: To turn the monitor ON or OFF. Empowering: Press the Empowering Key to your monitor. (a) VGA input (b) DVI input (c) HDMI input (d) HDMI(MHL) input As you cycle through the sources you quickly select the most commonly accessed settings. INPUT Input Key: Use Input key to select from different video sources that may take 1 or 2 seconds for the image to open the Acer eColor Management OSD and access the scenario modes. The Auto Adjustment function is used to adjust volume(only Audio-Input Mode...
... USER CONTROLS Power Switch / Power LED: To turn the monitor ON or OFF. Empowering: Press the Empowering Key to your monitor. (a) VGA input (b) DVI input (c) HDMI input (d) HDMI(MHL) input As you cycle through the sources you quickly select the most commonly accessed settings. INPUT Input Key: Use Input key to select from different video sources that may take 1 or 2 seconds for the image to open the Acer eColor Management OSD and access the scenario modes. The Auto Adjustment function is used to adjust volume(only Audio-Input Mode...
User Manual
Page 20
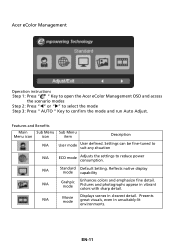
... in vibrant colors with sharp detail. N/A Movie mode Displays scenes in clearest detail. Settings can be fine-tuned to suit any situation N/A ECO mode Adjusts the settings to confirm the mode and run Auto Adjust. Features and Benefits Main Sub Menu Sub Menu Menu icon icon item Description N/A User mode User defined. EN-11 Acer eColor Management Operation instructions Step 1: Press " " Key to open the Acer eColor Management OSD and access...
... in vibrant colors with sharp detail. N/A Movie mode Displays scenes in clearest detail. Settings can be fine-tuned to suit any situation N/A ECO mode Adjusts the settings to confirm the mode and run Auto Adjust. Features and Benefits Main Sub Menu Sub Menu Menu icon icon item Description N/A User mode User defined. EN-11 Acer eColor Management Operation instructions Step 1: Press " " Key to open the Acer eColor Management OSD and access...
User Manual
Page 21
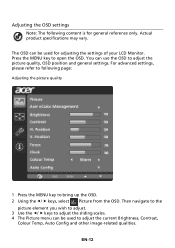
... is for adjusting the settings of your LCD Monitor. EN-12 Press the MENU key to adjust the picture quality, OSD position and general settings. Then navigate to the picture element you wish to adjust. 3 Use the e/ f keys to adjust the sliding scales. 4 The Picture menu can be used to adjust the current Brightness, Contrast, Colour Temp, Auto Config and other image-related qualities. Adjusting the OSD settings Note: The following page: Adjusting the picture quality 1 Press...
... is for adjusting the settings of your LCD Monitor. EN-12 Press the MENU key to adjust the picture quality, OSD position and general settings. Then navigate to the picture element you wish to adjust. 3 Use the e/ f keys to adjust the sliding scales. 4 The Picture menu can be used to adjust the current Brightness, Contrast, Colour Temp, Auto Config and other image-related qualities. Adjusting the OSD settings Note: The following page: Adjusting the picture quality 1 Press...
User Manual
Page 23
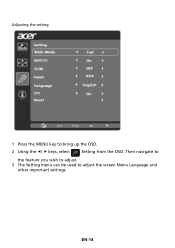
EN-14 Then navigate to the feature you wish to adjust. 3 The Setting menu can be used to bring up the OSD. 2 Using the e/ f keys, select Setting from the OSD. Adjusting the setting 1 Press the MENU key to adjust the screen Menu Language and other important settings.
EN-14 Then navigate to the feature you wish to adjust. 3 The Setting menu can be used to bring up the OSD. 2 Using the e/ f keys, select Setting from the OSD. Adjusting the setting 1 Press the MENU key to adjust the screen Menu Language and other important settings.
User Manual
Page 25
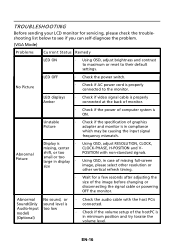
... input signal frequency mismatch. Abnormal Sound(Only Audio-Input model) (Optional) No sound, or sound level is too low · Check the audio cable with non-standard signals. Abnormal Picture Display is ON. EN-16 No Picture · Check if AC power cord is properly connected to their default settings. shift, or too POSITION with the host PCis connected. · Check if the volume setup of graphics adapter and monitor is in case of missing full-screen size image, please select other resolution...
... input signal frequency mismatch. Abnormal Sound(Only Audio-Input model) (Optional) No sound, or sound level is too low · Check the audio cable with non-standard signals. Abnormal Picture Display is ON. EN-16 No Picture · Check if AC power cord is properly connected to their default settings. shift, or too POSITION with the host PCis connected. · Check if the volume setup of graphics adapter and monitor is in case of missing full-screen size image, please select other resolution...
User Manual
Page 26
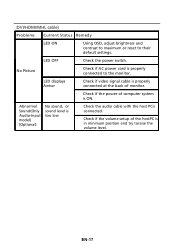
... Picture LED OFF LED displays Amber · Check the power switch. · Check if AC power cord is properly connected to their default settings. Abnormal Sound(Only Audio-Input model) (Optional) No sound, or sound level is too low · Check the audio cable with the host PCis connected. · Check if the volume setup of computer system is ON. (DVI/HDMI/MHL cable) Problems Current Status Remedy LED ON · Using OSD, adjust brightness and contrast to maximum or reset to the monitor. · Check if video signal cable is properly connected...
... Picture LED OFF LED displays Amber · Check the power switch. · Check if AC power cord is properly connected to their default settings. Abnormal Sound(Only Audio-Input model) (Optional) No sound, or sound level is too low · Check the audio cable with the host PCis connected. · Check if the volume setup of computer system is ON. (DVI/HDMI/MHL cable) Problems Current Status Remedy LED ON · Using OSD, adjust brightness and contrast to maximum or reset to the monitor. · Check if video signal cable is properly connected...

