
Safety Guide
Page 3
... instructions 10 Product servicing 10 Cleaning and servicing 10 Battery and adapter information 11 Accessing the power 11 Disconnecting the power source 11 Using electrical power 11 Guidelines for safe battery usage 13 Internal battery 15 Warnings and regulatory information 16 Optical drives 16 Telephone line safety 17 Emergency calls 17 Medical devices 17 Vehicles 18 Potentially explosive environments........ 18 Disposal instructions 19 ENERGY STAR 19 Wireless adapter regulatory...
... instructions 10 Product servicing 10 Cleaning and servicing 10 Battery and adapter information 11 Accessing the power 11 Disconnecting the power source 11 Using electrical power 11 Guidelines for safe battery usage 13 Internal battery 15 Warnings and regulatory information 16 Optical drives 16 Telephone line safety 17 Emergency calls 17 Medical devices 17 Vehicles 18 Potentially explosive environments........ 18 Disposal instructions 19 ENERGY STAR 19 Wireless adapter regulatory...

Safety Guide
Page 6
...; using a task light, • changing the display's viewing angle, • using a glare-reduction filter, The following sections provide suggestions on your leg muscles. • Take short rests to relax your neck and shoulders. • Avoid tensing your muscles or shrugging your shoulders. • Install the external display, keyboard and mouse properly and within comfortable reach. • If you view your monitor...
...; using a task light, • changing the display's viewing angle, • using a glare-reduction filter, The following sections provide suggestions on your leg muscles. • Take short rests to relax your neck and shoulders. • Avoid tensing your muscles or shrugging your shoulders. • Install the external display, keyboard and mouse properly and within comfortable reach. • If you view your monitor...
Safety Guide
Page 9
...burns. These openings must not be seriously damaged. • Slots and openings are provided for using your computer - 9 General • Do not use it from the lithium battery pack. • The bottom surface, areas around ventilation openings and AC adapter may get hot. The openings should never ...the base will probably cause a short-circuit or damage rotor devices, HDD, optical drive, and even exposure risk from overheating. Basic care and tips for ventilation to ensure reliable operation of the product and to AC power. Never spill liquid of any kind onto or into this product...
...burns. These openings must not be seriously damaged. • Slots and openings are provided for using your computer - 9 General • Do not use it from the lithium battery pack. • The bottom surface, areas around ventilation openings and AC adapter may get hot. The openings should never ...the base will probably cause a short-circuit or damage rotor devices, HDD, optical drive, and even exposure risk from overheating. Basic care and tips for ventilation to ensure reliable operation of the product and to AC power. Never spill liquid of any kind onto or into this product...

Safety Guide
Page 10
... the operating instructions. • The product exhibits a distinct change in sleep mode. Turn off or in performance, indicating a need for service. • The product does not operate normally after following the operating instructions. Basic care and tips for using your computer Before putting your computer in a carrying case while it is turned on. Do not put a computer in a carrying case, make sure that are covered by the operating instructions...
... the operating instructions. • The product exhibits a distinct change in sleep mode. Turn off or in performance, indicating a need for service. • The product does not operate normally after following the operating instructions. Basic care and tips for using your computer Before putting your computer in a carrying case while it is turned on. Do not put a computer in a carrying case, make sure that are covered by the operating instructions...
Safety Guide
Page 11
... power from the power supplies. If you need to disconnect power to the equipment, be operated from the electrical outlet. Disconnecting the power source Observe the following guidelines when connecting and disconnecting power to the power supply unit: Install the power supply unit before removing the power supply unit from electrostatic damage to a drive. Disconnect the AC adapter. 3. Use a soft, moist cloth. Do not use liquid or aerosol cleaners. Battery and adapter information Accessing...
... power from the power supplies. If you need to disconnect power to the equipment, be operated from the electrical outlet. Disconnecting the power source Observe the following guidelines when connecting and disconnecting power to the power supply unit: Install the power supply unit before removing the power supply unit from electrostatic damage to a drive. Disconnect the AC adapter. 3. Use a soft, moist cloth. Do not use liquid or aerosol cleaners. Battery and adapter information Accessing...
Safety Guide
Page 14
... notebook uses a Lithium-based battery. Do not put, store or leave your computer • ONLY CHARGE THE BATTERY IN A CLEAN, WELL VENTILATED AREA. Do not pierce, open or disassemble the battery. If the battery leaks and you come into contact with the leaked fluids, rinse thoroughly with parts approved by an authorized service center. 14 - Precautions when replacing the battery Improper replacement or...
... notebook uses a Lithium-based battery. Do not put, store or leave your computer • ONLY CHARGE THE BATTERY IN A CLEAN, WELL VENTILATED AREA. Do not pierce, open or disassemble the battery. If the battery leaks and you come into contact with the leaked fluids, rinse thoroughly with parts approved by an authorized service center. 14 - Precautions when replacing the battery Improper replacement or...
Safety Guide
Page 15
... instruction included in your computer - 15 Use the battery only for its intended purpose. authorized repair facility. • Recharge the battery by an Acer- Accidental short-circuiting can occur when a metallic object such as in a closed car in temperatures well below freezing. A device with a hot or cold battery may damage the battery or the connecting object. Dispose of batteries in rechargeable battery, battery replacement...
... instruction included in your computer - 15 Use the battery only for its intended purpose. authorized repair facility. • Recharge the battery by an Acer- Accidental short-circuiting can occur when a metallic object such as in a closed car in temperatures well below freezing. A device with a hot or cold battery may damage the battery or the connecting object. Dispose of batteries in rechargeable battery, battery replacement...

Safety Guide
Page 18
... invalidate any warranty that all signs and instructions. Using your device before boarding an aircraft. The use of wireless devices in an explosive environment unless the transmitter has been modified to turn off your vehicle or any area with great force. Potentially explosive environments Warning Do not operate a portable transmitter (including this wireless adapter) near unshielded blasting caps or in an...
... invalidate any warranty that all signs and instructions. Using your device before boarding an aircraft. The use of wireless devices in an explosive environment unless the transmitter has been modified to turn off your vehicle or any area with great force. Potentially explosive environments Warning Do not operate a portable transmitter (including this wireless adapter) near unshielded blasting caps or in an...
Safety Guide
Page 20
... not apply to the settings in its use is available. Parts of inactivity respectively (Refer to your laptop under the following conditions. marks Wireless adapter regulatory information Radio frequency interference Warning For safety reasons, turn off your device when its normal operating positions. Use the device only in Power Management). • Wake the computer from sleep mode by pushing keyboard or moving mouse. • Computers will save...
... not apply to the settings in its use is available. Parts of inactivity respectively (Refer to your laptop under the following conditions. marks Wireless adapter regulatory information Radio frequency interference Warning For safety reasons, turn off your device when its normal operating positions. Use the device only in Power Management). • Wake the computer from sleep mode by pushing keyboard or moving mouse. • Computers will save...
Safety Guide
Page 22
... any change in hospitals is governed by each hospital. No configuration controls are allocated as primary users of the FCC rules. These radar stations can cause interference with and /or damage this manual will result...set forth by the Federal Aviation Administration (FAA). • The use due to co-channel mobile satellite systems. High power radars are provided for harmful interference to its operation in this device. Proper operation of this radio according to the instructions found in the 5.15 to 5.25 GHz and 5.470 to device supporting IEEE 802.11a/ac wireless adapters...
... any change in hospitals is governed by each hospital. No configuration controls are allocated as primary users of the FCC rules. These radar stations can cause interference with and /or damage this manual will result...set forth by the Federal Aviation Administration (FAA). • The use due to co-channel mobile satellite systems. High power radars are provided for harmful interference to its operation in this device. Proper operation of this radio according to the instructions found in the 5.15 to 5.25 GHz and 5.470 to device supporting IEEE 802.11a/ac wireless adapters...
Safety Guide
Page 23
...is no guarantee, however, that changes or modifications not expressly approved by turning the equipment off and on the device. Details of the adapter is not installed and used in accordance with the instructions, the wireless adapter may cause harmful interference to operate the equipment. These limits are ...oet/ea/ by entering the FCC ID number on ), the user is minimized. This device complies with the limits for human contact during normal operation is encouraged to try to Part 15 of the FCC Rules. Interference statement This wireless adapter has been tested and found at...
...is no guarantee, however, that changes or modifications not expressly approved by turning the equipment off and on the device. Details of the adapter is not installed and used in accordance with the instructions, the wireless adapter may cause harmful interference to operate the equipment. These limits are ...oet/ea/ by entering the FCC ID number on ), the user is minimized. This device complies with the limits for human contact during normal operation is encouraged to try to Part 15 of the FCC Rules. Interference statement This wireless adapter has been tested and found at...

Safety Guide
Page 24
... may not cause interference, and (2) this device must not be installed and operated with a minimum distance which the equipment experiencing the interference is connected. • Consult the dealer or an experienced radio/TV technician for an uncontrolled environment. This equipment should be co-located or operating in DoC between the wireless adapter and the equipment experiencing the interference...
... may not cause interference, and (2) this device must not be installed and operated with a minimum distance which the equipment experiencing the interference is connected. • Consult the dealer or an experienced radio/TV technician for an uncontrolled environment. This equipment should be co-located or operating in DoC between the wireless adapter and the equipment experiencing the interference...

User Manual
Page 3
... 5 Required tools 5 Pre-installation instructions 6 Post-installation instructions 6 System Upgrade 7 Removing the left side system cover....7 Installing the left side system cover......8 Removing the right side system cover .9 Installing the right side system cover .10 Hard drives 11 Removing the 3.5-inch hard drives .....11 Installing the 3.5-inch hard drives .......15 Memory 18 Memory configuration guidelines .......18 Removing a memory module 19 Installing a memory module 21 Graphic board 24 Removing the Graphic board 24 Installing the Graphic board 26 M.2 SSD module 28...
... 5 Required tools 5 Pre-installation instructions 6 Post-installation instructions 6 System Upgrade 7 Removing the left side system cover....7 Installing the left side system cover......8 Removing the right side system cover .9 Installing the right side system cover .10 Hard drives 11 Removing the 3.5-inch hard drives .....11 Installing the 3.5-inch hard drives .......15 Memory 18 Memory configuration guidelines .......18 Removing a memory module 19 Installing a memory module 21 Graphic board 24 Removing the Graphic board 24 Installing the Graphic board 26 M.2 SSD module 28...
User Manual
Page 6
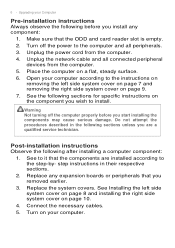
... system cover on your Computer Pre-installation instructions Always observe the following after installing a computer component: 1. Connect the necessary cables. 5. Make sure that you removed earlier. 3. Replace the system covers. Upgrading your computer. Unplug the power cord from the computer. 5. Place the computer on page 9. 7. step instructions in the following sections for specific instructions on the component you start installing the components may cause serious damage. Turn on...
... system cover on your Computer Pre-installation instructions Always observe the following after installing a computer component: 1. Connect the necessary cables. 5. Make sure that you removed earlier. 3. Replace the system covers. Upgrading your computer. Unplug the power cord from the computer. 5. Place the computer on page 9. 7. step instructions in the following sections for specific instructions on the component you start installing the components may cause serious damage. Turn on...

User Manual
Page 13
Upgrading your Computer - 13 6. Disconnect the power and data cables from HDD cage and take it off. Pull green rack out from the hard drives. 7.
Upgrading your Computer - 13 6. Disconnect the power and data cables from HDD cage and take it off. Pull green rack out from the hard drives. 7.

User Manual
Page 15
Remove the new hard drive from their packaging. 2. Insert green rack into the green rack. 3. Insert the new hard drive into HDD cage. Upgrading your Computer - 15 Installing the 3.5-inch hard drives 1.
Remove the new hard drive from their packaging. 2. Insert green rack into the green rack. 3. Insert the new hard drive into HDD cage. Upgrading your Computer - 15 Installing the 3.5-inch hard drives 1.

User Manual
Page 16
Insert the Power Cover and fix it. Connect the power and data cables to the hard drive. 5. Upgrading your Computer 4. 16 -
Insert the Power Cover and fix it. Connect the power and data cables to the hard drive. 5. Upgrading your Computer 4. 16 -

User Manual
Page 19
Perform Pre-installation instructions on page 6. 2. Use a long screw driver to loosen the four captive screws securing the thermal module to the mainboard. Upgrading your Computer - 19 Removing a memory module 1. Disconnect the thermal fan cable from the mainboard. 3.
Perform Pre-installation instructions on page 6. 2. Use a long screw driver to loosen the four captive screws securing the thermal module to the mainboard. Upgrading your Computer - 19 Removing a memory module 1. Disconnect the thermal fan cable from the mainboard. 3.

User Manual
Page 24
Removing the Graphic board 1. Upgrading your Computer Graphic board The computer contains one or two Graphic boards installed in the PCIe x16 slots. The detail configuration will be differed by different models. Perform Pre-installation instructions on page 6. 2. Disconnect the power cables from the Graphic board. 3. Remove the screw that secure the Graphic boards to the chassis. 24 -
Removing the Graphic board 1. Upgrading your Computer Graphic board The computer contains one or two Graphic boards installed in the PCIe x16 slots. The detail configuration will be differed by different models. Perform Pre-installation instructions on page 6. 2. Disconnect the power cables from the Graphic board. 3. Remove the screw that secure the Graphic boards to the chassis. 24 -
User Manual
Page 32
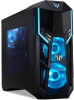
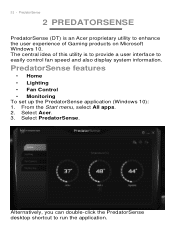
...-click the PredatorSense desktop shortcut to easily control fan speed and also display system information. The central idea of this utility is an Acer proprietary utility to enhance the user experience of Gaming products on Microsoft Windows 10. Select Acer. 3. PredatorSense 2 PREDATORSENSE PredatorSense (DT) is to provide a user interface to run the application. PredatorSense features • Home • Lighting • Fan Control • Monitoring To set up the...
...-click the PredatorSense desktop shortcut to easily control fan speed and also display system information. The central idea of this utility is an Acer proprietary utility to enhance the user experience of Gaming products on Microsoft Windows 10. Select Acer. 3. PredatorSense 2 PREDATORSENSE PredatorSense (DT) is to provide a user interface to run the application. PredatorSense features • Home • Lighting • Fan Control • Monitoring To set up the...


