Safety Guide
Page 3
... Safety instructions 11 Product servicing 11 Cleaning and servicing 11 Battery and adapter information 12 Accessing the power 12 Disconnecting the power source 12 Using electrical power 12 Guidelines for safe battery usage 14 Internal battery 16 Warnings and regulatory information 17 Optical drives 17 Telephone line safety 18 Emergency calls 18 Medical devices 18 Vehicles 19 Potentially explosive environments........ 19 Disposal instructions 20 ENERGY STAR 20 Wireless adapter...
... Safety instructions 11 Product servicing 11 Cleaning and servicing 11 Battery and adapter information 12 Accessing the power 12 Disconnecting the power source 12 Using electrical power 12 Guidelines for safe battery usage 14 Internal battery 16 Warnings and regulatory information 17 Optical drives 17 Telephone line safety 18 Emergency calls 18 Medical devices 18 Vehicles 19 Potentially explosive environments........ 19 Disposal instructions 20 ENERGY STAR 20 Wireless adapter...

Safety Guide
Page 6
... lenses, glare, excessive room lighting, poorly focused screens, very small typefaces and low-contrast displays could stress your eyes point downward when looking away from the monitor and focusing on how to relax your neck and shoulders. • Avoid tensing your muscles or shrugging your shoulders. • Install the external display, keyboard and mouse properly and within comfortable reach...
... lenses, glare, excessive room lighting, poorly focused screens, very small typefaces and low-contrast displays could stress your eyes point downward when looking away from the monitor and focusing on how to relax your neck and shoulders. • Avoid tensing your muscles or shrugging your shoulders. • Install the external display, keyboard and mouse properly and within comfortable reach...

Safety Guide
Page 10
... operation, particularly when plugged in a tightly packed suitcase or bag. These openings must not be seriously damaged. • Slots and openings are provided for using your computer carefully Use a quality carrying case that could be blocked or covered. Pack your computer General • Do not use it from the lithium battery pack. • The bottom surface, areas around ventilation openings and AC adapter...
... operation, particularly when plugged in a tightly packed suitcase or bag. These openings must not be seriously damaged. • Slots and openings are provided for using your computer carefully Use a quality carrying case that could be blocked or covered. Pack your computer General • Do not use it from the lithium battery pack. • The bottom surface, areas around ventilation openings and AC adapter...
Safety Guide
Page 11
... change in performance, indicating a need for service. • The product does not operate normally after following the operating instructions. Do not put a computer in a carrying case while it is off the computer and remove the battery pack if applicable. Note Adjust only those controls that it is turned on. Turn off or in damage and will often require extensive work by the operating instructions, since...
... change in performance, indicating a need for service. • The product does not operate normally after following the operating instructions. Do not put a computer in a carrying case while it is off the computer and remove the battery pack if applicable. Note Adjust only those controls that it is turned on. Turn off or in damage and will often require extensive work by the operating instructions, since...

Safety Guide
Page 12
... when connecting and disconnecting power to the power supply unit: Install the power supply unit before removing the power supply unit from the power supplies. If the system has multiple sources of power, disconnect power from the type of power available, consult your computer 2. When you plug into is easily accessible and located as close to the AC power outlet. Unplug before connecting to the equipment operator as possible. Do not use liquid...
... when connecting and disconnecting power to the power supply unit: Install the power supply unit before removing the power supply unit from the power supplies. If the system has multiple sources of power, disconnect power from the type of power available, consult your computer 2. When you plug into is easily accessible and located as close to the AC power outlet. Unplug before connecting to the equipment operator as possible. Do not use liquid...

Safety Guide
Page 15
... not disassemble or dispose of the battery, charging will eventually wear out. When the operation time becomes noticeably shorter than approved ones. Warning Batteries may cause the battery to purchase a new battery. Do not short external contacts, crush, puncture or otherwise tamper with parts approved by an authorized service center. This notebook uses a Lithium-based battery. Do not use it in fire. Failure to follow...
... not disassemble or dispose of the battery, charging will eventually wear out. When the operation time becomes noticeably shorter than approved ones. Warning Batteries may cause the battery to purchase a new battery. Do not short external contacts, crush, puncture or otherwise tamper with parts approved by an authorized service center. This notebook uses a Lithium-based battery. Do not use it in fire. Failure to follow...
Safety Guide
Page 16
... a spare battery in rechargeable battery, battery replacement must be susceptible to www.acer.com for using your pocket or purse. Do not dispose as in a closed car in the product documentation. authorized repair facility. • Recharge the battery by an Acer- 16 - Do not short-circuit the battery. Always try to local regulations. Please recycle when possible. Wireless devices may not work temporarily...
... a spare battery in rechargeable battery, battery replacement must be susceptible to www.acer.com for using your pocket or purse. Do not dispose as in a closed car in the product documentation. authorized repair facility. • Recharge the battery by an Acer- 16 - Do not short-circuit the battery. Always try to local regulations. Please recycle when possible. Wireless devices may not work temporarily...
Safety Guide
Page 19
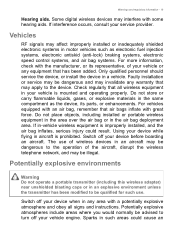
... explosive atmosphere and obey all wireless equipment in aircraft is mounted and operating properly. Switch off your device before boarding an aircraft. For vehicles equipped with an air bag, remember that all signs and instructions. Switch off your device when in such areas could result. If interference occurs, consult your vehicle is prohibited. Using your device while flying in your...
... explosive atmosphere and obey all wireless equipment in aircraft is mounted and operating properly. Switch off your device before boarding an aircraft. For vehicles equipped with an air bag, remember that all signs and instructions. Switch off your device when in such areas could result. If interference occurs, consult your vehicle is prohibited. Using your device while flying in your...
Safety Guide
Page 21
... the settings in Power Management). • Wake the computer from sleep mode by pushing keyboard or moving mouse. • Computers will save more than 80% energy at "sleep" mode. To successfully transmit data files or messages, this section may be attracted to the device, and persons with hearing aids should not hold the device to : wireless LAN (WLAN), Bluetooth and/or cellular. Parts of the device...
... the settings in Power Management). • Wake the computer from sleep mode by pushing keyboard or moving mouse. • Computers will save more than 80% energy at "sleep" mode. To successfully transmit data files or messages, this section may be attracted to the device, and persons with hearing aids should not hold the device to : wireless LAN (WLAN), Bluetooth and/or cellular. Parts of the device...
Safety Guide
Page 23
... the radio. • The use of wireless adapters in this wireless adapter allowing any exposed parts of the 5.25 to 5.35 GHz and 5.65 to device supporting IEEE 802.11a/ac wireless adapters. These radar stations can cause interference with and /or damage this behavior may cause damage to Part 15.407 of wireless adapters on airplanes is connected; No configuration controls are allocated as primary...
... the radio. • The use of wireless adapters in this wireless adapter allowing any exposed parts of the 5.25 to 5.35 GHz and 5.65 to device supporting IEEE 802.11a/ac wireless adapters. These radar stations can cause interference with and /or damage this behavior may cause damage to Part 15.407 of wireless adapters on airplanes is connected; No configuration controls are allocated as primary...
Safety Guide
Page 24
...turning the equipment off and on the device. 24 - Nevertheless, the adapter should keep a distance of the adapter is not installed and used in a particular installation. This wireless adapter generates, uses, and can be found to comply with the limits for a Class B digital device, pursuant to Part 15 of the device... that changes or modifications not expressly approved by entering the FCC ID number on ), the user is minimized. Operation of the FCC Rules. If the wireless adapter is far below the FCC radio frequency exposure limits. Details of the authorized configurations can ...
...turning the equipment off and on the device. 24 - Nevertheless, the adapter should keep a distance of the adapter is not installed and used in a particular installation. This wireless adapter generates, uses, and can be found to comply with the limits for a Class B digital device, pursuant to Part 15 of the device... that changes or modifications not expressly approved by entering the FCC ID number on ), the user is minimized. Operation of the FCC Rules. If the wireless adapter is far below the FCC radio frequency exposure limits. Details of the authorized configurations can ...
Safety Guide
Page 25
... should be co-located or operating in DoC between the wireless adapter and the equipment experiencing the interference. • Connect the computer with any interference, including interference that to which states in conjunction with the wireless adapter to an outlet on a circuit different from that may not cause interference, and (2) this device must not be installed and operated with RSS247...
... should be co-located or operating in DoC between the wireless adapter and the equipment experiencing the interference. • Connect the computer with any interference, including interference that to which states in conjunction with the wireless adapter to an outlet on a circuit different from that may not cause interference, and (2) this device must not be installed and operated with RSS247...
CE DoC
Page 1
... 2009/125/EC. The following harmonized standards and/or other information which is in conformity with setting up a network connection, using the touchpad, and other relevant standards have been applied: Electromagnetic compatibility (Directive 2014/30/EU)...Model: AX211NGW,AX201NGW,MTK-MT7921, Operation frequency and radio-frequency power are listed as below: [Bluetooth] 2402-2480MHz < 10 dBm [WLAN] 2412MHz-2462MHz < 20dBm, 5180-5320MHz < 23dBm, 5500-5700MHz < 23dBm Year to begin affixing CE marking:2021 RU Jan, Sr.Manager@Taipei 2021-10-15 Note: Open the Start Menu and search for 'Acer...
... 2009/125/EC. The following harmonized standards and/or other information which is in conformity with setting up a network connection, using the touchpad, and other relevant standards have been applied: Electromagnetic compatibility (Directive 2014/30/EU)...Model: AX211NGW,AX201NGW,MTK-MT7921, Operation frequency and radio-frequency power are listed as below: [Bluetooth] 2402-2480MHz < 10 dBm [WLAN] 2412MHz-2462MHz < 20dBm, 5180-5320MHz < 23dBm, 5500-5700MHz < 23dBm Year to begin affixing CE marking:2021 RU Jan, Sr.Manager@Taipei 2021-10-15 Note: Open the Start Menu and search for 'Acer...
User Manual
Page 3
... precautions 5 Required tools 5 Pre-installation instructions .....6 Post-installation instructions ..6 System Upgrade 7 Removing the Left side system cover 7 Installing the Left side system cover 8 System Layout 9 Hard drives 10 Removing the 3.5-inch hard drives 10 Installing the 3.5-inch hard drives 12 Memory 14 Memory configuration guidelines 14 Removing a memory module .. 15 Installing a memory module ... 16 Graphics board 17 Removing the Graphics board17 Installing the Graphics board 20 M.2 SSD module 22 Removing the M.2 SSD module 22 Installing the M.2 SSD module 23 2.
... precautions 5 Required tools 5 Pre-installation instructions .....6 Post-installation instructions ..6 System Upgrade 7 Removing the Left side system cover 7 Installing the Left side system cover 8 System Layout 9 Hard drives 10 Removing the 3.5-inch hard drives 10 Installing the 3.5-inch hard drives 12 Memory 14 Memory configuration guidelines 14 Removing a memory module .. 15 Installing a memory module ... 16 Graphics board 17 Removing the Graphics board17 Installing the Graphics board 20 M.2 SSD module 22 Removing the M.2 SSD module 22 Installing the M.2 SSD module 23 2.
User Manual
Page 6
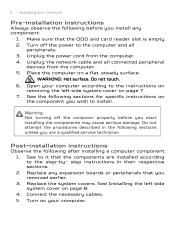
... start installing the components may cause serious damage. Unplug the network cable and all peripherals. 3. Post-installation instructions Observe the following before you removed earlier. 3. step instructions in the following sections for specific instructions on a flat, steady surface. Connect the necessary cables. 5. Make sure that the components are a qualified service technician. Unplug the power cord from the computer. 5. WARNING: Hot surface. Open your computer. Warning Not turning...
... start installing the components may cause serious damage. Unplug the network cable and all peripherals. 3. Post-installation instructions Observe the following before you removed earlier. 3. step instructions in the following sections for specific instructions on a flat, steady surface. Connect the necessary cables. 5. Make sure that the components are a qualified service technician. Unplug the power cord from the computer. 5. WARNING: Hot surface. Open your computer. Warning Not turning...
User Manual
Page 10
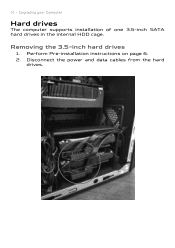
10 - Removing the 3.5-inch hard drives 1. Upgrading your Computer Hard drives The computer supports installation of one 3.5-inch SATA hard drives in the internal HDD cage. Disconnect the power and data cables from the hard drives. Perform Pre-installation instructions on page 6. 2.
10 - Removing the 3.5-inch hard drives 1. Upgrading your Computer Hard drives The computer supports installation of one 3.5-inch SATA hard drives in the internal HDD cage. Disconnect the power and data cables from the hard drives. Perform Pre-installation instructions on page 6. 2.
User Manual
Page 12
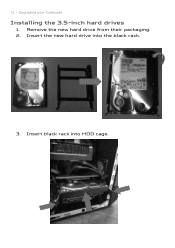
Upgrading your Computer Installing the 3.5-inch hard drives 1. Remove the new hard drive from their packaging. 2. Insert black rack into the black rack. 3. Insert the new hard drive into HDD cage. 12 -
Upgrading your Computer Installing the 3.5-inch hard drives 1. Remove the new hard drive from their packaging. 2. Insert black rack into the black rack. 3. Insert the new hard drive into HDD cage. 12 -
User Manual
Page 13
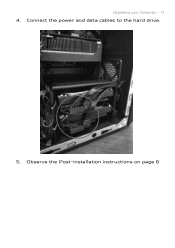
Connect the power and data cables to the hard drive. 5. Observe the Post-installation instructions on page 6 Upgrading your Computer - 13 4.
Connect the power and data cables to the hard drive. 5. Observe the Post-installation instructions on page 6 Upgrading your Computer - 13 4.
User Manual
Page 17
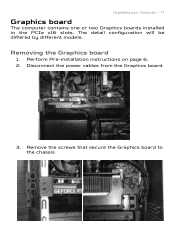
Removing the Graphics board 1. Disconnect the power cables from the Graphics board. 3. Perform Pre-installation instructions on page 6. 2. Upgrading your Computer - 17 Graphics board The computer contains one or two Graphics boards installed in the PCIe x16 slots. The detail configuration will be differed by different models. Remove the screws that secure the Graphics board to the chassis
Removing the Graphics board 1. Disconnect the power cables from the Graphics board. 3. Perform Pre-installation instructions on page 6. 2. Upgrading your Computer - 17 Graphics board The computer contains one or two Graphics boards installed in the PCIe x16 slots. The detail configuration will be differed by different models. Remove the screws that secure the Graphics board to the chassis
User Manual
Page 26
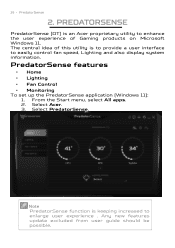
PredatorSense features • Home • Lighting • Fan Control • Monitoring To set up the PredatorSense application (Windows 11): 1. Select PredatorSense. PredatorSense 2. Note Select Acer. 3. From the Start menu, select All apps. 2. The central idea of this utility is an Acer proprietary utility to easily control fan speed, Lighting and also display system information. 26 - PREDATORSENSE PredatorSense (DT) is to provide a user interface to enhance the user experience of Gaming products on Microsoft Windows 11.
PredatorSense features • Home • Lighting • Fan Control • Monitoring To set up the PredatorSense application (Windows 11): 1. Select PredatorSense. PredatorSense 2. Note Select Acer. 3. From the Start menu, select All apps. 2. The central idea of this utility is an Acer proprietary utility to easily control fan speed, Lighting and also display system information. 26 - PREDATORSENSE PredatorSense (DT) is to provide a user interface to enhance the user experience of Gaming products on Microsoft Windows 11.


