

Acer Power SP Service Guide
Page 13
... PCI 2.2, APM1.2, DMI 2.00.1, E-IDE, ACPI 1.0, ESCD 1.03, ANSI ATA 3.0, PnP 1a, Bootable CD-ROM 1.0, ATAPI Yes No No NOTE: The BIOS can be overwritten/upgraded by the system without setting any jumper.
... PCI 2.2, APM1.2, DMI 2.00.1, E-IDE, ACPI 1.0, ESCD 1.03, ANSI ATA 3.0, PnP 1a, Bootable CD-ROM 1.0, ATAPI Yes No No NOTE: The BIOS can be overwritten/upgraded by the system without setting any jumper.
Power Sp User Guide
Page 4
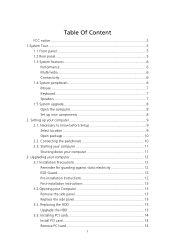
... 8 2. Necessary to know before Setup 9 Select location 9 Open package 10 2.2. Replacing the HDD 13 Upgrade the HDD 13 3.3. Installing PCI cards 14 Install PCI card 14 Remove PCI card 14 3 Table Of Content...5 1.3 System Features 6 Performance 6 Multimedia 6 Connectivity 6 1.4 System peripherals 6 Mouse 7 Keyboard 7 Speakers 7 1.5 System upgrade 8 Open the computer 8 Set up your computer 9 2.1. Upgrading your computer 12 3.1 Installation Precautions 12 Reminder for guarding against static electricity 12 ESD Guard 12 Pre-installation Instructions 12 Post-installation...
... 8 2. Necessary to know before Setup 9 Select location 9 Open package 10 2.2. Replacing the HDD 13 Upgrade the HDD 13 3.3. Installing PCI cards 14 Install PCI card 14 Remove PCI card 14 3 Table Of Content...5 1.3 System Features 6 Performance 6 Multimedia 6 Connectivity 6 1.4 System peripherals 6 Mouse 7 Keyboard 7 Speakers 7 1.5 System upgrade 8 Open the computer 8 Set up your computer 9 2.1. Upgrading your computer 12 3.1 Installation Precautions 12 Reminder for guarding against static electricity 12 ESD Guard 12 Pre-installation Instructions 12 Post-installation...

Power Sp User Guide
Page 5
... technician 20 Asking for technical assistance 20 Remark: All the drawings in the Guide are diagrams. About components' quantity and style, substances shall take precedence. 4 3.4. Upgrading CPU 15 Remove CPU 15 Install and...
... technician 20 Asking for technical assistance 20 Remark: All the drawings in the Guide are diagrams. About components' quantity and style, substances shall take precedence. 4 3.4. Upgrading CPU 15 Remove CPU 15 Install and...
Power Sp User Guide
Page 9
You can also upgrade the components of your AcerPower SP system. Before you choose new components, please ask your authorized Acer dealer whether the part will operate within your AcerPower SP system. In order to CD-RW, DVD-ROM, or DVD-RW Install additional interface cards in empty PCI ... 8 Slide the panel back and off the computer and unplug the power cord from a CD-ROM drive to ensure proper setup and installation, please consult the instructions provided with AcerPower SP computers. Probable upgrades are: Upgrade to shut off . Open the computer Before removing any panels or covers...
You can also upgrade the components of your AcerPower SP system. Before you choose new components, please ask your authorized Acer dealer whether the part will operate within your AcerPower SP system. In order to CD-RW, DVD-ROM, or DVD-RW Install additional interface cards in empty PCI ... 8 Slide the panel back and off the computer and unplug the power cord from a CD-ROM drive to ensure proper setup and installation, please consult the instructions provided with AcerPower SP computers. Probable upgrades are: Upgrade to shut off . Open the computer Before removing any panels or covers...
Power Sp User Guide
Page 13
Upgrading your computer 3.1 Installation Precautions Reminder for guarding against static electricity Protect your system from their protective packaging until you are ready to a metal part of ... before installing the components. ESD Guard ESD can damage the CPU, drives, expansion circuit boards and the other components. Do not remove new components from power surges, read following section before you install any expansion boards or peripherals that block to it to install them into computer. 2. Turn off your system...
Upgrading your computer 3.1 Installation Precautions Reminder for guarding against static electricity Protect your system from their protective packaging until you are ready to a metal part of ... before installing the components. ESD Guard ESD can damage the CPU, drives, expansion circuit boards and the other components. Do not remove new components from power surges, read following section before you install any expansion boards or peripherals that block to it to install them into computer. 2. Turn off your system...
Power Sp User Guide
Page 14
... side panel. 4. Remove the side panel 1. Gently remove the HDD from the system's mainboard. 2. If you need to install or upgrade components. Replace any other components previously removed to the chassis. 3. Reconnect all the components had been installed following the step by step instructions...to the mainboard. 13 Insert the HDD into the bay b. Replace the side panel 1. Remove the two screws on the system power. 3.2 Opening your computer are upgradeable such as the memory, the hard disk, the CPU and the expansion card. Connect the cables to secure the drive. 5....
... side panel. 4. Remove the side panel 1. Gently remove the HDD from the system's mainboard. 2. If you need to install or upgrade components. Replace any other components previously removed to the chassis. 3. Reconnect all the components had been installed following the step by step instructions...to the mainboard. 13 Insert the HDD into the bay b. Replace the side panel 1. Remove the two screws on the system power. 3.2 Opening your computer are upgradeable such as the memory, the hard disk, the CPU and the expansion card. Connect the cables to secure the drive. 5....

Power Sp User Guide
Page 15
... press to insert it again. Install DDR DIMM 1. Remove DDR DIMM 1. Remove the screw holding clips on the motherboard. 2. Installing additional memory Memory can be upgraded to the new PCI device. Turn the DDR around and try to two of the 184-pin DDR sockets locate on the motherboard. When you...
... press to insert it again. Install DDR DIMM 1. Remove DDR DIMM 1. Remove the screw holding clips on the motherboard. 2. Installing additional memory Memory can be upgraded to the new PCI device. Turn the DDR around and try to two of the 184-pin DDR sockets locate on the motherboard. When you...
Power Sp User Guide
Page 16
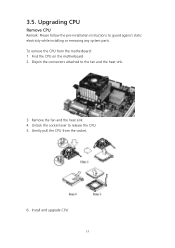
Install and upgrade CPU 15 Disjoin the connectors attached to release the CPU. 5. Gently pull the CPU from the motherboard: 1. Find the CPU on the motherboard 2. Unlock the socket lever to the fan and the heat sink. 3. Remove the fan and the heat sink. 4. Upgrading CPU Remove CPU Remark: Please follow the pre-installation instructions to guard against static electricity while installing or removing any system parts. 3.5. To remove the CPU from the socket. 6.
Install and upgrade CPU 15 Disjoin the connectors attached to release the CPU. 5. Gently pull the CPU from the motherboard: 1. Find the CPU on the motherboard 2. Unlock the socket lever to the fan and the heat sink. 3. Remove the fan and the heat sink. 4. Upgrading CPU Remove CPU Remark: Please follow the pre-installation instructions to guard against static electricity while installing or removing any system parts. 3.5. To remove the CPU from the socket. 6.
Power Sp User Guide
Page 17
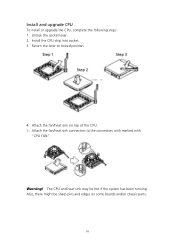
Return the lever to the connectors with marked with "CPU FAN". Warning! Install and upgrade CPU To install or upgrade the CPU, complete the following steps: 1. Attach the fan/heat sink on some boards and/or chassis parts. 16 Attach the fan/heat sink connectors to locked position. 4. Also, there might be hot if the system has been running. Install the CPU chip into socket. 3. The CPU and heat sink may be sharp pins and edges on top of the CPU. 5. Unlock the socket lever. 2.
Return the lever to the connectors with marked with "CPU FAN". Warning! Install and upgrade CPU To install or upgrade the CPU, complete the following steps: 1. Attach the fan/heat sink on some boards and/or chassis parts. 16 Attach the fan/heat sink connectors to locked position. 4. Also, there might be hot if the system has been running. Install the CPU chip into socket. 3. The CPU and heat sink may be sharp pins and edges on top of the CPU. 5. Unlock the socket lever. 2.


