
User Manual
Page 3
... a missing pixel or pixel lit all warnings and instructions marked on LCD monitors The following are normal with the LCD monitor and do not indicate a problem. • Due to the nature of the LCD screen, an afterimage of the fluorescent light, the screen may remain after switching the image, when the same image is recovered slowly by changing the image or turning off the power switch and then turn it on...
... a missing pixel or pixel lit all warnings and instructions marked on LCD monitors The following are normal with the LCD monitor and do not indicate a problem. • Due to the nature of the LCD screen, an afterimage of the fluorescent light, the screen may remain after switching the image, when the same image is recovered slowly by changing the image or turning off the power switch and then turn it on...

User Manual
Page 4
... internal devices. • The adapter is only used for other similar surface. If you can hear it could result in installation unless proper ventilation is easily accessible and located as close to the equipment operator as they may touch dangerous voltage points or short-out parts that the power outlet you plug the power cord into is provided. •...
... internal devices. • The adapter is only used for other similar surface. If you can hear it could result in installation unless proper ventilation is easily accessible and located as close to the equipment operator as they may touch dangerous voltage points or short-out parts that the power outlet you plug the power cord into is provided. •...
User Manual
Page 5
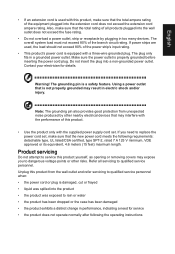
... power cord meets the following the operating instructions Product servicing Do not attempt to service this product. • Use the product only with the supplied power supply cord set , make sure that is equipped with a three-wire grounded plug. English • If an extension cord is used , the load should not exceed 80% of the power strip's input rating. • This product's power cord is not properly grounded may expose you need...
... power cord meets the following the operating instructions Product servicing Do not attempt to service this product. • Use the product only with the supplied power supply cord set , make sure that is equipped with a three-wire grounded plug. English • If an extension cord is used , the load should not exceed 80% of the power strip's input rating. • This product's power cord is not properly grounded may expose you need...

User Manual
Page 7
... remove the strain on the recorded image and does not constitute a malfunction. Finding your comfort zone Find your comfort zone by adjusting the viewing angle of working conditions, personal health and other musculoskeletal disorders. Users are also at risk of physical injury after prolonged use . Observe the following symptoms may occasionally misfire or appear as black or red dots. English LCD pixel...
... remove the strain on the recorded image and does not constitute a malfunction. Finding your comfort zone Find your comfort zone by adjusting the viewing angle of working conditions, personal health and other musculoskeletal disorders. Users are also at risk of physical injury after prolonged use . Observe the following symptoms may occasionally misfire or appear as black or red dots. English LCD pixel...

User Manual
Page 11
... comfortable use 7 Finding your comfort zone 7 Taking care of your vision 8 Developing good work habits 8 Federal Communications Commission 10 Supplier's Declaration of Conformity 10 Unpacking 12 Attaching the Base 13 Connecting the adapter and AC Power cord 15 Power saving 15 Display Data Channel (DDC) 16 20-pin color display signal cable 16 19-pin color display signal cable 17 Standard timing table 18 Installation 19 Troubleshooting 30 HDMI/DP Mode (Optional...
... comfortable use 7 Finding your comfort zone 7 Taking care of your vision 8 Developing good work habits 8 Federal Communications Commission 10 Supplier's Declaration of Conformity 10 Unpacking 12 Attaching the Base 13 Connecting the adapter and AC Power cord 15 Power saving 15 Display Data Channel (DDC) 16 20-pin color display signal cable 16 19-pin color display signal cable 17 Standard timing table 18 Installation 19 Troubleshooting 30 HDMI/DP Mode (Optional...
User Manual
Page 12
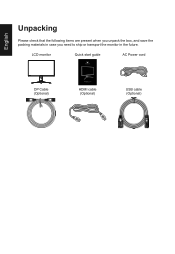
English Unpacking Please check that the following items are present when you unpack the box, and save the packing materials in case you need to ship or transport the monitor in the future. LCD monitor Quick start guide AC Power cord DP Cable (Optional) Predator X28 Quick Guide HDMI cable (Optional) USB cable (Optional)
English Unpacking Please check that the following items are present when you unpack the box, and save the packing materials in case you need to ship or transport the monitor in the future. LCD monitor Quick start guide AC Power cord DP Cable (Optional) Predator X28 Quick Guide HDMI cable (Optional) USB cable (Optional)

User Manual
Page 15
...: Use a cord set should have the appropriate safety approvals for your area. • The monitor has a universal power supply that allows operation in either 100/120 V AC or 220/240 V AC voltage area. State LED Light ON Blue Power Saving Mode Amber The power saving states will be installed. The recovery time from the display controller, as indicated by the amber-color power LED. The cord set consisting of H05VV-F cord and plug rated 10...
...: Use a cord set should have the appropriate safety approvals for your area. • The monitor has a universal power supply that allows operation in either 100/120 V AC or 220/240 V AC voltage area. State LED Light ON Blue Power Saving Mode Amber The power saving states will be installed. The recovery time from the display controller, as indicated by the amber-color power LED. The cord set consisting of H05VV-F cord and plug rated 10...

User Manual
Page 16
The monitor supports the DDC2B standard. 20-pin color display signal cable PIN No. Description 2 GND 4 ML_Lane 1+ 6 ML_Lane 1- 8 GND 10 ML_Lane 3+ 12 ML_Lane 3- 14 CONFIG2 16 GND 18 Hot Plug 20 DP_PWR English Display Data Channel (DDC) To make installation easier, so long as your system supports the DDC protocol, the monitor is a communication protocol through which the monitor automatically informs the host system about...
The monitor supports the DDC2B standard. 20-pin color display signal cable PIN No. Description 2 GND 4 ML_Lane 1+ 6 ML_Lane 1- 8 GND 10 ML_Lane 3+ 12 ML_Lane 3- 14 CONFIG2 16 GND 18 Hot Plug 20 DP_PWR English Display Data Channel (DDC) To make installation easier, so long as your system supports the DDC protocol, the monitor is a communication protocol through which the monitor automatically informs the host system about...
User Manual
Page 19
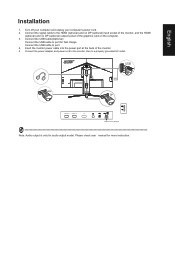
... check user manual for audio output model. Turn off your computer and unplug your computer's power cord. 2. Insert the monitor power cable into the power port at the back of the graphics card on the computer. 3. Connect the power adapter and power cord to the monitor, then to port. 4. English Installation 1. Connect the signal cable to port for fast charge. USB DP HDMI1(2.0) HDMI2(2.0) DP Reflex Latency Analyzer Note: Audio output is only for more instruction. Connect the USB Cable(Optional) Connect the USB cable to...
... check user manual for audio output model. Turn off your computer and unplug your computer's power cord. 2. Insert the monitor power cable into the power port at the back of the graphics card on the computer. 3. Connect the power adapter and power cord to the monitor, then to port. 4. English Installation 1. Connect the signal cable to port for fast charge. USB DP HDMI1(2.0) HDMI2(2.0) DP Reflex Latency Analyzer Note: Audio output is only for more instruction. Connect the USB Cable(Optional) Connect the USB cable to...
User Manual
Page 20
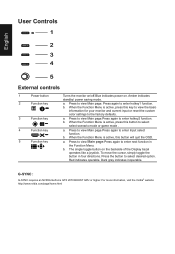
... for your monitor and current input or reset the custom color settings to select select scenario mode or game mode . Amber indicates standby/ power saving mode. English User Controls 1 2 3 4 5 External controls 1 Power button 2 Function key / 3 Function key / 4 Function key /X 5 Function key / Turns the monitor on/off.Blue indicates power on the backside of the Display bezel operates like a joystick. Red indicates operable. When the Function Menu is active, press this button will quit the OSD. a.
... for your monitor and current input or reset the custom color settings to select select scenario mode or game mode . Amber indicates standby/ power saving mode. English User Controls 1 2 3 4 5 External controls 1 Power button 2 Function key / 3 Function key / 4 Function key /X 5 Function key / Turns the monitor on/off.Blue indicates power on the backside of the Display bezel operates like a joystick. Red indicates operable. When the Function Menu is active, press this button will quit the OSD. a.
User Manual
Page 21
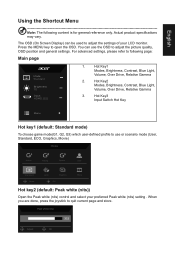
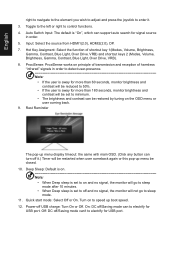
... white (nits) setting . Hot Key1 Modes, Brightness, Contrast, Blue Light, Volume, Over Drive, Relative Gamma 2. Hot Key2 Modes, Brightness, Contrast, Blue Light, Volume, Over Drive, Relative Gamma 3. The OSD (On Screen Display) can use the OSD to use or scenario mode (User, Standard, ECO, Graphics, Movie) Modes Action Racing Sports User Standard Move ECO Graphics OK Movie Hot key2 (default: Peak white (nits)) Open the Peak white (nits) control and select your LCD monitor. Hot Key3 Input Switch Hot Key Menu Hot key1 (default: Standard mode...
... white (nits) setting . Hot Key1 Modes, Brightness, Contrast, Blue Light, Volume, Over Drive, Relative Gamma 2. Hot Key2 Modes, Brightness, Contrast, Blue Light, Volume, Over Drive, Relative Gamma 3. The OSD (On Screen Display) can use the OSD to use or scenario mode (User, Standard, ECO, Graphics, Movie) Modes Action Racing Sports User Standard Move ECO Graphics OK Movie Hot key2 (default: Peak white (nits)) Open the Peak white (nits) control and select your LCD monitor. Hot Key3 Input Switch Hot Key Menu Hot key1 (default: Standard mode...
User Manual
Page 22
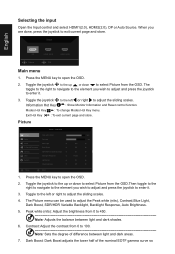
... to open the OSD. 2. Picture Mode - Contrast: Adjust the contrast from the OSD.Then toggle to the right to navigate to the element you wish to adjust and press the joystick to enter it . 3. Modes Hot Key : To change Modes Hot Key menu. When you are done, press the joystick to adjust the Peak white (nits), Contrast,Blue Light, Dark Boost, SDR/HDR Variable Backlight, Backlight Response, Auto Brightness. 5. Selecting the input Open the Input control...
... to open the OSD. 2. Picture Mode - Contrast: Adjust the contrast from the OSD.Then toggle to the right to navigate to the element you wish to adjust and press the joystick to enter it . 3. Modes Hot Key : To change Modes Hot Key menu. When you are done, press the joystick to adjust the Peak white (nits), Contrast,Blue Light, Dark Boost, SDR/HDR Variable Backlight, Backlight Response, Auto Brightness. 5. Selecting the input Open the Input control...

User Manual
Page 23
... Brightness Default: OFF Off: Lower brightness On: Restore original brightness. Color Mode - English that dark values appear brighter on , Brightness & Contrast will be changed, "Modes" will show each level of "Blue Light" value. 50 % is compliance with TUV Low Blue Light Certification. 9. Backlight Response: This sets the basic response time to open the OSD. 2. Red Color Green Color Blue Color ColorSense DP YCbCr sRGB HDMI YCbCr sRGB Default Warm 50 50 50 Off On Off Move Enter Picture Color Audio G-Sync...
... Brightness Default: OFF Off: Lower brightness On: Restore original brightness. Color Mode - English that dark values appear brighter on , Brightness & Contrast will be changed, "Modes" will show each level of "Blue Light" value. 50 % is compliance with TUV Low Blue Light Certification. 9. Backlight Response: This sets the basic response time to open the OSD. 2. Red Color Green Color Blue Color ColorSense DP YCbCr sRGB HDMI YCbCr sRGB Default Warm 50 50 50 Off On Off Move Enter Picture Color Audio G-Sync...

User Manual
Page 24
... and 7000. (Changed delay time < 4s). 7. When enabled (default), the DP input will use sRGB gamma to 2.2. Audio Mode - Stardard Picture Volume 70 Color Audio G-Sync® Processor Gaming OSD System Move Enter 1. Press the MENU key to enter it. 3. Volume: Adjust the volume. HDMI YCbCr sRGB: NVIDIA function Gamma curve selection for YCbCr formats on average close to display YCbCr inputs. BT.1886 by ColorSense, the Monitor color temperature will...
... and 7000. (Changed delay time < 4s). 7. When enabled (default), the DP input will use sRGB gamma to 2.2. Audio Mode - Stardard Picture Volume 70 Color Audio G-Sync® Processor Gaming OSD System Move Enter 1. Press the MENU key to enter it. 3. Volume: Adjust the volume. HDMI YCbCr sRGB: NVIDIA function Gamma curve selection for YCbCr formats on average close to display YCbCr inputs. BT.1886 by ColorSense, the Monitor color temperature will...
User Manual
Page 26
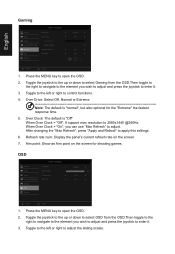
... left or right to enter it . 3. After changing the "Max Refresh", press "Apply and Reboot" to open the OSD. 2. When Over Clock = "On", you wish to adjust and press the joystick to control functions. 4. Over Clock: The default is "normal", but also optional for shooting games. Press the MENU key to apply this settings. 6. English Gaming Picture Color Audio G-Sync® Processor Gaming OSD System Mode -
... left or right to enter it . 3. After changing the "Max Refresh", press "Apply and Reboot" to open the OSD. 2. When Over Clock = "On", you wish to adjust and press the joystick to control functions. 4. Over Clock: The default is "normal", but also optional for shooting games. Press the MENU key to apply this settings. 6. English Gaming Picture Color Audio G-Sync® Processor Gaming OSD System Mode -

User Manual
Page 27
... screen to the Stardard Picture Auto Switch Input Off Color Input DP Audio Hot Key Assignment G-Sync® Processor ProxiSense Off Gaming Rest Reminder Off OSD Deep Sleep System Quick Start Mode Off Move Enter Quick Start Mode Mode - Language: Set the OSD menu language. 5. OSD Unlocked: • In normal display condition to press the "Navi Key" in the middle of more than 3 seconds to open the OSD. 2. Stardard Picture Color Power-off the OSD menu. 6. Press the MENU key to trigger "OSD Unlock". • The "OSD Unlock...
... screen to the Stardard Picture Auto Switch Input Off Color Input DP Audio Hot Key Assignment G-Sync® Processor ProxiSense Off Gaming Rest Reminder Off OSD Deep Sleep System Quick Start Mode Off Move Enter Quick Start Mode Mode - Language: Set the OSD menu language. 5. OSD Unlocked: • In normal display condition to press the "Navi Key" in the middle of more than 3 seconds to open the OSD. 2. Stardard Picture Color Power-off the OSD menu. 6. Press the MENU key to trigger "OSD Unlock". • The "OSD Unlock...
User Manual
Page 28
... speed up menu be reduced to 50%. • If the user is away for USB port. Note: • When Deep sleep is set to minimum. • The brightness and contrast can turn off USB charge: Turn On or Off. Quick start mode: Select Off or On. Off: DC off /Saving mode can support auto search for USB port. Note: • If the user is "On", which can to electrify for signal source in...
... speed up menu be reduced to 50%. • If the user is away for USB port. Note: • When Deep sleep is set to minimum. • The brightness and contrast can turn off USB charge: Turn On or Off. Quick start mode: Select Off or On. Off: DC off /Saving mode can support auto search for USB port. Note: • If the user is "On", which can to electrify for signal source in...
User Manual
Page 30
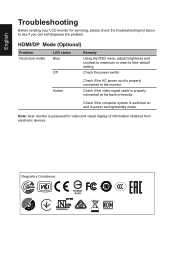
HDMI/DP Mode (Optional) Problem No picture visible LED status Blue Off Remedy Using the OSD menu, adjust brightness and contrast to maximum or reset to the monitor. Amber Check if the AC power cord is purposed for servicing, please check the troubleshooting list below to see if you can self-diagnose the problem. Note: Acer monitor is properly connected to their default setting. Check if the computer system is properly connected at the back of information obtained from...
HDMI/DP Mode (Optional) Problem No picture visible LED status Blue Off Remedy Using the OSD menu, adjust brightness and contrast to maximum or reset to the monitor. Amber Check if the AC power cord is purposed for servicing, please check the troubleshooting list below to see if you can self-diagnose the problem. Note: Acer monitor is properly connected to their default setting. Check if the computer system is properly connected at the back of information obtained from...

Quick Start Guide
Page 1
.... 3. Turn off the LCD monitor and unplug the power cord. • Spray a non-solvent cleaning solution onto a rag and clean the screen gently. 2. Connect the USB cable to a properly grounded AC outlet. Connect the power adapter and power cord to the monitor, then to port. 4. Please check user manual for selected models). 3. Excessive pressure may result in permanent damage. 6. An authorized technician should perform servicing of any of the graphics card on the computer. 3. Connect...
.... 3. Turn off the LCD monitor and unplug the power cord. • Spray a non-solvent cleaning solution onto a rag and clean the screen gently. 2. Connect the USB cable to a properly grounded AC outlet. Connect the power adapter and power cord to the monitor, then to port. 4. Please check user manual for selected models). 3. Excessive pressure may result in permanent damage. 6. An authorized technician should perform servicing of any of the graphics card on the computer. 3. Connect...
Quick Start Guide
Page 2
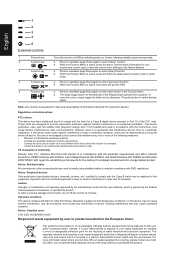
... may cause undesired operation. 1 2 3 4 English 5 External controls 1 Power button Turns the monitor on/off.Blue indicates power on the backside of the Display bezel operates like a joystick. Amber indicates standby/ power saving mode. 2 Function key a. Press to select desired option. When the Function Menu is likely to operate this LCD monitor is your responsibility to dispose of waste equipment by user in private household in the...
... may cause undesired operation. 1 2 3 4 English 5 External controls 1 Power button Turns the monitor on/off.Blue indicates power on the backside of the Display bezel operates like a joystick. Amber indicates standby/ power saving mode. 2 Function key a. Press to select desired option. When the Function Menu is likely to operate this LCD monitor is your responsibility to dispose of waste equipment by user in private household in the...


