
User Manual
Page 2
...are recorded on the label affixed to the contents hereof and specifically disclaims the implied warranties of such revisions or changes. Acer Projector P7500 Series User's Guide Original Issue: 05/2010 Changes may be incorporated in the space provided below. Record the model number,... serial number, purchase date and place of Acer Incorporated. Acer Projector P7500 Series Model number Serial number Date of purchase Place of purchase Acer and the Acer logo are trademarks or registered trademarks of this publication without the prior written ...
...are recorded on the label affixed to the contents hereof and specifically disclaims the implied warranties of such revisions or changes. Acer Projector P7500 Series User's Guide Original Issue: 05/2010 Changes may be incorporated in the space provided below. Record the model number,... serial number, purchase date and place of Acer Incorporated. Acer Projector P7500 Series Model number Serial number Date of purchase Place of purchase Acer and the Acer logo are trademarks or registered trademarks of this publication without the prior written ...

User Manual
Page 3
... openings must not be placed near water. • Do not place this product from the wall outlet before removing the power supply unit from the projector. • If the system has multiple sources of the product and to protect it could result in a fire or electric shock. The openings should never...
... openings must not be placed near water. • Do not place this product from the wall outlet before removing the power supply unit from the projector. • If the system has multiple sources of the product and to protect it could result in a fire or electric shock. The openings should never...
User Manual
Page 5
... damaged • the product exhibits a distinct change in performance, indicating a need for purchase options. It Your device and its enhancements may hurt your projector. Keep them out of the reach of a car with your eyes. • Turn on . Do not operate if smoke, strange noise or odor...50cm clearance from the wall outlet and refer servicing to qualified service personnel when: • the power cord or plug is on the projector first and then signal sources • Do not place the product in damage and will often require extensive work by the operating instructions,...
... damaged • the product exhibits a distinct change in performance, indicating a need for purchase options. It Your device and its enhancements may hurt your projector. Keep them out of the reach of a car with your eyes. • Turn on . Do not operate if smoke, strange noise or odor...50cm clearance from the wall outlet and refer servicing to qualified service personnel when: • the power cord or plug is on the projector first and then signal sources • Do not place the product in damage and will often require extensive work by the operating instructions,...

User Manual
Page 6
...; Never replace the lamp assembly or any object when the projector is capable of the lamp itself. In this case, unplug immediately and contact your dealer for ceiling mount installation. Only use acer ceiling mount kit for mounting the projector and ensure it is to wait for replacement. • ...Do not operate lamps beyond the rated lamp life. In this projector. It can lead to removing the lamp assembly for the ...
...; Never replace the lamp assembly or any object when the projector is capable of the lamp itself. In this case, unplug immediately and contact your dealer for ceiling mount installation. Only use acer ceiling mount kit for mounting the projector and ensure it is to wait for replacement. • ...Do not operate lamps beyond the rated lamp life. In this projector. It can lead to removing the lamp assembly for the ...
User Manual
Page 7
... into the trash when discarding. For more information on the Waste from Electrical and Electronics Equipment (WEEE) regulations, visit http://www.acer-group.com/public/ Sustainability/sustainability01.htm Mercury advisory For projectors or electronic products containing an LCD/CRT monitor or display: "Lamp(s) contain Mercury, Dispose Properly." Disposal instructions Do not throw...
... into the trash when discarding. For more information on the Waste from Electrical and Electronics Equipment (WEEE) regulations, visit http://www.acer-group.com/public/ Sustainability/sustainability01.htm Mercury advisory For projectors or electronic products containing an LCD/CRT monitor or display: "Lamp(s) contain Mercury, Dispose Properly." Disposal instructions Do not throw...

User Manual
Page 8
...excessive dust and dirt. • Near any appliance that generates a strong magnetic field. • Place In direct sunlight. If this happens, the projector will detect the life of the lamp itself. Don't: • Block the slots and openings on the unit provided for a long period of time... instructions. • This product will not turn back on . viii First things first Usage Notes Do: • Turn off , please ensure the projector completes its life, it shows warning messages. • Reset the "Lamp Hour Reset" function from the Onscreen display "Management" menu after replacing the ...
...excessive dust and dirt. • Near any appliance that generates a strong magnetic field. • Place In direct sunlight. If this happens, the projector will detect the life of the lamp itself. Don't: • Block the slots and openings on the unit provided for a long period of time... instructions. • This product will not turn back on . viii First things first Usage Notes Do: • Turn off , please ensure the projector completes its life, it shows warning messages. • Reset the "Lamp Hour Reset" function from the Onscreen display "Management" menu after replacing the ...
User Manual
Page 9
... Precautions viii Introduction 1 Product Features 1 Package Overview 2 Projector Overview 3 Projector Outlook 3 Control Panel 5 Remote Control Layout 6 Getting Started 8 Connecting the Projector 8 Turning the Projector On/Off 9 Turning on the Projector 9 Turning the projector off 10 Adjusting the Projected Image 11 Adjusting the Height ... preferred image position by adjusting lens shift 16 User Controls 19 Installation menu 19 Acer Empowering Technology 20 Onscreen Display (OSD) Menus 21 Color 22 Image 24 Management 25 Setting 26 Audio 28 Timer ...
... Precautions viii Introduction 1 Product Features 1 Package Overview 2 Projector Overview 3 Projector Outlook 3 Control Panel 5 Remote Control Layout 6 Getting Started 8 Connecting the Projector 8 Turning the Projector On/Off 9 Turning on the Projector 9 Turning the projector off 10 Adjusting the Projected Image 11 Adjusting the Height ... preferred image position by adjusting lens shift 16 User Controls 19 Installation menu 19 Acer Empowering Technology 20 Onscreen Display (OSD) Menus 21 Color 22 Image 24 Management 25 Setting 26 Audio 28 Timer ...

User Manual
Page 11
...Product Features This product is a single-chip DLP® projector. Outstanding features include: • DLP® technology • Native 1920 x 1080 1080p resolution 4:3 / 16:9 / L.Box aspect ratio supported • Acer ColorBoost technology delivers nature's true colors for vivid, life-like... and economy (ECO) mode extends lamp life • Acer EcoProjeciton Technology delivers Intelligent power management approach and physical efficiency improvement • Empowering Key reveals Acer Empowering Technology utilities (Acer eView, eTimer, ePower Management) for easy adjustment of settings...
...Product Features This product is a single-chip DLP® projector. Outstanding features include: • DLP® technology • Native 1920 x 1080 1080p resolution 4:3 / 16:9 / L.Box aspect ratio supported • Acer ColorBoost technology delivers nature's true colors for vivid, life-like... and economy (ECO) mode extends lamp life • Acer EcoProjeciton Technology delivers Intelligent power management approach and physical efficiency improvement • Empowering Key reveals Acer Empowering Technology utilities (Acer eView, eTimer, ePower Management) for easy adjustment of settings...

User Manual
Page 12
SOURCE MENU TEMP RESYNC LAMP ZOOM Projector with all the items shown below. English 2 Package Overview This projector comes with lens cap Power cord VGA cable S-Video cable Composite video cable DVI-D cable 3RCA conponent cable Security card Acer Projector Remote control Quick Start Guide Quick start guide User's guide 2 x Battery Carrying case Dust filter Check to make sure your dealer immediately if any thing is complete. Contact your unit is missing.
SOURCE MENU TEMP RESYNC LAMP ZOOM Projector with all the items shown below. English 2 Package Overview This projector comes with lens cap Power cord VGA cable S-Video cable Composite video cable DVI-D cable 3RCA conponent cable Security card Acer Projector Remote control Quick Start Guide Quick start guide User's guide 2 x Battery Carrying case Dust filter Check to make sure your dealer immediately if any thing is complete. Contact your unit is missing.

User Manual
Page 13
English 3 Projector Overview Projector Outlook Front / upper side 8 95 3 TEMP SOURCE 4 5 MENU LAMP RESYNC 10 2 1 # Description 1 Lens cap 2 Zoom lever 3 Zoom Lens 4 Focus ring 5 Remote control receivers ZOOM 7 6 # Description 6 Elevator feet 7 Tilt adjusting wheels 8 Control panel 9 Power button 10 Lens shift control rings
English 3 Projector Overview Projector Outlook Front / upper side 8 95 3 TEMP SOURCE 4 5 MENU LAMP RESYNC 10 2 1 # Description 1 Lens cap 2 Zoom lever 3 Zoom Lens 4 Focus ring 5 Remote control receivers ZOOM 7 6 # Description 6 Elevator feet 7 Tilt adjusting wheels 8 Control panel 9 Power button 10 Lens shift control rings

User Manual
Page 15
... to choose RGB, Component, SVideo, Composite, SCART, HDTV and HDMI™ sources. Press "SOURCE" to your selection of items. See the contents in "Turning the Projector On/ Off" section. Remote control receiver. English SOURCE 5 Control Panel 1 LAMP 2 6 TEMP 7 8 3 MENU 9 RESYNC 2 10 # 1 LAMP Function 2 ... Recevier 45 Description Lamp Indicator LED Adjusts the image to the previous step for distortion caused by tilting the projector. Automatically synchronizes the projector to the input source. • Press "MENU" to launch the Onscreen display (OSD) menu, back ...
... to choose RGB, Component, SVideo, Composite, SCART, HDTV and HDMI™ sources. Press "SOURCE" to your selection of items. See the contents in "Turning the Projector On/ Off" section. Remote control receiver. English SOURCE 5 Control Panel 1 LAMP 2 6 TEMP 7 8 3 MENU 9 RESYNC 2 10 # 1 LAMP Function 2 ... Recevier 45 Description Lamp Indicator LED Adjusts the image to the previous step for distortion caused by tilting the projector. Automatically synchronizes the projector to the input source. • Press "MENU" to launch the Onscreen display (OSD) menu, back ...
User Manual
Page 16
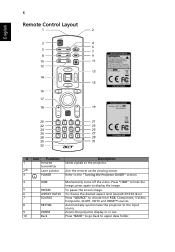
... RGB, Component, S-Video, Composite, SCART, HDTV and HDMI™ sources. 8 RESYNC Automatically synchronizes the projector to the input source. 9 ZOOM Zooms the projector display in or out. 10 Back Press "BACK" to go back to the "Turning the Projector On/Off" section. 4 HIDE Momentarily turns off the video. Aim the remote at the... 20 21 22 23 24 25 26 27 28 29 30 31 32 # Icon Function 1 Infrared transmitter 2(#) Laser pointer 3 POWER Description Sends signals to the projector.
... RGB, Component, S-Video, Composite, SCART, HDTV and HDMI™ sources. 8 RESYNC Automatically synchronizes the projector to the input source. 9 ZOOM Zooms the projector display in or out. 10 Back Press "BACK" to go back to the "Turning the Projector On/Off" section. 4 HIDE Momentarily turns off the video. Aim the remote at the... 20 21 22 23 24 25 26 27 28 29 30 31 32 # Icon Function 1 Infrared transmitter 2(#) Laser pointer 3 POWER Description Sends signals to the projector.
User Manual
Page 17
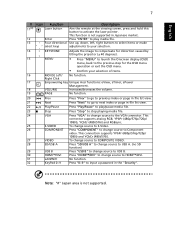
..., press and hold this button to Component video. KEYSTONE Adjusts the image to the previous step for distortion caused by tilting the projector (± 40 degrees). Press "Play/Pause" to S-Video. To change source to activate the laser pointer. This connection supports YPbPr... area is not supported in file list view. To change source to previous index or page in Japanese market. Right Click Empowering key Unique Acer functions: eView, eTimer, ePower Management. VOLUME Increases/decreases the volume. Press "ENTER" to USB B. Press "SD/USB A" to change ...
..., press and hold this button to Component video. KEYSTONE Adjusts the image to the previous step for distortion caused by tilting the projector (± 40 degrees). Press "Play/Pause" to S-Video. To change source to activate the laser pointer. This connection supports YPbPr... area is not supported in file list view. To change source to previous index or page in Japanese market. Right Click Empowering key Unique Acer functions: eView, eTimer, ePower Management. VOLUME Increases/decreases the volume. Press "ENTER" to USB B. Press "SD/USB A" to change ...
User Manual
Page 18
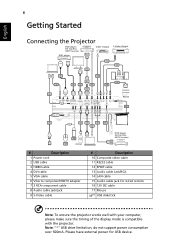
English 8 Getting Started Connecting the Projector DVD player, Set-top Box, HDTV receiver DVD player RBG Video Output Y S-Video Output HDMI DVI-D 3 7 D-Sub 9 10 12 RW B USB USB USB 2 2 HDMI RBG 4 5 8 6 ... jack for USB device. Please have external power for wired remote 16 12V DC cable 17 Mouse 18(*) USB disk/stick Note: To ensure the projector works well with your computer, please make sure the timing of the display mode is compatible with the...
English 8 Getting Started Connecting the Projector DVD player, Set-top Box, HDTV receiver DVD player RBG Video Output Y S-Video Output HDMI DVI-D 3 7 D-Sub 9 10 12 RW B USB USB USB 2 2 HDMI RBG 4 5 8 6 ... jack for USB device. Please have external power for wired remote 16 12V DC cable 17 Mouse 18(*) USB disk/stick Note: To ensure the projector works well with your computer, please make sure the timing of the display mode is compatible with the...
User Manual
Page 19
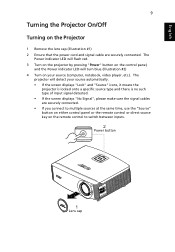
... control or direct source key on the remote control to switch between inputs. 2 Power button SOURCE 1 Lens cap MENU TEMP RESYNC LAMP ZOOM The projector will turn blue.(Illustration #2) 4 Turn on the control panel, and the Power indicator LED will detect your source (computer, notebook, video player ,etc....). The Power indicator LED will flash red. 3 Turn on the projector by pressing "Power" button on your source automatically. • If the screen displays "Lock" and "Source" icons, it means the...
... control or direct source key on the remote control to switch between inputs. 2 Power button SOURCE 1 Lens cap MENU TEMP RESYNC LAMP ZOOM The projector will turn blue.(Illustration #2) 4 Turn on the control panel, and the Power indicator LED will detect your source (computer, notebook, video player ,etc....). The Power indicator LED will flash red. 3 Turn on the projector by pressing "Power" button on your source automatically. • If the screen displays "Lock" and "Source" icons, it means the...

User Manual
Page 20
...that the system cools properly. 3 As long as the power cord remains plugged in, you can press the power button to turn the projector immediately back on anytime during the 2minute shutdown process. 4 Once the system has finished cooling, the LED power indicator will stop blinking ...and turn the projector off, press the power button. This onscreen message indicates that the projector has overheated. This message appears: "Please press the power button again to complete the shutdown process." Contact...
...that the system cools properly. 3 As long as the power cord remains plugged in, you can press the power button to turn the projector immediately back on anytime during the 2minute shutdown process. 4 Once the system has finished cooling, the LED power indicator will stop blinking ...and turn the projector off, press the power button. This onscreen message indicates that the projector has overheated. This message appears: "Please press the power button again to complete the shutdown process." Contact...

User Manual
Page 21
English 11 Adjusting the Projected Image Adjusting the Height of Projected Image The projector is equipped with elevator feet for adjusting the height of image. To raise/lower the image: 1 Raise the image to the desired height angle (Illustration #1), then pull out the stand feet into position. 2 Use Tilt adjusting wheel (Illustration #2) to fine-tune the display angle. 3 Use Lens shift control rings to move the image to the ideal position. (refer to page 16) 1 Elevator feet 2 Tilt adjusting wheels
English 11 Adjusting the Projected Image Adjusting the Height of Projected Image The projector is equipped with elevator feet for adjusting the height of image. To raise/lower the image: 1 Raise the image to the desired height angle (Illustration #1), then pull out the stand feet into position. 2 Use Tilt adjusting wheel (Illustration #2) to fine-tune the display angle. 3 Use Lens shift control rings to move the image to the ideal position. (refer to page 16) 1 Elevator feet 2 Tilt adjusting wheels

User Manual
Page 22
... screen, good image quality is possible for image sizes between 59" and 91". Example: If the projector is 3 m from the screen. Note: Remind as below to find the optimal image sizes achievable when the projector is positioned at 3m distance. English 12 How to optimize image size and distance Consult the table...
... screen, good image quality is possible for image sizes between 59" and 91". Example: If the projector is 3 m from the screen. Note: Remind as below to find the optimal image sizes achievable when the projector is positioned at 3m distance. English 12 How to optimize image size and distance Consult the table...

User Manual
Page 24
For example: to obtain an image size of image 2.5 m 1.7 m Desired Distance The table below shows how to top of 50" set the projector at a distance 1.7 m and 2.5 m from the screen and adjust the zoom level accordingly. 14 How to get a preferred image size by adjusting distance and zoom English 50" bGeeelwdfeonrsmt aat Height Form base to achieve a desired image size by adjusting either the position or the zoom ring.
For example: to obtain an image size of image 2.5 m 1.7 m Desired Distance The table below shows how to top of 50" set the projector at a distance 1.7 m and 2.5 m from the screen and adjust the zoom level accordingly. 14 How to get a preferred image size by adjusting distance and zoom English 50" bGeeelwdfeonrsmt aat Height Form base to achieve a desired image size by adjusting either the position or the zoom ring.

User Manual
Page 26
Vertical Lens Shift ring Horizontal Lens Shift ring Note: The figures shown in this section are for adjusting the position of projected image right and left or up and down without requiring you to physically move the projector. The figures between units can be different due to assembly tolerance. English 16 How to get a preferred image position by adjusting lens shift The projector is equipped with lens shift for reference only not approximate value.
Vertical Lens Shift ring Horizontal Lens Shift ring Note: The figures shown in this section are for adjusting the position of projected image right and left or up and down without requiring you to physically move the projector. The figures between units can be different due to assembly tolerance. English 16 How to get a preferred image position by adjusting lens shift The projector is equipped with lens shift for reference only not approximate value.


