
User Manual (3D)
Page 1
Acer Projectors with 3D Technology Quick Guide
Acer Projectors with 3D Technology Quick Guide

User Manual (3D)
Page 2
Acer Projector Series Quick Guide Original Issue: 8/2012 Model number Serial number Date of purchase Place of purchase © 2012 All Rights Reserved.
Acer Projector Series Quick Guide Original Issue: 8/2012 Model number Serial number Date of purchase Place of purchase © 2012 All Rights Reserved.
User Manual (3D)
Page 3
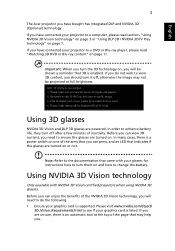
... 3D is enabled. Before you can press, and an LED that may not be shown a reminder that came with NVIDIA 3D Vision certified projectors when using NVIDIA 3D glasses. Using 3D glasses NVIDIA 3D Vision and DLP 3D glasses are turned on or not. If you do the ...glasses are powered. If you have bought has integrated DLP and NVIDIA 3D (Optional) technology. In many cases, there is supported. English 3 The Acer projector you have connected your projector to a DVD or Blu-ray player, please read sections "Using NVIDIA 3D Vision technology" on page 3 or "Using DLP 3D / NVIDIA ...
... 3D is enabled. Before you can press, and an LED that may not be shown a reminder that came with NVIDIA 3D Vision certified projectors when using NVIDIA 3D glasses. Using 3D glasses NVIDIA 3D Vision and DLP 3D glasses are turned on or not. If you do the ...glasses are powered. If you have bought has integrated DLP and NVIDIA 3D (Optional) technology. In many cases, there is supported. English 3 The Acer projector you have connected your projector to a DVD or Blu-ray player, please read sections "Using NVIDIA 3D Vision technology" on page 3 or "Using DLP 3D / NVIDIA ...

User Manual (3D)
Page 5
If you are viewing Blu-ray 3D content over an HDMI 1.4a or later connection, this will be set automatically. 6 Press the menu button on the left-hand side of the display has been set to open the OSD. Make sure the refresh rate of the window. Select the 3D section (the sixth menu option) on the projector remote control to 100/120 Hz (from the appropriate dropdown menu). English 5 4 Check the Enable Stereoscopic 3D option and select the correct display type. 5 In the Select a task... list, select Change Resolution.
If you are viewing Blu-ray 3D content over an HDMI 1.4a or later connection, this will be set automatically. 6 Press the menu button on the left-hand side of the display has been set to open the OSD. Make sure the refresh rate of the window. Select the 3D section (the sixth menu option) on the projector remote control to 100/120 Hz (from the appropriate dropdown menu). English 5 4 Check the Enable Stereoscopic 3D option and select the correct display type. 5 In the Select a task... list, select Change Resolution.

User Manual (3D)
Page 6
English 6 7 Set 3D to Nvidia 3D Vision. 8 Alternatively, press the Empowering Key on your projector's remote control to view 3D content using the Stereoscopic player that is available at www.3dtv.at. The instructions below explain how to open Acer e3D Management. Using the stereoscopic player You need to view 3D content. Other players may have a stereoscopic player in order to have different procedures. From the 3D options, select Nvidia 3D Vision.
English 6 7 Set 3D to Nvidia 3D Vision. 8 Alternatively, press the Empowering Key on your projector's remote control to view 3D content using the Stereoscopic player that is available at www.3dtv.at. The instructions below explain how to open Acer e3D Management. Using the stereoscopic player You need to view 3D content. Other players may have a stereoscopic player in order to have different procedures. From the 3D options, select Nvidia 3D Vision.

User Manual (3D)
Page 7
....3dtv.at fullscreen resolution in the player. Note: You need to get the 3D effects. To download software and use an NVIDIA 3DTV Play ready projector with DLP glasses, refer to View > Viewing Method > NVIDIA 3D Vision. 2 Open the 3D content in order to do the following. 1 Ensure your graphics card...
....3dtv.at fullscreen resolution in the player. Note: You need to get the 3D effects. To download software and use an NVIDIA 3DTV Play ready projector with DLP glasses, refer to View > Viewing Method > NVIDIA 3D Vision. 2 Open the 3D content in order to do the following. 1 Ensure your graphics card...

User Manual (3D)
Page 8
... 3D section (the sixth menu option) on the left-hand side of the window. 3 Set 3D to On. 4 Alternatively, press the Empowering Key on the projector remote control to open the OSD. Setting up a 3D environment Once you are viewing Blu-ray 3D content over an HDMI 1.4a or later connection..., this will need to set up the environment. 1 Set the refresh rate to 100/120 Hz on your projector's remote control to open Acer e3D Management. From the 3D options, select On.
... 3D section (the sixth menu option) on the left-hand side of the window. 3 Set 3D to On. 4 Alternatively, press the Empowering Key on the projector remote control to open the OSD. Setting up a 3D environment Once you are viewing Blu-ray 3D content over an HDMI 1.4a or later connection..., this will need to set up the environment. 1 Set the refresh rate to 100/120 Hz on your projector's remote control to open Acer e3D Management. From the 3D options, select On.
User Manual (3D)
Page 9
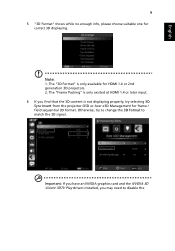
...card and the NVIDIA 3D Vision/ 3DTV Play drivers installed, you find that the 3D content is only available for HDMI 1.4 or 2nd generation 3D projectors. 2. The "3D Format" is not displaying properly, try to change the 3D Format to disable the The "Frame Packing" is only existed at... HDMI 1.4 or later input. 6 If you may need to match the 3D signal. Note: 1. Otherwise, try selecting 3D Sync Invert from the projector OSD or Acer e3D Management for correct 3D displaying. English 9 5 "3D Format" shows while no enough info, please choose suitable one for frame / field sequential ...
...card and the NVIDIA 3D Vision/ 3DTV Play drivers installed, you find that the 3D content is only available for HDMI 1.4 or 2nd generation 3D projectors. 2. The "3D Format" is not displaying properly, try to change the 3D Format to disable the The "Frame Packing" is only existed at... HDMI 1.4 or later input. 6 If you may need to match the 3D signal. Note: 1. Otherwise, try selecting 3D Sync Invert from the projector OSD or Acer e3D Management for correct 3D displaying. English 9 5 "3D Format" shows while no enough info, please choose suitable one for frame / field sequential ...

User Manual (3D)
Page 11
...4a, check that 3D options are on and the video uses 24p before turning on the projector remote control to open Acer e3D Management. Select the 3D section (the sixth menu option) on your projector. Older connections should check the resolution is set to 480i or 576i. 1 Press the menu... button on your projector's remote control to On. 3 Alternatively, press the Empowering Key on the left-...
...4a, check that 3D options are on and the video uses 24p before turning on the projector remote control to open Acer e3D Management. Select the 3D section (the sixth menu option) on your projector. Older connections should check the resolution is set to 480i or 576i. 1 Press the menu... button on your projector's remote control to On. 3 Alternatively, press the Empowering Key on the left-...

User Manual (3D)
Page 12
The "Frame Packing" is only existed at HDMI 1.4 or later input. 5 If you find that the 3D content is only available for correct 3D displaying. English 12 4 "3D Format" shows while no enough info, please choose suitable one for HDMI 1.4 or 2nd generation 3D projectors. 2. The "3D Format" is not displaying properly, try selecting 3D Sync Invert from the projector OSD or Acer e3D Management. Note: 1.
The "Frame Packing" is only existed at HDMI 1.4 or later input. 5 If you find that the 3D content is only available for correct 3D displaying. English 12 4 "3D Format" shows while no enough info, please choose suitable one for HDMI 1.4 or 2nd generation 3D projectors. 2. The "3D Format" is not displaying properly, try selecting 3D Sync Invert from the projector OSD or Acer e3D Management. Note: 1.

User Manual (3D)
Page 13
Note: The "3D Format" is only available for HDMI 1.4 or 2nd generation 3D projectors. English 13 6 If this does not improve the image, change the 3D Format to match the signal sent by your player.
Note: The "3D Format" is only available for HDMI 1.4 or 2nd generation 3D projectors. English 13 6 If this does not improve the image, change the 3D Format to match the signal sent by your player.
User Manual
Page 1
Acer Projector P5227/P5327W/P1285i/ P1285B/P1385Wi/P1385WB/ S1385WHBe/S1385WHne Series User's Guide
Acer Projector P5227/P5327W/P1285i/ P1285B/P1385Wi/P1385WB/ S1385WHBe/S1385WHne Series User's Guide
User Manual
Page 2
...are used herein for a particular purpose. All correspondence concerning your projector. No part of this publication may be incorporated in this manual or supplementary documents and publications. All Rights Reserved. Acer Projector User's Guide Original Issue: 01/2015 Changes may be reproduced, ... of this publication without the prior written permission of such revisions or changes. Acer Projector Model number Serial number Date of purchase Place of purchase Acer and the Acer logo are recorded on the label affixed to notify any means, electronically, mechanically...
...are used herein for a particular purpose. All correspondence concerning your projector. No part of this publication may be incorporated in this manual or supplementary documents and publications. All Rights Reserved. Acer Projector User's Guide Original Issue: 01/2015 Changes may be reproduced, ... of this publication without the prior written permission of such revisions or changes. Acer Projector Model number Serial number Date of purchase Place of purchase Acer and the Acer logo are recorded on the label affixed to notify any means, electronically, mechanically...

User Manual
Page 3
... outlet. • Unplug the power cord before cleaning. Do not use this product from the wall outlet before removing the power supply unit from the projector. • If the system has multiple sources of power, disconnect power from the electrical outlet. Turning the product off before cleaning Unplug this product near...
... outlet. • Unplug the power cord before cleaning. Do not use this product from the wall outlet before removing the power supply unit from the projector. • If the system has multiple sources of power, disconnect power from the electrical outlet. Turning the product off before cleaning Unplug this product near...

User Manual
Page 5
... • the product exhibits a distinct change in performance, indicating a need for purchase options. Your device and its enhancements may hurt your projector. At least 50cm clearance from the wall outlet and refer servicing to qualified service personnel when: • the power cord or plug is...poorly ventilated or confined. v Product servicing Do not attempt to service this product from walls and free flow of air around the projector are necessary. • Locations where temperatures may become excessively high, such as opening or removing covers may expose you to dangerous voltage...
... • the product exhibits a distinct change in performance, indicating a need for purchase options. Your device and its enhancements may hurt your projector. At least 50cm clearance from the wall outlet and refer servicing to qualified service personnel when: • the power cord or plug is...poorly ventilated or confined. v Product servicing Do not attempt to service this product from walls and free flow of air around the projector are necessary. • Locations where temperatures may become excessively high, such as opening or removing covers may expose you to dangerous voltage...

User Manual
Page 6
...it . vi might cause fire or electric shock. It could cause the object to the sun. Only use acer ceiling mount kit for inspection. • Do not face the projector lens to become hot. • Clean the air filter frequently. The temperature inside which become heated and ...deformed or even cause a fire. There are clogged with any object when the projector is securely installed. In this case contact your local dealer or Acer service center for ceiling mount installation. To temporarily turn off . • Do not touch the air outlet...
...it . vi might cause fire or electric shock. It could cause the object to the sun. Only use acer ceiling mount kit for inspection. • Do not face the projector lens to become hot. • Clean the air filter frequently. The temperature inside which become heated and ...deformed or even cause a fire. There are clogged with any object when the projector is securely installed. In this case contact your local dealer or Acer service center for ceiling mount installation. To temporarily turn off . • Do not touch the air outlet...

User Manual
Page 7
... into the trash when discarding. For more information on the Waste from Electrical and Electronics Equipment (WEEE) regulations, visit http://www.acer-group.com/public/ Sustainability/index.htm Mercury advisory For projectors or electronic products containing an LCD/CRT monitor or display: "Lamp(s) contain Mercury, Dispose Properly." For lamp-specific disposal information...
... into the trash when discarding. For more information on the Waste from Electrical and Electronics Equipment (WEEE) regulations, visit http://www.acer-group.com/public/ Sustainability/index.htm Mercury advisory For projectors or electronic products containing an LCD/CRT monitor or display: "Lamp(s) contain Mercury, Dispose Properly." For lamp-specific disposal information...

User Manual
Page 8
... • Please do not open or disassemble the product as recommended in direct sunlight. If this happens, the projector will detect the life of your local dealer or Acer service center for ventilation. • Use abrasive cleaners, waxes or solvents to clean the unit. • Use...not use lens cap when projector is on. Precautions Follow all warnings, precautions and maintenance as this user's guide to excessive dust and dirt. • Near any appliance that generates a strong magnetic field. • Place in this may hurt your local dealer or Acer service center. Don't: •...
... • Please do not open or disassemble the product as recommended in direct sunlight. If this happens, the projector will detect the life of your local dealer or Acer service center for ventilation. • Use abrasive cleaners, waxes or solvents to clean the unit. • Use...not use lens cap when projector is on. Precautions Follow all warnings, precautions and maintenance as this user's guide to excessive dust and dirt. • Near any appliance that generates a strong magnetic field. • Place in this may hurt your local dealer or Acer service center. Don't: •...

User Manual
Page 9
... First viii Usage Notes viii Precautions viii Introduction 1 Product Features 1 Package Overview 2 Projector Overview 3 Projector Outlook 3 Control Panel 4 Remote Control Layout 5 MHL Feature Introduction 7 Getting Started 8 Connecting the Projector 8 Turning the Projector On/Off 10 Turning On the Projector 10 Turning Off the Projector 11 Adjusting the Projected Image 12 Adjusting the Height of the Projected...
... First viii Usage Notes viii Precautions viii Introduction 1 Product Features 1 Package Overview 2 Projector Overview 3 Projector Outlook 3 Control Panel 4 Remote Control Layout 5 MHL Feature Introduction 7 Getting Started 8 Connecting the Projector 8 Turning the Projector On/Off 10 Turning On the Projector 10 Turning Off the Projector 11 Adjusting the Projected Image 12 Adjusting the Height of the Projected...
User Manual
Page 11
...Ray 3D supported • One-touch "3D" button on , the projector dynamically adjusts the power consumption of the lamp according to the brightness of the lamp by up to the 3D functions • Acer ColorBoost technology delivers vivid, life-like images • High brightness and...outstanding features: • DLP® technology • P5227/P1285i/P1285B: Native 1024 x 768 XGA resolution, Auto/4:3/16:9 aspect ratio supported P5327W/P1385Wi/P1385WB/S1385WHBe/S1385WHne: Native 1280 x 800 WXGA resolution, Auto/Full/4:3 /16:9/L.BOX aspect ratio supported • Enables projecting 3D content ...
...Ray 3D supported • One-touch "3D" button on , the projector dynamically adjusts the power consumption of the lamp according to the brightness of the lamp by up to the 3D functions • Acer ColorBoost technology delivers vivid, life-like images • High brightness and...outstanding features: • DLP® technology • P5227/P1285i/P1285B: Native 1024 x 768 XGA resolution, Auto/4:3/16:9 aspect ratio supported P5327W/P1385Wi/P1385WB/S1385WHBe/S1385WHne: Native 1280 x 800 WXGA resolution, Auto/Full/4:3 /16:9/L.BOX aspect ratio supported • Enables projecting 3D content ...


