Acer P5000 Series Projector Quick Start Guide
Page 2
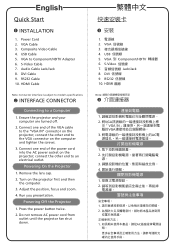
...specifications INTERFACE CONNECTOR Connecting to Component/HDTV Adapter 6. Connect one end of the power cord into the AC power socket on the projector; Turn on the computer and tighten the screws. 3. VGA 到 Component/HDTV 轉接器 6. DVI 信號線...; 9. Adjust the position, focus and zoom. 4. Do not remove AC power cord from outlet until the projector fan shut down. 繁體中文 安裝 1. 電源線 2. Composite Video Cable 4. connect the other...
...specifications INTERFACE CONNECTOR Connecting to Component/HDTV Adapter 6. Connect one end of the power cord into the AC power socket on the projector; Turn on the computer and tighten the screws. 3. VGA 到 Component/HDTV 轉接器 6. DVI 信號線...; 9. Adjust the position, focus and zoom. 4. Do not remove AC power cord from outlet until the projector fan shut down. 繁體中文 安裝 1. 電源線 2. Composite Video Cable 4. connect the other...

Acer P5000 Series Projector User's Guide
Page 2
... system, or transmitted, in this manual or supplementary documents and publications. All correspondence concerning your projector. Acer Projector P1165/P1165P/P1265/P1265P/P5260i/P5270/P5280/P5370W Series Model number Serial number Date of purchase Place of purchase Acer and the Acer logo are used herein for a particular purpose. Other companies' product names or trademarks are registered...
... system, or transmitted, in this manual or supplementary documents and publications. All correspondence concerning your projector. Acer Projector P1165/P1165P/P1265/P1265P/P5260i/P5270/P5280/P5370W Series Model number Serial number Date of purchase Place of purchase Acer and the Acer logo are used herein for a particular purpose. Other companies' product names or trademarks are registered...
Acer P5000 Series Projector User's Guide
Page 3
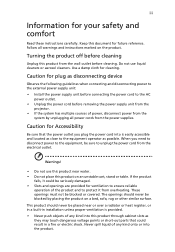
... possible. Never spill liquid of any kind into the product. Keep this product from the wall outlet before removing the power supply unit from the projector. • If the system has multiple sources of power, disconnect power from the system by placing the product on a bed, sofa, rug or other similar...
... possible. Never spill liquid of any kind into the product. Keep this product from the wall outlet before removing the power supply unit from the projector. • If the system has multiple sources of power, disconnect power from the system by placing the product on a bed, sofa, rug or other similar...
Acer P5000 Series Projector User's Guide
Page 5
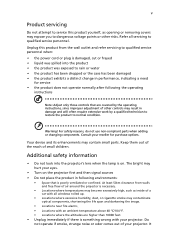
...poorly ventilated or confined. For safety reasons, do not use non-compliant parts when adding or changing components. The bright may hurt your projector. Do not operate if smoke, strange noise or odor comes out of your reseller for service • the product does not operate normally...a need for purchase options. It v Product servicing Do not attempt to service this product from walls and free flow of air around the projector is necessary. • Locations where temperatures may become excessively high, such as opening or removing covers may expose you to dangerous voltage points ...
...poorly ventilated or confined. For safety reasons, do not use non-compliant parts when adding or changing components. The bright may hurt your projector. Do not operate if smoke, strange noise or odor comes out of your reseller for service • the product does not operate normally...a need for purchase options. It v Product servicing Do not attempt to service this product from walls and free flow of air around the projector is necessary. • Locations where temperatures may become excessively high, such as opening or removing covers may expose you to dangerous voltage points ...
Acer P5000 Series Projector User's Guide
Page 6
...off before disconnecting power. • Do not turn off the main power abruptly or unplug the projector during operation. Only use acer ceiling mount kit for mounting the projector and ensure it . It can lead to disassemble this could cause it to suitable qualified professional ...service personnel. • Do not stand the projector on the projector or remote controller. • The lamp ...
...off before disconnecting power. • Do not turn off the main power abruptly or unplug the projector during operation. Only use acer ceiling mount kit for mounting the projector and ensure it . It can lead to disassemble this could cause it to suitable qualified professional ...service personnel. • Do not stand the projector on the projector or remote controller. • The lamp ...

Acer P5000 Series Projector User's Guide
Page 9
For more information on the Waste from Electrical and Electronics Equipment (WEEE) regulations, visit http://global.acer.com/about/ sustainability.htm Mercury advisory For projectors or electronic products containing an LCD/CRT monitor or display: "Lamp(s) contain Mercury, Dispose Properly." For more information, contact the Electronic Industries Alliance at www....
For more information on the Waste from Electrical and Electronics Equipment (WEEE) regulations, visit http://global.acer.com/about/ sustainability.htm Mercury advisory For projectors or electronic products containing an LCD/CRT monitor or display: "Lamp(s) contain Mercury, Dispose Properly." For more information, contact the Electronic Industries Alliance at www....
Acer P5000 Series Projector User's Guide
Page 10
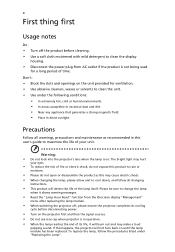
... in this user's guide to maximize the life of the lamp itself. Warning: • Do not look into the projector's lens when the lamp is not being used for ventilation. • Use abrasive cleaners, waxes or solvents to rain or moisture. • Please do not ... the product is on. If this may make a loud popping sound. To replace the lamp, follow all warnings, precautions and maintenance as this happens, the projector will not turn back on until the lamp module has been replaced. x First thing first Usage notes Do: • Turn off , please ensure the...
... in this user's guide to maximize the life of the lamp itself. Warning: • Do not look into the projector's lens when the lamp is not being used for ventilation. • Use abrasive cleaners, waxes or solvents to rain or moisture. • Please do not ... the product is on. If this may make a loud popping sound. To replace the lamp, follow all warnings, precautions and maintenance as this happens, the projector will not turn back on until the lamp module has been replaced. x First thing first Usage notes Do: • Turn off , please ensure the...

Acer P5000 Series Projector User's Guide
Page 11
... 11 Turning on the Projector 11 Turning off the Projector 12 Adjusting the Projected Image 13 Adjusting the Height of Projected Image 13 How to optimize image size and distance 14 How to get a preferred image size by adjusting distance and zoom 18 User Controls 22 Installation menu 22 Acer Empowering Technology 23...
... 11 Turning on the Projector 11 Turning off the Projector 12 Adjusting the Projected Image 13 Adjusting the Height of Projected Image 13 How to optimize image size and distance 14 How to get a preferred image size by adjusting distance and zoom 18 User Controls 22 Installation menu 22 Acer Empowering Technology 23...

Acer P5000 Series Projector User's Guide
Page 13
Outstanding features include: • DLP® technology • P1165/P1165P: Native 800 x 600 SVGA resolution P1265/P1265P/P5260i/P5270/P5280 series : Native 1024 x 768 XGA resolution P5370W: Native 1280 x 800 WXGA resolution 4:3 / 16:9 aspect ratio supported Full/4:3/16:9/L.Box aspect ratio supported (P5370W) • Acer ColorBoost technology delivers nature's true colors for vivid, life-like... digital zoom and pan function • Microsoft® Windows® 2000, XP, Vista® OS compliant English 1 Introduction Product Features This product is a single-chip DLP® projector.
Outstanding features include: • DLP® technology • P1165/P1165P: Native 800 x 600 SVGA resolution P1265/P1265P/P5260i/P5270/P5280 series : Native 1024 x 768 XGA resolution P5370W: Native 1280 x 800 WXGA resolution 4:3 / 16:9 aspect ratio supported Full/4:3/16:9/L.Box aspect ratio supported (P5370W) • Acer ColorBoost technology delivers nature's true colors for vivid, life-like... digital zoom and pan function • Microsoft® Windows® 2000, XP, Vista® OS compliant English 1 Introduction Product Features This product is a single-chip DLP® projector.

Acer P5000 Series Projector User's Guide
Page 14
... Series) for P5260i Series) 2 x Quick start guide Battery Pack with all the items shown below. Projector with lens cap Power cord VGA cable Compostive video cable 2 x Batteries Carrying case DVI-D Cable (P5260i/P5270/P5280/ P5370W Series) #A #B Security card Acer Projector 2 x User's Guide (Wireless CD for P5260i Series) PgUp Quick Start Guide PgDn Remote control...
... Series) for P5260i Series) 2 x Quick start guide Battery Pack with all the items shown below. Projector with lens cap Power cord VGA cable Compostive video cable 2 x Batteries Carrying case DVI-D Cable (P5260i/P5270/P5280/ P5370W Series) #A #B Security card Acer Projector 2 x User's Guide (Wireless CD for P5260i Series) PgUp Quick Start Guide PgDn Remote control...

Acer P5000 Series Projector User's Guide
Page 15
English 3 Projector Overview Projector Outlook Front / upper side 3 8 1 2 3 4 5 6 7 # Description 1 Zoom ring 2 Focus ring 3 Remote control receiver 4 Zoom lens Rear side # Description 5 Lens cap 6 Elevator button 7 Elevator foot 8 Control panel 1 2345 6 7 8 11 12 9 13 10 14 15 16 17 18
English 3 Projector Overview Projector Outlook Front / upper side 3 8 1 2 3 4 5 6 7 # Description 1 Zoom ring 2 Focus ring 3 Remote control receiver 4 Zoom lens Rear side # Description 5 Lens cap 6 Elevator button 7 Elevator foot 8 Control panel 1 2345 6 7 8 11 12 9 13 10 14 15 16 17 18

Acer P5000 Series Projector User's Guide
Page 16
...HDCP function) 9 KensingtonTM lock port 10 Power socket 11 HDMI connector 12 Audio input connector (2) # Description Below items are for P5270/P5280/P5370W series only: 11 HDMI connector 12 Audio input connector (2) 13 PC analog signal/HDTV/component video input connector (2) Below... Antenna 15 Power LED for wireless 16 Reset button 17 Audio output connector for wireless 18 Lan (RJ45 Port for distortion caused by tilting the projector (± 40 degrees). Temp Indicator LED Adjusts the image to compensate for 10/100M Ethernet) Control Panel 12 3 9 4 8 5 7 4 # Function 1 ...
...HDCP function) 9 KensingtonTM lock port 10 Power socket 11 HDMI connector 12 Audio input connector (2) # Description Below items are for P5270/P5280/P5370W series only: 11 HDMI connector 12 Audio input connector (2) 13 PC analog signal/HDTV/component video input connector (2) Below... Antenna 15 Power LED for wireless 16 Reset button 17 Audio output connector for wireless 18 Lan (RJ45 Port for distortion caused by tilting the projector (± 40 degrees). Temp Indicator LED Adjusts the image to compensate for 10/100M Ethernet) Control Panel 12 3 9 4 8 5 7 4 # Function 1 ...

Acer P5000 Series Projector User's Guide
Page 17
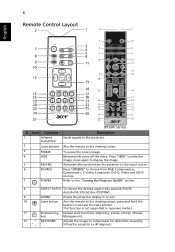
5 English # Function 5 RESYNC 6 POWER 7 MENU 8 SOURCE 9 Four directional select keys Description Automatically synchronizes the projector to choose RGB, Component, S-Video, Composite, DVI, HDTV and HDMI™ sources. See the contents in "Turning the Projector On/Off" section. • Press "MENU" to launch the Onscreen display (OSD) menu, back to the previous step for the OSD menu operation or exit the OSD menu. • Confirm your selection. Use to select items or make adjustments to your selection of items. Press "SOURCE" to the input source.
5 English # Function 5 RESYNC 6 POWER 7 MENU 8 SOURCE 9 Four directional select keys Description Automatically synchronizes the projector to choose RGB, Component, S-Video, Composite, DVI, HDTV and HDMI™ sources. See the contents in "Turning the Projector On/Off" section. • Press "MENU" to launch the Onscreen display (OSD) menu, back to the previous step for the OSD menu operation or exit the OSD menu. • Confirm your selection. Use to select items or make adjustments to your selection of items. Press "SOURCE" to the input source.
Acer P5000 Series Projector User's Guide
Page 18
Auto/Full/4:3/16:9/L.Box (P5370W) 9 ZOOM Zooms the projector display in Japanese market. 11 Empowering Unique Acer functions: eOpening, eView, eTimer, ePower key Management. 12 KEYSTONE Adjusts the image to activate the laser pointer. This function is not...image. 4 HIDE Momentarily turns off the video. Press "HIDE" to hide the image, press again to display the image. 5 RESYNC Automatically synchronizes the projector to the input source. 6 SOURCE Press "SOURCE" to choose from RGB, Component-p, Component-i, S-Video, Composite, DVI-D, Video and HDTV sources. 7 POWER ...
Auto/Full/4:3/16:9/L.Box (P5370W) 9 ZOOM Zooms the projector display in Japanese market. 11 Empowering Unique Acer functions: eOpening, eView, eTimer, ePower key Management. 12 KEYSTONE Adjusts the image to activate the laser pointer. This function is not...image. 4 HIDE Momentarily turns off the video. Press "HIDE" to hide the image, press again to display the image. 5 RESYNC Automatically synchronizes the projector to the input source. 6 SOURCE Press "SOURCE" to choose from RGB, Component-p, Component-i, S-Video, Composite, DVI-D, Video and HDTV sources. 7 POWER ...

Acer P5000 Series Projector User's Guide
Page 19
This function is only available when connected to a computer via the "Acer eProjection Management" utility. (for wireless model) Press "0~9" to input a password in P5260i. Press "VGA" to change source to the VGA connector. Press "WIRELESS" to adjust ... make adjustments to your selection. • Press "MENU" to launch the Onscreen display (OSD) menu, back to the projector via a USB cable. Use this function, an USB cable must be connected to projector from the PC to the previous step for the model if with HDMI™ connector) To turn on/off...
This function is only available when connected to a computer via the "Acer eProjection Management" utility. (for wireless model) Press "0~9" to input a password in P5260i. Press "VGA" to change source to the VGA connector. Press "WIRELESS" to adjust ... make adjustments to your selection. • Press "MENU" to launch the Onscreen display (OSD) menu, back to the projector via a USB cable. Use this function, an USB cable must be connected to projector from the PC to the previous step for the model if with HDMI™ connector) To turn on/off...

Acer P5000 Series Projector User's Guide
Page 21
English USB 9 Getting Started Connecting the Projector DVD player, Set-top Box HDTV receiver RBG VGA, DVI DVD player RS232 D-Sub DVI-D D-Sub 28 RBG RS232 7 4 5 HDTV adapter D-Sub D-Sub DVI-D HDMI ... cord 2 VGA cable 3 Composite video cable 4 USB cable 5 VGA to component/HDTV adapter # Description 6 S-Video cable 7 Audio cable jack/jack 8 DVI cable 9 HDMI cable (P5260i/P5270/P5280/ P5370W series) Note: To ensure the projector works well with your computer, please make sure the timing of the display mode is compatible with the...
English USB 9 Getting Started Connecting the Projector DVD player, Set-top Box HDTV receiver RBG VGA, DVI DVD player RS232 D-Sub DVI-D D-Sub 28 RBG RS232 7 4 5 HDTV adapter D-Sub D-Sub DVI-D HDMI ... cord 2 VGA cable 3 Composite video cable 4 USB cable 5 VGA to component/HDTV adapter # Description 6 S-Video cable 7 Audio cable jack/jack 8 DVI cable 9 HDMI cable (P5260i/P5270/P5280/ P5370W series) Note: To ensure the projector works well with your computer, please make sure the timing of the display mode is compatible with the...

Acer P5000 Series Projector User's Guide
Page 22
English 10 Connecting the Projector for Wireless Function WLAN 4 2 3 Internet Speaker # Description 1 Power cord 2 Audio cable jack 3 Lan cable 4 Antenna Note: For P5260i only Power 1
English 10 Connecting the Projector for Wireless Function WLAN 4 2 3 Internet Speaker # Description 1 Power cord 2 Audio cable jack 3 Lan cable 4 Antenna Note: For P5260i only Power 1
Acer P5000 Series Projector User's Guide
Page 23
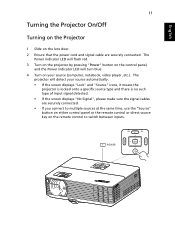
... the "Source" button on either control panel or the remote control or direct source key on the remote control to switch between inputs. 1 POWER The projector will turn blue. 4 Turn on the control panel, and the Power indicator LED will detect your source (computer, notebook, video player ,etc.). The... Power indicator LED will flash red. 3 Turn on the projector by pressing "Power" button on your source automatically. • If the screen displays "Lock" and "Source" icons, it means the...
... the "Source" button on either control panel or the remote control or direct source key on the remote control to switch between inputs. 1 POWER The projector will turn blue. 4 Turn on the control panel, and the Power indicator LED will detect your source (computer, notebook, video player ,etc.). The... Power indicator LED will flash red. 3 Turn on the projector by pressing "Power" button on your source automatically. • If the screen displays "Lock" and "Source" icons, it means the...

Acer P5000 Series Projector User's Guide
Page 24
... , the Power indicator LED will flash RED rapidly and the fan(s) will continue to operate for about to happen: "Projector Overheated. Warning indicators: • If the projector automatically shuts down and the LAMP indicator turns solid RED, please contact your local dealer or service center: "Fan fail....4 It is about 120 seconds. The message below is displayed onscreen, please contact your local reseller or service center. • If the projector automatically shuts down and the TEMP indicator turns solid RED, this is now safe to unplug the power cord. Lamp will turn off soon."...
... , the Power indicator LED will flash RED rapidly and the fan(s) will continue to operate for about to happen: "Projector Overheated. Warning indicators: • If the projector automatically shuts down and the LAMP indicator turns solid RED, please contact your local dealer or service center: "Fan fail....4 It is about 120 seconds. The message below is displayed onscreen, please contact your local reseller or service center. • If the projector automatically shuts down and the TEMP indicator turns solid RED, this is now safe to unplug the power cord. Lamp will turn off soon."...

Acer P5000 Series Projector User's Guide
Page 25
.... 1 Elevator foot release button 3 Tilt adjusting wheel 2 Elevator foot 3 Tilt adjusting wheel English 13 Adjusting the Projected Image Adjusting the Height of Projected Image The projector is equipped with elevator feet for adjusting the height of image.
.... 1 Elevator foot release button 3 Tilt adjusting wheel 2 Elevator foot 3 Tilt adjusting wheel English 13 Adjusting the Projected Image Adjusting the Height of Projected Image The projector is equipped with elevator feet for adjusting the height of image.


