User Manual
Page 2
Record the model number, serial number, purchase date and place of Acer Incorporated. Other companies' product names or trademarks are used herein for a particular purpose. Acer LCD Monitor User's Guide Model number Serial number Date of purchase Place of purchase Acer and the Acer logo are recorded on the label affixed to the contents hereof and specifically disclaims the implied warranties of such revisions or changes. Acer Incorporated. Such changes will be...
Record the model number, serial number, purchase date and place of Acer Incorporated. Other companies' product names or trademarks are used herein for a particular purpose. Acer LCD Monitor User's Guide Model number Serial number Date of purchase Place of purchase Acer and the Acer logo are recorded on the label affixed to the contents hereof and specifically disclaims the implied warranties of such revisions or changes. Acer Incorporated. Such changes will be...
User Manual
Page 3
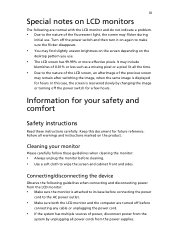
... unplug the monitor before cleaning. • Use a soft cloth to the nature of the LCD screen, an afterimage of the fluorescent light, the screen may flicker during initial use . • The LCD screen has 99.99% or more effective pixels. iii Special notes on LCD monitors The following guidelines when connecting and disconnecting power from the power supplies. Connecting/disconnecting the device Observe the following are turned off the power switch for...
... unplug the monitor before cleaning. • Use a soft cloth to the nature of the LCD screen, an afterimage of the fluorescent light, the screen may flicker during initial use . • The LCD screen has 99.99% or more effective pixels. iii Special notes on LCD monitors The following guidelines when connecting and disconnecting power from the power supplies. Connecting/disconnecting the device Observe the following are turned off the power switch for...

User Manual
Page 4
... unplug the power cord from overheating. Using electrical power • This product should never be placed near you. The openings should be blocked or covered. If you are provided for ventilation to ensure reliable operation of any kind into this product, make sure that the total iv Accessibility Be sure that the power outlet you plug the power cord into is...
... unplug the power cord from overheating. Using electrical power • This product should never be placed near you. The openings should be blocked or covered. If you are provided for ventilation to ensure reliable operation of any kind into this product, make sure that the total iv Accessibility Be sure that the power outlet you plug the power cord into is...

User Manual
Page 5
... is properly grounded before inserting the power cord plug. Product servicing Do not attempt to service this product yourself, as opening or removing covers may expose you need for details. Note: The grounding pin also provides good protection from the wall outlet and refer servicing to qualified service personnel when: • the power cord or plug is equipped with the supplied power supply cord set , make sure that may result in...
... is properly grounded before inserting the power cord plug. Product servicing Do not attempt to service this product yourself, as opening or removing covers may expose you need for details. Note: The grounding pin also provides good protection from the wall outlet and refer servicing to qualified service personnel when: • the power cord or plug is equipped with the supplied power supply cord set , make sure that may result in...

User Manual
Page 6
...turn off your device in the form of salvaging and disposal of used equipment, as grain, dust or metal powders. chemical plants; Potentially explosive environments Switch off the device near gas pumps at Acer are very conscious of the environmental effects of our business and strive to identify and provide the best working...use of radio equipment in damage and will often require extensive work by the operating instructions, since improper adjustment of small children. We at service stations. For more information and help when recycling, please go to this website: http://www.acer-...
...turn off your device in the form of salvaging and disposal of used equipment, as grain, dust or metal powders. chemical plants; Potentially explosive environments Switch off the device near gas pumps at Acer are very conscious of the environmental effects of our business and strive to identify and provide the best working...use of radio equipment in damage and will often require extensive work by the operating instructions, since improper adjustment of small children. We at service stations. For more information and help when recycling, please go to this website: http://www.acer-...

User Manual
Page 7
..., please recycle. Nevertheless, some pixels may occasionally misfire or appear as black or red dots. This has no effect on the Waste from Electrical and Electronics Equipment (WEEE) regulations, visit http://www.acer‐group.com/public/Sustainability/ LCD pixel statement The LCD unit is produced with high-precision manufacturing techniques. vii Disposal instructions Do not throw this...
..., please recycle. Nevertheless, some pixels may occasionally misfire or appear as black or red dots. This has no effect on the Waste from Electrical and Electronics Equipment (WEEE) regulations, visit http://www.acer‐group.com/public/Sustainability/ LCD pixel statement The LCD unit is produced with high-precision manufacturing techniques. vii Disposal instructions Do not throw this...

User Manual
Page 8
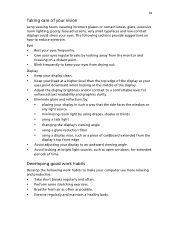
... provides tips for more comfortable computer use . Tips and information for comfortable use , consult a physician immediately and inform your sitting height to achieve maximum comfort. The following tips: • refrain from Sleep mode by adjusting the viewing angle of a computer. Long work periods, bad posture, poor work habits, stress, inadequate working in front of the monitor, using a footrest, or raising your company...
... provides tips for more comfortable computer use . Tips and information for comfortable use , consult a physician immediately and inform your sitting height to achieve maximum comfort. The following tips: • refrain from Sleep mode by adjusting the viewing angle of a computer. Long work periods, bad posture, poor work habits, stress, inadequate working in front of the monitor, using a footrest, or raising your company...
User Manual
Page 9
... light source • minimizing room light by looking away from the monitor and focusing on how to an awkward viewing angle. • Avoid looking at bright light sources, such as open windows, for extended periods of your vision Long viewing hours, wearing incorrect glasses or contact lenses, glare, excessive room lighting, poorly focused screens, very small typefaces and low-contrast displays could stress your computer use...
... light source • minimizing room light by looking away from the monitor and focusing on how to an awkward viewing angle. • Avoid looking at bright light sources, such as open windows, for extended periods of your vision Long viewing hours, wearing incorrect glasses or contact lenses, glare, excessive room lighting, poorly focused screens, very small typefaces and low-contrast displays could stress your computer use...
User Manual
Page 10
... 40, 20020 Lainate (MI) Italy Tel: +39-02-939-921 ,Fax: +39-02 9399-2913 www.acer.it Declare under our own responsibility that the product: Product: LCD Monitor Trade Name: Acer Model Number: V226HQL SKU Number: V226HQL xxxxxx; ("x" = 0~9, a ~ z, A ~ Z, or blank) To which this declaration refers conforms...other standardizing documents: EN 55022:2006/A1:2007 Class B; Dec. 27 , 2012 Date Year to establishing a framework for the setting of ecodesign requirements for energy-related product. EN 55024:2010 N 61000-3-2:2006+A1:2009+A2:2009, Class D ...
... 40, 20020 Lainate (MI) Italy Tel: +39-02-939-921 ,Fax: +39-02 9399-2913 www.acer.it Declare under our own responsibility that the product: Product: LCD Monitor Trade Name: Acer Model Number: V226HQL SKU Number: V226HQL xxxxxx; ("x" = 0~9, a ~ z, A ~ Z, or blank) To which this declaration refers conforms...other standardizing documents: EN 55022:2006/A1:2007 Class B; Dec. 27 , 2012 Date Year to establishing a framework for the setting of ecodesign requirements for energy-related product. EN 55024:2010 N 61000-3-2:2006+A1:2009+A2:2009, Class D ...
User Manual
Page 12
... Accessibility Safe listening Warnings Using electrical power Product servicing Additional safety information IT equipment recycling information Disposal instructions LCD pixel statement Tips and information for comfortable use Federal Communications Commission Declaration of Conformity Unpacking Attaching/removing the base Screen position adjustment Connecting the power cord Power saving Display Data Channel (DDC) Connector pin assignment Standard timing table Installation User controls How to adjust a setting Acer eColor Management User Troubleshooting VGA mode DVI mode 1 iii iii iii iii...
... Accessibility Safe listening Warnings Using electrical power Product servicing Additional safety information IT equipment recycling information Disposal instructions LCD pixel statement Tips and information for comfortable use Federal Communications Commission Declaration of Conformity Unpacking Attaching/removing the base Screen position adjustment Connecting the power cord Power saving Display Data Channel (DDC) Connector pin assignment Standard timing table Installation User controls How to adjust a setting Acer eColor Management User Troubleshooting VGA mode DVI mode 1 iii iii iii iii...

User Manual
Page 13
English 1 Unpacking Please check that the following items are present when you unpack the box, and save the packing materials in case you need to ship or transport the monitor in the future. LCD monitor Quick start guide DP cable (Option) D-sub cable (Option) DVI cable (Option) AC power cord Audio Cable (Option)
English 1 Unpacking Please check that the following items are present when you unpack the box, and save the packing materials in case you need to ship or transport the monitor in the future. LCD monitor Quick start guide DP cable (Option) D-sub cable (Option) DVI cable (Option) AC power cord Audio Cable (Option)

User Manual
Page 14
English 2 Attaching the Base Note: Remove the monitor and monitor base from its packaging. The monitor can adjust the monitor tilt by using both of your hands to remove the base. Screen position adjustment To optimize the viewing position, you can be adjusted to 25 degrees up or 5 degrees down on a stable surface -- Carefully place the monitor face-down . 25 use a cloth to avoid scratching the screen. ① ④② ③ Remove: Reverse the steps to hold the edges of the monitor as shown below.
English 2 Attaching the Base Note: Remove the monitor and monitor base from its packaging. The monitor can adjust the monitor tilt by using both of your hands to remove the base. Screen position adjustment To optimize the viewing position, you can be adjusted to 25 degrees up or 5 degrees down on a stable surface -- Carefully place the monitor face-down . 25 use a cloth to avoid scratching the screen. ① ④② ③ Remove: Reverse the steps to hold the edges of the monitor as shown below.
User Manual
Page 15
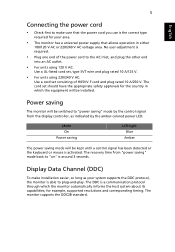
...-F cord and plug rated 10 A/250 V. Mode On Power saving LED light Blue Amber The power saving mode will be installed. The recovery time from the display controller, as your area. • The monitor has a universal power supply that the power cord you use is a communication protocol through which the equipment will be switched to "power saving" mode by the amber-colored power LED. The DDC is the correct type required for example, supported resolutions and corresponding timing. 5 English Connecting the power cord • Check...
...-F cord and plug rated 10 A/250 V. Mode On Power saving LED light Blue Amber The power saving mode will be installed. The recovery time from the display controller, as your area. • The monitor has a universal power supply that the power cord you use is a communication protocol through which the equipment will be switched to "power saving" mode by the amber-colored power LED. The DDC is the correct type required for example, supported resolutions and corresponding timing. 5 English Connecting the power cord • Check...
User Manual
Page 19
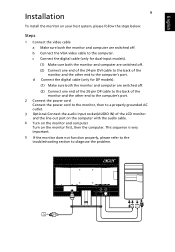
... the audio cable. 4 Turn on the monitor and computer Turn on your host system, please follow the steps below: Steps 1 Connect the video cable a Make sure both the monitor and computer are switched off. d Connect the digital cable (only for dual-input models). (1) Make sure both the monitor and computer are switched off. (2) Connect one end of the 20-pin DP cable to the computer's port. b Connect the VGA video cable to diagnose the problem. English Installation 9 To install the monitor...
... the audio cable. 4 Turn on the monitor and computer Turn on your host system, please follow the steps below: Steps 1 Connect the video cable a Make sure both the monitor and computer are switched off. d Connect the digital cable (only for dual-input models). (1) Make sure both the monitor and computer are switched off. (2) Connect one end of the 20-pin DP cable to the computer's port. b Connect the VGA video cable to diagnose the problem. English Installation 9 To install the monitor...
User Manual
Page 20
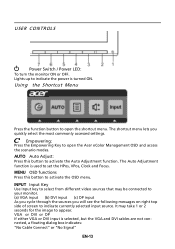
... selected input source. AUTO Auto Adjust: Press this botton to your monitor. (a) VGA input (b) DVI input (c) DP input As you cycle through the sources you quickly select the most commonly accessed settings. It may be connected to activate the OSD menu. USER CONTROLS Power Switch / Power LED: To turn the monitor ON or OFF. Using the Shortcut Menu Press the function button to open the shortcut menu. Empowering: Press the Empowering Key to open the Acer eColor Management OSD and access the scenario modes. Lights...
... selected input source. AUTO Auto Adjust: Press this botton to your monitor. (a) VGA input (b) DVI input (c) DP input As you cycle through the sources you quickly select the most commonly accessed settings. It may be connected to activate the OSD menu. USER CONTROLS Power Switch / Power LED: To turn the monitor ON or OFF. Using the Shortcut Menu Press the function button to open the shortcut menu. Empowering: Press the Empowering Key to open the Acer eColor Management OSD and access the scenario modes. Lights...

User Manual
Page 21
... instructions Step 1: Press " " Key to open the Acer eColor Management OSD and access the scenario modes Step 2: Press " " or " " to select the mode Step 3: Press " AUTO " Key to reduce power consumption. Settings can be fine-tuned to suit any situation N/A ECO mode Adjusts the settings to confirm the mode and exit the eColor menu. Pictures and photographs appear in clearest detail. N/A Movie mode Displays scenes in vibrant colors...
... instructions Step 1: Press " " Key to open the Acer eColor Management OSD and access the scenario modes Step 2: Press " " or " " to select the mode Step 3: Press " AUTO " Key to reduce power consumption. Settings can be fine-tuned to suit any situation N/A ECO mode Adjusts the settings to confirm the mode and exit the eColor menu. Pictures and photographs appear in clearest detail. N/A Movie mode Displays scenes in vibrant colors...
User Manual
Page 22
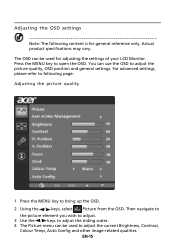
Actual product specifications may vary. For advanced settings, please refer to following content is for adjusting the settings of your LCD Monitor. Adjusting the OSD settings Note: The following page: Adjusting the picture quality 1 Press the MENU key to bring up the OSD. 2 Using the / keys, select Picture from the OSD. You can use the OSD to open the OSD. EN-15 The OSD can be used to adjust the current Brightness, Contrast, Colour Temp, Auto Config...
Actual product specifications may vary. For advanced settings, please refer to following content is for adjusting the settings of your LCD Monitor. Adjusting the OSD settings Note: The following page: Adjusting the picture quality 1 Press the MENU key to bring up the OSD. 2 Using the / keys, select Picture from the OSD. You can use the OSD to open the OSD. EN-15 The OSD can be used to adjust the current Brightness, Contrast, Colour Temp, Auto Config...

User Manual
Page 24
Adjusting the setting 1 Press the MENU key to adjust the screen Menu Language and other important settings. Then navigate to the feature you wish to adjust. 3 The Setting menu can be used to bring up the OSD. 2 Using the / keys, select Setting from the OSD. EN-17
Adjusting the setting 1 Press the MENU key to adjust the screen Menu Language and other important settings. Then navigate to the feature you wish to adjust. 3 The Setting menu can be used to bring up the OSD. 2 Using the / keys, select Setting from the OSD. EN-17
User Manual
Page 26
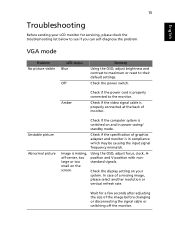
... changing or disconnecting the signal cable or switching off -center, too large or too small on your LCD monitor for a few seconds after adjusting the size of a missing image, please select another resolution or vertical refresh rate. Check the power switch. Check the display setting on the screen. Using the OSD, adjust focus, clock, Hposition and V-position with nonstandard signals. 15 English Troubleshooting Before sending your system. VGA mode Problem No picture visible LED status Blue Off Remedy Using the OSD, adjust brightness and contrast to maximum or reset...
... changing or disconnecting the signal cable or switching off -center, too large or too small on your LCD monitor for a few seconds after adjusting the size of a missing image, please select another resolution or vertical refresh rate. Check the power switch. Check the display setting on the screen. Using the OSD, adjust focus, clock, Hposition and V-position with nonstandard signals. 15 English Troubleshooting Before sending your system. VGA mode Problem No picture visible LED status Blue Off Remedy Using the OSD, adjust brightness and contrast to maximum or reset...
User Manual
Page 27
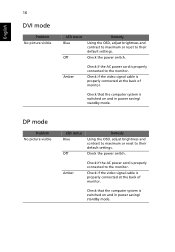
... switched on and in power saving/ standby mode. Amber Check if the AC power cord is properly connected to the monitor. Amber Check if the AC power cord is properly connected to the monitor. English 16 DVI mode Problem No picture visible LED status Blue Off Remedy Using the OSD, adjust brightness and contrast to maximum or reset to their default settings. Check if the video signal cable is properly connected at the back of monitor. Check if the video signal cable is properly connected at the back of monitor. Check the power switch...
... switched on and in power saving/ standby mode. Amber Check if the AC power cord is properly connected to the monitor. Amber Check if the AC power cord is properly connected to the monitor. English 16 DVI mode Problem No picture visible LED status Blue Off Remedy Using the OSD, adjust brightness and contrast to maximum or reset to their default settings. Check if the video signal cable is properly connected at the back of monitor. Check if the video signal cable is properly connected at the back of monitor. Check the power switch...

