

User Manual
Page 1
TABLE OF CONTENTS Special notes on LCD monitors 1 Information for your safety and comfort 2 Unpacking 5 Attaching/Removing the base 6 Screen position adjustment 6 Connecting the power cord 7 Safety precaution 7 Cleaning your monitor 7 Power saving 8 DDC 8 Connector Pin Assignment 9 Standard Timing Table 11 Installation 12 User controls 13 Troubleshooting 19
TABLE OF CONTENTS Special notes on LCD monitors 1 Information for your safety and comfort 2 Unpacking 5 Attaching/Removing the base 6 Screen position adjustment 6 Connecting the power cord 7 Safety precaution 7 Cleaning your monitor 7 Power saving 8 DDC 8 Connector Pin Assignment 9 Standard Timing Table 11 Installation 12 User controls 13 Troubleshooting 19

User Manual
Page 2
... screen may flicker during initial use. EN-1 Turn off the Power Switch for hours. NOTES • Due to make sure the flicker disappears. • You may find slightly uneven brightness on the screen depending on the desktop pattern you use. • The LCD screen has effective pixels of the fluorescent light, the screen may remain after switching the image, when the same image is recovered slowly by changing the image or turning...
... screen may flicker during initial use. EN-1 Turn off the Power Switch for hours. NOTES • Due to make sure the flicker disappears. • You may find slightly uneven brightness on the screen depending on the desktop pattern you use. • The LCD screen has effective pixels of the fluorescent light, the screen may remain after switching the image, when the same image is recovered slowly by changing the image or turning...
User Manual
Page 3
... power cord from overheating. If the product falls, it could result in installation unless proper ventilation is easily accessible and located as they may touch dangerous voltage points or short-out parts that the power outlet you . Follow all warnings and instructions marked on a bed, sofa, rug or other similar surface. The openings should never be blocked or covered...
... power cord from overheating. If the product falls, it could result in installation unless proper ventilation is easily accessible and located as they may touch dangerous voltage points or short-out parts that the power outlet you . Follow all warnings and instructions marked on a bed, sofa, rug or other similar surface. The openings should never be blocked or covered...

User Manual
Page 4
... operating instructions Note: Adjust only those controls that are also at risk of the monitor, using a footrest, or raising your company's health and safety department. Product servicing Do not attempt to service this product from staying too long in one fixed posture • avoid slouching forward and/or leaning backward • stand up and walk around regularly to remove the...
... operating instructions Note: Adjust only those controls that are also at risk of the monitor, using a footrest, or raising your company's health and safety department. Product servicing Do not attempt to service this product from staying too long in one fixed posture • avoid slouching forward and/or leaning backward • stand up and walk around regularly to remove the...
User Manual
Page 5
... side faces the window or any light source • minimizing room light by using drapes, shades or blinds • using a task light • changing the display's viewing angle • using a glare-reduction filter • using the product on how to make your computer use more than the top edge of the display so your eyes point downward when looking at bright light sources, such as open windows, for extended periods...
... side faces the window or any light source • minimizing room light by using drapes, shades or blinds • using a task light • changing the display's viewing angle • using a glare-reduction filter • using the product on how to make your computer use more than the top edge of the display so your eyes point downward when looking at bright light sources, such as open windows, for extended periods...
User Manual
Page 6
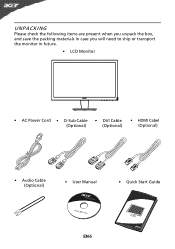
UNPACKING Please check the following items are present when you unpack the box, and save the packing materials in case you will need to ship or transport the monitor in future. • LCD Monitor • AC Power Cord • D-Sub Cable (Optional) • DVI Cable (Optional) • HDMI Cabel (Optional) • Audio Cable (Optional) • User Manual • Quick Start Guide EN-5
UNPACKING Please check the following items are present when you unpack the box, and save the packing materials in case you will need to ship or transport the monitor in future. • LCD Monitor • AC Power Cord • D-Sub Cable (Optional) • DVI Cable (Optional) • HDMI Cabel (Optional) • Audio Cable (Optional) • User Manual • Quick Start Guide EN-5

User Manual
Page 7
Attaching / Removing the Base Note: Remove the monitor and monitor base from its packaging. SCREEN POSITION ADJUSTMENT In oder to optimize the best viewing position, you can be adjusted to hold the edges of the monitor. Install: Align the base with the stand and push the base towards the top of the monitor as shown in the figure below . EN-6 use a cloth to remove it. Remove: Depress the release hooks as indicated by using both of...
Attaching / Removing the Base Note: Remove the monitor and monitor base from its packaging. SCREEN POSITION ADJUSTMENT In oder to optimize the best viewing position, you can be adjusted to hold the edges of the monitor. Install: Align the base with the stand and push the base towards the top of the monitor as shown in the figure below . EN-6 use a cloth to remove it. Remove: Depress the release hooks as indicated by using both of...

User Manual
Page 8
... your area. • This monitor has a universal power supply that allows operation in which the equipment will be installed. CONNECTING THE POWER CORD • Check first to make sure that the power cord you use is adequate ventilation. • Avoid placing the monitor against a bright background or where sun- No user-adjustment is fragile. light or other heavy object, on the face of H05VV-F cord and plug rated 10 A, 250 V.
... your area. • This monitor has a universal power supply that allows operation in which the equipment will be installed. CONNECTING THE POWER CORD • Check first to make sure that the power cord you use is adequate ventilation. • Avoid placing the monitor against a bright background or where sun- No user-adjustment is fragile. light or other heavy object, on the face of H05VV-F cord and plug rated 10 A, 250 V.

User Manual
Page 9
... is activated. State ON Power Saving Mode LED Light Blue Amber The power saving states will be kept until a control signal has been detected or the keyboard or mouse is around 3 seconds. The recovery time from the display controller, as indicated by the control signal from Active OFF state back to Plug and Play with your system if your installation easier, the monitor is a communication protocol through...
... is activated. State ON Power Saving Mode LED Light Blue Amber The power saving states will be kept until a control signal has been detected or the keyboard or mouse is around 3 seconds. The recovery time from the display controller, as indicated by the control signal from Active OFF state back to Plug and Play with your system if your installation easier, the monitor is a communication protocol through...

User Manual
Page 10
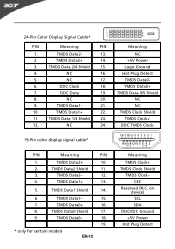
DESCRIPTION Red Green Blue Monitor Ground DDC-return R-Ground G-Ground B-Ground PIN NO. 9. 10. 11. 12. 13. 14. 15. DESCRIPTION +5V Logic Ground Monitor Ground DDC-Serial Data H-Sync V-Sync DDC-Serial Clock EN-9 CONNECTOR PIN ASSIGNMENT 15-Pin Color Display Signal Cable PIN NO. 1. 2. 3. 4. 5. 6. 7. 8.
DESCRIPTION Red Green Blue Monitor Ground DDC-return R-Ground G-Ground B-Ground PIN NO. 9. 10. 11. 12. 13. 14. 15. DESCRIPTION +5V Logic Ground Monitor Ground DDC-Serial Data H-Sync V-Sync DDC-Serial Clock EN-9 CONNECTOR PIN ASSIGNMENT 15-Pin Color Display Signal Cable PIN NO. 1. 2. 3. 4. 5. 6. 7. 8.
User Manual
Page 11
...Shield 14. 6. TMDS Data1+ 22. 11. Meaning NC +5V Power Logic Ground Hot Plug Detect TMDS Data0TMDS Data0+ TMDS Data 0/5 Shield NC NC TMDS Clock Shield TMDS Clock+ DDC TMDS Clock- 19-Pin color display signal cable* PIN Meaning PIN 1. TMDS Data2+ 10. 2. TMDS Data1- 15...23. 12. NC 24. TMDS Data2- 13. 2. TMDS Data 2/4 Shield 15. 4. on device) SCL SDA DDC/CEC Ground +5V Power Hot Plug Detect 24-Pin Color Display Signal Cable* PIN Meaning PIN 1. TMDS Data2+ 14. 3. NC 17. 6. DDC Clock 18. 7. TMDS Data1- 21. 10. TMDS Data1+ ...
...Shield 14. 6. TMDS Data1+ 22. 11. Meaning NC +5V Power Logic Ground Hot Plug Detect TMDS Data0TMDS Data0+ TMDS Data 0/5 Shield NC NC TMDS Clock Shield TMDS Clock+ DDC TMDS Clock- 19-Pin color display signal cable* PIN Meaning PIN 1. TMDS Data2+ 10. 2. TMDS Data1- 15...23. 12. NC 24. TMDS Data2- 13. 2. TMDS Data 2/4 Shield 15. 4. on device) SCL SDA DDC/CEC Ground +5V Power Hot Plug Detect 24-Pin Color Display Signal Cable* PIN Meaning PIN 1. TMDS Data2+ 14. 3. NC 17. 6. DDC Clock 18. 7. TMDS Data1- 21. 10. TMDS Data1+ ...
User Manual
Page 12
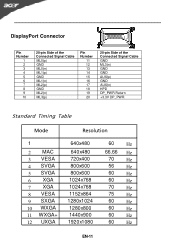
DisplayPort Connector Pin Number 1 2 3 4 5 6 7 8 9 10 20-pin Side of the Connected Signal Cable ML0(p) GND ML0(n) ML1(p) GND ML1(n) ML2(p) GND ML2(n) ML3(p) Pin Number 11 12 13 14 15 16 17 18 19 20 20-pin Side of the Connected Signal Cable GND ML3(n) GND GND AUX(p) GND AUX(n) HPD DP_PWR Return +3.3V DP_PWR Standard Timing Table Mode Resolution 1 2 MAC 3 VESA 4 SVGA 5 SVGA...
DisplayPort Connector Pin Number 1 2 3 4 5 6 7 8 9 10 20-pin Side of the Connected Signal Cable ML0(p) GND ML0(n) ML1(p) GND ML1(n) ML2(p) GND ML2(n) ML3(p) Pin Number 11 12 13 14 15 16 17 18 19 20 20-pin Side of the Connected Signal Cable GND ML3(n) GND GND AUX(p) GND AUX(n) HPD DP_PWR Return +3.3V DP_PWR Standard Timing Table Mode Resolution 1 2 MAC 3 VESA 4 SVGA 5 SVGA...
User Manual
Page 13
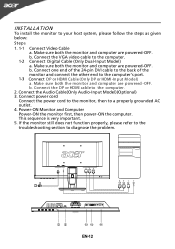
... powered-OFF. Connect the VGA video cable to the computer's port. 1-3 Connect DP or HDMI Ca ble (O nly DP or HDMI-Input M odel) a. Connect one end of the 24-pin DVI cable to the back of the monitor and connect the other end to the computer. 1-2 Connect Digital Cable (Only Dual-Input Model) a. Conne ct the DP or HDMI cable to your host system, please follow the steps as given below: Steps 1. 1-1 Connect Video Cable...
... powered-OFF. Connect the VGA video cable to the computer's port. 1-3 Connect DP or HDMI Ca ble (O nly DP or HDMI-Input M odel) a. Connect one end of the 24-pin DVI cable to the back of the monitor and connect the other end to the computer. 1-2 Connect Digital Cable (Only Dual-Input Model) a. Conne ct the DP or HDMI cable to your host system, please follow the steps as given below: Steps 1. 1-1 Connect Video Cable...
User Manual
Page 14
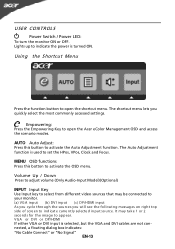
USER CONTROLS Power Switch / Power LED: To turn the monitor ON or OFF. MENU OSD functions Press this button to open the shortcut menu. V GA or DV I input (c) DP/HDMI input A s you cycle thro ugh the sources you quickly select the most commonly accessed settings. Empowering: Press the Empowering Key to activate the Auto Adjustment function. Volume Up / Down Press to adjust volume (Only Audio-Input Model)(Optional) INPUT Input Key Use Input key to select from different video sources that may ta k e 1 or...
USER CONTROLS Power Switch / Power LED: To turn the monitor ON or OFF. MENU OSD functions Press this button to open the shortcut menu. V GA or DV I input (c) DP/HDMI input A s you cycle thro ugh the sources you quickly select the most commonly accessed settings. Empowering: Press the Empowering Key to activate the Auto Adjustment function. Volume Up / Down Press to adjust volume (Only Audio-Input Model)(Optional) INPUT Input Key Use Input key to select from different video sources that may ta k e 1 or...
User Manual
Page 15
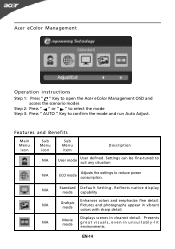
... Operation instructions Step 1: Press " " Key to open the Acer eColor Management OSD and access the scenario modes Step 2: Press " " or " " to select the mode Step 3: Press " AUTO " Key to reduce power consumption. N/A Movie mode Displays scenes in unsuitably-lit environments. N/A Standard D efau lt Settin g . Settings can be fine-tuned to suit any situation N/A ECO mode Adjusts the settings to confirm the mode and run Auto Adjust. Pictures and...
... Operation instructions Step 1: Press " " Key to open the Acer eColor Management OSD and access the scenario modes Step 2: Press " " or " " to select the mode Step 3: Press " AUTO " Key to reduce power consumption. N/A Movie mode Displays scenes in unsuitably-lit environments. N/A Standard D efau lt Settin g . Settings can be fine-tuned to suit any situation N/A ECO mode Adjusts the settings to confirm the mode and run Auto Adjust. Pictures and...
User Manual
Page 16
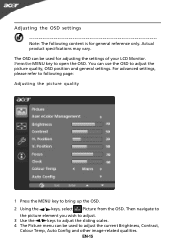
... used to adjust the current Brightness, Contrast, Colour Temp, Auto Config and other image-related qualities. Then navigate to the picture element you wish to adjust. 3 Use the / keys to adjust the sliding scales. 4 The Picture menu can use the OSD to open the OSD. Adjusting the OSD settings Note: The following page: Adjusting the picture quality 1 Press the MENU key to bring up the OSD. 2 Using the / keys, select Picture from the OSD. Actual product specifications...
... used to adjust the current Brightness, Contrast, Colour Temp, Auto Config and other image-related qualities. Then navigate to the picture element you wish to adjust. 3 Use the / keys to adjust the sliding scales. 4 The Picture menu can use the OSD to open the OSD. Adjusting the OSD settings Note: The following page: Adjusting the picture quality 1 Press the MENU key to bring up the OSD. 2 Using the / keys, select Picture from the OSD. Actual product specifications...
User Manual
Page 18
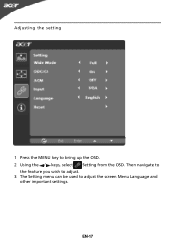
Then navigate to the feature you wish to adjust. 3 The Setting menu can be used to bring up the OSD. 2 Using the / keys, select Setting from the OSD. EN-17 Adjusting the setting 1 Press the MENU key to adjust the screen Menu Language and other important settings.
Then navigate to the feature you wish to adjust. 3 The Setting menu can be used to bring up the OSD. 2 Using the / keys, select Setting from the OSD. EN-17 Adjusting the setting 1 Press the MENU key to adjust the screen Menu Language and other important settings.
User Manual
Page 20
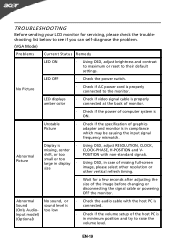
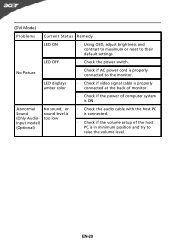
... connected. · Check if the volume setup of computer system is properly connected to the monitor. Unstable Picture · Check if the specification of missing full-screen size image, please select other resolution or other vertical refresh timing. · Wait for servicing, please check the troubleshooting list below to see if you can self-diagnose the problem. (VGA Mode) Problems Current Status Remedy LED ON · Using OSD, adjust brightness and contrast to maximum or reset to raise the volume...
... connected. · Check if the volume setup of computer system is properly connected to the monitor. Unstable Picture · Check if the specification of missing full-screen size image, please select other resolution or other vertical refresh timing. · Wait for servicing, please check the troubleshooting list below to see if you can self-diagnose the problem. (VGA Mode) Problems Current Status Remedy LED ON · Using OSD, adjust brightness and contrast to maximum or reset to raise the volume...
User Manual
Page 21
...; Using OSD, adjust brightness and contrast to maximum or reset to the monitor. No Picture · Check if AC power cord is in minimum position and try to raise the volume level. EN-20 Abnormal Sound (Only AudioInput model) (Optional) No sound, or sound level is too low · Check the audio cable with the host PC is connected. · Check if the volume setup of computer system is ON. LED displays amber color · Check if video signal cable is...
...; Using OSD, adjust brightness and contrast to maximum or reset to the monitor. No Picture · Check if AC power cord is in minimum position and try to raise the volume level. EN-20 Abnormal Sound (Only AudioInput model) (Optional) No sound, or sound level is too low · Check the audio cable with the host PC is connected. · Check if the volume setup of computer system is ON. LED displays amber color · Check if video signal cable is...
User Manual
Page 22
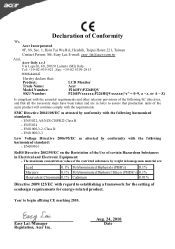
...Date it Hereby declare that: Product: Trade Name: Model Number: SKU Number: LCD Monitor Acer P216HV;P226HQV P216HVxxxxxx;P226HQVxxxxxx("x" = 0~9, a ~ z, or A ~ Z) Is compliant with the requirements. EN61000-3-2, Class D -. EN55024 -. Easy Lai /Manager Regulation, Acer Inc. Declaration of certain Hazardous Substances in force to...setting of the same product will continue comply with the essential requirements and other relevant provisions of the following harmonized standards: -. EN60950-1 RoHS Directive 2002/95/EC on the Restriction of the Use of Conformity We, Acer...
...Date it Hereby declare that: Product: Trade Name: Model Number: SKU Number: LCD Monitor Acer P216HV;P226HQV P216HVxxxxxx;P226HQVxxxxxx("x" = 0~9, a ~ z, or A ~ Z) Is compliant with the requirements. EN61000-3-2, Class D -. EN55024 -. Easy Lai /Manager Regulation, Acer Inc. Declaration of certain Hazardous Substances in force to...setting of the same product will continue comply with the essential requirements and other relevant provisions of the following harmonized standards: -. EN60950-1 RoHS Directive 2002/95/EC on the Restriction of the Use of Conformity We, Acer...

