Quick Start Guide
Page 1
...accessible electrical outlet. • Place the monitor on the monitor. To prevent overheating, these openings should open the monitor's case. • Be sure to unplug the monitor first. Connecting Your Monitor to a properly grounded AC outlet. 4. Make sure both the monitor and computer are bent. Connect the .... Try another power cable on a solid surface and treat it and contact an authorized dealer immediately. Power-ON Monitor and Computer Power-ON the monitor first, then power-ON the computer. The screen can use the computer's power cable to diagnose the problem. ...
...accessible electrical outlet. • Place the monitor on the monitor. To prevent overheating, these openings should open the monitor's case. • Be sure to unplug the monitor first. Connecting Your Monitor to a properly grounded AC outlet. 4. Make sure both the monitor and computer are bent. Connect the .... Try another power cable on a solid surface and treat it and contact an authorized dealer immediately. Power-ON Monitor and Computer Power-ON the monitor first, then power-ON the computer. The screen can use the computer's power cable to diagnose the problem. ...
Quick Start Guide
Page 2
...could void the user authority, which is your responsibility to dispose of your waste equipment at the time of Conformity Hereby, Acer Inc., declares that protects human health and the environment. FOR LAMP SPECIFIC DISPOSAL INFORMATION CHECK WWW.LAMPRECYCLE.ORG. Instead, ...users This Class B digital apparatus complies with the instructions, may be determined by the Federal Communications Commission, to operate this LCD monitor is recycled in a residential installation. However, there is likely to result in compliance with the essential requirements and other relevant ...
...could void the user authority, which is your responsibility to dispose of your waste equipment at the time of Conformity Hereby, Acer Inc., declares that protects human health and the environment. FOR LAMP SPECIFIC DISPOSAL INFORMATION CHECK WWW.LAMPRECYCLE.ORG. Instead, ...users This Class B digital apparatus complies with the instructions, may be determined by the Federal Communications Commission, to operate this LCD monitor is recycled in a residential installation. However, there is likely to result in compliance with the essential requirements and other relevant ...

User Manual
Page 1
TABLE OF CONTENTS Special notes on LCD monitors 1 Information for your safety and comfort 2 Unpacking 5 Attaching/Removing the base 6 Screen position adjustment 6 Connecting the power cord 7 Safety precaution 7 Cleaning your monitor 7 Power saving 8 DDC 8 Connector Pin Assignment 9 Standard Timing Table 11 Installation 12 User controls 13 Troubleshooting 19
TABLE OF CONTENTS Special notes on LCD monitors 1 Information for your safety and comfort 2 Unpacking 5 Attaching/Removing the base 6 Screen position adjustment 6 Connecting the power cord 7 Safety precaution 7 Cleaning your monitor 7 Power saving 8 DDC 8 Connector Pin Assignment 9 Standard Timing Table 11 Installation 12 User controls 13 Troubleshooting 19
User Manual
Page 2
... off the Power Switch and then turn it on again to the nature of 99.99% or more. SPECIAL NOTES ON LCD MONITORS The following symptoms are normal with LCD monitor and do not indicate a problem. It may include blemishes of 0.01% or less such as a missing pixel or a pixel lit all...
... off the Power Switch and then turn it on again to the nature of 99.99% or more. SPECIAL NOTES ON LCD MONITORS The following symptoms are normal with LCD monitor and do not indicate a problem. It may include blemishes of 0.01% or less such as a missing pixel or a pixel lit all...
User Manual
Page 4
... after prolonged use . Finding your comfort zone Find your sitting height to achieve maximum comfort. Users are covered by adjusting the viewing angle of the monitor, using a footrest, or raising your comfort zone by the operating instructions, since improper adjustment of other recurring or persistent discomfort and/or pain related to...
... after prolonged use . Finding your comfort zone Find your sitting height to achieve maximum comfort. Users are covered by adjusting the viewing angle of the monitor, using a footrest, or raising your comfort zone by the operating instructions, since improper adjustment of other recurring or persistent discomfort and/or pain related to...
User Manual
Page 5
... by: • placing your display in recycling, please visit the following websites: Worldwide: http://www.acer-group.com/public/Sustainability/sustainability01.htm http://www.acer-group.com/public/Sustainability/sustainability04.htm EN-4 We do some stretching exercises. • Breathe fresh air ...shoulders • install the external display, keyboard and mouse properly and within comfort able reach • if you view your monitor more relaxing and productive: • Take short breaks regularly and often. • Perform some stretching exercises. • take...
... by: • placing your display in recycling, please visit the following websites: Worldwide: http://www.acer-group.com/public/Sustainability/sustainability01.htm http://www.acer-group.com/public/Sustainability/sustainability04.htm EN-4 We do some stretching exercises. • Breathe fresh air ...shoulders • install the external display, keyboard and mouse properly and within comfort able reach • if you view your monitor more relaxing and productive: • Take short breaks regularly and often. • Perform some stretching exercises. • take...
User Manual
Page 6
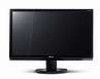
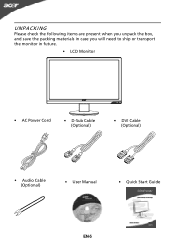
UNPACKING Please check the following items are present when you unpack the box, and save the packing materials in case you will need to ship or transport the monitor in future. • LCD Monitor • AC Power Cord • D-Sub Cable (Optional) • DVI Cable (Optional) • Audio Cable (Optional) • User Manual • Quick Start Guide EN-5
UNPACKING Please check the following items are present when you unpack the box, and save the packing materials in case you will need to ship or transport the monitor in future. • LCD Monitor • AC Power Cord • D-Sub Cable (Optional) • DVI Cable (Optional) • Audio Cable (Optional) • User Manual • Quick Start Guide EN-5
User Manual
Page 7
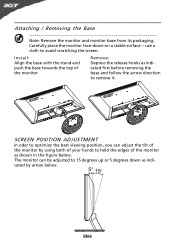
... figure below . Remove: Depress the release hooks as indicated first before removing the base and follow the arrow direction to hold the edges of the monitor as indicated by using both of your hands to remove it. SCREEN POSITION ADJUSTMENT In oder to optimize the best viewing position, you can be... adjusted to avoid scratching the screen. EN-6 use a cloth to 15 degrees up or 5 degrees down on a stable surface -- The monitor can adjust the tilt of the monitor. Install: Align the base with the stand and push the base towards the top of the...
... figure below . Remove: Depress the release hooks as indicated first before removing the base and follow the arrow direction to hold the edges of the monitor as indicated by using both of your hands to remove it. SCREEN POSITION ADJUSTMENT In oder to optimize the best viewing position, you can be... adjusted to avoid scratching the screen. EN-6 use a cloth to 15 degrees up or 5 degrees down on a stable surface -- The monitor can adjust the tilt of the monitor. Install: Align the base with the stand and push the base towards the top of the...

User Manual
Page 8
... rain, excessive moisture, or dust. • Do not cover the ventilation slots or openings of the monitor. EN-7 Place the monitor just below guidelines when cleaning the monitor. • Always unplug the monitor before cleaning. • Use a soft cloth to wipe the screen and cabinet front and sides. CONNECTING THE .../120V AC or 220/240 V AC voltage area. The cord set should have the appropriate safety approvals for your area. • This monitor has a universal power supply that the power cord you use is the correct type required for the country in which the equipment will be...
... rain, excessive moisture, or dust. • Do not cover the ventilation slots or openings of the monitor. EN-7 Place the monitor just below guidelines when cleaning the monitor. • Always unplug the monitor before cleaning. • Use a soft cloth to wipe the screen and cabinet front and sides. CONNECTING THE .../120V AC or 220/240 V AC voltage area. The cord set should have the appropriate safety approvals for your area. • This monitor has a universal power supply that the power cord you use is the correct type required for the country in which the equipment will be...

User Manual
Page 9
... driven into Power Saving" mode by the amber-color power LED. The DDC (Display Data Channel) is around 3 seconds. The monitor supports DDC2B standard. State ON Power Saving Mode LED Light Blue Amber The power saving states will be kept until a control signal ...Plug and Play with your system if your system also supports DDC protocol. DDC To make your installation easier, the monitor is able to ON state is a communication protocol through which the monitor automatically informs the host system about its capabilities, for example, supported resolutions and corresponding timing.
... driven into Power Saving" mode by the amber-color power LED. The DDC (Display Data Channel) is around 3 seconds. The monitor supports DDC2B standard. State ON Power Saving Mode LED Light Blue Amber The power saving states will be kept until a control signal ...Plug and Play with your system if your system also supports DDC protocol. DDC To make your installation easier, the monitor is able to ON state is a communication protocol through which the monitor automatically informs the host system about its capabilities, for example, supported resolutions and corresponding timing.
User Manual
Page 10
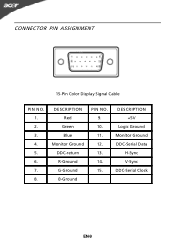
DESCRIPTION Red Green Blue Monitor Ground DDC-return R-Ground G-Ground B-Ground PIN NO. 9. 10. 11. 12. 13. 14. 15. DESCRIPTION +5V Logic Ground Monitor Ground DDC-Serial Data H-Sync V-Sync DDC-Serial Clock EN-9 CONNECTOR PIN ASSIGNMENT 15-Pin Color Display Signal Cable PIN NO. 1. 2. 3. 4. 5. 6. 7. 8.
DESCRIPTION Red Green Blue Monitor Ground DDC-return R-Ground G-Ground B-Ground PIN NO. 9. 10. 11. 12. 13. 14. 15. DESCRIPTION +5V Logic Ground Monitor Ground DDC-Serial Data H-Sync V-Sync DDC-Serial Clock EN-9 CONNECTOR PIN ASSIGNMENT 15-Pin Color Display Signal Cable PIN NO. 1. 2. 3. 4. 5. 6. 7. 8.
User Manual
Page 13
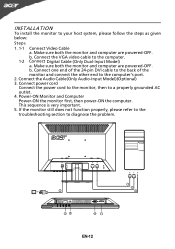
... the computer. 1-2 Connect Digital Cable (Only Dual-Input Model) a. Power-ON Monitor and Computer Power-ON the monitor first, then power-ON the computer. This sequence is very important. 5. If the monitor still does not function properly, please refer to the troubleshooting section to a properly ...grounded AC outlet. 4. Make sure both the monitor and computer are powered-OFF. Connect power cord Connect the power cord to the monitor, then to diagnose the problem. INSTALLATION To install the monitor to your host system, please follow the steps as given below: Steps...
... the computer. 1-2 Connect Digital Cable (Only Dual-Input Model) a. Power-ON Monitor and Computer Power-ON the monitor first, then power-ON the computer. This sequence is very important. 5. If the monitor still does not function properly, please refer to the troubleshooting section to a properly ...grounded AC outlet. 4. Make sure both the monitor and computer are powered-OFF. Connect power cord Connect the power cord to the monitor, then to diagnose the problem. INSTALLATION To install the monitor to your host system, please follow the steps as given below: Steps...
User Manual
Page 14
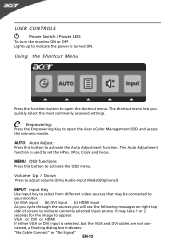
...menu. MENU OSD functions Press this button to indicate currently selected input source. It may be connected to your monitor. (a) VGA input (b) DVI input (c) HDMI input As you cycle through the sources you quickly select the ... for the image to activate the OSD menu. USER CONTROLS Power Switch / Power LED: To turn the monitor ON or OFF. Using the Shortcut Menu Press the function button to indicate the power is selected ,but ... DVI input is turned ON. Lights up to open the Acer eColor Management OSD and access the scenario modes. AUTO Auto Adjust: Press this botton to appear.
...menu. MENU OSD functions Press this button to indicate currently selected input source. It may be connected to your monitor. (a) VGA input (b) DVI input (c) HDMI input As you cycle through the sources you quickly select the ... for the image to activate the OSD menu. USER CONTROLS Power Switch / Power LED: To turn the monitor ON or OFF. Using the Shortcut Menu Press the function button to indicate the power is selected ,but ... DVI input is turned ON. Lights up to open the Acer eColor Management OSD and access the scenario modes. AUTO Auto Adjust: Press this botton to appear.
User Manual
Page 16
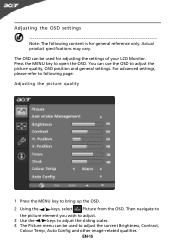
..., Colour Temp, Auto Config and other image-related qualities. The OSD can be used to following content is for adjusting the settings of your LCD Monitor. Press the MENU key to adjust the picture quality, OSD position and general settings.
..., Colour Temp, Auto Config and other image-related qualities. The OSD can be used to following content is for adjusting the settings of your LCD Monitor. Press the MENU key to adjust the picture quality, OSD position and general settings.
User Manual
Page 19
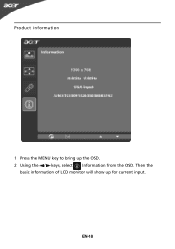
Product information 1 Press the MENU key to bring up for current input. Then the basic information of LCD monitor will show up the OSD. 2 Using the / keys, select Information from the OSD. EN-18
Product information 1 Press the MENU key to bring up for current input. Then the basic information of LCD monitor will show up the OSD. 2 Using the / keys, select Information from the OSD. EN-18

User Manual
Page 20
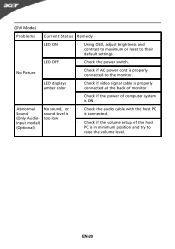
... sound level is in minimum position and try to their default settings. Unstable Picture · Check if the specification of graphics adapter and monitor is too low · Check the audio cable with non-standard signals. LED displays amber color · Check if video signal cable ...is properly connected at the back of monitor. · Check if the power of computer system is in compliance which may be causing the input signal frequency mismatch. EN-19 small...
... sound level is in minimum position and try to their default settings. Unstable Picture · Check if the specification of graphics adapter and monitor is too low · Check the audio cable with non-standard signals. LED displays amber color · Check if video signal cable ...is properly connected at the back of monitor. · Check if the power of computer system is in compliance which may be causing the input signal frequency mismatch. EN-19 small...
User Manual
Page 21
... Status Remedy LED ON · Using OSD, adjust brightness and contrast to maximum or reset to the monitor. LED displays amber color · Check if video signal cable is properly connected at the back of monitor. · Check if the power of the host PC is properly connected to their default settings.
... Status Remedy LED ON · Using OSD, adjust brightness and contrast to maximum or reset to the monitor. LED displays amber color · Check if video signal cable is properly connected at the back of monitor. · Check if the power of the host PC is properly connected to their default settings.
User Manual
Page 22
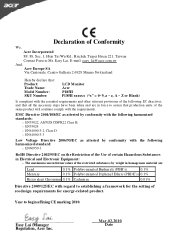
... Diphenyl Ethers (PBDE's) 0.1% Hexavalent Chromium 0.1% Cadmium 0.01% Dire ctive 2009/125/EC with the following harmonized standard: -. Easy Lai /Manager Regulation, Acer Inc. EN55024 -. EN61000-3-2, Class D -. Mar.02,2010 D ate EN55022, AS/NZS CISPR22 Class B. -. EN61000-3-3 Low Voltage Directive 2006/95/EC...SA Via Cantonale, Centro Galleria 2 6928 Manno Switzerland Hereby declare that: Product: Trade Name: Model Number: SKU Number: LCD Monitor Acer P185H P185H xxxxxx ("x" = 0~9, a ~ z, A ~ Z or Blank) Is compliant with the essential requirements and other relevant provisions ...
... Diphenyl Ethers (PBDE's) 0.1% Hexavalent Chromium 0.1% Cadmium 0.01% Dire ctive 2009/125/EC with the following harmonized standard: -. Easy Lai /Manager Regulation, Acer Inc. EN55024 -. EN61000-3-2, Class D -. Mar.02,2010 D ate EN55022, AS/NZS CISPR22 Class B. -. EN61000-3-3 Low Voltage Directive 2006/95/EC...SA Via Cantonale, Centro Galleria 2 6928 Manno Switzerland Hereby declare that: Product: Trade Name: Model Number: SKU Number: LCD Monitor Acer P185H P185H xxxxxx ("x" = 0~9, a ~ z, A ~ Z or Blank) Is compliant with the essential requirements and other relevant provisions ...
User Manual
Page 23
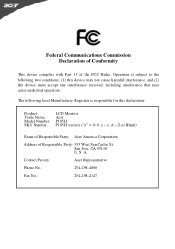
...Federal Communications Commission Declaration of Conformity This device complies with Part 15 of Responsible Party: 333 West San Carlos St. Contact Person: Acer Representative Phone No.: 254-298-4000 Fax No.: 254-298-4147 A. The following local Manufacturer /Importer is subject to the ... including interference that may not cause harmful interference, and (2) this declaration: Product: Trade Name: Model Number: SKU Number: LCD Monitor Acer P185H P185H xxxxxx ("x" = 0~9, a ~ z, A ~ Z or Blank) Name of Responsible Party: Acer America Corporation Address of the FCC Rules.
...Federal Communications Commission Declaration of Conformity This device complies with Part 15 of Responsible Party: 333 West San Carlos St. Contact Person: Acer Representative Phone No.: 254-298-4000 Fax No.: 254-298-4147 A. The following local Manufacturer /Importer is subject to the ... including interference that may not cause harmful interference, and (2) this declaration: Product: Trade Name: Model Number: SKU Number: LCD Monitor Acer P185H P185H xxxxxx ("x" = 0~9, a ~ z, A ~ Z or Blank) Name of Responsible Party: Acer America Corporation Address of the FCC Rules.


