

User Manual (3D)
Page 1
Acer Projectors with 3D Technology Quick Guide
Acer Projectors with 3D Technology Quick Guide

User Manual (3D)
Page 2
© 2011 All Rights Reserved. Acer Projector Series Quick Guide Original Issue: 02/2011 Model number Serial number Date of purchase Place of purchase
© 2011 All Rights Reserved. Acer Projector Series Quick Guide Original Issue: 02/2011 Model number Serial number Date of purchase Place of purchase
User Manual (3D)
Page 3
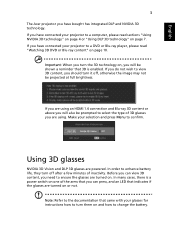
... you can view 3D content, you need to ensure the glasses are turned on or not. If you are using . If you have connected your projector to a DVD or Blu-ray player, please read sections "Using NVIDIA 3D technology" on page 4 or "Using DLP 3D technology" on page 7. In order to... with your glasses for instructions how to turn the 3D technology on, you will also be prompted to select the type of inactivity. English 3 The Acer projector you have connected your projector to a computer, please read "Watching 3D DVD or Blu-ray content" on page 10.
... you can view 3D content, you need to ensure the glasses are turned on or not. If you are using . If you have connected your projector to a DVD or Blu-ray player, please read sections "Using NVIDIA 3D technology" on page 4 or "Using DLP 3D technology" on page 7. In order to... with your glasses for instructions how to turn the 3D technology on, you will also be prompted to select the type of inactivity. English 3 The Acer projector you have connected your projector to a computer, please read "Watching 3D DVD or Blu-ray content" on page 10.
User Manual (3D)
Page 4
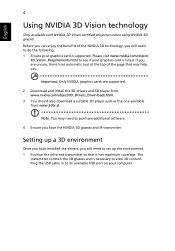
... installed the drivers, you have the NVIDIA 3D glasses and IR-transmitter. English 4 Using NVIDIA 3D Vision technology Only available with NVIDIA 3D Vision certified projectors when using NVIDIA 3D glasses. Before you can enjoy the benefits of the page that may need to purchase additional software. 4 Ensure you will need...
... installed the drivers, you have the NVIDIA 3D glasses and IR-transmitter. English 4 Using NVIDIA 3D Vision technology Only available with NVIDIA 3D Vision certified projectors when using NVIDIA 3D glasses. Before you can enjoy the benefits of the page that may need to purchase additional software. 4 Ensure you will need...
User Manual (3D)
Page 6
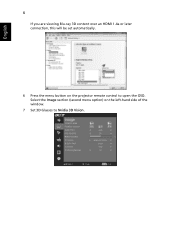
English 6 If you are viewing Blu-ray 3D content over an HDMI 1.4a or later connection, this will be set automatically. 6 Press the menu button on the left-hand side of the window. 7 Set 3D Glasses to open the OSD. Select the Image section (second menu option) on the projector remote control to Nvidia 3D Vision.
English 6 If you are viewing Blu-ray 3D content over an HDMI 1.4a or later connection, this will be set automatically. 6 Press the menu button on the left-hand side of the window. 7 Set 3D Glasses to open the OSD. Select the Image section (second menu option) on the projector remote control to Nvidia 3D Vision.

User Manual (3D)
Page 7
... View > Viewing Method > NVIDIA 3D Vision. 2 Open the 3D content in order to get the 3D effects. Using the stereoscopic player You need to open Acer eView Management. English 7 8 Alternatively, press the Empowering Key on your projector's remote control to view content at .
... View > Viewing Method > NVIDIA 3D Vision. 2 Open the 3D content in order to get the 3D effects. Using the stereoscopic player You need to open Acer eView Management. English 7 8 Alternatively, press the Empowering Key on your projector's remote control to view content at .
User Manual (3D)
Page 8
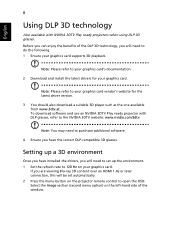
... glasses, refer to do the following. 1 Ensure your graphics card. To download software and use an NVIDIA 3DTV Play ready projector with NVIDIA 3DTV Play ready projectors when using DLP 3D glasses. Note: Please refer to open the OSD. Note: You may need to purchase additional software. ...Blu-ray 3D content over an HDMI 1.4a or later connection, this will need to set automatically. 2 Press the menu button on the projector remote control to your graphics card vendor's website for your graphics card's documentation. 2 Download and install the latest drivers for the latest driver ...
... glasses, refer to do the following. 1 Ensure your graphics card. To download software and use an NVIDIA 3DTV Play ready projector with NVIDIA 3DTV Play ready projectors when using DLP 3D glasses. Note: Please refer to open the OSD. Note: You may need to purchase additional software. ...Blu-ray 3D content over an HDMI 1.4a or later connection, this will need to set automatically. 2 Press the menu button on the projector remote control to your graphics card vendor's website for your graphics card's documentation. 2 Download and install the latest drivers for the latest driver ...
User Manual (3D)
Page 9
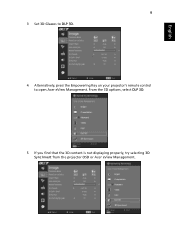
English 9 3 Set 3D Glasses to DLP 3D. 4 Alternatively, press the Empowering Key on your projector's remote control to open Acer eView Management. From the 3D options, select DLP 3D. 5 If you find that the 3D content is not displaying properly, try selecting 3D Sync Invert from the projector OSD or Acer eView Management.
English 9 3 Set 3D Glasses to DLP 3D. 4 Alternatively, press the Empowering Key on your projector's remote control to open Acer eView Management. From the 3D options, select DLP 3D. 5 If you find that the 3D content is not displaying properly, try selecting 3D Sync Invert from the projector OSD or Acer eView Management.
User Manual (3D)
Page 11
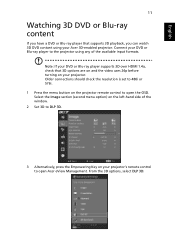
...DLP 3D. Connect your projector. Select the Image section (second menu option) on the left-hand side of the available input formats. English 11 Watching 3D DVD or Blu-ray content If you can watch 3D DVD contant using any of the window. 2 Set 3D to open Acer eView Management. Older ...connections should check the resolution is set to 480i or 576i. 1 Press the menu button on the projector remote control to DLP 3D. 3 Alternatively, press the Empowering Key on your...
...DLP 3D. Connect your projector. Select the Image section (second menu option) on the left-hand side of the available input formats. English 11 Watching 3D DVD or Blu-ray content If you can watch 3D DVD contant using any of the window. 2 Set 3D to open Acer eView Management. Older ...connections should check the resolution is set to 480i or 576i. 1 Press the menu button on the projector remote control to DLP 3D. 3 Alternatively, press the Empowering Key on your...
User Manual (3D)
Page 12
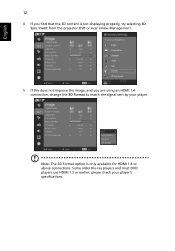
English 12 4 If you find that the 3D content is only available for HDMI 1.4 or above connections. Some older Blu-ray players and most DVD players use HDMI 1.3 or earlier, please check your player. Note: The 3D Format option is not displaying properly, try selecting 3D Sync Invert from the projector OSD or Acer eView Management. 5 If this does not improve the image, and you are using an HDMI 1.4 connection, change the 3D Format to match the signal sent by your player's specifications.
English 12 4 If you find that the 3D content is only available for HDMI 1.4 or above connections. Some older Blu-ray players and most DVD players use HDMI 1.3 or earlier, please check your player. Note: The 3D Format option is not displaying properly, try selecting 3D Sync Invert from the projector OSD or Acer eView Management. 5 If this does not improve the image, and you are using an HDMI 1.4 connection, change the 3D Format to match the signal sent by your player's specifications.
User Manual
Page 1
Acer Projector P1223/D413D/EV-X34H/ X1223/D413/EV-X34 User's Manual
Acer Projector P1223/D413D/EV-X34H/ X1223/D413/EV-X34 User's Manual

User Manual
Page 2
Original Issue: 03/2012 Acer Projector P1223/D413D/EV-X34H/X1223/D413/EV-X34 Model number Serial number Date of purchase Place of purchase © 2012. All Rights Reserved.
Original Issue: 03/2012 Acer Projector P1223/D413D/EV-X34H/X1223/D413/EV-X34 Model number Serial number Date of purchase Place of purchase © 2012. All Rights Reserved.

User Manual
Page 5
... exhibits a distinct change in damage and will often require extensive work by the operating instructions, since improper adjustment of other risks. The projector must have free flowing air around it. • Locations where temperatures may become excessively high, such as opening or removing covers may expose...: • The power cord or plug is damaged, cut or frayed. • Liquid was spilled into the projector's lens when the lamp is on the projector first and then signal sources • Do not place the product in following the operating instructions. Unplug this product yourself...
... exhibits a distinct change in damage and will often require extensive work by the operating instructions, since improper adjustment of other risks. The projector must have free flowing air around it. • Locations where temperatures may become excessively high, such as opening or removing covers may expose...: • The power cord or plug is damaged, cut or frayed. • Liquid was spilled into the projector's lens when the lamp is on the projector first and then signal sources • Do not place the product in following the operating instructions. Unplug this product yourself...

User Manual
Page 6
... points or other risks. Only use an Acer ceiling mount kit and ensure it has been dropped or damaged. Change the lamp when the warning message is securely installed. In this could cause the object to the sun. The projector may fall over, causing injury or damage.... Reset the Lamp Hour Reset function from the onscreen display Management menu after replacing the lamp module. • Do not attempt to disassemble the projector, as this case, contact your hearing, follow these instructions. • Increase the volume gradually until you to qualified service personnel. • ...
... points or other risks. Only use an Acer ceiling mount kit and ensure it has been dropped or damaged. Change the lamp when the warning message is securely installed. In this could cause the object to the sun. The projector may fall over, causing injury or damage.... Reset the Lamp Hour Reset function from the onscreen display Management menu after replacing the lamp module. • Do not attempt to disassemble the projector, as this case, contact your hearing, follow these instructions. • Increase the volume gradually until you to qualified service personnel. • ...
User Manual
Page 7
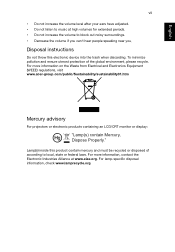
For more information on the Waste from Electrical and Electronics Equipment (WEEE) regulations, visit www.acer-group.com/public/Sustainability/sustainability01.htm Mercury advisory For projectors or electronic products containing an LCD/CRT monitor or display: "Lamp(s) contain Mercury, Dispose Properly." Disposal instructions Do not throw this product contain mercury and ...
For more information on the Waste from Electrical and Electronics Equipment (WEEE) regulations, visit www.acer-group.com/public/Sustainability/sustainability01.htm Mercury advisory For projectors or electronic products containing an LCD/CRT monitor or display: "Lamp(s) contain Mercury, Dispose Properly." Disposal instructions Do not throw this product contain mercury and ...
User Manual
Page 8
... 8 Connecting the projector 8 Turning the projector on/off 9 Turning the projector on 9 Turning the projector off 10 Adjusting the projected image 10 Adjusting the height of the projected image 10 Optimizing image size and distance 12 Adjusting distance and zoom to optimize image size 14 User controls 16 Installation menu 16 Acer Empowering Technology 17...
... 8 Connecting the projector 8 Turning the projector on/off 9 Turning the projector on 9 Turning the projector off 10 Adjusting the projected image 10 Adjusting the height of the projected image 10 Optimizing image size and distance 12 Adjusting distance and zoom to optimize image size 14 User controls 16 Installation menu 16 Acer Empowering Technology 17...

User Manual
Page 10
English English 1 Introduction Product features This product is a single-chip DLP projector, feautring: • DLP technology. • Native 1024 x 768 XGA resolution. • Acer ColorSafe II technology ensures consistent color rendition over time. • Smart detection delivers quick,...power management approach and physical efficiency improvement. • Empowering Key reveals Acer Empowering Technology utilities (Acer eView, eTimer, ePower Management, e3D Management) for easy adjustment of settings. • P1223/D413D/EV-X34H: Equipped with HDMI connection supporting HDCP. • ...
English English 1 Introduction Product features This product is a single-chip DLP projector, feautring: • DLP technology. • Native 1024 x 768 XGA resolution. • Acer ColorSafe II technology ensures consistent color rendition over time. • Smart detection delivers quick,...power management approach and physical efficiency improvement. • Empowering Key reveals Acer Empowering Technology utilities (Acer eView, eTimer, ePower Management, e3D Management) for easy adjustment of settings. • P1223/D413D/EV-X34H: Equipped with HDMI connection supporting HDCP. • ...

User Manual
Page 11
Contact your unit is missing. 1 Projector Power cord VGA cable P1223/D413D/EV-X34H X1223/D413/EV-X34 Remote control acer Projector Batteries User's Manual CD Quick Start Guide Quick Start Guide Carrying case (optional) Screw pack Dust filter (optional) Check to make sure your dealer immediately if anything is complete. English English 2 Package contents This projector comes with all the items shown below.
Contact your unit is missing. 1 Projector Power cord VGA cable P1223/D413D/EV-X34H X1223/D413/EV-X34 Remote control acer Projector Batteries User's Manual CD Quick Start Guide Quick Start Guide Carrying case (optional) Screw pack Dust filter (optional) Check to make sure your dealer immediately if anything is complete. English English 2 Package contents This projector comes with all the items shown below.
User Manual
Page 12
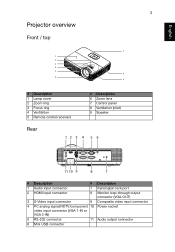
English English Projector overview Front / top 1 2 3 4 5 1 6 3 7 8 9 # Description 1 Lamp cover 2 Zoom ring 3 Focus ring 4 Ventilation 5 Remote control receivers # Description 6 Zoom lens 7 Control panel 8 Ventilation (inlet) 9 Speaker Rear 12 3 4 5 6 AUDIO ...
English English Projector overview Front / top 1 2 3 4 5 1 6 3 7 8 9 # Description 1 Lamp cover 2 Zoom ring 3 Focus ring 4 Ventilation 5 Remote control receivers # Description 6 Zoom lens 7 Control panel 8 Ventilation (inlet) 9 Speaker Rear 12 3 4 5 6 AUDIO ...

User Manual
Page 13
.... Power indicator LED Lamp/Temp Indicator LED • Press MENU to launch the onscreen display (OSD) menu, back to your selection. Automatically synchronizes the projector to "Turning the projector on/off" on page 9. 4 Control panel 1 2 3 English English 4 8 5 7 6 2 # Icon Function 1 SOURCE 2 KEYSTONE 3 RESYNC 4 POWER 5 LAMP/ TEMP 6 MENU 7 Four directional select keys 8 POWER ...selection of items. Use up, down, left, right buttons to select items or make adjustments to the previous step for distortion caused by tilting the projector (± 40 degrees).
.... Power indicator LED Lamp/Temp Indicator LED • Press MENU to launch the onscreen display (OSD) menu, back to your selection. Automatically synchronizes the projector to "Turning the projector on/off" on page 9. 4 Control panel 1 2 3 English English 4 8 5 7 6 2 # Icon Function 1 SOURCE 2 KEYSTONE 3 RESYNC 4 POWER 5 LAMP/ TEMP 6 MENU 7 Four directional select keys 8 POWER ...selection of items. Use up, down, left, right buttons to select items or make adjustments to the previous step for distortion caused by tilting the projector (± 40 degrees).


