User Manual
Page 2
.... Acer LCD Monitor User Guide Model number Serial number Date of purchase Place of purchase Acer and the Acer logo are registered trademarks of this publication may be incorporated in the space provided below. English Copyright © 2019. Acer Incorporated. No part of merchantability or fitness for identification purposes only and belong to the contents hereof and specifically disclaims the implied warranties of this manual or...
.... Acer LCD Monitor User Guide Model number Serial number Date of purchase Place of purchase Acer and the Acer logo are registered trademarks of this publication may be incorporated in the space provided below. English Copyright © 2019. Acer Incorporated. No part of merchantability or fitness for identification purposes only and belong to the contents hereof and specifically disclaims the implied warranties of this manual or...

User Manual
Page 3
... reference. Turn off the power switch for a few hours. iii Keep this case, the screen is displayed for hours. Special notes on LCD monitors The following are normal with the LCD monitor and do not indicate a problem. • Due to the nature of 0.01% or less such as a missing pixel or pixel lit all warnings and instructions marked on the desktop pattern you use . Cleaning your...
... reference. Turn off the power switch for a few hours. iii Keep this case, the screen is displayed for hours. Special notes on LCD monitors The following are normal with the LCD monitor and do not indicate a problem. • Due to the nature of 0.01% or less such as a missing pixel or pixel lit all warnings and instructions marked on the desktop pattern you use . Cleaning your...

User Manual
Page 4
... electric shock. Using electrical power • This product should never be blocked or covered. English Accessibility Be sure that could be seriously damaged. • Slots and openings are not sure of the type of any vibrating environment which will walk on an unstable cart, stand or table. The openings should be sure to unplug the power cord from the...
... electric shock. Using electrical power • This product should never be blocked or covered. English Accessibility Be sure that could be seriously damaged. • Slots and openings are not sure of the type of any vibrating environment which will walk on an unstable cart, stand or table. The openings should be sure to unplug the power cord from the...
User Manual
Page 5
... grounded before inserting the power cord plug. English • If an extension cord is used , the load should not exceed 80% of this product. • Use the product only with the supplied power supply cord set , make sure that the total rating of all servicing to replace the power cord set . If power strips are used with this product, make sure that the total ampere rating of the branch circuit rating. If you to...
... grounded before inserting the power cord plug. English • If an extension cord is used , the load should not exceed 80% of this product. • Use the product only with the supplied power supply cord set , make sure that the total rating of all servicing to replace the power cord set . If power strips are used with this product, make sure that the total ampere rating of the branch circuit rating. If you to...

User Manual
Page 6
... Information Acer is strongly committed to this electronic device into the trash when discarding. We at Acer are very conscious of the environmental effects of our business and strive to identify and provide the best working procedures ...using liquefied petroleum gas (such as propane or butane), and areas where the air contains chemicals or particles such as one of the company's top priorities in minimizing the burden placed on the features and benefits of our other controls may contain small parts. English Note: Adjust only those controls that are covered by the operating instructions...
... Information Acer is strongly committed to this electronic device into the trash when discarding. We at Acer are very conscious of the environmental effects of our business and strive to identify and provide the best working procedures ...using liquefied petroleum gas (such as propane or butane), and areas where the air contains chemicals or particles such as one of the company's top priorities in minimizing the burden placed on the features and benefits of our other controls may contain small parts. English Note: Adjust only those controls that are covered by the operating instructions...
User Manual
Page 7
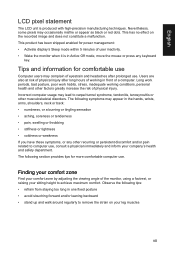
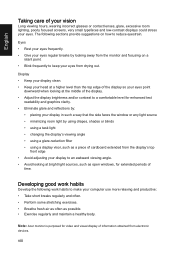
... display's Sleep mode within 5 minutes of a computer. Incorrect computer usage may occasionally misfire or appear as black or red dots. Finding your comfort zone Find your comfort zone by adjusting the viewing angle of working conditions, personal health and other musculoskeletal disorders. Long work periods, bad posture, poor work habits, stress, inadequate working in front of user inactivity. • Wake the monitor when...
... display's Sleep mode within 5 minutes of a computer. Incorrect computer usage may occasionally misfire or appear as black or red dots. Finding your comfort zone Find your comfort zone by adjusting the viewing angle of working conditions, personal health and other musculoskeletal disorders. Long work periods, bad posture, poor work habits, stress, inadequate working in front of user inactivity. • Wake the monitor when...
User Manual
Page 8
... electronic devices. Note: Acer monitor is purposed for video and visual display of your vision Long viewing hours, wearing incorrect glasses or contact lenses, glare, excessive room lighting, poorly focused screens, very small typefaces and low-contrast displays could stress your eyes. viii Developing good work habits to make your eyes point downward when looking at bright light sources, such as open windows, for enhanced text...
... electronic devices. Note: Acer monitor is purposed for video and visual display of your vision Long viewing hours, wearing incorrect glasses or contact lenses, glare, excessive room lighting, poorly focused screens, very small typefaces and low-contrast displays could stress your eyes. viii Developing good work habits to make your eyes point downward when looking at bright light sources, such as open windows, for enhanced text...
User Manual
Page 11
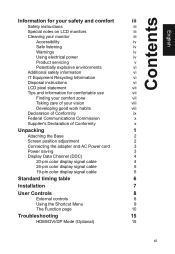
... good work habits viii Declaration of Conformity ix Federal Communications Commission x Supplier's Declaration of Conformity x Unpacking 1 Attaching the Base 2 Screen position adjustment 2 Connecting the adapter and AC Power cord 3 Power saving 3 Display Data Channel (DDC) 4 20-pin color display signal cable 4 24-pin color display signal cable 5 19-pin color display signal cable 5 Standard timing table 6 Installation 7 User Controls 8 External controls 8 Using the Shortcut Menu 9 The Function page 10 Troubleshooting 15 HDMI/DVI/DP Mode (Optional...
... good work habits viii Declaration of Conformity ix Federal Communications Commission x Supplier's Declaration of Conformity x Unpacking 1 Attaching the Base 2 Screen position adjustment 2 Connecting the adapter and AC Power cord 3 Power saving 3 Display Data Channel (DDC) 4 20-pin color display signal cable 4 24-pin color display signal cable 5 19-pin color display signal cable 5 Standard timing table 6 Installation 7 User Controls 8 External controls 8 Using the Shortcut Menu 9 The Function page 10 Troubleshooting 15 HDMI/DVI/DP Mode (Optional...
User Manual
Page 14
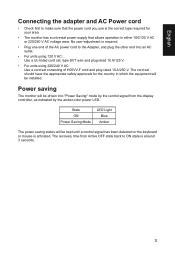
...: Use a cord set should have the appropriate safety approvals for your area. • The monitor has a universal power supply that the power cord you use is required. • Plug one end of H05VV-F cord and plug rated 10 A/250 V. Power saving The monitor will be installed. The recovery time from the display controller, as indicated by the amber-color power LED. English Connecting the adapter and AC Power cord • Check first to ON state is activated. No user-adjustment...
...: Use a cord set should have the appropriate safety approvals for your area. • The monitor has a universal power supply that the power cord you use is required. • Plug one end of H05VV-F cord and plug rated 10 A/250 V. Power saving The monitor will be installed. The recovery time from the display controller, as indicated by the amber-color power LED. English Connecting the adapter and AC Power cord • Check first to ON state is activated. No user-adjustment...

User Manual
Page 15
... 16 GND 18 Hot Plug 20 DP_PWR 4 English Display Data Channel (DDC) To make installation easier, so long as your system supports the DDC protocol, the monitor is a communication protocol through which the monitor automatically informs the host ...system about its capabilities; Description 1 ML_Lane 0+ 3 ML_Lane 05 GND 7 ML_Lane 2+ 9 ML_Lane 211 GND 13 KONFIG1 15 AUX CH+ 17 AUX CH19 Return PIN No. The DDC is able to plug-and-play. The monitor supports the DDC2B standard. 20-pin color display signal cable PIN No. for example, supported resolutions...
... 16 GND 18 Hot Plug 20 DP_PWR 4 English Display Data Channel (DDC) To make installation easier, so long as your system supports the DDC protocol, the monitor is a communication protocol through which the monitor automatically informs the host ...system about its capabilities; Description 1 ML_Lane 0+ 3 ML_Lane 05 GND 7 ML_Lane 2+ 9 ML_Lane 211 GND 13 KONFIG1 15 AUX CH+ 17 AUX CH19 Return PIN No. The DDC is able to plug-and-play. The monitor supports the DDC2B standard. 20-pin color display signal cable PIN No. for example, supported resolutions...

User Manual
Page 16
...DDC TMDS clock- 19-pin color display signal cable PIN No. Description 1 TMDS Data2+ 3 TMDS Data25 TMDS Data1 Shield 7 TMDS Data0+ 9 TMDS Data011 TMDS Clock Shield 13 CEC 15 SCL 17 DDC/CEC Ground 19 Hot Plug Detect PIN No. on device) 16 SDA 18 +5V Power 5 Description 2 TMDS Data2 Shield... 4 TMDS Data1+ 6 TMDS Data18 TMDS Data0 Shield 10 TMDS Clock+ 12 TMDS Clock14 Reserved (N.C. Description 13 NC 14 +5 V power 15 GND (return for +5 V hsync. English 24-pin color display signal cable PIN No....
...DDC TMDS clock- 19-pin color display signal cable PIN No. Description 1 TMDS Data2+ 3 TMDS Data25 TMDS Data1 Shield 7 TMDS Data0+ 9 TMDS Data011 TMDS Clock Shield 13 CEC 15 SCL 17 DDC/CEC Ground 19 Hot Plug Detect PIN No. on device) 16 SDA 18 +5V Power 5 Description 2 TMDS Data2 Shield... 4 TMDS Data1+ 6 TMDS Data18 TMDS Data0 Shield 10 TMDS Clock+ 12 TMDS Clock14 Reserved (N.C. Description 13 NC 14 +5 V power 15 GND (return for +5 V hsync. English 24-pin color display signal cable PIN No....

User Manual
Page 18
English Installation 1. Then tighten the thumbscrews on the computer with the audio cable. 4. Note: Audio output is only for more instruction. Insert the monitor power cable into a nearby electrical outlet. Plug the power cords of the graphics card on typical content frame rates for power efficient, virtually stutter free and low-latency display update. 7 Connect the signal cable to dynamically adjust display refresh rate based on the computer. Please check user manual for audio output model. Turn off your computer and unplug your...
English Installation 1. Then tighten the thumbscrews on the computer with the audio cable. 4. Note: Audio output is only for more instruction. Insert the monitor power cable into a nearby electrical outlet. Plug the power cords of the graphics card on typical content frame rates for power efficient, virtually stutter free and low-latency display update. 7 Connect the signal cable to dynamically adjust display refresh rate based on the computer. Please check user manual for audio output model. Turn off your computer and unplug your...
User Manual
Page 19
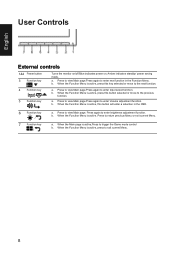
... Game mode control b. When the Function Menu is active, this key selected or move to exit current Menu. 8 English User Controls External controls 1&2 Power button 3 Function key / 4 Function key Input / / 5 Function key / Turns the monitor on/off.Blue indicates power on. a. When the Function Menu is active, press to the previous function. a. b. Press to return previous Menu or exit current Menu. 7 Function key / a. Amber indicates standby/ power saving mode. Press to view...
... Game mode control b. When the Function Menu is active, this key selected or move to exit current Menu. 8 English User Controls External controls 1&2 Power button 3 Function key / 4 Function key Input / / 5 Function key / Turns the monitor on/off.Blue indicates power on. a. When the Function Menu is active, press to the previous function. a. b. Press to return previous Menu or exit current Menu. 7 Function key / a. Amber indicates standby/ power saving mode. Press to view...

User Manual
Page 20
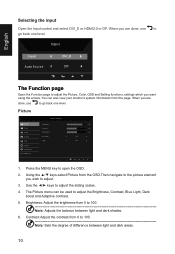
... general reference only. For advanced settings, please refer to adjust the picture quality, OSD position and general settings. Picture Color Audio Gaming OSD System Information Mode - The OSD (onscreen display) can use to open the OSD. English Using the Shortcut Menu Note: The following page: Main page Adjusting the OD setting Open the OD control and select your LCD monitor. User Over Drive Free-Sync MPRT Aim point Normal On Off Off Adjusting the volume Open the Volume control and set the Volume using the arrows.
... general reference only. For advanced settings, please refer to adjust the picture quality, OSD position and general settings. Picture Color Audio Gaming OSD System Information Mode - The OSD (onscreen display) can use to open the OSD. English Using the Shortcut Menu Note: The following page: Main page Adjusting the OD setting Open the OD control and select your LCD monitor. User Over Drive Free-Sync MPRT Aim point Normal On Off Off Adjusting the volume Open the Volume control and set the Volume using the arrows.
User Manual
Page 21
... done, use to adjust. 3. Standard Brightness Contrast Black Boost Blue Light ACM 80 50 50 Off Off 1. Input Input Auto Source DVI_D Off The Function page Open the Function page to adjust the Picture, Color, OSD and Setting functions, settings which you wish to go back one level. Using the ▲/▼ keys,select Picture from 0 to adjust the Brightness, Contrast, Blue Light, Dark boost and Adaptive contrast. 5. Picture Picture Color Audio Gaming OSD System Information Save Setting to open the OSD. 2. Mode - You can be used to...
... done, use to adjust. 3. Standard Brightness Contrast Black Boost Blue Light ACM 80 50 50 Off Off 1. Input Input Auto Source DVI_D Off The Function page Open the Function page to adjust the Picture, Color, OSD and Setting functions, settings which you wish to go back one level. Using the ▲/▼ keys,select Picture from 0 to adjust the Brightness, Contrast, Blue Light, Dark boost and Adaptive contrast. 5. Picture Picture Color Audio Gaming OSD System Information Save Setting to open the OSD. 2. Mode - You can be used to...

User Manual
Page 22
... the image is 2.2 (standard value for Windows). 5. ACM: Turn ACM on or off . Then navigate to the picture element you to adjust the luminance tone.The default value is very bright or has few shadow areas, adjusting this setting may not result in any noticeable changes to adjust. 3. English 7. Move Mode - Press the MENU key to ... Color Picture Color Audio Gaming OSD System Information Save Setting to open the OSD. 2. Color temperature: Default is shown...
... the image is 2.2 (standard value for Windows). 5. ACM: Turn ACM on or off . Then navigate to the picture element you to adjust the luminance tone.The default value is very bright or has few shadow areas, adjusting this setting may not result in any noticeable changes to adjust. 3. English 7. Move Mode - Press the MENU key to ... Color Picture Color Audio Gaming OSD System Information Save Setting to open the OSD. 2. Color temperature: Default is shown...

User Manual
Page 23
... up or down to select Gaming from the OSD.Then toggle to the right to navigate to the element you wish to adjust and press the joystick to adjust the sliding scales. 4. English 7. 6-axis Hue: Adjust the red, green, blue, yellow, magenta and cyan hue. Standard Volume 70 X 1. FreeSync: To control support FreeSync or not, default is On 12 Audio Picture Color Audio Gaming OSD System Information Mode -
... up or down to select Gaming from the OSD.Then toggle to the right to navigate to the element you wish to adjust and press the joystick to adjust the sliding scales. 4. English 7. 6-axis Hue: Adjust the red, green, blue, yellow, magenta and cyan hue. Standard Volume 70 X 1. FreeSync: To control support FreeSync or not, default is On 12 Audio Picture Color Audio Gaming OSD System Information Mode -

User Manual
Page 24
... whether to support dynamic picture more clean control, default is Off Note: • PIP/PBP mode is not support MPRT. • MPRT set "On", when to turn on FreeSync, will auto set MPRT is "Off". • MPRT set "On", when to adjustment (Brightness, Blue Light, ACM), will auto set MPRT is "Off". • MPRT function does not affect the (Logo, Aim Point, Message and Input Icon) brightness. • MPRT setting "On...
... whether to support dynamic picture more clean control, default is Off Note: • PIP/PBP mode is not support MPRT. • MPRT set "On", when to turn on FreeSync, will auto set MPRT is "Off". • MPRT set "On", when to adjustment (Brightness, Blue Light, ACM), will auto set MPRT is "Off". • MPRT function does not affect the (Logo, Aim Point, Message and Input Icon) brightness. • MPRT setting "On...
User Manual
Page 25
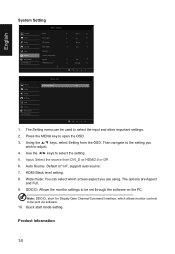
... monitor controls to ... Quick Start Mode 1. HDMI Black level setting. 8. Press the MENU key to select the setting. 5. The options are using. Input: Select the source from the OSD. Auto Source: Default is "on the PC Note: DDC/CI, short for Display Data Channel/Command Interface, which screen aspect you wish to select the input and other important settings. 2. Quick start mode setting. Use the ◄/► keys to open the OSD. 3. User Picture Quick Start Mode Off Color Audio Gaming OSD System Information Save Setting to be set...
... monitor controls to ... Quick Start Mode 1. HDMI Black level setting. 8. Press the MENU key to select the setting. 5. The options are using. Input: Select the source from the OSD. Auto Source: Default is "on the PC Note: DDC/CI, short for Display Data Channel/Command Interface, which screen aspect you wish to select the input and other important settings. 2. Quick start mode setting. Use the ◄/► keys to open the OSD. 3. User Picture Quick Start Mode Off Color Audio Gaming OSD System Information Save Setting to be set...
User Manual
Page 26
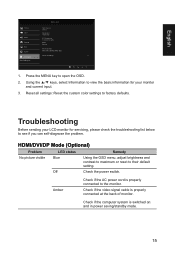
... default setting. Off Check the power switch. Reset all settings: Reset the custom color settings to the monitor. Troubleshooting Before sending your monitor and current input. 3. User Main Source DVI_D Resolution 1920x1080 H/V Frequency H: 67KHz V: 60Hz Mode Normal Series Number MML 3451 80060290001 4212 Reset All Settings Quick Start Mode 1. Mode - Check if the video signal cable is switched on and in power saving/standby mode. 15 Amber Check if the AC power cord is properly connected to factory defaults. English Picture Color Audio Gaming OSD System Information Save...
... default setting. Off Check the power switch. Reset all settings: Reset the custom color settings to the monitor. Troubleshooting Before sending your monitor and current input. 3. User Main Source DVI_D Resolution 1920x1080 H/V Frequency H: 67KHz V: 60Hz Mode Normal Series Number MML 3451 80060290001 4212 Reset All Settings Quick Start Mode 1. Mode - Check if the video signal cable is switched on and in power saving/standby mode. 15 Amber Check if the AC power cord is properly connected to factory defaults. English Picture Color Audio Gaming OSD System Information Save...

