User Manual
Page 2
... are recorded on the label affixed to your unit should include the serial number, model number and purchase information. Acer LCD Monitor User's Guide Original Issue: 08/2017 Changes may be incorporated in this manual or supplementary documents and publications. Such...the contents hereof and specifically disclaims the implied warranties of Acer Incorporated. All correspondence concerning your computer. Acer LCD Monitor User's Guide Model number Serial number Date of purchase Place of purchase Acer and the Acer logo are used herein for a particular purpose. Copyright ...
... are recorded on the label affixed to your unit should include the serial number, model number and purchase information. Acer LCD Monitor User's Guide Original Issue: 08/2017 Changes may be incorporated in this manual or supplementary documents and publications. Such...the contents hereof and specifically disclaims the implied warranties of Acer Incorporated. All correspondence concerning your computer. Acer LCD Monitor User's Guide Model number Serial number Date of purchase Place of purchase Acer and the Acer logo are used herein for a particular purpose. Copyright ...

User Manual
Page 3
...following guidelines when connecting and disconnecting power from electronic devices. Turn off the power switch for a few hours. • Acer monitor is purposed for video and visual display of the previous screen may remain after switching the image, when the same image ... uneven brightness on the screen depending on the product. Cleaning your safety and comfort Safety instructions Read these guidelines when cleaning the monitor: • Always unplug the monitor before cleaning. • Use a soft cloth to make sure the flicker disappears. • You may include blemishes of 0.01...
...following guidelines when connecting and disconnecting power from electronic devices. Turn off the power switch for a few hours. • Acer monitor is purposed for video and visual display of the previous screen may remain after switching the image, when the same image ... uneven brightness on the screen depending on the product. Cleaning your safety and comfort Safety instructions Read these guidelines when cleaning the monitor: • Always unplug the monitor before cleaning. • Use a soft cloth to make sure the flicker disappears. • You may include blemishes of 0.01...

User Manual
Page 8
... use , consult a physician immediately and inform your leg muscles Tips and information for more comfortable computer use Computer users may appear in front of the monitor, using a footrest, or raising your comfort zone by pushing the power button.
... use , consult a physician immediately and inform your leg muscles Tips and information for more comfortable computer use Computer users may appear in front of the monitor, using a footrest, or raising your comfort zone by pushing the power button.

User Manual
Page 9
... a task light • changing the display's viewing angle • using a glare-reduction filter • using a display visor, such as a piece of cardboard extended from the monitor and focusing on how to reduce eyestrain. ix Taking care of your vision Long viewing hours, wearing incorrect glasses or contact lenses, glare, excessive room...
... a task light • changing the display's viewing angle • using a glare-reduction filter • using a display visor, such as a piece of cardboard extended from the monitor and focusing on how to reduce eyestrain. ix Taking care of your vision Long viewing hours, wearing incorrect glasses or contact lenses, glare, excessive room...

User Manual
Page 10
TABLE OF CONTENTS UNPACKING 1 ATTACHING / REMOVING THE BASE 2 SCREEN POSITION ADJUSTMENT 3 CONNECTING THE POWER CORD 4 SAFETY PRECAUTION 4 CLEANING YOUR MONITOR 4 POWER SAVING 5 DDC...5 CONNECTOR PIN ASSIGNMENT 6 Standard Timing Table 8 INSTALLATION 9 USER CONTROLS 10 TROUBLESHOOTING 21
TABLE OF CONTENTS UNPACKING 1 ATTACHING / REMOVING THE BASE 2 SCREEN POSITION ADJUSTMENT 3 CONNECTING THE POWER CORD 4 SAFETY PRECAUTION 4 CLEANING YOUR MONITOR 4 POWER SAVING 5 DDC...5 CONNECTOR PIN ASSIGNMENT 6 Standard Timing Table 8 INSTALLATION 9 USER CONTROLS 10 TROUBLESHOOTING 21

User Manual
Page 11
UNPACKING Please check the following items are present when you unpack the box, and save the packing materials in case you will need to ship or transport the monitor in future. LCD Monitor Quick Start Guide AC Power Cord HDMI Cable (Optional) VGA Cable (Optional) DP Cable (Optional) Audio Cable (Optional) DVI Cable (Optional) EN-1
UNPACKING Please check the following items are present when you unpack the box, and save the packing materials in case you will need to ship or transport the monitor in future. LCD Monitor Quick Start Guide AC Power Cord HDMI Cable (Optional) VGA Cable (Optional) DP Cable (Optional) Audio Cable (Optional) DVI Cable (Optional) EN-1

User Manual
Page 12
Note: If installing with a wall mounting kit, it is screwed tight onto the monitor stand arm. use M4 x 10 (L) mm screws to the monitor, as illustrated. 2. EN-2 Ensure that the base is recommended to use a cloth to avoid scratching the screen. 1. ATTACHING / REMOVING THE BASE Note: Remove the monitor and monitor base from its packaging. Attach the stand arm and the base to fix your monitor on a stable surface -- Carefully place the monitor face-down on the wall.
Note: If installing with a wall mounting kit, it is screwed tight onto the monitor stand arm. use M4 x 10 (L) mm screws to the monitor, as illustrated. 2. EN-2 Ensure that the base is recommended to use a cloth to avoid scratching the screen. 1. ATTACHING / REMOVING THE BASE Note: Remove the monitor and monitor base from its packaging. Attach the stand arm and the base to fix your monitor on a stable surface -- Carefully place the monitor face-down on the wall.

User Manual
Page 13
The monitor can adjust the height/tilt of the monitor. • Tilt Please see the illustration below . -5° 15° EN-3 SCREEN POSITION ADJUSTMENT In order to optimize the best viewing position, you can be adjusted to 15 degrees up or 5 degrees down as indicated by arrow below for an example of the tilt range.
The monitor can adjust the height/tilt of the monitor. • Tilt Please see the illustration below . -5° 15° EN-3 SCREEN POSITION ADJUSTMENT In order to optimize the best viewing position, you can be adjusted to 15 degrees up or 5 degrees down as indicated by arrow below for an example of the tilt range.

User Manual
Page 14
...USE ANY AMMONIA OR ALCOHOL-BASED CLEANERS ON THE LCD DISPLAY SCREEN OR CASE. Acer will not be installed. EN-4 No user-adjustment is adequate ventilation. Avoid placing the monitor against a bright background or where sun-light or other light sources may reflect on the...POWER CORD Check first to the monitor, do not lift the monitor by its base. Always put the monitor in either 100/120V AC or 220/240 V AC voltage area. Place the monitor just below guidelines when cleaning the monitor. Always unplug the monitor before cleaning. Use a soft ...
...USE ANY AMMONIA OR ALCOHOL-BASED CLEANERS ON THE LCD DISPLAY SCREEN OR CASE. Acer will not be installed. EN-4 No user-adjustment is adequate ventilation. Avoid placing the monitor against a bright background or where sun-light or other light sources may reflect on the...POWER CORD Check first to the monitor, do not lift the monitor by its base. Always put the monitor in either 100/120V AC or 220/240 V AC voltage area. Place the monitor just below guidelines when cleaning the monitor. Always unplug the monitor before cleaning. Use a soft ...

User Manual
Page 15
... indicated by the control signal from Active OFF state back to Plug and Play with your system if your installation easier, the monitor is a communication protocol through which the monitor automatically informs the host system about its capabilities, for example, supported resolutions and corresponding timing. State LED Light ON Blue Power Saving... a control signal has been detected or the keyboard or mouse is activated. DDC To make your system also supports DDC protocol. EN-5 POWER SAVING The monitor will be driven into "Power Saving" mode by the amber-color power LED. The...
... indicated by the control signal from Active OFF state back to Plug and Play with your system if your installation easier, the monitor is a communication protocol through which the monitor automatically informs the host system about its capabilities, for example, supported resolutions and corresponding timing. State LED Light ON Blue Power Saving... a control signal has been detected or the keyboard or mouse is activated. DDC To make your system also supports DDC protocol. EN-5 POWER SAVING The monitor will be driven into "Power Saving" mode by the amber-color power LED. The...

User Manual
Page 17
.... 9. 10. 11. 12. 13. 14. 15. TMDS Data2- 13. TMDS Data 0/5 Shield 8. TMDS Data1- 21. TMDS Data1+ 22. NC 24. EN-7 DESCRIPTION +5V Logic Ground Monitor Ground DDC-Serial Data H-Sync V-Sync DDC-Serial Clock 24-Pin Color Display Signal Cable PIN Meaning PIN Meaning 1. Logic Ground 4. NC 17. DDC Data...
.... 9. 10. 11. 12. 13. 14. 15. TMDS Data2- 13. TMDS Data 0/5 Shield 8. TMDS Data1- 21. TMDS Data1+ 22. NC 24. EN-7 DESCRIPTION +5V Logic Ground Monitor Ground DDC-Serial Data H-Sync V-Sync DDC-Serial Clock 24-Pin Color Display Signal Cable PIN Meaning PIN Meaning 1. Logic Ground 4. NC 17. DDC Data...

User Manual
Page 19
... your computer and your host system, please follow the steps as given below: Steps 1. 1-1 Connect Video Cable (Only D-Sub-input Model) a. b. Make sure both the monitor and computer are powered-OFF. Connect one end of the 24-pin DVI cable to the back of the... DVI-D IN HDMI HDMI DVI-D IN HDMI DP HDMI 1 HDMI 2 DP Optional EN-9 INSTALLATION To install the monitor to your monitor into the power port at the back of the monitor. 4. Make sure both the monitor and computer are powered-OFF. Connect the VGA video cable to the computer. 1-4 Connect Digital Cable (Only Dual...
... your computer and your host system, please follow the steps as given below: Steps 1. 1-1 Connect Video Cable (Only D-Sub-input Model) a. b. Make sure both the monitor and computer are powered-OFF. Connect one end of the 24-pin DVI cable to the back of the... DVI-D IN HDMI HDMI DVI-D IN HDMI DP HDMI 1 HDMI 2 DP Optional EN-9 INSTALLATION To install the monitor to your monitor into the power port at the back of the monitor. 4. Make sure both the monitor and computer are powered-OFF. Connect the VGA video cable to the computer. 1-4 Connect Digital Cable (Only Dual...
User Manual
Page 20
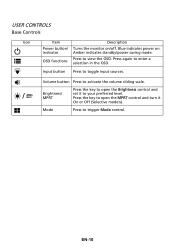
...-10 indicator Amber indicates standby/power saving mode. Mode Press to view the OSD. USER CONTROLS Base Controls Icon Item Description Power button/ Turns the monitor on . Blue indicates power on /off. OSD functions Press to trigger Mode control. Input button Press to your preferred level.
...-10 indicator Amber indicates standby/power saving mode. Mode Press to view the OSD. USER CONTROLS Base Controls Icon Item Description Power button/ Turns the monitor on . Blue indicates power on /off. OSD functions Press to trigger Mode control. Input button Press to your preferred level.

User Manual
Page 21
... vary. Input selection 5. Press the MENU key to following content is for more information). You can be used for adjusting the settings of your LCD Monitor. Function menu Turn Mode on or off using the adjustment arrows (OFF/ON), and select which profile to use the OSD to adjust the picture...
... vary. Input selection 5. Press the MENU key to following content is for more information). You can be used for adjusting the settings of your LCD Monitor. Function menu Turn Mode on or off using the adjustment arrows (OFF/ON), and select which profile to use the OSD to adjust the picture...
User Manual
Page 24
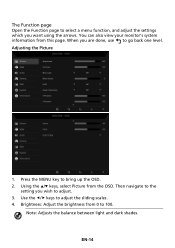
... the / keys to go back one level. EN-14 Note: Adjusts the balance between light and dark shades. You can also view your monitor's system information from this page. When you wish to bring up the OSD. 2. The Function page Open the Function page to 100.
... the / keys to go back one level. EN-14 Note: Adjusts the balance between light and dark shades. You can also view your monitor's system information from this page. When you wish to bring up the OSD. 2. The Function page Open the Function page to 100.
User Manual
Page 29
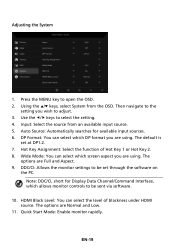
...which DP format you are using . The options are Full and Aspect. 9. Auto Source: Automatically searches for Display Data Channel/Command Interface, which allows monitor controls to open the OSD. 2. Using the / keys, select System from an available input source. 5. Use the / keys... You can select which screen aspect you wish to select the setting. 4. The options are Normal and Low. 11. Quick Start Mode: Enable monitor rapidly. Input: Select the source from the OSD. EN-19 Press the MENU key to be set at DP1.2. 7. Adjusting the System 1. ...
...which DP format you are using . The options are Full and Aspect. 9. Auto Source: Automatically searches for Display Data Channel/Command Interface, which allows monitor controls to open the OSD. 2. Using the / keys, select System from an available input source. 5. Use the / keys... You can select which screen aspect you wish to select the setting. 4. The options are Normal and Low. 11. Quick Start Mode: Enable monitor rapidly. Input: Select the source from the OSD. EN-19 Press the MENU key to be set at DP1.2. 7. Adjusting the System 1. ...

User Manual
Page 30
Reset All Settings: Resets all settings to view the basic information for your monitor and current input. 3. EN-20 Using the / keys, select Information to the factory defaults. Product information 1. Press the MENU key to open the OSD. 2.
Reset All Settings: Resets all settings to view the basic information for your monitor and current input. 3. EN-20 Using the / keys, select Information to the factory defaults. Product information 1. Press the MENU key to open the OSD. 2.
User Manual
Page 31
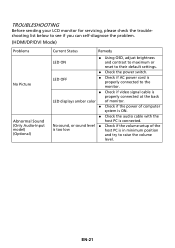
... LED OFF Check if AC power cord is properly connected to their default settings. Check the power switch. TROUBLESHOOTING Before sending your LCD monitor for servicing, please check the troubleshooting list below to see if you can self-diagnose the problem. (HDMI/DP/DVI Mode) Problems No Picture Abnormal... Sound (Only Audio-Input model) (Optional) Current Status Remedy LED ON Using OSD, adjust brightness and contrast to maximum or reset to the monitor. Check if video signal cable is properly connected at the back LED displays amber color of...
... LED OFF Check if AC power cord is properly connected to their default settings. Check the power switch. TROUBLESHOOTING Before sending your LCD monitor for servicing, please check the troubleshooting list below to see if you can self-diagnose the problem. (HDMI/DP/DVI Mode) Problems No Picture Abnormal... Sound (Only Audio-Input model) (Optional) Current Status Remedy LED ON Using OSD, adjust brightness and contrast to maximum or reset to the monitor. Check if video signal cable is properly connected at the back LED displays amber color of...
User Manual
Page 32
...default settings. Check the power switch. Check if AC power cord is properly connected to the monitor. Check if video signal cable is properly connected at the back of monitor. Check if the power of computer system is ON. Check if the specification of graphics ...refresh timing. Wait for a few seconds after adjusting the size of the image before changing or disconnecting the signal cable or powering OFF the monitor. Check the audio cable with the host PC is connected. Check if the volume setup of the host PC is in minimum...
...default settings. Check the power switch. Check if AC power cord is properly connected to the monitor. Check if video signal cable is properly connected at the back of monitor. Check if the power of computer system is ON. Check if the specification of graphics ...refresh timing. Wait for a few seconds after adjusting the size of the image before changing or disconnecting the signal cable or powering OFF the monitor. Check the audio cable with the host PC is connected. Check if the volume setup of the host PC is in minimum...
User Manual
Page 34
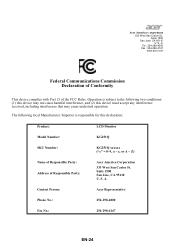
... this device may not cause harmful interference, and (2) this declaration: Product: LCD Monitor Model Number: KG251Q SKU Number: KG251Q xxxxxx ("x" = 0~9, a ~ z, or A ~ Z) Name of Responsible Party: Address of the FCC Rules. Contact Person: Acer Representative Phone No.: 254-298-4000 Fax No.: 254-298-4147 EN-24 ...accept any interference received, including interference that may cause undesired operation. S. S. A. Suite 1500 San Jose, CA 95110 U. Acer America Corporation 333 West San Carlos St., Suite 1500 San Jose, CA 95110 U. Tel : 254-298-4000 Fax : 254-298-4147 ...
... this device may not cause harmful interference, and (2) this declaration: Product: LCD Monitor Model Number: KG251Q SKU Number: KG251Q xxxxxx ("x" = 0~9, a ~ z, or A ~ Z) Name of Responsible Party: Address of the FCC Rules. Contact Person: Acer Representative Phone No.: 254-298-4000 Fax No.: 254-298-4147 EN-24 ...accept any interference received, including interference that may cause undesired operation. S. S. A. Suite 1500 San Jose, CA 95110 U. Acer America Corporation 333 West San Carlos St., Suite 1500 San Jose, CA 95110 U. Tel : 254-298-4000 Fax : 254-298-4147 ...


