
User Manual
Page 3
... after switching the image, when the same image is displayed for future reference. Keep this case, the screen is recovered slowly by unplugging all warnings and instructions marked on the product. iii Special notes on LCD monitors The following guidelines when connecting and disconnecting power from the LCD monitor: • Make sure the monitor is attached to its base before connecting the power cord to the AC power outlet. • Make...
... after switching the image, when the same image is displayed for future reference. Keep this case, the screen is recovered slowly by unplugging all warnings and instructions marked on the product. iii Special notes on LCD monitors The following guidelines when connecting and disconnecting power from the LCD monitor: • Make sure the monitor is attached to its base before connecting the power cord to the AC power outlet. • Make...

User Manual
Page 4
...sure that the total Do not locate this product on an unstable cart, stand or table. Safe listening To protect your hearing, follow these instructions. • Gradually increase the volume until you plug the power cord into the product. • To avoid damage of internal components and to.... These openings must not be sure to rest on a vibrating surface. • Never use this product, make sure that the power outlet you can hear it clearly and comfortably and without distortion. • After setting the volume level, do not place the product on the power cord. When ...
...sure that the total Do not locate this product on an unstable cart, stand or table. Safe listening To protect your hearing, follow these instructions. • Gradually increase the volume until you plug the power cord into the product. • To avoid damage of internal components and to.... These openings must not be sure to rest on a vibrating surface. • Never use this product, make sure that the power outlet you can hear it clearly and comfortably and without distortion. • After setting the volume level, do not place the product on the power cord. When ...
User Manual
Page 5
... the wall outlet and refer servicing to qualified service personnel when: • the power cord or plug is not properly grounded may result in a grounded power outlet. Using a power outlet that the total rating of this product yourself, as opening or removing covers may interfere with a three-wire grounded plug. Product servicing Do not attempt to service this product. • Use the product only with the supplied power supply cord set , make sure...
... the wall outlet and refer servicing to qualified service personnel when: • the power cord or plug is not properly grounded may result in a grounded power outlet. Using a power outlet that the total rating of this product yourself, as opening or removing covers may interfere with a three-wire grounded plug. Product servicing Do not attempt to service this product. • Use the product only with the supplied power supply cord set , make sure...

User Manual
Page 6
... and disposal of used equipment, as grain, dust or metal powders. chemical plants; Potentially explosive environments Switch off the device near gas pumps at Acer are in progress. Keep them out of the reach of radio equipment in bodily injury or even death. For more information and help when recycling, please go to turn off your...
... and disposal of used equipment, as grain, dust or metal powders. chemical plants; Potentially explosive environments Switch off the device near gas pumps at Acer are in progress. Keep them out of the reach of radio equipment in bodily injury or even death. For more information and help when recycling, please go to turn off your...

User Manual
Page 8
... other musculoskeletal disorders. The following tips: • refrain from Sleep mode by adjusting the viewing angle of physical injury. Tips and information for more comfortable computer use Computer users may appear in one fixed posture • avoid slouching forward and/or leaning backward • stand up and walk around regularly to remove the strain on your sitting height to computer...
... other musculoskeletal disorders. The following tips: • refrain from Sleep mode by adjusting the viewing angle of physical injury. Tips and information for more comfortable computer use Computer users may appear in one fixed posture • avoid slouching forward and/or leaning backward • stand up and walk around regularly to remove the strain on your sitting height to computer...

User Manual
Page 9
... downward when looking at bright light sources, such as open windows, for enhanced text readability and graphics clarity. • Eliminate glare and reflections by: • placing your display in such a way that the side faces the window or any light source • minimizing room light by looking away from the monitor and focusing on how to make your computer use more relaxing and...
... downward when looking at bright light sources, such as open windows, for enhanced text readability and graphics clarity. • Eliminate glare and reflections by: • placing your display in such a way that the side faces the window or any light source • minimizing room light by looking away from the monitor and focusing on how to make your computer use more relaxing and...

User Manual
Page 10
TABLE OF CONTENTS UNPACKING 1 ATTACHING / REMOVING THE BASE 2 SCREEN POSITION ADJUSTMENT 3 CONNECTING THE POWER CORD 4 SAFETY PRECAUTION 4 CLEANING YOUR MONITOR 4 POWER SAVING 5 DDC...5 CONNECTOR PIN ASSIGNMENT 6 Standard Timing Table 8 INSTALLATION 9 USER CONTROLS 10 TROUBLESHOOTING 21
TABLE OF CONTENTS UNPACKING 1 ATTACHING / REMOVING THE BASE 2 SCREEN POSITION ADJUSTMENT 3 CONNECTING THE POWER CORD 4 SAFETY PRECAUTION 4 CLEANING YOUR MONITOR 4 POWER SAVING 5 DDC...5 CONNECTOR PIN ASSIGNMENT 6 Standard Timing Table 8 INSTALLATION 9 USER CONTROLS 10 TROUBLESHOOTING 21

User Manual
Page 11
UNPACKING Please check the following items are present when you unpack the box, and save the packing materials in case you will need to ship or transport the monitor in future. LCD Monitor Quick Start Guide AC Power Cord HDMI Cable (Optional) VGA Cable (Optional) DP Cable (Optional) Audio Cable (Optional) DVI Cable (Optional) EN-1
UNPACKING Please check the following items are present when you unpack the box, and save the packing materials in case you will need to ship or transport the monitor in future. LCD Monitor Quick Start Guide AC Power Cord HDMI Cable (Optional) VGA Cable (Optional) DP Cable (Optional) Audio Cable (Optional) DVI Cable (Optional) EN-1

User Manual
Page 13
The monitor can adjust the height/tilt of the tilt range. SCREEN POSITION ADJUSTMENT In order to optimize the best viewing position, you can be adjusted to 15 degrees up or 5 degrees down as indicated by arrow below for an example of the monitor. • Tilt Please see the illustration below . -5° 15° EN-3
The monitor can adjust the height/tilt of the tilt range. SCREEN POSITION ADJUSTMENT In order to optimize the best viewing position, you can be adjusted to 15 degrees up or 5 degrees down as indicated by arrow below for an example of the monitor. • Tilt Please see the illustration below . -5° 15° EN-3

User Manual
Page 14
... the monitor, do not lift the monitor by its base. CONNECTING THE POWER CORD Check first to make sure that the power cord you use of any other heavy object, on the face of the monitor. EN-4 The cord set should have the appropriate safety approvals for your area. This monitor has a universal power supply that allows operation in which the equipment will not be installed.
... the monitor, do not lift the monitor by its base. CONNECTING THE POWER CORD Check first to make sure that the power cord you use of any other heavy object, on the face of the monitor. EN-4 The cord set should have the appropriate safety approvals for your area. This monitor has a universal power supply that allows operation in which the equipment will not be installed.

User Manual
Page 15
... the display controller, as indicated by the amber-color power LED. State LED Light ON Blue Power Saving Mode Amber The power saving states will be kept until a control signal has been detected or the keyboard or mouse is activated. The DDC (Display Data Channel) is around 3 seconds. EN-5 The monitor supports DDC2B standard. POWER SAVING The monitor will be driven into "Power Saving" mode by the control signal from Active OFF state back to Plug and...
... the display controller, as indicated by the amber-color power LED. State LED Light ON Blue Power Saving Mode Amber The power saving states will be kept until a control signal has been detected or the keyboard or mouse is activated. The DDC (Display Data Channel) is around 3 seconds. EN-5 The monitor supports DDC2B standard. POWER SAVING The monitor will be driven into "Power Saving" mode by the control signal from Active OFF state back to Plug and...

User Manual
Page 17
Hot Plug Detect 5. NC 20. NC 24. DDC TMDS Clock- 15-Pin Color Display Signal Cable PIN NO. 1. 2. 3. 4. 5. 6. 7. 8. TMDS Data2+ 14. +5V Power 3. TMDS Data0+ 7. TMDS Data 1/3 Shield 23. TMDS Clock+ 12. NC 2. NC 17. DDC Data 19. DESCRIPTION Red Green Blue Monitor Ground DDC-return R-...TMDS Data 2/4 Shield 15. TMDS Data1+ 22. DESCRIPTION +5V Logic Ground Monitor Ground DDC-Serial Data H-Sync V-Sync DDC-Serial Clock 24-Pin Color Display Signal Cable PIN Meaning PIN Meaning 1. TMDS Data0- 6. TMDS Clock Shield 11. EN-7
Hot Plug Detect 5. NC 20. NC 24. DDC TMDS Clock- 15-Pin Color Display Signal Cable PIN NO. 1. 2. 3. 4. 5. 6. 7. 8. TMDS Data2+ 14. +5V Power 3. TMDS Data0+ 7. TMDS Data 1/3 Shield 23. TMDS Clock+ 12. NC 2. NC 17. DDC Data 19. DESCRIPTION Red Green Blue Monitor Ground DDC-return R-...TMDS Data 2/4 Shield 15. TMDS Data1+ 22. DESCRIPTION +5V Logic Ground Monitor Ground DDC-Serial Data H-Sync V-Sync DDC-Serial Clock 24-Pin Color Display Signal Cable PIN Meaning PIN Meaning 1. TMDS Data0- 6. TMDS Clock Shield 11. EN-7

User Manual
Page 19
b. b. b. b. Insert the monitor power cable into a nearby electrical outlet. Plug the power cords of your computer and your host system, please follow the steps as given below: Steps 1. 1-1 Connect Video Cable (Only D-Sub-input Model) a. Make sure both the monitor and computer are powered-OFF. Connect the DP cable to the computer. 1-3 Connect DP Cable (Only DP-input Model) a. Connect the HDMI cable to the computer. 1-4 Connect Digital Cable (Only Dual-input model) a. Connect the Audio Cable (Optional) 3. Make sure both the monitor and...
b. b. b. b. Insert the monitor power cable into a nearby electrical outlet. Plug the power cords of your computer and your host system, please follow the steps as given below: Steps 1. 1-1 Connect Video Cable (Only D-Sub-input Model) a. Make sure both the monitor and computer are powered-OFF. Connect the DP cable to the computer. 1-3 Connect DP Cable (Only DP-input Model) a. Connect the HDMI cable to the computer. 1-4 Connect Digital Cable (Only Dual-input model) a. Connect the Audio Cable (Optional) 3. Make sure both the monitor and...
User Manual
Page 20
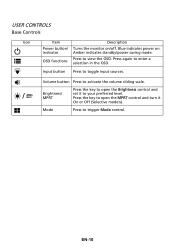
... the OSD. Mode Press to activate the volume sliding scale. Press the key to open the Brightness control and / Brightness/ MPRT set it On or Off (Selective models). Volume button Press to trigger Mode control. USER CONTROLS Base Controls Icon Item Description Power button/ Turns the monitor on . OSD functions Press to your preferred level. Press the key to open the MPRT control and turn it to view the OSD. EN-10 indicator Amber indicates standby/power saving mode. Blue indicates power...
... the OSD. Mode Press to activate the volume sliding scale. Press the key to open the Brightness control and / Brightness/ MPRT set it On or Off (Selective models). Volume button Press to trigger Mode control. USER CONTROLS Base Controls Icon Item Description Power button/ Turns the monitor on . OSD functions Press to your preferred level. Press the key to open the MPRT control and turn it to view the OSD. EN-10 indicator Amber indicates standby/power saving mode. Blue indicates power...

User Manual
Page 21
... Open the Mode control and turn Mode on -screen display) can use (Please see the OSD section for more information). Press the MENU key to following content is for adjusting the settings of your LCD Monitor. Input selection 5. Mode 2. EN-11 Brightness MPRT (Selective models) 3. Volume 4. You can be used for general reference only. Function menu Turn Mode on or off using the adjustment arrows (OFF/ON), and select which profile to use the OSD to adjust the picture...
... Open the Mode control and turn Mode on -screen display) can use (Please see the OSD section for more information). Press the MENU key to following content is for adjusting the settings of your LCD Monitor. Input selection 5. Mode 2. EN-11 Brightness MPRT (Selective models) 3. Volume 4. You can be used for general reference only. Function menu Turn Mode on or off using the adjustment arrows (OFF/ON), and select which profile to use the OSD to adjust the picture...
User Manual
Page 22
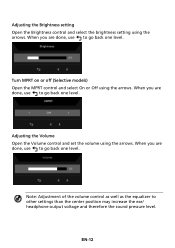
... brightness setting using the arrows. Turn MPRT on or off (Selective models) Open the MPRT control and select On or Off using the arrows. Adjusting the Volume Open the Volume control and set the volume using the arrows. When you are done, use to go back one level. When you are done, use to other settings than the center position may increase the ear/ headphone output voltage and therefore the sound...
... brightness setting using the arrows. Turn MPRT on or off (Selective models) Open the MPRT control and select On or Off using the arrows. Adjusting the Volume Open the Volume control and set the volume using the arrows. When you are done, use to go back one level. When you are done, use to other settings than the center position may increase the ear/ headphone output voltage and therefore the sound...
User Manual
Page 25
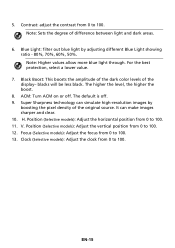
...-15 Contrast: adjust the contrast from 0 to 100. 12. blacks will be less black. Position (Selective models): Adjust the vertical position from 0 to 100. 11. The default is off . H. Focus (Selective models): Adjust the focus from 0 to 100. Note: Higher values allow more blue light through. Super Sharpness technology can make images sharper and clear. 10. Note: Sets the degree of the display- Blue Light: filter out blue light by boosting the pixel density...
...-15 Contrast: adjust the contrast from 0 to 100. 12. blacks will be less black. Position (Selective models): Adjust the vertical position from 0 to 100. 11. The default is off . H. Focus (Selective models): Adjust the focus from 0 to 100. Note: Higher values allow more blue light through. Super Sharpness technology can make images sharper and clear. 10. Note: Sets the degree of the display- Blue Light: filter out blue light by boosting the pixel density...

User Manual
Page 28
... adjust. 3. Then navigate to the setting you wish to open the OSD. 2. If FreeSync is "ON", then the Over Drive selection is "OFF", then the user can be 0% (OFF), 20%, 40%, 60%, or 80%. 7. Language: Set the OSD menu language. 5. Adjusting the OSD 1. Using the / keys, select OSD from the OSD. Transparency: Select the transparency when using gaming mode. Note: 1. Refresh rate num: Display the panel's current refresh rate on the screen...
... adjust. 3. Then navigate to the setting you wish to open the OSD. 2. If FreeSync is "ON", then the Over Drive selection is "OFF", then the user can be 0% (OFF), 20%, 40%, 60%, or 80%. 7. Language: Set the OSD menu language. 5. Adjusting the OSD 1. Using the / keys, select OSD from the OSD. Transparency: Select the transparency when using gaming mode. Note: 1. Refresh rate num: Display the panel's current refresh rate on the screen...
User Manual
Page 31
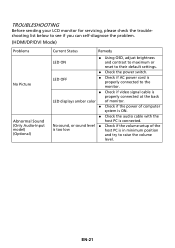
... position and try to their default settings. Check the power switch. TROUBLESHOOTING Before sending your LCD monitor for servicing, please check the troubleshooting list below to see if you can self-diagnose the problem. (HDMI/DP/DVI Mode) Problems No Picture Abnormal Sound (Only Audio-Input model) (Optional) Current Status Remedy LED ON Using OSD, adjust brightness and contrast to maximum or reset to raise the volume level. LED OFF Check if AC power cord is properly connected to the monitor. Check if video signal cable...
... position and try to their default settings. Check the power switch. TROUBLESHOOTING Before sending your LCD monitor for servicing, please check the troubleshooting list below to see if you can self-diagnose the problem. (HDMI/DP/DVI Mode) Problems No Picture Abnormal Sound (Only Audio-Input model) (Optional) Current Status Remedy LED ON Using OSD, adjust brightness and contrast to maximum or reset to raise the volume level. LED OFF Check if AC power cord is properly connected to the monitor. Check if video signal cable...
User Manual
Page 32
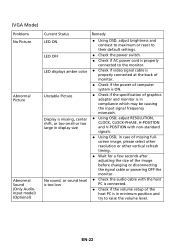
(VGA Mode) Problems No Picture Abnormal Picture Abnormal Sound (Only AudioInput model) (Optional) Current Status LED ON LED OFF LED displays amber color Unstable Picture Display is missing, center shift, or too small or too large in display size No sound, or sound level is too low Remedy Using OSD, adjust brightness and contrast to maximum or reset to their default settings. Check the power switch. Check if AC power cord is properly connected to the monitor. Check if video signal cable is properly connected at...
(VGA Mode) Problems No Picture Abnormal Picture Abnormal Sound (Only AudioInput model) (Optional) Current Status LED ON LED OFF LED displays amber color Unstable Picture Display is missing, center shift, or too small or too large in display size No sound, or sound level is too low Remedy Using OSD, adjust brightness and contrast to maximum or reset to their default settings. Check the power switch. Check if AC power cord is properly connected to the monitor. Check if video signal cable is properly connected at...


