
User Manual
Page 12
LCD monitor Quick start guide AC Power cord Audio Cable (Optional) LCD Monitor KA2 series/KA272 USER GUIDE HDMI1.4 cable (Optional) VGA Cable (Optional) English Unpacking Please check that the following items are present when you unpack the box, and save the packing materials in case you need to ship or transport the monitor in the future.
LCD monitor Quick start guide AC Power cord Audio Cable (Optional) LCD Monitor KA2 series/KA272 USER GUIDE HDMI1.4 cable (Optional) VGA Cable (Optional) English Unpacking Please check that the following items are present when you unpack the box, and save the packing materials in case you need to ship or transport the monitor in the future.
User Manual
Page 18
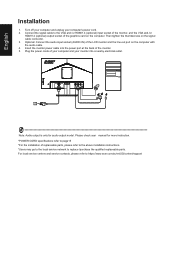
... please refer to page15 *For the installation of the LCD monitor and the line-out port on the computer with the audio cable. 4. Optional: Connect the audio input socket (AUDIO IN) of replaceable parts, please refer to the above installation instructions. *Users may go to the local service network to... socket of the monitor, and the VGA and /or HDMI1.4 (optional) output socket of the graphics card on the signal cable connector. 3. Note: Audio output is only for more instruction. *POWER CORD specifications refer to https://www.acer.com/ac/en/US/content/support Please check user manual for...
... please refer to page15 *For the installation of the LCD monitor and the line-out port on the computer with the audio cable. 4. Optional: Connect the audio input socket (AUDIO IN) of replaceable parts, please refer to the above installation instructions. *Users may go to the local service network to... socket of the monitor, and the VGA and /or HDMI1.4 (optional) output socket of the graphics card on the signal cable connector. 3. Note: Audio output is only for more instruction. *POWER CORD specifications refer to https://www.acer.com/ac/en/US/content/support Please check user manual for...

User Manual
Page 21
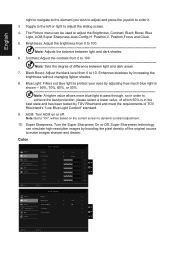
.... 2. The toggle to the right to navigate to the element you are done, press the joystick to enter it. 3. Picture Picture Color Audio Performance OSD System Mode - Press the MENU key to the English Selecting the input Open the Input control and select VGA IN, HDMI1.4, or... Contrast Black Boost Blue Light ACM Super Sharpness Auto Config H.Position 80 50 5 Off Off Off X 50 Move Enter Picture Color Audio Performance OSD System Mode - Input Input HDMI Auto Source On Move OK Exit Main menu 1. Exit Hot Key X : To exit current page and store.
.... 2. The toggle to the right to navigate to the element you are done, press the joystick to enter it. 3. Picture Picture Color Audio Performance OSD System Mode - Press the MENU key to the English Selecting the input Open the Input control and select VGA IN, HDMI1.4, or... Contrast Black Boost Blue Light ACM Super Sharpness Auto Config H.Position 80 50 5 Off Off Off X 50 Move Enter Picture Color Audio Performance OSD System Mode - Input Input HDMI Auto Source On Move OK Exit Main menu 1. Exit Hot Key X : To exit current page and store.
User Manual
Page 22
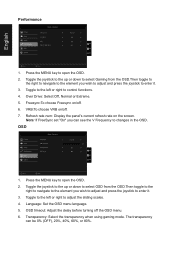
... between light and dark shades. 6. Position,Focus and Clock. 5. ACM: Turn ACM on the current screen to make images sharper and clearer.. Stamdard Picture Color Audio Performance OSD System Modes sRGB Mode Grayscale Mode 6-axis Hue 6-axis Saturate Off Off X Move Enter Super Sharpness technology can be based on or off...,Auto Config,H. English right to navigate to the element you wish to adjust and press the joystick to adjust the sliding scales. 4. Color Picture Color Audio Performance OSD System Move Mode - Note: Set to "On", will be used to 10.
... between light and dark shades. 6. Position,Focus and Clock. 5. ACM: Turn ACM on the current screen to make images sharper and clearer.. Stamdard Picture Color Audio Performance OSD System Modes sRGB Mode Grayscale Mode 6-axis Hue 6-axis Saturate Off Off X Move Enter Super Sharpness technology can be based on or off...,Auto Config,H. English right to navigate to the element you wish to adjust and press the joystick to adjust the sliding scales. 4. Color Picture Color Audio Performance OSD System Move Mode - Note: Set to "On", will be used to 10.

User Manual
Page 23
...: Default is 2.2 (standard value for Windows). 5. Modes:To choose scenario mode. 7. You can choose Cool, Normal, Warm, Bluelight or User. 6. Audio Picture Color Audio Performance OSD System Mode - Stardard Volume Mute 70 Off X Move Enter 1. Toggle to the left or right to adjust the luminance tone.The default... Saturate: Adjust the red, green, blue, yellow, magenta and cyan saturation. Toggle the joystick to the up or down to select Audio from the OSD.Then toggle to the right to navigate to the element you wish to adjust and press the joystick to better color ...
...: Default is 2.2 (standard value for Windows). 5. Modes:To choose scenario mode. 7. You can choose Cool, Normal, Warm, Bluelight or User. 6. Audio Picture Color Audio Performance OSD System Mode - Stardard Volume Mute 70 Off X Move Enter 1. Toggle to the left or right to adjust the luminance tone.The default... Saturate: Adjust the red, green, blue, yellow, magenta and cyan saturation. Toggle the joystick to the up or down to select Audio from the OSD.Then toggle to the right to navigate to the element you wish to adjust and press the joystick to better color ...
User Manual
Page 24
... to the left or right to open the OSD. 2. OSD timeout: Adjust the delay before turning off . 6. OSD Picture Color Audio Performance OSD System Mode - Toggle the joystick to the up or down to select OSD from the OSD.Then toggle to the right to... Language OSD Timeout Transparency OSD Lock English Off Off 10 X Move Enter 1. Press the MENU key to control functions. 4. Standard Picture Color Audio Performance OSD System Over Drive FreeSync VRB Refresh Rate Num Normal Off Off Off X Move Enter 1. Transparency: Select the transparency when using...
... to the left or right to open the OSD. 2. OSD timeout: Adjust the delay before turning off . 6. OSD Picture Color Audio Performance OSD System Mode - Toggle the joystick to the up or down to select OSD from the OSD.Then toggle to the right to... Language OSD Timeout Transparency OSD Lock English Off Off 10 X Move Enter 1. Press the MENU key to control functions. 4. Standard Picture Color Audio Performance OSD System Over Drive FreeSync VRB Refresh Rate Num Normal Off Off Off X Move Enter 1. Transparency: Select the transparency when using...

User Manual
Page 25
... blue light to orange light. • Press any Key screen to the element you are Aspect and Full. 7. The options are using. System Picture Color Audio Performance OSD System Mode - Standard Input Auto Source Wide Mode Hot Key Assignment DDC/CI HDMI Black Level Quick Start Mode HDMI On Full On...
... blue light to orange light. • Press any Key screen to the element you are Aspect and Full. 7. The options are using. System Picture Color Audio Performance OSD System Mode - Standard Input Auto Source Wide Mode Hot Key Assignment DDC/CI HDMI Black Level Quick Start Mode HDMI On Full On...
User Manual
Page 26
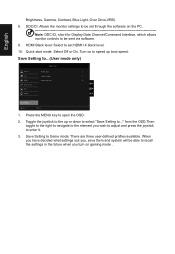
User Picture Mode: sRGB Color Mode: Reading Audio Mode: Darkroom Performance OSD System X Save setting to enter it. 3. from the OSD.Then toggle to the right to navigate to the element you wish ...
User Picture Mode: sRGB Color Mode: Reading Audio Mode: Darkroom Performance OSD System X Save setting to enter it. 3. from the OSD.Then toggle to the right to navigate to the element you wish ...


