
User Manual
Page 2
...changes. Copyright © 2017. The serial number and model number are recorded on the label affixed to their respective companies. Acer Incorporated. Such changes will be reproduced, stored in a retrieval system, or transmitted, in any form or by any person of Acer Incorporated. No part of Acer Incorporated. All Rights Reserved. Acer LCD Monitor User's Guide...to the contents hereof and specifically disclaims the implied warranties of purchase information in this manual or supplementary documents and publications. This company makes no representations or warranties, ...
...changes. Copyright © 2017. The serial number and model number are recorded on the label affixed to their respective companies. Acer Incorporated. Such changes will be reproduced, stored in a retrieval system, or transmitted, in any form or by any person of Acer Incorporated. No part of Acer Incorporated. All Rights Reserved. Acer LCD Monitor User's Guide...to the contents hereof and specifically disclaims the implied warranties of purchase information in this manual or supplementary documents and publications. This company makes no representations or warranties, ...

User Manual
Page 3
... to make sure the flicker disappears. • You may flicker during initial use . • The LCD screen has 99.99% or more effective pixels. Turn off the power switch for your monitor Please carefully follow these instructions carefully. It may remain after switching the image, when the same image is recovered slowly by unplugging all power cords from the system by changing the image or turning off the power switch and then turn...
... to make sure the flicker disappears. • You may flicker during initial use . • The LCD screen has 99.99% or more effective pixels. Turn off the power switch for your monitor Please carefully follow these instructions carefully. It may remain after switching the image, when the same image is recovered slowly by unplugging all power cords from the system by changing the image or turning off the power switch and then turn...

User Manual
Page 4
...touch dangerous voltage points or short-out parts that the total If you . Warnings • Do not use it from overheating. Using electrical power • This product should never be sure to rest on a vibrating surface. • Never use this product, make sure that could be blocked or covered. The openings... setting the volume level, do not place the product on the power cord. When you can hear it after your ears have adjusted. • Limit the amount of power available, consult your hearing, follow these instructions. • Gradually increase the volume until...
...touch dangerous voltage points or short-out parts that the total If you . Warnings • Do not use it from overheating. Using electrical power • This product should never be sure to rest on a vibrating surface. • Never use this product, make sure that could be blocked or covered. The openings... setting the volume level, do not place the product on the power cord. When you can hear it after your ears have adjusted. • Limit the amount of power available, consult your hearing, follow these instructions. • Gradually increase the volume until...
User Manual
Page 5
... servicing to qualified service personnel when: • the power cord or plug is damaged, cut or frayed • liquid was exposed to qualified service personnel. Also, make sure that may interfere with the performance of this product yourself, as opening or removing covers may result in a grounded power outlet. Using a power outlet that is equipped with the supplied power supply cord set , make sure that the total rating of all servicing...
... servicing to qualified service personnel when: • the power cord or plug is damaged, cut or frayed • liquid was exposed to qualified service personnel. Also, make sure that may interfere with the performance of this product yourself, as opening or removing covers may result in a grounded power outlet. Using a power outlet that is equipped with the supplied power supply cord set , make sure that the total rating of all servicing...

User Manual
Page 6
... of our products. vi Note: Adjust only those controls that are covered by the operating instructions, since improper adjustment of other products. Potentially explosive environments Switch off the device near gas pumps at Acer are very conscious of the environmental effects of our business and strive to identify and provide the best working procedures to normal condition. IT Equipment...
... of our products. vi Note: Adjust only those controls that are covered by the operating instructions, since improper adjustment of other products. Potentially explosive environments Switch off the device near gas pumps at Acer are very conscious of the environmental effects of our business and strive to identify and provide the best working procedures to normal condition. IT Equipment...

User Manual
Page 8
...fixed posture • avoid slouching forward and/or leaning backward • stand up and walk around regularly to achieve maximum comfort. Long work periods, bad posture, poor work habits, stress, inadequate working in front of a computer. Finding your comfort zone Find your comfort zone by adjusting the viewing angle of the monitor, using a footrest, or raising your sitting height to remove...has been shipped enabled for power management: • Activate the Display Sleep mode within 5 minutes of user inactivity. • Wake the monitor when it is in Active Off mode, move the mouse or ...
...fixed posture • avoid slouching forward and/or leaning backward • stand up and walk around regularly to achieve maximum comfort. Long work periods, bad posture, poor work habits, stress, inadequate working in front of a computer. Finding your comfort zone Find your comfort zone by adjusting the viewing angle of the monitor, using a footrest, or raising your sitting height to remove...has been shipped enabled for power management: • Activate the Display Sleep mode within 5 minutes of user inactivity. • Wake the monitor when it is in Active Off mode, move the mouse or ...

User Manual
Page 9
... display. • Adjust the display brightness and/or contrast to a comfortable level for enhanced text readability and graphics clarity. • Eliminate glare and reflections by: • placing your display in such a way that the side faces the window or any light source • minimizing room light by looking away from the monitor and focusing on how to reduce eyestrain. Display • Keep your display clean...
... display. • Adjust the display brightness and/or contrast to a comfortable level for enhanced text readability and graphics clarity. • Eliminate glare and reflections by: • placing your display in such a way that the side faces the window or any light source • minimizing room light by looking away from the monitor and focusing on how to reduce eyestrain. Display • Keep your display clean...
User Manual
Page 12
... device Accessibility Safe listening Warnings Using electrical power Product servicing Additional safety information IT equipment recycling information Disposal instructions LCD pixel statement Tips and information for comfortable use Federal Communications Commission Declaration of Conformity Unpacking Attaching/removing the base Screen position adjustment Connecting the power cord Power saving Display Data Channel (DDC) Connector pin assignment Standard timing table Installation User controls How to adjust a setting Acer eColor Management User Troubleshooting HDMI/DVI/DP 1 iii iii iii iii...
... device Accessibility Safe listening Warnings Using electrical power Product servicing Additional safety information IT equipment recycling information Disposal instructions LCD pixel statement Tips and information for comfortable use Federal Communications Commission Declaration of Conformity Unpacking Attaching/removing the base Screen position adjustment Connecting the power cord Power saving Display Data Channel (DDC) Connector pin assignment Standard timing table Installation User controls How to adjust a setting Acer eColor Management User Troubleshooting HDMI/DVI/DP 1 iii iii iii iii...

User Manual
Page 14
Screen position adjustment To optimize the viewing position, you can be adjusted to hold the edges of the monitor as shown below. The monitor can adjust the monitor tilt by using both of your hands to 15 degrees up or 5 degrees down on a stable surface -- Remove: Reverse the steps to avoid scratching the screen. English 2 Attaching the Base Note: Remove the monitor and monitor base from its packaging. Carefully place the monitor face-down . 15° 5° use a cloth to remove the base.
Screen position adjustment To optimize the viewing position, you can be adjusted to hold the edges of the monitor as shown below. The monitor can adjust the monitor tilt by using both of your hands to 15 degrees up or 5 degrees down on a stable surface -- Remove: Reverse the steps to avoid scratching the screen. English 2 Attaching the Base Note: Remove the monitor and monitor base from its packaging. Carefully place the monitor face-down . 15° 5° use a cloth to remove the base.
User Manual
Page 15
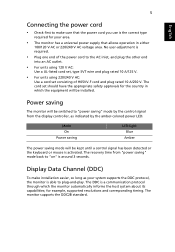
... using 120 V AC: Use a UL-listed cord set, type SVT wire and plug rated 10 A/125 V. • For units using 220/240 V AC: Use a cord set should have the appropriate safety approvals for example, supported resolutions and corresponding timing. The monitor supports the DDC2B standard. Mode On Power saving LED light Blue Amber The power saving mode will be installed. The recovery time from the display controller, as your area. • The monitor has a universal power supply that the power cord...
... using 120 V AC: Use a UL-listed cord set, type SVT wire and plug rated 10 A/125 V. • For units using 220/240 V AC: Use a cord set should have the appropriate safety approvals for example, supported resolutions and corresponding timing. The monitor supports the DDC2B standard. Mode On Power saving LED light Blue Amber The power saving mode will be installed. The recovery time from the display controller, as your area. • The monitor has a universal power supply that the power cord...
User Manual
Page 16
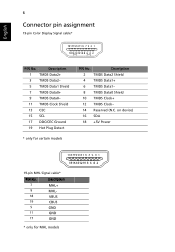
on device) 16 SDA 18 +5V Power 19-pin MHL Signal cable* Description 2 TMDS Data2 Shield 4 TMDS Data1+ 6 TMDS Data1- 8 TMDS Data0 Shield 10 TMDS Clock+ 12 TMDS Clock- 14 Reserved (N.C. Description 1 TMDS Data2+ 3 TMDS Data2- 5 TMDS Data1 Shield 7 TMDS Data0+ 9 TMDS Data0- 11 TMDS Clock Shield 13 CEC 15 SCL 17 DDC/CEC Ground 19 Hot Plug Detect * only for certain models PIN No. English 6 Connector pin assignment 19-pin Color Display Signal cable* 1917151311 9 7 5 3 1 1816141210 8 6 4 2 PIN No.
on device) 16 SDA 18 +5V Power 19-pin MHL Signal cable* Description 2 TMDS Data2 Shield 4 TMDS Data1+ 6 TMDS Data1- 8 TMDS Data0 Shield 10 TMDS Clock+ 12 TMDS Clock- 14 Reserved (N.C. Description 1 TMDS Data2+ 3 TMDS Data2- 5 TMDS Data1 Shield 7 TMDS Data0+ 9 TMDS Data0- 11 TMDS Clock Shield 13 CEC 15 SCL 17 DDC/CEC Ground 19 Hot Plug Detect * only for certain models PIN No. English 6 Connector pin assignment 19-pin Color Display Signal cable* 1917151311 9 7 5 3 1 1816141210 8 6 4 2 PIN No.

User Manual
Page 20
... 1 Connect the video cable a Make sure both the monitor and computer are switched off . (2) Connect one end of the monitor and the other settings than the center position may increase the ear-/headphones output voltage and therefore the sound pressure level. English Installation To install the monitor on the monitor first, then the computer. Connect the HDMI cable to the computer. 2 Connect the power cord Connect the power cord to the monitor, then to the computer's port...
... 1 Connect the video cable a Make sure both the monitor and computer are switched off . (2) Connect one end of the monitor and the other settings than the center position may increase the ear-/headphones output voltage and therefore the sound pressure level. English Installation To install the monitor on the monitor first, then the computer. Connect the HDMI cable to the computer. 2 Connect the power cord Connect the power cord to the monitor, then to the computer's port...
User Manual
Page 21
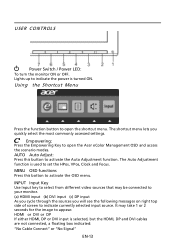
...: "No Cable Connect" or "No Signal" EN-13 USER CONTROLS Power Switch / Power LED: To turn the monitor ON or OFF. Lights up to appear. AUTO Auto Adjust: Press this botton to your monitor. (a) HDMI input (b) DVI input (c) DP input As you cycle through the sources you quickly select the most commonly accessed settings. MENU OSD functions Press this button to open the Acer eColor Management OSD and access the scenario modes. It may be connected to activate the OSD menu. Using the Shortcut Menu Press...
...: "No Cable Connect" or "No Signal" EN-13 USER CONTROLS Power Switch / Power LED: To turn the monitor ON or OFF. Lights up to appear. AUTO Auto Adjust: Press this botton to your monitor. (a) HDMI input (b) DVI input (c) DP input As you cycle through the sources you quickly select the most commonly accessed settings. MENU OSD functions Press this button to open the Acer eColor Management OSD and access the scenario modes. It may be connected to activate the OSD menu. Using the Shortcut Menu Press...
User Manual
Page 22
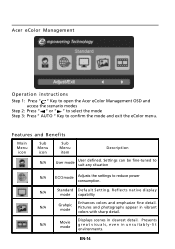
... lay mode capability N/A Grahpic mode Enhances colors and emphasize fine detail. Pictures and photographs appear in clearest detail. EN-14 Features and Benefits Main Menu icon Sub Menu icon Sub Menu item Description N/A User mode User defined. N/A Standard D efau lt Settin g . Presents great visuals, even in unsuitably-lit environments. Acer eColor Management Operation instructions Step 1: Press " " Key to open the Acer eColor Management OSD and...
... lay mode capability N/A Grahpic mode Enhances colors and emphasize fine detail. Pictures and photographs appear in clearest detail. EN-14 Features and Benefits Main Menu icon Sub Menu icon Sub Menu item Description N/A User mode User defined. N/A Standard D efau lt Settin g . Presents great visuals, even in unsuitably-lit environments. Acer eColor Management Operation instructions Step 1: Press " " Key to open the Acer eColor Management OSD and...
User Manual
Page 23
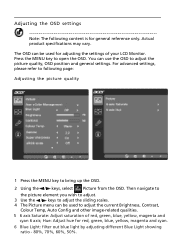
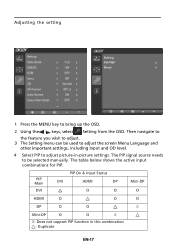
... OSD. Adjusting the OSD settings Note: The following page: Adjusting the picture quality 1 Press the MENU key to open the OSD. The OSD can use the OSD to adjust the sliding scales. 4 The Picture menu can be used to adjust the current Brightness, Contrast, Colour Temp, Auto Config and other image-related qualities. 5 6 axis Saturate: Adjust saturation of your LCD Monitor. Then navigate to the picture element you wish to adjust. 3 Use the / keys to adjust the picture quality, OSD position...
... OSD. Adjusting the OSD settings Note: The following page: Adjusting the picture quality 1 Press the MENU key to open the OSD. The OSD can use the OSD to adjust the sliding scales. 4 The Picture menu can be used to adjust the current Brightness, Contrast, Colour Temp, Auto Config and other image-related qualities. 5 6 axis Saturate: Adjust saturation of your LCD Monitor. Then navigate to the picture element you wish to adjust. 3 Use the / keys to adjust the picture quality, OSD position...

User Manual
Page 24
It can simulate high-resolution images by boosting the pixel density of luminance. sRGB mode is 2.2. (Standard value for Windows) Super Sharpness technology can make the image more sharper and clear. 8. The default value is for user to get better color matching representation with the peripheral device. 9. 7. Gamma mode is for user such as DSCs, printers, photographer to adjust Tone of the original source.
It can simulate high-resolution images by boosting the pixel density of luminance. sRGB mode is 2.2. (Standard value for Windows) Super Sharpness technology can make the image more sharper and clear. 8. The default value is for user to get better color matching representation with the peripheral device. 9. 7. Gamma mode is for user such as DSCs, printers, photographer to adjust Tone of the original source.
User Manual
Page 26
/ , including Input and OD level. 4 Select PIP to be selected manually. PIP Main DVI PIP On & Input Status DVI HDMI DP O O Mini-DP O HDMI O O O DP O O X Mini-DP O O X X: Does not support PIP function in -picture settings. The table below shows the active input combinations for PIP. The PIP signal source needs to adjust picture-in this combination : Duplicate
/ , including Input and OD level. 4 Select PIP to be selected manually. PIP Main DVI PIP On & Input Status DVI HDMI DP O O Mini-DP O HDMI O O O DP O O X Mini-DP O O X X: Does not support PIP function in -picture settings. The table below shows the active input combinations for PIP. The PIP signal source needs to adjust picture-in this combination : Duplicate

User Manual
Page 27
"Wide mode" is DP 1.2. When using PBP function. 7. DP mode selection, the default out of DP 1.2 or DP 1.1. User can follow the setting message to confirm selection of DP signal setting is not supported when using PIP/PBP, "Wide mode", "6-axis Saturate", "6-axis Hue", "ACM", "Gamma", "sRGB", and "Super Sharpness" will be enabled for the main source display. 6. 5.
"Wide mode" is DP 1.2. When using PBP function. 7. DP mode selection, the default out of DP 1.2 or DP 1.1. User can follow the setting message to confirm selection of DP signal setting is not supported when using PIP/PBP, "Wide mode", "6-axis Saturate", "6-axis Hue", "ACM", "Gamma", "sRGB", and "Super Sharpness" will be enabled for the main source display. 6. 5.
User Manual
Page 29
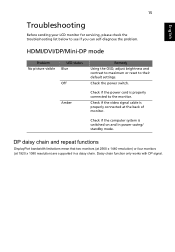
... monitor. Check if the power cord is properly connected at 1920 x 1080 resolution) are supported in power saving/ standby mode. Check if the video signal cable is properly connected to the monitor. English 15 Troubleshooting Before sending your LCD monitor for servicing, please check the troubleshooting list below to their default settings. HDMI/DVI/DP/Mini-DP mode Problem No picture visible LED status Blue Off Amber Remedy Using the OSD, adjust brightness and contrast to maximum or reset to see if you can self-diagnose the problem. Check the power switch. Check...
... monitor. Check if the power cord is properly connected at 1920 x 1080 resolution) are supported in power saving/ standby mode. Check if the video signal cable is properly connected to the monitor. English 15 Troubleshooting Before sending your LCD monitor for servicing, please check the troubleshooting list below to their default settings. HDMI/DVI/DP/Mini-DP mode Problem No picture visible LED status Blue Off Amber Remedy Using the OSD, adjust brightness and contrast to maximum or reset to see if you can self-diagnose the problem. Check the power switch. Check...

User Manual
Page 30
... • Automatically go into "display sleep" within 5 minutes of climate change. What is committed to offer our customers products with the ENERGY STAR mark. Acer is in Active Off mode, move the mouse or press ...set by reducing energy costs and helps protect the environment without sacrificing features or performance. The more energy we can save through energy efficiency, the more we reduce greenhouse gases and the risks of inactivity. • Wake the monitor when it is proud to offer products and services worldwide that are registered U.S. Products that help customers save...
... • Automatically go into "display sleep" within 5 minutes of climate change. What is committed to offer our customers products with the ENERGY STAR mark. Acer is in Active Off mode, move the mouse or press ...set by reducing energy costs and helps protect the environment without sacrificing features or performance. The more energy we can save through energy efficiency, the more we reduce greenhouse gases and the risks of inactivity. • Wake the monitor when it is proud to offer products and services worldwide that are registered U.S. Products that help customers save...

