
User Manual
Page 3
...; Install the power supply unit before connecting the power cord to the AC power outlet. • Unplug the power cord before removing the power supply unit from the projector. • If the system has multiple sources of the product and to ensure reliable operation of power, disconnect power from the wall outlet before cleaning Unplug this product on a bed, sofa, rug or other similar surface. Do not use this...
...; Install the power supply unit before connecting the power cord to the AC power outlet. • Unplug the power cord before removing the power supply unit from the projector. • If the system has multiple sources of the product and to ensure reliable operation of power, disconnect power from the wall outlet before cleaning Unplug this product on a bed, sofa, rug or other similar surface. Do not use this...

User Manual
Page 5
... not attempt to service this product from walls and free flow of air around the projector is necessary. • Locations where temperatures may become excessively high, such as opening or removing covers may expose you to dangerous voltage points or other controls may contaminate optical components, shortening the life span and darkening the image. • Locations near fire alarms. • Locations with your projector. Consult your...
... not attempt to service this product from walls and free flow of air around the projector is necessary. • Locations where temperatures may become excessively high, such as opening or removing covers may expose you to dangerous voltage points or other controls may contaminate optical components, shortening the life span and darkening the image. • Locations near fire alarms. • Locations with your projector. Consult your...

User Manual
Page 6
... the projector is under operation as this projector. vi might cause fire or electric shock. The temperature inside which becomes hot. • Clean the air filter frequently if have. In this product to turn off , suggest to block out noisy surroundings. • Decrease the volume if you can lead to fire. • When switching the projector off the main power abruptly...
... the projector is under operation as this projector. vi might cause fire or electric shock. The temperature inside which becomes hot. • Clean the air filter frequently if have. In this product to turn off , suggest to block out noisy surroundings. • Decrease the volume if you can lead to fire. • When switching the projector off the main power abruptly...

User Manual
Page 8
... Do: • Turn off , please ensure the projector completes its cooling cycle before cleaning. • Use a soft cloth moistened with mild detergent to clean the display housing. • Disconnect the power plug from AC outlet if the product is on. Warning: • Do not look into the projector's lens when the light is not being used for ventilation. • Use abrasive cleaners, waxes...
... Do: • Turn off , please ensure the projector completes its cooling cycle before cleaning. • Use a soft cloth moistened with mild detergent to clean the display housing. • Disconnect the power plug from AC outlet if the product is on. Warning: • Do not look into the projector's lens when the light is not being used for ventilation. • Use abrasive cleaners, waxes...

User Manual
Page 9
... Overview 3 Projector Outlook 3 Control Panel 4 Remote Control Layout 5 Getting Started 7 Connecting the Projector 7 Turning the Projector On/Off 8 Turning on the Projector 8 Turning the projector off 9 Adjusting the Projected Image 10 Adjusting the Height of Projected Image 10 How to optimize image size and distance 11 How to get a preferred image size by adjusting distance and zoom 13 User Controls 15 Installation menu 15 Acer Empowering Technology 16 Onscreen Display (OSD) Menus 17 Color 18 Image 20 Management 22 Setting 22 Audio 24 Timer 25...
... Overview 3 Projector Outlook 3 Control Panel 4 Remote Control Layout 5 Getting Started 7 Connecting the Projector 7 Turning the Projector On/Off 8 Turning on the Projector 8 Turning the projector off 9 Adjusting the Projected Image 10 Adjusting the Height of Projected Image 10 How to optimize image size and distance 11 How to get a preferred image size by adjusting distance and zoom 13 User Controls 15 Installation menu 15 Acer Empowering Technology 16 Onscreen Display (OSD) Menus 17 Color 18 Image 20 Management 22 Setting 22 Audio 24 Timer 25...

User Manual
Page 11
... size projector facilitates business purposes and home entertainment. • Acer EcoProjeciton Technology delivers Intelligent power management approach and physical efficiency improvement • Empowering Key reveals Acer Empowering Technology utilities (Acer eView, eTimer, ePower Management) for easy adjustment of settings • Equipped with HDMITM connection supporting HDCP • Advanced digital keystone correction delivers optimum presentations • Multi-language on screen display (OSD) menus • Environmental light source and...
... size projector facilitates business purposes and home entertainment. • Acer EcoProjeciton Technology delivers Intelligent power management approach and physical efficiency improvement • Empowering Key reveals Acer Empowering Technology utilities (Acer eView, eTimer, ePower Management) for easy adjustment of settings • Equipped with HDMITM connection supporting HDCP • Advanced digital keystone correction delivers optimum presentations • Multi-language on screen display (OSD) menus • Environmental light source and...

User Manual
Page 14
.... Unique Acer functions: eView, eTimer and ePower Management. Changes the active source. • Press "MENU" to launch the Onscreen display (OSD) menu, back to the input source. English 4 Control Panel 92 3 8 4 5 10 7 1 6 9 # Icon Function 1 POWER 2 LAMP 3 TEMP 4 RESYNC 5 SOURCE 6 MENU 7 Empowering key 8 Remote control receiver Description Power button and Power Indicator LED. Receives signals from remote control. 9 Keystone Adjusts the image to compensate for the OSD menu operation or exit the OSD menu. See the contents in "Turning the Projector On...
.... Unique Acer functions: eView, eTimer and ePower Management. Changes the active source. • Press "MENU" to launch the Onscreen display (OSD) menu, back to the input source. English 4 Control Panel 92 3 8 4 5 10 7 1 6 9 # Icon Function 1 POWER 2 LAMP 3 TEMP 4 RESYNC 5 SOURCE 6 MENU 7 Empowering key 8 Remote control receiver Description Power button and Power Indicator LED. Receives signals from remote control. 9 Keystone Adjusts the image to compensate for the OSD menu operation or exit the OSD menu. See the contents in "Turning the Projector On...

User Manual
Page 15
... 2 POWER Description Sends signals to the input source. 8 ZOOM Zooms the projector display in or out. 9 BACK No function. Press "HIDE" to hide the image, press again to display the image. 4 FREEZE To pause the screen image. 5 ASPECT RATIO To choose the desired aspect ratio (Auto/4:3/16:9/L.Box) 6 SOURCE Press "SOURCE" to choose from RGB, Component, S-Video, Composite, HDTV and HDMI™ sources. 7 RESYNC Automatically synchronizes the projector to the projector...
... 2 POWER Description Sends signals to the input source. 8 ZOOM Zooms the projector display in or out. 9 BACK No function. Press "HIDE" to hide the image, press again to display the image. 4 FREEZE To pause the screen image. 5 ASPECT RATIO To choose the desired aspect ratio (Auto/4:3/16:9/L.Box) 6 SOURCE Press "SOURCE" to choose from RGB, Component, S-Video, Composite, HDTV and HDMI™ sources. 7 RESYNC Automatically synchronizes the projector to the projector...

User Manual
Page 17
English W R D-Sub 7 Getting Started Connecting the Projector S-Video Output VGA Y HDMI 4 Video Output RS232 RS232 3 2 Y RS232 VIDEO S-VIDEO 5 D-Sub VGA IN 6 HDMI 1 HDMI 2 AUDIO IN HDTV adapter 7 HDMI AUDIO OUT 1 DVD player, Set-top Box, HDTV receiver # Description 1 Power cord 2 RS232 cable 3 Composite video cable 4 S-Video cable 5 VGA cable RBG 8 RBG 9 10 Audio Output # Description 6 Audio cable jack/jack 7 VGA to component/HDTV adapter 8 3 RCA component cable 9 HDMI cable 10 Audio cable Jack/RCA Note: To ensure the projector works well with your computer, ...
English W R D-Sub 7 Getting Started Connecting the Projector S-Video Output VGA Y HDMI 4 Video Output RS232 RS232 3 2 Y RS232 VIDEO S-VIDEO 5 D-Sub VGA IN 6 HDMI 1 HDMI 2 AUDIO IN HDTV adapter 7 HDMI AUDIO OUT 1 DVD player, Set-top Box, HDTV receiver # Description 1 Power cord 2 RS232 cable 3 Composite video cable 4 S-Video cable 5 VGA cable RBG 8 RBG 9 10 Audio Output # Description 6 Audio cable jack/jack 7 VGA to component/HDTV adapter 8 3 RCA component cable 9 HDMI cable 10 Audio cable Jack/RCA Note: To ensure the projector works well with your computer, ...

User Manual
Page 18
... input signal detected. • If the screen displays "No Signal", please make sure the signal cables are securely connected. • If you connect to switch between inputs. 2 Power button 1 Lens cap The Power indicator LED will flash red. 3 Turn on the projector by pressing "Power" button on the control panel, and the Power indicator LED will detect your source (computer, notebook, video player ,etc.). English 8 Turning the Projector On/Off Turning on the remote control to multiple sources at the same time, use the "Source" button on either control panel or the remote control...
... input signal detected. • If the screen displays "No Signal", please make sure the signal cables are securely connected. • If you connect to switch between inputs. 2 Power button 1 Lens cap The Power indicator LED will flash red. 3 Turn on the projector by pressing "Power" button on the control panel, and the Power indicator LED will detect your source (computer, notebook, video player ,etc.). English 8 Turning the Projector On/Off Turning on the remote control to multiple sources at the same time, use the "Source" button on either control panel or the remote control...

User Manual
Page 21
... How to optimize image size and distance Consult the table below figure, the space of image Height: 91 cm C Figure: Fixed distance with different zoom and screen size. Max screen size Min screen size 75" B 63" A 2.5 m Desired Distance Height: 109 cm From base to top of 109 cm height is required when located at a desired distance from the screen, good image quality is possible for image sizes between 63" and...
... How to optimize image size and distance Consult the table below figure, the space of image Height: 91 cm C Figure: Fixed distance with different zoom and screen size. Max screen size Min screen size 75" B 63" A 2.5 m Desired Distance Height: 109 cm From base to top of 109 cm height is required when located at a desired distance from the screen, good image quality is possible for image sizes between 63" and...

User Manual
Page 25
...;Menu location •Keystone settings •Language settings •Reset to factory default function Use the up and down arrow keys to select an option, the left and right arrow keys to adjust selected option settings, and the right arrow key to the Acer welcome screen. English 15 User Controls Installation menu The installation menu provides an onscreen display (OSD) for screen size and distance, focus, keystone correction and more. 1 Turn on the projector by pressing "Power" button on...
...;Menu location •Keystone settings •Language settings •Reset to factory default function Use the up and down arrow keys to select an option, the left and right arrow keys to adjust selected option settings, and the right arrow key to the Acer welcome screen. English 15 User Controls Installation menu The installation menu provides an onscreen display (OSD) for screen size and distance, focus, keystone correction and more. 1 Turn on the projector by pressing "Power" button on...

User Manual
Page 29
.... Color Management Adjusts the red, green, blue, cyan, magenta and yellow colors. Ind. Gain Adjusts the contrast levels. Adjusts a video image from black and white to fully saturated color. • Press to decrease the amount of color in the image. • Press to correct color display error. • Auto: Automatically adjust by default. This feature is "On" by information from black and white to increase the sharpness. Ind. Adjust the color range of the HDMI image data...
.... Color Management Adjusts the red, green, blue, cyan, magenta and yellow colors. Ind. Gain Adjusts the contrast levels. Adjusts a video image from black and white to fully saturated color. • Press to decrease the amount of color in the image. • Press to correct color display error. • Auto: Automatically adjust by default. This feature is "On" by information from black and white to increase the sharpness. Ind. Adjust the color range of the HDMI image data...
User Manual
Page 30
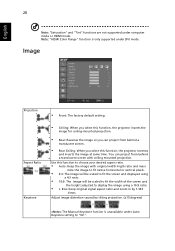
Note: "HDMI Color Range" function is unavailable under Auto Keystone setting to display the image using a 16:9 ratio. • L. Use this function to choose your desired aspect ratio. • Auto: Keep the image with ceiling mounted projection. Box: Keep original signal aspect ratio and zoom in by tilting projection. (±15 degrees) The Manual Keystone funcion is only supported under computer mode or HDMI mode. Adjust image distortion caused by 1.333 times. Image Projection Aspect Ratio Keystone • Front: The factory default setting. • Ceiling: When...
Note: "HDMI Color Range" function is unavailable under Auto Keystone setting to display the image using a 16:9 ratio. • L. Use this function to choose your desired aspect ratio. • Auto: Keep the image with ceiling mounted projection. Box: Keep original signal aspect ratio and zoom in by tilting projection. (±15 degrees) The Manual Keystone funcion is only supported under computer mode or HDMI mode. Adjust image distortion caused by 1.333 times. Image Projection Aspect Ratio Keystone • Front: The factory default setting. • Ceiling: When...

User Manual
Page 32
... ECO Mode High Altitude Auto Shutdown Lamp Hour Elapse Lamp Hour Reset Choose "On" to dim the projector lamp which will automatically shutdown when there is no signal input after the allocated time. (in minutes) Displays the lamp's elapsed operating time (in your screen aspect ratio to return normal mode. Choose "Off" to 4:3. Set your area). Operate the fans at full speed continuously to 0 hours. Choose "On" to turn on the display screen. The projector will lower power...
... ECO Mode High Altitude Auto Shutdown Lamp Hour Elapse Lamp Hour Reset Choose "On" to dim the projector lamp which will automatically shutdown when there is no signal input after the allocated time. (in minutes) Displays the lamp's elapsed operating time (in your screen aspect ratio to return normal mode. Choose "Off" to 4:3. Set your area). Operate the fans at full speed continuously to 0 hours. Choose "On" to turn on the display screen. The projector will lower power...

User Manual
Page 33
... "Off" is enabled, your password on the remote control and press "MENU" to confirm. • Press to enter the password every time when the projector is enabled, the projector will prompt the user to enter the password again. • The factory default setting of the projector . Security 23 Security This projector provides a useful security function for the administrator to setup or change the "Security" setting. User password • Press to manage...
... "Off" is enabled, your password on the remote control and press "MENU" to confirm. • Press to enter the password every time when the projector is enabled, the projector will prompt the user to enter the password again. • The factory default setting of the projector . Security 23 Security This projector provides a useful security function for the administrator to setup or change the "Security" setting. User password • Press to manage...
User Manual
Page 34
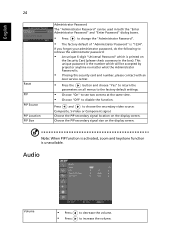
... function is activated, zoom and keystone function is "1234". English 24 Reset PIP PIP Source PIP Location PIP Size Administrator Password The "Administrator Password" can be accepted by projector anytime no matter what the Administrator Password is printed on the display screen. Choose the PIP secondary signal size on all menus to the factory default settings. • Choose "On" to see two screens at the same time. • Choose...
... function is activated, zoom and keystone function is "1234". English 24 Reset PIP PIP Source PIP Location PIP Size Administrator Password The "Administrator Password" can be accepted by projector anytime no matter what the Administrator Password is printed on the display screen. Choose the PIP secondary signal size on all menus to the factory default settings. • Choose "On" to see two screens at the same time. • Choose...

User Manual
Page 37
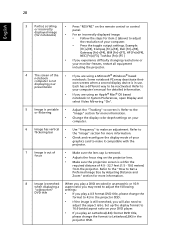
... troubleshooting guide. or incorrectly displayed image (For PC (Windows • For an incorrectly displayed image: • Open "My Computer," open the "Control 95/98/2000/XP/ Panel," and then double-click the "Display" Vista/Win7)) icon. • Select the "Settings" tab. • Verify that your display resolution setting is lower than or equal to 1080P-EIA. • Click the "Change" button under the "Models" box. • Verify that the resolution setting...
... troubleshooting guide. or incorrectly displayed image (For PC (Windows • For an incorrectly displayed image: • Open "My Computer," open the "Control 95/98/2000/XP/ Panel," and then double-click the "Display" Vista/Win7)) icon. • Select the "Settings" tab. • Verify that your display resolution setting is lower than or equal to 1080P-EIA. • Click the "Change" button under the "Models" box. • Verify that the resolution setting...
User Manual
Page 38
... ratio on the projector lens. • Make sure the projection screen is in the projector OSD. Refer to the "How to Get a Preferred Image Size by Adjusting Distance and Zoom" section for more information. • Change the display color depth settings on the remote control or control or incorrectly panel. 28 English 3 Partial, scrolling • Press "RESYNC" on your computer. 6 Image has vertical • Use "Frequency" to adjust the aspect ratio...
... ratio on the projector lens. • Make sure the projection screen is in the projector OSD. Refer to the "How to Get a Preferred Image Size by Adjusting Distance and Zoom" section for more information. • Change the display color depth settings on the remote control or control or incorrectly panel. 28 English 3 Partial, scrolling • Press "RESYNC" on your computer. 6 Image has vertical • Use "Frequency" to adjust the aspect ratio...

User Manual
Page 41
... light source over temperature), OSD shows "Projector Overheated ON -- ON ballast) Phosphor Wheel error 0.5 second -- ON -- 31 English LED & Alarm Definition Listing LED Messages Message Lamp_LED Red Temp_LED Red Power_LED Red Power_LED Blue Power Plug Flash ON to OFF Flash ON to Flash ON to -- 100ms OFF 100ms OFF 100ms Standby -- -- H(ON), 0.5 second L(OFF) flashing Power button OFF: -- Standby Mode -- Firmware Download ON ON ON -- ON shows red "Fan Fail, H(On), 0.5 Will automatically second L(Off) turn off soon" flashing Lamp error...
... light source over temperature), OSD shows "Projector Overheated ON -- ON ballast) Phosphor Wheel error 0.5 second -- ON -- 31 English LED & Alarm Definition Listing LED Messages Message Lamp_LED Red Temp_LED Red Power_LED Red Power_LED Blue Power Plug Flash ON to OFF Flash ON to Flash ON to -- 100ms OFF 100ms OFF 100ms Standby -- -- H(ON), 0.5 second L(OFF) flashing Power button OFF: -- Standby Mode -- Firmware Download ON ON ON -- ON shows red "Fan Fail, H(On), 0.5 Will automatically second L(Off) turn off soon" flashing Lamp error...


