User Manual
Page 12
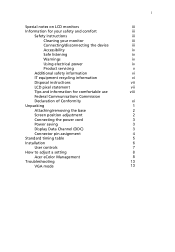
... position adjustment Connecting the power cord Power saving Display Data Channel (DDC) Connector pin assignment Standard timing table Installation User controls How to adjust a setting Acer eColor Management Troubleshooting VGA mode 1 iii iii iii iii iii iv iv iv iv v vi vi vii vii viii xi 1 2 2 3 3 3 4 5 6 7 8 8 13 13
... position adjustment Connecting the power cord Power saving Display Data Channel (DDC) Connector pin assignment Standard timing table Installation User controls How to adjust a setting Acer eColor Management Troubleshooting VGA mode 1 iii iii iii iii iii iv iv iv iv v vi vi vii vii viii xi 1 2 2 3 3 3 4 5 6 7 8 8 13 13
User Manual
Page 18
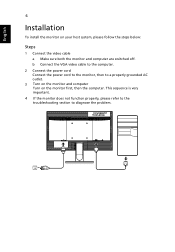
English 6 Installation To install the monitor on the monitor first, then the computer. b Connect the VGA video cable to the computer. 2 Connect the power cord Connect the power cord to the monitor, then to diagnose the problem. This sequence is very important. 4 If the monitor does not function properly, please refer to the troubleshooting section to a properly grounded AC outlet. 3 Turn on the monitor and computer Turn on your host system, please follow the steps below: Steps 1 Connect the video cable a Make sure both the monitor and computer are switched off.
English 6 Installation To install the monitor on the monitor first, then the computer. b Connect the VGA video cable to the computer. 2 Connect the power cord Connect the power cord to the monitor, then to diagnose the problem. This sequence is very important. 4 If the monitor does not function properly, please refer to the troubleshooting section to a properly grounded AC outlet. 3 Turn on the monitor and computer Turn on your host system, please follow the steps below: Steps 1 Connect the video cable a Make sure both the monitor and computer are switched off.
User Manual
Page 19
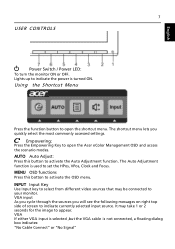
... dialog box indicates: "No Cable Connect" or "No Signal" MENU OSD functions Press this button to activate the OSD menu. VGA If either VGA input is selected ,but the VGA cable is turned ON. Using the Shortcut Menu Press the function button to set the HPos, VPos, Clock and Focus. The Auto... Adjustment function is used to open the Acer eColor Management OSD and access the scenario modes. AUTO Auto Adjust: Press this botton to...
... dialog box indicates: "No Cable Connect" or "No Signal" MENU OSD functions Press this button to activate the OSD menu. VGA If either VGA input is selected ,but the VGA cable is turned ON. Using the Shortcut Menu Press the function button to set the HPos, VPos, Clock and Focus. The Auto... Adjustment function is used to open the Acer eColor Management OSD and access the scenario modes. AUTO Auto Adjust: Press this botton to...

User Manual
Page 24
English 12 Product information Information 1366 x 768 H:48KHz V:60Hz VGA Input S/N:ETL5309 1326350380B3742 1 Press the MENU key to bring up for current input. Then the basic information of LCD monitor will show up the OSD. 2 Using the / keys, select Information from the OSD.
English 12 Product information Information 1366 x 768 H:48KHz V:60Hz VGA Input S/N:ETL5309 1326350380B3742 1 Press the MENU key to bring up for current input. Then the basic information of LCD monitor will show up the OSD. 2 Using the / keys, select Information from the OSD.
User Manual
Page 25
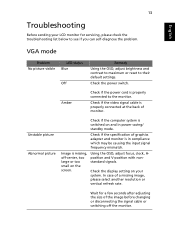
... a few seconds after adjusting the size of monitor. Check the display setting on and in compliance which may be causing the input signal frequency mismatch. VGA mode Problem No picture visible LED status Blue Off Remedy Using the OSD, adjust brightness and contrast to maximum or reset to the monitor. Check...
... a few seconds after adjusting the size of monitor. Check the display setting on and in compliance which may be causing the input signal frequency mismatch. VGA mode Problem No picture visible LED status Blue Off Remedy Using the OSD, adjust brightness and contrast to maximum or reset to the monitor. Check...


