User Manual (3D)
Page 3
... Vision certified projectors when using NVIDIA 3D glasses. Important: When you turn off , otherwise the image may help you will be projected at the top of the NVIDIA 3D Vision technology, you . In order to see if your graphics card is a power switch on one of inactivity. Before you can view 3D content, you have connected your glasses for instructions how...
... Vision certified projectors when using NVIDIA 3D glasses. Important: When you turn off , otherwise the image may help you will be projected at the top of the NVIDIA 3D Vision technology, you . In order to see if your graphics card is a power switch on one of inactivity. Before you can view 3D content, you have connected your glasses for instructions how...
User Manual (3D)
Page 4
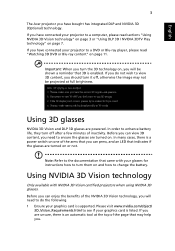
... the onscreen instructions to set up the environment. 1 Position the infra-red transmitter so that it has maximum coverage. The transmitter controls the 3D glasses and is necessary to an available USB port on your computer. 2 Right-click anywhere on the desktop and select NVIDIA Control Panel. Setting up a 3D environment Once you have installed the drivers, you will open the setup Wizard...
... the onscreen instructions to set up the environment. 1 Position the infra-red transmitter so that it has maximum coverage. The transmitter controls the 3D glasses and is necessary to an available USB port on your computer. 2 Right-click anywhere on the desktop and select NVIDIA Control Panel. Setting up a 3D environment Once you have installed the drivers, you will open the setup Wizard...
User Manual (3D)
Page 7
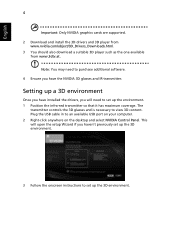
... your graphics card's documentation. 2 Download and install the latest drivers for the latest driver version. 3 You should also download a suitable 3D player such as the one available from www.3dtv.at fullscreen resolution in the player. Using DLP 3D / NVIDIA 3DTV Play technology Requires DLP 3D glasses. To download software and use an NVIDIA 3DTV Play ready projector with DLP glasses, refer to the...
... your graphics card's documentation. 2 Download and install the latest drivers for the latest driver version. 3 You should also download a suitable 3D player such as the one available from www.3dtv.at fullscreen resolution in the player. Using DLP 3D / NVIDIA 3DTV Play technology Requires DLP 3D glasses. To download software and use an NVIDIA 3DTV Play ready projector with DLP glasses, refer to the...

User Manual
Page 5
... to service this product from walls and free flow of air around the projector are necessary. • Locations where temperatures may become excessively high, such as opening or removing covers may contain small parts. The bright light may result in the following the operating instructions Note: Adjust only those controls that is poorly ventilated or confined. Unplug this product yourself, as inside of small children. Keep them...
... to service this product from walls and free flow of air around the projector are necessary. • Locations where temperatures may become excessively high, such as opening or removing covers may contain small parts. The bright light may result in the following the operating instructions Note: Adjust only those controls that is poorly ventilated or confined. Unplug this product yourself, as inside of small children. Keep them...

User Manual
Page 6
... the projector lens to wait for ceiling mount installation. Please be sure to change the lamp when warning messages display. • When changing the lamp, please allow the projector to cool down, and follow all changing instructions. • Reset the "Lamp Hour Reset" function from the Onscreen Display "Management" menu after replacing the lamp module. • Do not attempt to disassemble this product to break or drop it to fire. • When switching the projector...
... the projector lens to wait for ceiling mount installation. Please be sure to change the lamp when warning messages display. • When changing the lamp, please allow the projector to cool down, and follow all changing instructions. • Reset the "Lamp Hour Reset" function from the Onscreen Display "Management" menu after replacing the lamp module. • Do not attempt to disassemble this product to break or drop it to fire. • When switching the projector...

User Manual
Page 8
... power. • Turn on the projector first and then the signal sources. • Do not use lens cap when projector is in operation. • When the lamp reaches the end of its life, it shows warning messages. • Reset the "Lamp Hour Reset" function from the Onscreen Display "Management" menu after replacing the lamp module. • When switching the projector off the product before cleaning. • Use a soft cloth moistened with mild detergent to clean the display...
... power. • Turn on the projector first and then the signal sources. • Do not use lens cap when projector is in operation. • When the lamp reaches the end of its life, it shows warning messages. • Reset the "Lamp Hour Reset" function from the Onscreen Display "Management" menu after replacing the lamp module. • When switching the projector off the product before cleaning. • Use a soft cloth moistened with mild detergent to clean the display...

User Manual
Page 11
... x 1080 1080p resolution, Auto/Full/4:3/16:9/L.Box aspect ratio supported • Enables projecting 3D content via 2D to 3D convert function • One-touch "3D" button on , the projector dynamically adjusts the power consumption of the lamp according to the brightness of the lamp by up to the 3D functions • Acer ColorBoost technology delivers vivid, life-like images • High brightness and contrast...
... x 1080 1080p resolution, Auto/Full/4:3/16:9/L.Box aspect ratio supported • Enables projecting 3D content via 2D to 3D convert function • One-touch "3D" button on , the projector dynamically adjusts the power consumption of the lamp according to the brightness of the lamp by up to the 3D functions • Acer ColorBoost technology delivers vivid, life-like images • High brightness and contrast...

User Manual
Page 13
... button 4 Power key and Power indicator LED (H7550ST/E155S/HE-815ST/ H1P1403/H7550STz) # Description 5 Focus ring and Zoom ring 6 HDMI (MHL) connector Micro USB cable 7 Projection lens 8 Remote control receiver Rear side 1 2 34 5 6 7 8 3 4 5 6 2 7 8 9 10 11 12 13 # Description 1 RS232 connector 2 HDMI (MHL) connector 3 HDMI connector 4 Mini USB connector 5 S-Video input connector Composite video input connector 6 Analog RGB signal/HDTV/component video input connector 7 Component Video inputs # Description 8 Audio input connector Audio output connector 9 Tilt adjusting...
... button 4 Power key and Power indicator LED (H7550ST/E155S/HE-815ST/ H1P1403/H7550STz) # Description 5 Focus ring and Zoom ring 6 HDMI (MHL) connector Micro USB cable 7 Projection lens 8 Remote control receiver Rear side 1 2 34 5 6 7 8 3 4 5 6 2 7 8 9 10 11 12 13 # Description 1 RS232 connector 2 HDMI (MHL) connector 3 HDMI connector 4 Mini USB connector 5 S-Video input connector Composite video input connector 6 Analog RGB signal/HDTV/component video input connector 7 Component Video inputs # Description 8 Audio input connector Audio output connector 9 Tilt adjusting...

User Manual
Page 15
... supports YPbPr/YCbCr. 9 S-VIDEO To change source to S-Video. 10 HDMI™/DVI To change source to the projector. 12 FREEZE To pause the screen image. 5 Remote Control Layout English # Function 1 POWER 2 MEDIA SETUP 3 ZOOM 4 MODE 5 Keystone Description Refer to VGA. Four directional selection keys Selects items or makes adjustments to your selection. 6 Keypad 0~9 Press "0~9" to input a password in the "Setting" > "Security" OSD. 7 VGA To change source to the "Turning the Projector On/Off" section. (No function) Zooms the projector display...
... supports YPbPr/YCbCr. 9 S-VIDEO To change source to S-Video. 10 HDMI™/DVI To change source to the projector. 12 FREEZE To pause the screen image. 5 Remote Control Layout English # Function 1 POWER 2 MEDIA SETUP 3 ZOOM 4 MODE 5 Keystone Description Refer to VGA. Four directional selection keys Selects items or makes adjustments to your selection. 6 Keypad 0~9 Press "0~9" to input a password in the "Setting" > "Security" OSD. 7 VGA To change source to the "Turning the Projector On/Off" section. (No function) Zooms the projector display...
User Manual
Page 19
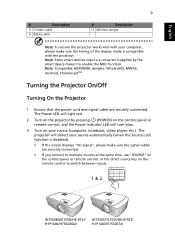
... power cord and signal cable are securely connected. • If you connect to switch between inputs. 1 & 2 (H7550BD/E155D/HE-815J/ H1P1406/H7550BDz) (H7550ST/E155S/HE-815ST/ H1P1403/H7550STz) The projector will turn blue. 3 Turn on the remote control to multiple sources at the same time, use "SOURCE" on the control panel or remote control, or the direct source key on your computer, please make sure the timing of the display mode is disabled). • If the screen displays "No Signal...
... power cord and signal cable are securely connected. • If you connect to switch between inputs. 1 & 2 (H7550BD/E155D/HE-815J/ H1P1406/H7550BDz) (H7550ST/E155S/HE-815ST/ H1P1403/H7550STz) The projector will turn blue. 3 Turn on the remote control to multiple sources at the same time, use "SOURCE" on the control panel or remote control, or the direct source key on your computer, please make sure the timing of the display mode is disabled). • If the screen displays "No Signal...

User Manual
Page 28
... image. Adjusts the brightness of green in the image. Adjusts the color balance of red and green. • Press to increase the amount of the image. • Press to darken the image. • Press to the wall. It will compensate for various types of the picture. English 18 Color Display Mode Wall Color Brightness Contrast Saturation Tint There are several choices, including White, Light Yellow, Light Blue, Pink and Dark Green...
... image. Adjusts the brightness of green in the image. Adjusts the color balance of red and green. • Press to increase the amount of the image. • Press to darken the image. • Press to the wall. It will compensate for various types of the picture. English 18 Color Display Mode Wall Color Brightness Contrast Saturation Tint There are several choices, including White, Light Yellow, Light Blue, Pink and Dark Green...

User Manual
Page 29
At higher color temperatures, the screen looks colder; Color Management: Adjusts the red, green, blue, cyan, yellow and magenta colors. • - Gain: Adjusts the contrast levels. • Brilliant Color: Produces an expanded on , the projector dynamically adjusts the power consumption of the image will look brighter. • Ind. English 19 Color Temperature Dynamic Black Gamma Advanced Adjusts the color temperature. Ind. at lower color temperatures, the screen looks warmer. Ind. With greater gamma value, dark...
At higher color temperatures, the screen looks colder; Color Management: Adjusts the red, green, blue, cyan, yellow and magenta colors. • - Gain: Adjusts the contrast levels. • Brilliant Color: Produces an expanded on , the projector dynamically adjusts the power consumption of the image will look brighter. • Ind. English 19 Color Temperature Dynamic Black Gamma Advanced Adjusts the color temperature. Ind. at lower color temperatures, the screen looks warmer. Ind. With greater gamma value, dark...

User Manual
Page 30
...; Ceiling: Turns the image upside down for ceiling- mounted projection. English 20 Image Projection Mode Projection Location Aspect Ratio Auto Keystone • Front: The factory default setting. • Rear: Reverses the image so you can project from behind a translucent screen. • Auto: Automatically adjusts projection location of the horizontal and vertical pixels. • 4:3: The image will be scaled to fit the screen and displayed using a 16:9 ratio. • L.Box: Keeps the original signal aspect ratio and zooms in by 1.333 times. Use this...
...; Ceiling: Turns the image upside down for ceiling- mounted projection. English 20 Image Projection Mode Projection Location Aspect Ratio Auto Keystone • Front: The factory default setting. • Rear: Reverses the image so you can project from behind a translucent screen. • Auto: Automatically adjusts projection location of the horizontal and vertical pixels. • 4:3: The image will be scaled to fit the screen and displayed using a 16:9 ratio. • L.Box: Keeps the original signal aspect ratio and zooms in by 1.333 times. Use this...
User Manual
Page 31
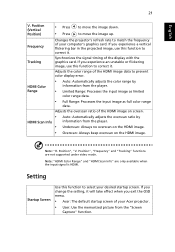
Frequency Tracking Changes the projector's refresh rate to prevent color display error. Note: "H. Note: "HDMI Color Range" and "HDMI Scan Info" are not supported under video mode. to move the image down. If you experience an unstable or flickering image, use this function to select your desired startup screen. If you experience a vertical flickering bar in the projected image, use this function to correct it. Adjusts the color range of the HDMI image data to match...
Frequency Tracking Changes the projector's refresh rate to prevent color display error. Note: "H. Note: "HDMI Color Range" and "HDMI Scan Info" are not supported under video mode. to move the image down. If you experience an unstable or flickering image, use this function to select your desired startup screen. If you experience a vertical flickering bar in the projected image, use this function to correct it. Adjusts the color range of the HDMI image data to match...

User Manual
Page 32
... use the current image as the startup screen, follow the instructions below. Both micro USB cable inside the projector and the DC 5V out port on the back of the projector can output a VGA signal when it is in standby mode and the VGA IN (or VGA IN 1) and VGA OUT sockets are correctly connected to the "Image" section. • Change the "Startup Screen" from CC1, CC2, CC3, CC4 (CC1 displays...
... use the current image as the startup screen, follow the instructions below. Both micro USB cable inside the projector and the DC 5V out port on the back of the projector can output a VGA signal when it is in standby mode and the VGA IN (or VGA IN 1) and VGA OUT sockets are correctly connected to the "Image" section. • Change the "Startup Screen" from CC1, CC2, CC3, CC4 (CC1 displays...

User Manual
Page 34
... the "Enter Administrator Password" or "Enter Password" dialogue box displays. • Press to change "User Password". • Use the numerical keys on the remote control to set to "OFF" by default. English 24 Security User Password • Press to set up or change "Administrator Password". • The factory default of "Administrator Password" is lost, please contact your local Acer service center. If set to "ON", the startup screen is locked and cannot be accepted...
... the "Enter Administrator Password" or "Enter Password" dialogue box displays. • Press to change "User Password". • Use the numerical keys on the remote control to set to "OFF" by default. English 24 Security User Password • Press to set up or change "Administrator Password". • The factory default of "Administrator Password" is lost, please contact your local Acer service center. If set to "ON", the startup screen is locked and cannot be accepted...

User Manual
Page 35
... warning message Lamp Reminding when the changing lamp message is supplied via the power cord. Choose this function is (Minutes) no signal input detected after the time you to restart the projector immediately within 2 minutes after choosing "Yes" to reset the lamp hour counter to 0 hours. Selecting "On" enables the function. Adjusts treble level. When this function to show up 30 hours before end of life. Lamp Hour Reset Press after turning it off the projector...
... warning message Lamp Reminding when the changing lamp message is supplied via the power cord. Choose this function is (Minutes) no signal input detected after the time you to restart the projector immediately within 2 minutes after choosing "Yes" to reset the lamp hour counter to 0 hours. Selecting "On" enables the function. Adjusts treble level. When this function to show up 30 hours before end of life. Lamp Hour Reset Press after turning it off the projector...

User Manual
Page 39
...; Check if the projection lamp has been securely installed. Image Problems and Solutions # Problem Solution 1 No image appears • Make sure all the cables are correctly connected as onscreen described in the "Getting Started" section. • Ensure none of the monitor display is switched on. 2 Partial, scrolling • Press "RESYNC" on the control panel or remote or incorrectly displayed image (For PC (Windows • control. Please refer to the "Replacing the Lamp...
...; Check if the projection lamp has been securely installed. Image Problems and Solutions # Problem Solution 1 No image appears • Make sure all the cables are correctly connected as onscreen described in the "Getting Started" section. • Ensure none of the monitor display is switched on. 2 Partial, scrolling • Press "RESYNC" on the control panel or remote or incorrectly displayed image (For PC (Windows • control. Please refer to the "Replacing the Lamp...

User Manual
Page 41
... the image becomes square. • Press "MENU" on the control panel or remote control. Set up the display format to all controls unplug the power cord and wait at least 30 seconds before reconnecting power. 2 Lamp burns out or makes a popping sound When the lamp reaches the end of the screen. • Press the Keystone correction keys on the control panel or remote control until the lamp module has been replaced. Problems with the projector...
... the image becomes square. • Press "MENU" on the control panel or remote control. Set up the display format to all controls unplug the power cord and wait at least 30 seconds before reconnecting power. 2 Lamp burns out or makes a popping sound When the lamp reaches the end of the screen. • Press the Keystone correction keys on the control panel or remote control until the lamp module has been replaced. Problems with the projector...

User Manual
Page 43
V LAMP LED Red -- ---- -- --- V Quick flashing --- 33 LED & Alarm Definition Listing LED Messages English Message Standby (Power cord plugged in) Power on Lamp retry Turning off (Cooling state) Turning off (Cooling completed) Error (Thermal failure) Error (Fan lock failure) Power LED Red Blue V -- --- failure) V V V Quick flashing TEMP LED Red -- --- -- -- Error (Lamp breakdown) -- V -- Error (Color wheel -- Quick flashing V V Quick flashing -- -- --
V LAMP LED Red -- ---- -- --- V Quick flashing --- 33 LED & Alarm Definition Listing LED Messages English Message Standby (Power cord plugged in) Power on Lamp retry Turning off (Cooling state) Turning off (Cooling completed) Error (Thermal failure) Error (Fan lock failure) Power LED Red Blue V -- --- failure) V V V Quick flashing TEMP LED Red -- --- -- -- Error (Lamp breakdown) -- V -- Error (Color wheel -- Quick flashing V V Quick flashing -- -- --


