
Quick Start Guide
Page 2
...be made using shielded cables to maintain compliance with EMC regulations. Operation conditions This device complies with Part 15 of Conformity Hereby, Acer Inc., declares that protects human health and the environment. Operation is connected. • Consult the dealer or an experienced radio/... office, your household waste disposal service or the shop where you can radiate radio frequency energy and, if not installed and used in a residential installation. LAMP Disposal LAMP(S) INSIDE THIS PRODUCT CONTAIN MERCURY AND MUST BE RECYCLED OR DISPOSED OF ACCORDING TO LOCAL, STATE...
...be made using shielded cables to maintain compliance with EMC regulations. Operation conditions This device complies with Part 15 of Conformity Hereby, Acer Inc., declares that protects human health and the environment. Operation is connected. • Consult the dealer or an experienced radio/... office, your household waste disposal service or the shop where you can radiate radio frequency energy and, if not installed and used in a residential installation. LAMP Disposal LAMP(S) INSIDE THIS PRODUCT CONTAIN MERCURY AND MUST BE RECYCLED OR DISPOSED OF ACCORDING TO LOCAL, STATE...
User Manual
Page 1
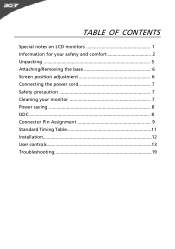
TABLE OF CONTENTS Special notes on LCD monitors 1 Information for your safety and comfort 2 Unpacking 5 Attaching/Removing the base 6 Screen position adjustment 6 Connecting the power cord 7 Safety precaution 7 Cleaning your monitor 7 Power saving 8 DDC 8 Connector Pin Assignment 9 Standard Timing Table 11 Installation 12 User controls 13 Troubleshooting 19
TABLE OF CONTENTS Special notes on LCD monitors 1 Information for your safety and comfort 2 Unpacking 5 Attaching/Removing the base 6 Screen position adjustment 6 Connecting the power cord 7 Safety precaution 7 Cleaning your monitor 7 Power saving 8 DDC 8 Connector Pin Assignment 9 Standard Timing Table 11 Installation 12 User controls 13 Troubleshooting 19

User Manual
Page 3
... reliable operation of the product and to unplug the power cord from overheating. The openings should never be sure to protect it could result in installation unless proper ventilation is easily accessible and located as possible. Information for your safety and comfort Safety instructions Read these instructions, suggested by placing the...
... reliable operation of the product and to unplug the power cord from overheating. The openings should never be sure to protect it could result in installation unless proper ventilation is easily accessible and located as possible. Information for your safety and comfort Safety instructions Read these instructions, suggested by placing the...
User Manual
Page 5
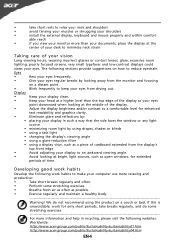
.... • Blink frequently to relax your neck and shoulders • avoid tensing your muscles or shrugging your shoulders • install the external display, keyboard and mouse properly and within comfort able reach • if you view your monitor more than the ... as possible. • Exercise regularly and maintain a healthy body. The following websites: Worldwide: http://www.acer-group.com/public/Sustainability/sustainability01.htm http://www.acer-group.com/public/Sustainability/sustainability04.htm EN-4 Eyes • Rest your eyes frequently. • Give your eyes...
.... • Blink frequently to relax your neck and shoulders • avoid tensing your muscles or shrugging your shoulders • install the external display, keyboard and mouse properly and within comfort able reach • if you view your monitor more than the ... as possible. • Exercise regularly and maintain a healthy body. The following websites: Worldwide: http://www.acer-group.com/public/Sustainability/sustainability01.htm http://www.acer-group.com/public/Sustainability/sustainability04.htm EN-4 Eyes • Rest your eyes frequently. • Give your eyes...
User Manual
Page 7
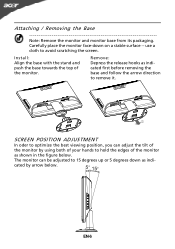
... the base and follow the arrow direction to hold the edges of the monitor as indicated by using both of your hands to remove it. Install: Align the base with the stand and push the base towards the top of the monitor by arrow below . The monitor can adjust the tilt...
... the base and follow the arrow direction to hold the edges of the monitor as indicated by using both of your hands to remove it. Install: Align the base with the stand and push the base towards the top of the monitor by arrow below . The monitor can adjust the tilt...

User Manual
Page 8
... moisture, or dust. • Do not cover the ventilation slots or openings of the monitor. Always put the monitor in which the equipment will be installed. The cord set should have the appropriate safety approvals for your area. • This monitor has a universal power supply that allows operation in either 100...
... moisture, or dust. • Do not cover the ventilation slots or openings of the monitor. Always put the monitor in which the equipment will be installed. The cord set should have the appropriate safety approvals for your area. • This monitor has a universal power supply that allows operation in either 100...
User Manual
Page 9
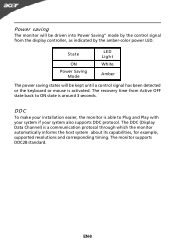
... time from the display controller, as indicated by the control signal from Active OFF state back to Plug and Play with your system if your installation easier, the monitor is able to ON state is a communication protocol through which the monitor automatically informs the host system about its capabilities, for example...
... time from the display controller, as indicated by the control signal from Active OFF state back to Plug and Play with your system if your installation easier, the monitor is able to ON state is a communication protocol through which the monitor automatically informs the host system about its capabilities, for example...
User Manual
Page 13
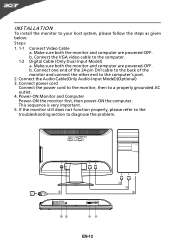
... host system, please follow the steps as given below: Steps 1. 1-1 Connect Video Cable a. AC IN AUDIO IN DVI-D IN V GA IN 3 1-1 1-2 2 32 1-2 1-1 EN-12 b. INSTALLATION To install the monitor to a properly grounded AC outlet. 4. If the monitor still does not function properly, please refer to the troubleshooting section to diagnose the problem.
... host system, please follow the steps as given below: Steps 1. 1-1 Connect Video Cable a. AC IN AUDIO IN DVI-D IN V GA IN 3 1-1 1-2 2 32 1-2 1-1 EN-12 b. INSTALLATION To install the monitor to a properly grounded AC outlet. 4. If the monitor still does not function properly, please refer to the troubleshooting section to diagnose the problem.


