
User Manual
Page 3
... the volume to block out noisy surroundings. • Turn the volume down if you can hear it clearly and comfortably and without distortion. • After setting the volume level, do not place the product on the product. This product should never be sure to protect it under sporting, exercising, or any...
... the volume to block out noisy surroundings. • Turn the volume down if you can hear it clearly and comfortably and without distortion. • After setting the volume level, do not place the product on the product. This product should never be sure to protect it under sporting, exercising, or any...

User Manual
Page 8
... make sure that allows operation in either 100/120V AC or 220/240 V AC voltage area. The cord set should have the appropriate safety approvals for the country in a place where there is the correct type required for ...proper AC outlet. • For unit using at 120 V AC: Use a UL Listed Cord Set, Type SVT wire and plug rated 10 A/125 V. • For unit using at 220/240 V AC (outside of U.S.): Use... a Cord Set consisting of the monitor. No user-adjustment is fragile. light or other heavy object, on the face of...
... make sure that allows operation in either 100/120V AC or 220/240 V AC voltage area. The cord set should have the appropriate safety approvals for the country in a place where there is the correct type required for ...proper AC outlet. • For unit using at 120 V AC: Use a UL Listed Cord Set, Type SVT wire and plug rated 10 A/125 V. • For unit using at 220/240 V AC (outside of U.S.): Use... a Cord Set consisting of the monitor. No user-adjustment is fragile. light or other heavy object, on the face of...

User Manual
Page 14
Using the Shortcut Menu Press the function button to open the shortcut menu. Empowering: Press the Empowering Key to open the Acer eColor Management OSD and access the scenario modes. It may be connected to your monitor. (a) VGA input (b) DVI input (c) HDMI input As you cycle through... the sources you quickly select the most commonly accessed settings. The shortcut menu lets you will see the following messages on right top side of screen to activate the OSD menu. VGA or DVI or...
Using the Shortcut Menu Press the function button to open the shortcut menu. Empowering: Press the Empowering Key to open the Acer eColor Management OSD and access the scenario modes. It may be connected to your monitor. (a) VGA input (b) DVI input (c) HDMI input As you cycle through... the sources you quickly select the most commonly accessed settings. The shortcut menu lets you will see the following messages on right top side of screen to activate the OSD menu. VGA or DVI or...

User Manual
Page 15
... Press " " Key to open the Acer eColor Management OSD and access the scenario modes Step 2: Press " " or " " to select the mode Step 3: Press " Adjust/Exit " Key to reduce powerconsumption N /A S ta n d a rd mode Default Setting. EN-14 Settings can be fine-tuned to suit any situ... a tio n N /A ECO mode Adjusts the settings to confirm the mode and run Auto Adjust. Reflects native display capability N /A G rahpic mode Enhances colors...
... Press " " Key to open the Acer eColor Management OSD and access the scenario modes Step 2: Press " " or " " to select the mode Step 3: Press " Adjust/Exit " Key to reduce powerconsumption N /A S ta n d a rd mode Default Setting. EN-14 Settings can be fine-tuned to suit any situ... a tio n N /A ECO mode Adjusts the settings to confirm the mode and run Auto Adjust. Reflects native display capability N /A G rahpic mode Enhances colors...

User Manual
Page 16
EN-15 Actual product specifications may vary. For advanced settings, please refer to following content is for adjusting the settings of your LCD Monitor. Then navigate to the picture element you wish to open the OSD. Press the MENU key to adjust. Use the to ... qualities. You can be used for general reference only. The OSD can use the OSD to adjust the picture quality, OSD Timeout and general settings. Adjusting the OSD settings Note: The following page: Adjusting the picture quality 1 Press the MENU key to bring up the OSD. 2 Using the / keys, select Picture from...
EN-15 Actual product specifications may vary. For advanced settings, please refer to following content is for adjusting the settings of your LCD Monitor. Then navigate to the picture element you wish to open the OSD. Press the MENU key to adjust. Use the to ... qualities. You can be used for general reference only. The OSD can use the OSD to adjust the picture quality, OSD Timeout and general settings. Adjusting the OSD settings Note: The following page: Adjusting the picture quality 1 Press the MENU key to bring up the OSD. 2 Using the / keys, select Picture from...

User Manual
Page 18
Adjusting the setting 1 Press the MENU key to adjust. Then navigate to the feature you wish to bring up the OSD. 2 Using the / keys, select Setting from the OSD. EN-17 Use the to Enter to the item page. 3 The Setting menu can be used to adjust the screen Menu Language and other important settings.
Adjusting the setting 1 Press the MENU key to adjust. Then navigate to the feature you wish to bring up the OSD. 2 Using the / keys, select Setting from the OSD. EN-17 Use the to Enter to the item page. 3 The Setting menu can be used to adjust the screen Menu Language and other important settings.
User Manual
Page 20
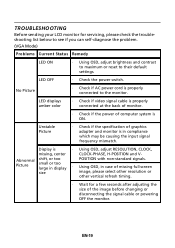
LED OFF · Check the power switch. Unstable Picture · Check if the specification of graphics adapter and monitor is properly connected to their default settings. Picture small or too large in display · Using OSD, in compliance which may be causing the input signal frequency mismatch. LED displays amber color &#...
LED OFF · Check the power switch. Unstable Picture · Check if the specification of graphics adapter and monitor is properly connected to their default settings. Picture small or too large in display · Using OSD, in compliance which may be causing the input signal frequency mismatch. LED displays amber color &#...

User Manual
Page 21
... ON. (DVI Mode) P ro b le ms Current Status Remedy LED ON · Using OSD, adjust brightness and contrast to maximum or reset to their default settings.
... ON. (DVI Mode) P ro b le ms Current Status Remedy LED ON · Using OSD, adjust brightness and contrast to maximum or reset to their default settings.

User Manual
Page 22
... 40, 20020 Lainate (MI) Italy Tel: +39-02-939-921, Fax: +39-02 9399-2913 www.acer.it Hereby declare that: Product: Trade Name: Model Number: SKU Number: LCD Monitor Acer GN246HL GN246HL xxxxxx ("x" = 0~9, a ~ z, or A ~ Z) Is compliant with the essential requirements and other relevant provisions... Cadmium 0.1% 0.1% 0.01% Directive 2009/125/EC with regard to establishing a framework for the setting of ecodesign requirements for energy-related product. RU Jan / Sr. Manager Regulation, Acer Inc. EN60950-1 RoHS Directive 2002/95/EC on the Restriction of the Use of certain Hazardous ...
... 40, 20020 Lainate (MI) Italy Tel: +39-02-939-921, Fax: +39-02 9399-2913 www.acer.it Hereby declare that: Product: Trade Name: Model Number: SKU Number: LCD Monitor Acer GN246HL GN246HL xxxxxx ("x" = 0~9, a ~ z, or A ~ Z) Is compliant with the essential requirements and other relevant provisions... Cadmium 0.1% 0.1% 0.01% Directive 2009/125/EC with regard to establishing a framework for the setting of ecodesign requirements for energy-related product. RU Jan / Sr. Manager Regulation, Acer Inc. EN60950-1 RoHS Directive 2002/95/EC on the Restriction of the Use of certain Hazardous ...

User Manual
Page 24
...ENERGY STAR mark are ENERGY STAR qualified use less energy and prevent greenhouse gas emissions by meeting strict energy efficiency guidelines set by reducing energy costs and helps protect the environment without sacrificing features or performance. More information refers to http://www....energystar.gov or http:// www.energystar.gov/powermangement Acer ENERGY STAR qualified products: • Produce less heat and reduce cooling loads, and warmer climates. • Automatically go into...
...ENERGY STAR mark are ENERGY STAR qualified use less energy and prevent greenhouse gas emissions by meeting strict energy efficiency guidelines set by reducing energy costs and helps protect the environment without sacrificing features or performance. More information refers to http://www....energystar.gov or http:// www.energystar.gov/powermangement Acer ENERGY STAR qualified products: • Produce less heat and reduce cooling loads, and warmer climates. • Automatically go into...
User Manual
Page 31
Contents Information for your safety and comfort iii Safety requirements iii Warning about Epilepsy iii Warning about seizures iv Tips and information for comfortable use v Introducing 3D technology 1 Wireless glasses 1 Charging the glasses 1 Using the glasses 2 Hardware Installation 3 Setting up 3D Vision (Dual DVI to PC) 3 Connecting the display 3 Setting up HDMI 3D 5 Frequently asked questions 6 3D Vision is not working 6 Excessive flickering 6 Eyestrain/headache 7 3D content isn't shown correctly on the display 7
Contents Information for your safety and comfort iii Safety requirements iii Warning about Epilepsy iii Warning about seizures iv Tips and information for comfortable use v Introducing 3D technology 1 Wireless glasses 1 Charging the glasses 1 Using the glasses 2 Hardware Installation 3 Setting up 3D Vision (Dual DVI to PC) 3 Connecting the display 3 Setting up HDMI 3D 5 Frequently asked questions 6 3D Vision is not working 6 Excessive flickering 6 Eyestrain/headache 7 3D content isn't shown correctly on the display 7

User Manual
Page 34
... Link DVI cable (supplied with the display. Note: Compatible graphics cards include: NVIDIA GeForce 8 Series (8800GT+), 9 Series (9600GT+) or GTX 200 Series. English 3 Hardware Installation Setting up 3D Vision (Dual DVI to PC) Connecting the display Connect your NVIDIA graphics card. The driver and software must be installed prior to connecting...
... Link DVI cable (supplied with the display. Note: Compatible graphics cards include: NVIDIA GeForce 8 Series (8800GT+), 9 Series (9600GT+) or GTX 200 Series. English 3 Hardware Installation Setting up 3D Vision (Dual DVI to PC) Connecting the display Connect your NVIDIA graphics card. The driver and software must be installed prior to connecting...

User Manual
Page 36
English 5 Setting up HDMI 3D Connect your Acer 3D monitor to your HDMI compatible PC or Blu-ray player. Note: Compatible graphic cards include: NVIDIA GT300 Series, NVIDIA GTX400 Series, For more information, please visit: http://www.nvidia.com/object/3d-vision-requirements.html 3D LCD PC HDMI HDMI HDMI cable
English 5 Setting up HDMI 3D Connect your Acer 3D monitor to your HDMI compatible PC or Blu-ray player. Note: Compatible graphic cards include: NVIDIA GT300 Series, NVIDIA GTX400 Series, For more information, please visit: http://www.nvidia.com/object/3d-vision-requirements.html 3D LCD PC HDMI HDMI HDMI cable

User Manual
Page 38
... with 50 Hz lighting and when lights are experiencing eyestrain or headaches, it could be due to excessive depth amount set to view the stereoscopic 3D. Once you have found the best setting, click Next to continue. English 7 • 120 Hz refresh rate for use in stereoscopic 3D and consult a doctor. 3D...
... with 50 Hz lighting and when lights are experiencing eyestrain or headaches, it could be due to excessive depth amount set to view the stereoscopic 3D. Once you have found the best setting, click Next to continue. English 7 • 120 Hz refresh rate for use in stereoscopic 3D and consult a doctor. 3D...


