

Altos G330 User's Guide
Page 7
... side panel 27 Removing the front bezels 28 Configuring a 5-25 inch storage device 29 Configuring a hard drive 31 Upgrading the processor 35 Upgrading the system memory 39 Installing an expansion card 43 Replacing the CMOS battery 46
... side panel 27 Removing the front bezels 28 Configuring a 5-25 inch storage device 29 Configuring a hard drive 31 Upgrading the processor 35 Upgrading the system memory 39 Installing an expansion card 43 Replacing the CMOS battery 46

Altos G330 User's Guide
Page 13
3 System specifications This section lists down the impressive computing features of the Altos G330 system. Intel 82801GR I/O Controller Hub (ICH7R) 1 Support for dual core, quad core configuration, Hyper-Threading Technology and EM64T may vary depending on processor type specifications. ... • Supports the following Intel technologies: 1 • Intel Quad-Core Architecture • Intel Dual-Core Architecture • Intel Hyper-Threading Technology (HT) • Intel Extended Memory 64 Technology (EM64T) Chipset • North bridge - Intel 3000...
3 System specifications This section lists down the impressive computing features of the Altos G330 system. Intel 82801GR I/O Controller Hub (ICH7R) 1 Support for dual core, quad core configuration, Hyper-Threading Technology and EM64T may vary depending on processor type specifications. ... • Supports the following Intel technologies: 1 • Intel Quad-Core Architecture • Intel Dual-Core Architecture • Intel Hyper-Threading Technology (HT) • Intel Extended Memory 64 Technology (EM64T) Chipset • North bridge - Intel 3000...
Altos G330 User's Guide
Page 14
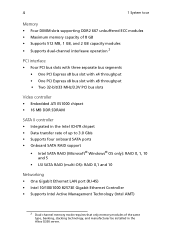
...slots supporting DDR2 667 unbuffered ECC modules • Maximum memory capacity of 8 GB • Supports 512 MB, 1 GB, and 2 GB capacity modules • Supports dual-channel interleave operation 2... SATA II controller • Integrated in the Intel ICH7R chipset • Data transfer rate of up to 3.0 Gb/s • Supports four onboard SATA ports • Onboard SATA RAID support • Intel SATA RAID (Microsoft&#...Management Technology (Intel AMT) 2 Dual-channel memory mode requires that only memory modules of the same type, banking, stacking technology, and manufacturer be installed in the...
...slots supporting DDR2 667 unbuffered ECC modules • Maximum memory capacity of 8 GB • Supports 512 MB, 1 GB, and 2 GB capacity modules • Supports dual-channel interleave operation 2... SATA II controller • Integrated in the Intel ICH7R chipset • Data transfer rate of up to 3.0 Gb/s • Supports four onboard SATA ports • Onboard SATA RAID support • Intel SATA RAID (Microsoft&#...Management Technology (Intel AMT) 2 Dual-channel memory mode requires that only memory modules of the same type, banking, stacking technology, and manufacturer be installed in the...

Altos G330 User's Guide
Page 22
Jumper Setting 1 NIC1 NVM protect mode 1-2 - The contents of the Intel 82573E NVM (nonvolatile memory) is 1-2 for all system jumpers. BIOS recovery setting Note: The default setting for normal operation is protected and can be programmed. 2 Clear CMOS 1-2 - The contents of the Intel 82573E NVM can not be cleared on the next reset. 3 BIOS recovery 1-2 - Normal operation setting 2-3 - 12 System jumpers 1 System tour No. Normal operation setting 2-3 - The CMOS RAM contents will be updated. 2-3 -
Jumper Setting 1 NIC1 NVM protect mode 1-2 - The contents of the Intel 82573E NVM (nonvolatile memory) is 1-2 for all system jumpers. BIOS recovery setting Note: The default setting for normal operation is protected and can be programmed. 2 Clear CMOS 1-2 - The contents of the Intel 82573E NVM can not be cleared on the next reset. 3 BIOS recovery 1-2 - Normal operation setting 2-3 - 12 System jumpers 1 System tour No. Normal operation setting 2-3 - The CMOS RAM contents will be updated. 2-3 -
Altos G330 User's Guide
Page 49
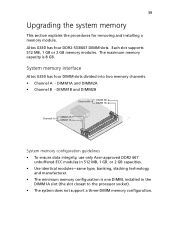
... not support a three-DIMM memory configuration. Each slot supports 512 MB, 1 GB or 2 GB memory modules. 39 Upgrading the system memory This section explains the procedures for removing and installing a memory module. Altos G330 has four DDR2-533/667 DIMM slots. DIMM1B and DIMM2B System memory configuration guidelines • To ensure data integrity, use only Acer-approved DDR2 667 unbuffered...
... not support a three-DIMM memory configuration. Each slot supports 512 MB, 1 GB or 2 GB memory modules. 39 Upgrading the system memory This section explains the procedures for removing and installing a memory module. Altos G330 has four DDR2-533/667 DIMM slots. DIMM1B and DIMM2B System memory configuration guidelines • To ensure data integrity, use only Acer-approved DDR2 667 unbuffered...

Altos G330 User's Guide
Page 50
... then DIMM2A and 2B. • Observe the population sequence illustrated in the table below lists the supported memory installation based on channel A (DIMM1A and 2A) are being used, the population order must be DIMM1A and DIMM1B ...Memory channel A A B B DIMM slot DIMM1A DIMM2A DIMM1B DIMM2B Population order 1 3 2 4 • The table below when installing a memory module. 40 3 System upgrade • DIMMs on the memory interleave configuration. Interleave mode Channel A Channel B DIMM1A DIMM2A DIMM1B DIMM2B Total memory Single channel 512 MB 1 GB 2 GB 512 MB 1 GB 2 GB...
... then DIMM2A and 2B. • Observe the population sequence illustrated in the table below lists the supported memory installation based on channel A (DIMM1A and 2A) are being used, the population order must be DIMM1A and DIMM1B ...Memory channel A A B B DIMM slot DIMM1A DIMM2A DIMM1B DIMM2B Population order 1 3 2 4 • The table below when installing a memory module. 40 3 System upgrade • DIMMs on the memory interleave configuration. Interleave mode Channel A Channel B DIMM1A DIMM2A DIMM1B DIMM2B Total memory Single channel 512 MB 1 GB 2 GB 512 MB 1 GB 2 GB...

Altos G330 User's Guide
Page 51
41 Interleave mode Channel A Channel B DIMM1A DIMM2A DIMM1B DIMM2B Total memory 512 MB 512 MB 1 GB Dual channel 1 GB 2 GB 512 MB 512 MB 1 GB 2 GB 512 MB 512 MB 2 GB 4 GB 2 GB 1 GB 1 GB 1 GB 1 GB 4 GB 2 GB 2 GB 2 GB 2 GB 8 GB To remove a memory module: 1 Perform the pre-installation instructions described on page 26. 2 Lay the server on its side (components showing). 3 If necessary, remove any cables that prevent...
41 Interleave mode Channel A Channel B DIMM1A DIMM2A DIMM1B DIMM2B Total memory 512 MB 512 MB 1 GB Dual channel 1 GB 2 GB 512 MB 512 MB 1 GB 2 GB 512 MB 512 MB 2 GB 4 GB 2 GB 1 GB 1 GB 1 GB 1 GB 4 GB 2 GB 2 GB 2 GB 2 GB 8 GB To remove a memory module: 1 Perform the pre-installation instructions described on page 26. 2 Lay the server on its side (components showing). 3 If necessary, remove any cables that prevent...

Altos G330 User's Guide
Page 52
...to lock the module in place. If the holding clips of the selected DIMM slot. 4 Remove the new memory module from its protective packaging, handling it by the edges. 5 Install the new memory module. (1) Align the module so that the notch on page 26. Reverse the orientation of the module ...and insert it incorrectly. 42 3 System upgrade To install memory module: 1 Perform steps 1 through 3 of the previous section. 2 Select an empty DIMM slot. 3 If necessary, open the holding clips do not close, the ...
...to lock the module in place. If the holding clips of the selected DIMM slot. 4 Remove the new memory module from its protective packaging, handling it by the edges. 5 Install the new memory module. (1) Align the module so that the notch on page 26. Reverse the orientation of the module ...and insert it incorrectly. 42 3 System upgrade To install memory module: 1 Perform steps 1 through 3 of the previous section. 2 Select an empty DIMM slot. 3 If necessary, open the holding clips do not close, the ...
Altos G330 User's Guide
Page 61
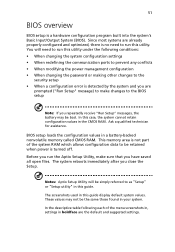
...BIOS overview BIOS setup is turned off. You will be the same those found in boldface are the default and suggested settings. This memory area is not part of the menu screenshots in, settings in your system. Before you run the Aptio Setup Utility, make changes... configuration values in this guide display default system values. Ask a qualified technician for assistance. The screenshots used in a battery-backed nonvolatile memory called CMOS RAM. Since most systems are prompted ("Run Setup" message) to be bad. In this utility under the following each of the system...
...BIOS overview BIOS setup is turned off. You will be the same those found in boldface are the default and suggested settings. This memory area is not part of the menu screenshots in, settings in your system. Before you run the Aptio Setup Utility, make changes... configuration values in this guide display default system values. Ask a qualified technician for assistance. The screenshots used in a battery-backed nonvolatile memory called CMOS RAM. Since most systems are prompted ("Run Setup" message) to be bad. In this utility under the following each of the system...

Altos G330 User's Guide
Page 67
... Configuration Description Option Total system memory size detected during POST Current memory configuration mode (dual or single channel operation) When a malicious worm attempts to run multiple operating systems in independent partitions. VT allows a single ...platform to insert code in this section, ensure that your system OS user documentation for storage of data. Refer to divide the system memory into areas for storage of the Intel processor technologies mentioned in the buffer, the processor disables code execution, preventing damage or worm propagation. Enabled ...
... Configuration Description Option Total system memory size detected during POST Current memory configuration mode (dual or single channel operation) When a malicious worm attempts to run multiple operating systems in independent partitions. VT allows a single ...platform to insert code in this section, ensure that your system OS user documentation for storage of data. Refer to divide the system memory into areas for storage of the Intel processor technologies mentioned in the buffer, the processor disables code execution, preventing damage or worm propagation. Enabled ...

Altos G330 User's Guide
Page 68
...Disabled Onboard SATA Select whether to enable the system to Legacy or Enhanced mode. 58 4 System BIOS Parameter Description Option Memory Channel The memory size installed on each of the DIMM slots. Non-ECC IDE Controller Parameter Description Option Onboard PATA Select whether to ...enable the system to enable the ECC (Error ECC Correction Code) event logging function. A/B Slot 0/1 Memory Correction Select whether to Controller detect the onboard PATA controller. Legacy Enhanced Config SATA as RAID Select whether to OPROM enable for SATA...
...Disabled Onboard SATA Select whether to enable the system to Legacy or Enhanced mode. 58 4 System BIOS Parameter Description Option Memory Channel The memory size installed on each of the DIMM slots. Non-ECC IDE Controller Parameter Description Option Onboard PATA Select whether to ...enable the system to enable the ECC (Error ECC Correction Code) event logging function. A/B Slot 0/1 Memory Correction Select whether to Controller detect the onboard PATA controller. Legacy Enhanced Config SATA as RAID Select whether to OPROM enable for SATA...

Altos G330 User's Guide
Page 80
... the OS boot watchdog timer. Enabled Disabled Enabled Disabled Select whether to enable the Alert Standard Format (ASF) protocol in the Advanced | Memory submenu be set to Enabled, the watchdog timer will trigger the system to automatically reset if the OS boot-up . This function requires ...that the Memory Correction field in implementing the system remote management function. When set to Enabled. Enabled Disabled Select whether to allow logging of DMI (...
... the OS boot watchdog timer. Enabled Disabled Enabled Disabled Select whether to enable the Alert Standard Format (ASF) protocol in the Advanced | Memory submenu be set to Enabled, the watchdog timer will trigger the system to automatically reset if the OS boot-up . This function requires ...that the Memory Correction field in implementing the system remote management function. When set to Enabled. Enabled Disabled Select whether to allow logging of DMI (...

Altos G330 User's Guide
Page 89
... recovery code, latest version of the Setup Exit menu to complete the upgrade. Important: Review the instructions and release notes that are provided in flash memory. The release notes contain critical information regarding jumper settings, specific fixes, or other option ROMs for devices embedded on your hard drive or to upgrade...
... recovery code, latest version of the Setup Exit menu to complete the upgrade. Important: Review the instructions and release notes that are provided in flash memory. The release notes contain critical information regarding jumper settings, specific fixes, or other option ROMs for devices embedded on your hard drive or to upgrade...

Altos G330 User's Guide
Page 93
... installed in -depth troubleshooting, attempt first to all peripherals. Perform Soft boot reset Cold boot reset Purpose To clear the system memory and reload the operating system. To clear the system memory, restart POST, and reload the operating system. To do this Press Ctrl+Alt+Del Press the system power button off...
... installed in -depth troubleshooting, attempt first to all peripherals. Perform Soft boot reset Cold boot reset Purpose To clear the system memory and reload the operating system. To clear the system memory, restart POST, and reload the operating system. To do this Press Ctrl+Alt+Del Press the system power button off...

Altos G330 User's Guide
Page 98
... correctly. • Check that may arise during the use of them is causing the problem. • Make sure that you have correctly installed system compliant memory modules, and that the system DIMM population guidelines were observed. • Make sure that the wall outlet has power. Do the following : • Make sure...
... correctly. • Check that may arise during the use of them is causing the problem. • Make sure that you have correctly installed system compliant memory modules, and that the system DIMM population guidelines were observed. • Make sure that the wall outlet has power. Do the following : • Make sure...

Altos G330 User's Guide
Page 99
... in their slots. Do the following : • Make sure the memory modules specifications comply with the system requirements. • Make sure the memory modules have been populated according to the system guidelines. • Make sure the memory modules are properly connected. Newly installed memory modules are set correctly. • Check that relevant switches and...
... in their slots. Do the following : • Make sure the memory modules specifications comply with the system requirements. • Make sure the memory modules have been populated according to the system guidelines. • Make sure the memory modules are properly connected. Newly installed memory modules are set correctly. • Check that relevant switches and...

Altos G330 User's Guide
Page 101
... correctly if plugged into a different system? • Remove all add-in its slot. 3 Reboot the system for technical assistance. Contact your local Acer representative or authorized dealer for the changes to determine if one at a time with a reboot between each addition to take effect. 4 If there ...no characters on the monitor. Take note of them is causing the problem. • Make sure that you have correctly installed system compliant memory modules, and that the system DIMM population guidelines were observed. • Make sure that the add-in video controller card is it again....
... correctly if plugged into a different system? • Remove all add-in its slot. 3 Reboot the system for technical assistance. Contact your local Acer representative or authorized dealer for the changes to determine if one at a time with a reboot between each addition to take effect. 4 If there ...no characters on the monitor. Take note of them is causing the problem. • Make sure that you have correctly installed system compliant memory modules, and that the system DIMM population guidelines were observed. • Make sure that the add-in video controller card is it again....

Altos G330 User's Guide
Page 102
...The table below lists the POST error beep codes. If the error still occurs, contact your local Acer representative for assistance. Prior to system video initialization, the BIOS uses these beep codes to reveal .... If the onboard video controller is being used, the mainboard may be faulty. Contact your local Acer representative for assistance. Number of error conditions. Remove all error conditions are removed, insert the cards ... beeps 1, 2, or 3 4 - 7 or 9 - 11 8 Possible cause Corrective action Memory error Reseat the memory or replace the DIMMs with known good modules.
...The table below lists the POST error beep codes. If the error still occurs, contact your local Acer representative for assistance. Prior to system video initialization, the BIOS uses these beep codes to reveal .... If the onboard video controller is being used, the mainboard may be faulty. Contact your local Acer representative for assistance. Number of error conditions. Remove all error conditions are removed, insert the cards ... beeps 1, 2, or 3 4 - 7 or 9 - 11 8 Possible cause Corrective action Memory error Reseat the memory or replace the DIMMs with known good modules.
Altos G330 User's Guide
Page 122
... location 8 specifications 4 troubleshooting 90 LED indicators front panel 13 HDD carrier 14 LAN port 14 M mechanical specifications chassis 6 mainboard 6 media storage controller 4 specification 5 upgrade option 5 memory BIOS settings 57 configuration guidelines 39 install 42 population order 40 remove 41 troubleshooting 89 monitor port 8 O ODD, see optical disc drive 7 operating system support...
... location 8 specifications 4 troubleshooting 90 LED indicators front panel 13 HDD carrier 14 LAN port 14 M mechanical specifications chassis 6 mainboard 6 media storage controller 4 specification 5 upgrade option 5 memory BIOS settings 57 configuration guidelines 39 install 42 population order 40 remove 41 troubleshooting 89 monitor port 8 O ODD, see optical disc drive 7 operating system support...

Altos G330 User's Guide
Page 123
...server management Intel AMT 95 specification 6 side panel release latch 8 remove 27 specification chipset 3 hardware monitoring 6 I/O ports 5 mechanical 6 media storage 5 memory 4 networking 4 operating system 6 PCI interface 4 power supply 5 processor 3 server management 6 system cooling 5 video controller 4 system boards backplane board ...system 19 system upgrade 5.25 inch storage device 29 ESD precautions 25 expansion card 43 hard disk drive 31 memory 39 post-installation instructions 26 pre-installation instructions 26 processor 35 T troubleshooting check firmware update 83 display problems ...
...server management Intel AMT 95 specification 6 side panel release latch 8 remove 27 specification chipset 3 hardware monitoring 6 I/O ports 5 mechanical 6 media storage 5 memory 4 networking 4 operating system 6 PCI interface 4 power supply 5 processor 3 server management 6 system cooling 5 video controller 4 system boards backplane board ...system 19 system upgrade 5.25 inch storage device 29 ESD precautions 25 expansion card 43 hard disk drive 31 memory 39 post-installation instructions 26 pre-installation instructions 26 processor 35 T troubleshooting check firmware update 83 display problems ...


