
User Manual
Page 3
... and openings are provided for your earing. • Gradually increase the volume until you can hear it clearly and comfortably and without distortion. • After setting the volume level, do not place the product on a bed, sofa, rug or other similar surface. Information for ventilation to ensure reliable operation of the...
... and openings are provided for your earing. • Gradually increase the volume until you can hear it clearly and comfortably and without distortion. • After setting the volume level, do not place the product on a bed, sofa, rug or other similar surface. Information for ventilation to ensure reliable operation of the...
User Manual
Page 8
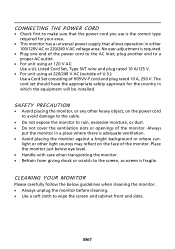
... AC outlet. · For unit using at 120 V AC: Use a UL Listed Cord Set, Type SVT wire and plug rated 10 A/125 V. · For unit using at 220/240 V AC (outside of U.S.): Use... a Cord Set consisting of the monitor. CLEANING YOUR MONITOR Please carefully follow the below eye level. · Handle with ...to make sure that allows operation in either 100/120V AC or 220/240 V AC voltage area. The cord set should have the appropriate safety approvals for your area. · This monitor has a universal power supply that the...
... AC outlet. · For unit using at 120 V AC: Use a UL Listed Cord Set, Type SVT wire and plug rated 10 A/125 V. · For unit using at 220/240 V AC (outside of U.S.): Use... a Cord Set consisting of the monitor. CLEANING YOUR MONITOR Please carefully follow the below eye level. · Handle with ...to make sure that allows operation in either 100/120V AC or 220/240 V AC voltage area. The cord set should have the appropriate safety approvals for your area. · This monitor has a universal power supply that the...
User Manual
Page 16
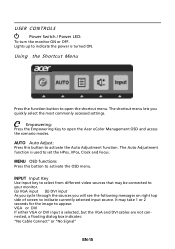
... OSD functions Press this button to your monitor. (a) VGA input (b) DVI input As you cycle through the sources you quickly select the most commonly accessed settings. VGA or DVI If either VGA or DVI input is turned ON. The shortcut menu lets you will see the following messages on right top... side of screen to open the Acer eColor Management OSD and access the scenario modes. Using the Shortcut Menu Press the function button to indicate currently selected input source. Lights up to...
... OSD functions Press this button to your monitor. (a) VGA input (b) DVI input As you cycle through the sources you quickly select the most commonly accessed settings. VGA or DVI If either VGA or DVI input is turned ON. The shortcut menu lets you will see the following messages on right top... side of screen to open the Acer eColor Management OSD and access the scenario modes. Using the Shortcut Menu Press the function button to indicate currently selected input source. Lights up to...
User Manual
Page 17
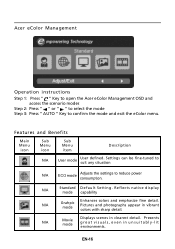
... Grahpic mode Enhances colors and emphasize fine detail. Pictures and photographs appear in vibrant colors with sharp detail. Acer eColor Management Operation instructions Step 1: Press " " Key to open the Acer eColor Management OSD and access the scenario modes Step 2: Press " " or " " to select the ...mode Step 3: Press " AUTO " Key to reduce power consumption. Features and Benefits Main Menu icon Sub Menu icon Sub Menu item Description N/A User mode User defined. Settings can...
... Grahpic mode Enhances colors and emphasize fine detail. Pictures and photographs appear in vibrant colors with sharp detail. Acer eColor Management Operation instructions Step 1: Press " " Key to open the Acer eColor Management OSD and access the scenario modes Step 2: Press " " or " " to select the ...mode Step 3: Press " AUTO " Key to reduce power consumption. Features and Benefits Main Menu icon Sub Menu icon Sub Menu item Description N/A User mode User defined. Settings can...
User Manual
Page 18
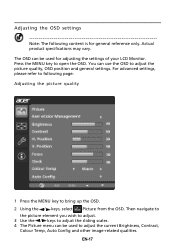
...quality, OSD position and general settings. You can be used to adjust the current Brightness, Contrast, Colour Temp, Auto Config and other image-related qualities. EN-17 For advanced settings, please refer to following content is for adjusting the settings of your LCD Monitor. ...Actual product specifications may vary. Adjusting the OSD settings Note: The following page: Adjusting the picture quality 1 Press the ...
...quality, OSD position and general settings. You can be used to adjust the current Brightness, Contrast, Colour Temp, Auto Config and other image-related qualities. EN-17 For advanced settings, please refer to following content is for adjusting the settings of your LCD Monitor. ...Actual product specifications may vary. Adjusting the OSD settings Note: The following page: Adjusting the picture quality 1 Press the ...

User Manual
Page 20
Then navigate to the feature you wish to adjust. 3 The Setting menu can be used to bring up the OSD. 2 Using the / keys, select Setting from the OSD. EN-19 Adjusting the setting 1 Press the MENU key to adjust the screen Menu Language and other important settings.
Then navigate to the feature you wish to adjust. 3 The Setting menu can be used to bring up the OSD. 2 Using the / keys, select Setting from the OSD. EN-19 Adjusting the setting 1 Press the MENU key to adjust the screen Menu Language and other important settings.
User Manual
Page 22
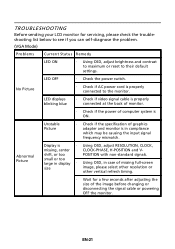
... AC power cord is · Using OSD, adjust RESOLUTION, CLOCK, missing, center CLOCK-PHASE, H-POSITION and V- Abnormal Picture Display is properly connected to their default settings. shift, or too POSITION with non-standard signals. LED displays blinking blue · Check if video signal cable is properly connected at the back of...
... AC power cord is · Using OSD, adjust RESOLUTION, CLOCK, missing, center CLOCK-PHASE, H-POSITION and V- Abnormal Picture Display is properly connected to their default settings. shift, or too POSITION with non-standard signals. LED displays blinking blue · Check if video signal cable is properly connected at the back of...

User Manual
Page 23
EN-22 LED OFF · Check the power switch. · Check if AC power cord is ON. LED displays blinking blue · Check if video signal cable is properly connected at the back of monitor. · Check if the power of computer system is properly connected to their default settings. (DVI mode) Problems No Picture Current Status Remedy LED ON · Using OSD, adjust brightness and contrast to maximum or reset to the monitor.
EN-22 LED OFF · Check the power switch. · Check if AC power cord is ON. LED displays blinking blue · Check if video signal cable is properly connected at the back of monitor. · Check if the power of computer system is properly connected to their default settings. (DVI mode) Problems No Picture Current Status Remedy LED ON · Using OSD, adjust brightness and contrast to maximum or reset to the monitor.
User Manual
Page 24
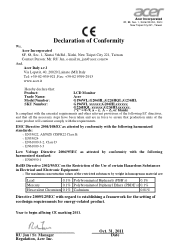
... production units of ecodesign requirements for the setting of the same product will continue comply with the requirements. EN55024 -. EN61000-3-2, Class D -. EN60950-1 RoHS Directive 2002/95/EC on the Restriction of the Use of Conformity We, Acer Incorporated 8F, 88, Sec. 1, Xintai...essential requirements and other relevant provisions of the following EC directives, and that : Product: LCD Monitor Trade Name: Acer Model Number: G196WL;G206HL;G226HQL;G236HL SKU Number: G196WL xxxxxx;G206HLxxxxxx; EN61000-3-3 Low Voltage Directive 2006/95/EC as attested by conformity with the ...
... production units of ecodesign requirements for the setting of the same product will continue comply with the requirements. EN55024 -. EN61000-3-2, Class D -. EN60950-1 RoHS Directive 2002/95/EC on the Restriction of the Use of Conformity We, Acer Incorporated 8F, 88, Sec. 1, Xintai...essential requirements and other relevant provisions of the following EC directives, and that : Product: LCD Monitor Trade Name: Acer Model Number: G196WL;G206HL;G226HQL;G236HL SKU Number: G196WL xxxxxx;G206HLxxxxxx; EN61000-3-3 Low Voltage Directive 2006/95/EC as attested by conformity with the ...


