User Manual
Page 1
TABLE OF CONTENTS Special notes on LCD monitors 1 Information for your safety and comfort 2 Unpacking 5 Attaching/Removing the base 6 Screen position adjustment 6 Connecting the power cord 7 Safety precaution 7 Cleaning your monitor 7 Power saving 8 DDC 8 Connector Pin Assignment 9 Standard Timing Table 11 Installation 14 User controls 15 Troubleshooting 21
TABLE OF CONTENTS Special notes on LCD monitors 1 Information for your safety and comfort 2 Unpacking 5 Attaching/Removing the base 6 Screen position adjustment 6 Connecting the power cord 7 Safety precaution 7 Cleaning your monitor 7 Power saving 8 DDC 8 Connector Pin Assignment 9 Standard Timing Table 11 Installation 14 User controls 15 Troubleshooting 21
User Manual
Page 2
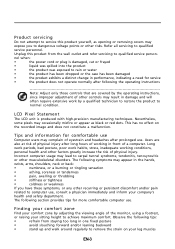
... normal with LCD monitor and do not indicate a problem. In this case, the screen is recovered slowly by changing the image or turning off the Power Switch and then turn it on the desktop pattern you use . It may flicker during initial use . · The LCD screen has effective pixels of the previous screen may remain after switching the image, when the same image is displayed for hours. Turn off the Power Switch for...
... normal with LCD monitor and do not indicate a problem. In this case, the screen is recovered slowly by changing the image or turning off the Power Switch and then turn it on the desktop pattern you use . It may flicker during initial use . · The LCD screen has effective pixels of the previous screen may remain after switching the image, when the same image is displayed for hours. Turn off the Power Switch for...
User Manual
Page 3
... you plug the power cord into is easily accessible and located as close to the equipment operator as they may touch dangerous voltage points or short-out parts that could be sure to prevent battery leakage, do not increase it afteryour ears adjust. • Limit the amount of time listening to music at high volume. • Avoid turning...
... you plug the power cord into is easily accessible and located as close to the equipment operator as they may touch dangerous voltage points or short-out parts that could be sure to prevent battery leakage, do not increase it afteryour ears adjust. • Limit the amount of time listening to music at high volume. • Avoid turning...
User Manual
Page 4
... working in front of the monitor, using a footrest, or raising your company's health and safety department. Tips and information for comfortable use . The following tips: • refrain from the wall outlet and refer servicing to computer use . Refer all servicing to achieve maximum comfort. Finding your comfort zone Find your leg muscles EN-3 nel when: • the power cord or plug...
... working in front of the monitor, using a footrest, or raising your company's health and safety department. Tips and information for comfortable use . The following tips: • refrain from the wall outlet and refer servicing to computer use . Refer all servicing to achieve maximum comfort. Finding your comfort zone Find your leg muscles EN-3 nel when: • the power cord or plug...
User Manual
Page 5
.... Display • Keep your display clean. • Keep your head at a higher level than your documents, place the display at the middle of the display. • Adjust the display brightness and/or contrast to a comfortable level for extended periods of your vision Long viewing hours, wearing incorrect glasses or contact lenses, glare, excessive room lighting, poorly focused screens, very small typefaces and low-contrast displays could...
.... Display • Keep your display clean. • Keep your head at a higher level than your documents, place the display at the middle of the display. • Adjust the display brightness and/or contrast to a comfortable level for extended periods of your vision Long viewing hours, wearing incorrect glasses or contact lenses, glare, excessive room lighting, poorly focused screens, very small typefaces and low-contrast displays could...
User Manual
Page 6
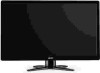
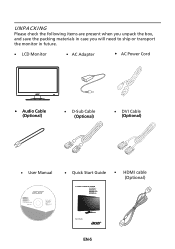
UNPACKING Please check the following items are present when you unpack the box, and save the packing materials in case you will need to ship or transport the monitor in future. LCD Monitor AC Adapter AC Power Cord · Audio Cable (Optional) D-Sub Cable (Optional) DVI Cable (Optional) User Manual G196WL G206HL G226HQL G236HL LCD monitor MU.LUZ00.001 Quick Start Guide HDMI cable (Optional) G196WL EN-5
UNPACKING Please check the following items are present when you unpack the box, and save the packing materials in case you will need to ship or transport the monitor in future. LCD Monitor AC Adapter AC Power Cord · Audio Cable (Optional) D-Sub Cable (Optional) DVI Cable (Optional) User Manual G196WL G206HL G226HQL G236HL LCD monitor MU.LUZ00.001 Quick Start Guide HDMI cable (Optional) G196WL EN-5
User Manual
Page 7
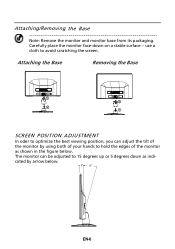
The monitor can adjust the tilt of the monitor by using both of the monitor as indicated by arrow below . Carefully place the monitor face-down as shown in the figure below . 5 15 EN-6 Attaching the Base Removing the Base 1 2 2 1 SCREEN POSITION ADJUSTMENT In oder to optimize the best viewing position, you can be adjusted to hold the edges of your hands to 15 degrees up or 5 degrees down on a stable surface -- Attaching/Removing the Base Note: Remove the monitor and monitor base from its packaging. use a cloth to avoid scratching the screen.
The monitor can adjust the tilt of the monitor by using both of the monitor as indicated by arrow below . Carefully place the monitor face-down as shown in the figure below . 5 15 EN-6 Attaching the Base Removing the Base 1 2 2 1 SCREEN POSITION ADJUSTMENT In oder to optimize the best viewing position, you can be adjusted to hold the edges of your hands to 15 degrees up or 5 degrees down on a stable surface -- Attaching/Removing the Base Note: Remove the monitor and monitor base from its packaging. use a cloth to avoid scratching the screen.
User Manual
Page 8
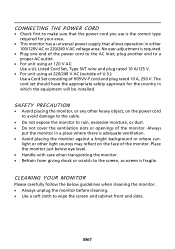
... below guidelines when cleaning the monitor. · Always unplug the monitor before cleaning. · Use a soft cloth to a proper AC outlet. · For unit using at 120 V AC: Use a UL Listed Cord Set, Type SVT wire and plug rated 10 A/125 V. · For unit using at 220/240 V AC (outside of U.S.): Use a Cord Set consisting of the monitor. CONNECTING THE POWER CORD · Check first to make sure that allows operation...
... below guidelines when cleaning the monitor. · Always unplug the monitor before cleaning. · Use a soft cloth to a proper AC outlet. · For unit using at 120 V AC: Use a UL Listed Cord Set, Type SVT wire and plug rated 10 A/125 V. · For unit using at 220/240 V AC (outside of U.S.): Use a Cord Set consisting of the monitor. CONNECTING THE POWER CORD · Check first to make sure that allows operation...
User Manual
Page 9
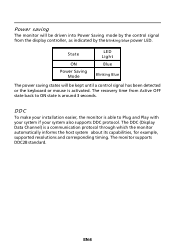
... monitor supports DDC2B standard. Power saving The monitor will be driven into Power Saving mode by the blinking blue power LED. The DDC (Display Data Channel) is able to ON state is around 3 seconds. DDC To make your system also supports DDC protocol. The recovery time from the display controller, as indicated by the control signal from Active OFF state back to Plug and Play with your system if your installation...
... monitor supports DDC2B standard. Power saving The monitor will be driven into Power Saving mode by the blinking blue power LED. The DDC (Display Data Channel) is able to ON state is around 3 seconds. DDC To make your system also supports DDC protocol. The recovery time from the display controller, as indicated by the control signal from Active OFF state back to Plug and Play with your system if your installation...
User Manual
Page 10
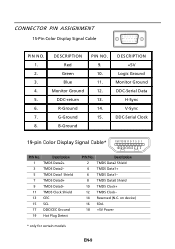
...- 14 Reserved (N.C. CONNECTOR PIN ASSIGNMENT 15-Pin Color Display Signal Cable PIN NO. 1. 2. 3. 4. 5. 6. 7. 8. Description 1 TMDS Data2+ 3 TMDS Data2- 5 TMDS Data1 Shield 7 TMDS Data0+ 9 TMDS Data0- 11 TMDS Clock Shield 13 CEC 15 SCL 17 DDC/CEC Ground 19 Hot Plug Detect PIN No. on device) 16 SDA 18 +5V Power * only for certain models EN-9 DESCRIPTION Red Green Blue Monitor Ground DDC...
...- 14 Reserved (N.C. CONNECTOR PIN ASSIGNMENT 15-Pin Color Display Signal Cable PIN NO. 1. 2. 3. 4. 5. 6. 7. 8. Description 1 TMDS Data2+ 3 TMDS Data2- 5 TMDS Data1 Shield 7 TMDS Data0+ 9 TMDS Data0- 11 TMDS Clock Shield 13 CEC 15 SCL 17 DDC/CEC Ground 19 Hot Plug Detect PIN No. on device) 16 SDA 18 +5V Power * only for certain models EN-9 DESCRIPTION Red Green Blue Monitor Ground DDC...
User Manual
Page 11
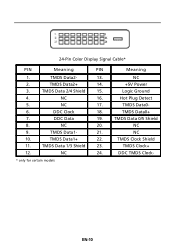
TMDS Data 2/4 Shield 15. NC 16. NC 17. DDC Clock 18. DDC Data 19. TMDS Data1- 21. TMDS Data 1/3 Shield 23. DDC TMDS Clock- * only for certain models EN-10 TMDS Data2+ 14. +5V Power 3. TMDS Data0+ 7. NC 9. TMDS Data0- 6. NC 10. TMDS Clock Shield 11. NC 2. NC 20. Logic Ground 4. TMDS Data 0/5 Shield 8. TMDS Clock+ 12. Hot Plug Detect 5. TMDS Data1+ 22. 24-Pin Color Display Signal Cable* PIN Meaning PIN Meaning 1. TMDS Data2- 13. NC 24.
TMDS Data 2/4 Shield 15. NC 16. NC 17. DDC Clock 18. DDC Data 19. TMDS Data1- 21. TMDS Data 1/3 Shield 23. DDC TMDS Clock- * only for certain models EN-10 TMDS Data2+ 14. +5V Power 3. TMDS Data0+ 7. NC 9. TMDS Data0- 6. NC 10. TMDS Clock Shield 11. NC 2. NC 20. Logic Ground 4. TMDS Data 0/5 Shield 8. TMDS Clock+ 12. Hot Plug Detect 5. TMDS Data1+ 22. 24-Pin Color Display Signal Cable* PIN Meaning PIN Meaning 1. TMDS Data2- 13. NC 24.
User Manual
Page 15
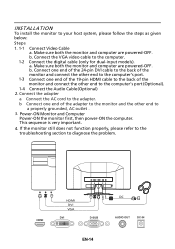
... Computer Power-ON the monitor first, then power-ON the computer. Connect the adapter a Connect the AC cord to diagnose the problem. Connect one end of the 24-pin DVI cable to the back of the monitor and connect the other end to the computer's port. 1-3 Connect one end of the monitor and connect the other end to the computer's port (Optional). 1-4 Connect the Audio Cable(Optional) 2. HDMI DVI HDMI D-SUB AUDIO OUT DC-IN HDMI DVI VGA DVI...
... Computer Power-ON the monitor first, then power-ON the computer. Connect the adapter a Connect the AC cord to diagnose the problem. Connect one end of the 24-pin DVI cable to the back of the monitor and connect the other end to the computer's port. 1-3 Connect one end of the monitor and connect the other end to the computer's port (Optional). 1-4 Connect the Audio Cable(Optional) 2. HDMI DVI HDMI D-SUB AUDIO OUT DC-IN HDMI DVI VGA DVI...
User Manual
Page 16
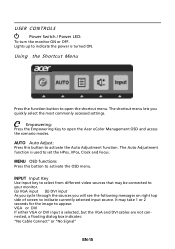
...: "No Cable Connect" or "No Signal" EN-15 AUTO Auto Adjust: Press this botton to appear. USER CONTROLS Power Switch / Power LED: To turn the monitor ON or OFF. INPUT Input Key Use Input key to select from different video sources that may take 1 or 2 seconds for the image to activate the OSD menu. MENU OSD functions Press this button to indicate currently selected input source. It may be connected to your monitor. (a) VGA input (b) DVI input As you cycle through the sources you quickly select...
...: "No Cable Connect" or "No Signal" EN-15 AUTO Auto Adjust: Press this botton to appear. USER CONTROLS Power Switch / Power LED: To turn the monitor ON or OFF. INPUT Input Key Use Input key to select from different video sources that may take 1 or 2 seconds for the image to activate the OSD menu. MENU OSD functions Press this button to indicate currently selected input source. It may be connected to your monitor. (a) VGA input (b) DVI input As you cycle through the sources you quickly select...
User Manual
Page 17
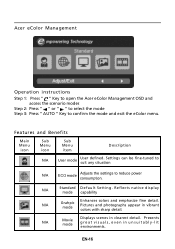
... Sub Menu item Description N/A User mode User defined. Pictures and photographs appear in clearest detail. N/A Movie mode Displays scenes in vibrant colors with sharp detail. Presents great visuals, even in unsuitably-lit environments. Acer eColor Management Operation instructions Step 1: Press " " Key to open the Acer eColor Management OSD and access the scenario modes Step 2: Press " " or " " to select the mode Step 3: Press " AUTO " Key to reduce power...
... Sub Menu item Description N/A User mode User defined. Pictures and photographs appear in clearest detail. N/A Movie mode Displays scenes in vibrant colors with sharp detail. Presents great visuals, even in unsuitably-lit environments. Acer eColor Management Operation instructions Step 1: Press " " Key to open the Acer eColor Management OSD and access the scenario modes Step 2: Press " " or " " to select the mode Step 3: Press " AUTO " Key to reduce power...
User Manual
Page 18
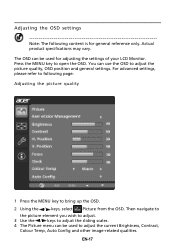
.... Actual product specifications may vary. Press the MENU key to open the OSD. Then navigate to the picture element you wish to adjust. 3 Use the / keys to adjust the sliding scales. 4 The Picture menu can be used to adjust the current Brightness, Contrast, Colour Temp, Auto Config and other image-related qualities. For advanced settings, please refer to following content is for adjusting the settings of your LCD Monitor. Adjusting the OSD settings Note...
.... Actual product specifications may vary. Press the MENU key to open the OSD. Then navigate to the picture element you wish to adjust. 3 Use the / keys to adjust the sliding scales. 4 The Picture menu can be used to adjust the current Brightness, Contrast, Colour Temp, Auto Config and other image-related qualities. For advanced settings, please refer to following content is for adjusting the settings of your LCD Monitor. Adjusting the OSD settings Note...

User Manual
Page 20
EN-19 Then navigate to the feature you wish to adjust. 3 The Setting menu can be used to bring up the OSD. 2 Using the / keys, select Setting from the OSD. Adjusting the setting 1 Press the MENU key to adjust the screen Menu Language and other important settings.
EN-19 Then navigate to the feature you wish to adjust. 3 The Setting menu can be used to bring up the OSD. 2 Using the / keys, select Setting from the OSD. Adjusting the setting 1 Press the MENU key to adjust the screen Menu Language and other important settings.
User Manual
Page 22
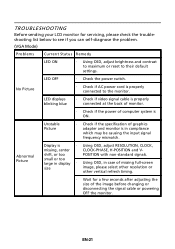
... causing the input signal frequency mismatch. LED displays blinking blue · Check if video signal cable is properly connected at the back of monitor. · Check if the power of computer system is properly connected to their default settings. LED OFF · Check the power switch. No Picture · Check if AC power cord is ON. Abnormal Picture Display is in case of missing full-screen size image, please select other resolution or other vertical refresh timing. · Wait for servicing, please check the troubleshooting list below...
... causing the input signal frequency mismatch. LED displays blinking blue · Check if video signal cable is properly connected at the back of monitor. · Check if the power of computer system is properly connected to their default settings. LED OFF · Check the power switch. No Picture · Check if AC power cord is ON. Abnormal Picture Display is in case of missing full-screen size image, please select other resolution or other vertical refresh timing. · Wait for servicing, please check the troubleshooting list below...

User Manual
Page 23
(DVI mode) Problems No Picture Current Status Remedy LED ON · Using OSD, adjust brightness and contrast to maximum or reset to the monitor. EN-22 LED displays blinking blue · Check if video signal cable is properly connected at the back of monitor. · Check if the power of computer system is properly connected to their default settings. LED OFF · Check the power switch. · Check if AC power cord is ON.
(DVI mode) Problems No Picture Current Status Remedy LED ON · Using OSD, adjust brightness and contrast to maximum or reset to the monitor. EN-22 LED displays blinking blue · Check if video signal cable is properly connected at the back of monitor. · Check if the power of computer system is properly connected to their default settings. LED OFF · Check the power switch. · Check if AC power cord is ON.
User Manual
Page 24
...of the following harmonized standards: -. EN55024 -. EN60950-1 RoHS Directive 2002/95/EC on the Restriction of the Use of Conformity We, Acer Incorporated 8F, 88, Sec. 1, Xintai 5th Rd., Xizhi, New Taipei City 221, Taiwan Contact Person: Mr. RU ...assure that production units of ecodesign requirements for the setting of the same product will continue comply with the following EC directives, and that : Product: LCD Monitor Trade Name: Acer Model Number: G196WL;G206HL;G226HQL;G236HL SKU Number: G196WL xxxxxx;G206HLxxxxxx; Acer Incorporated 8F, 88, Sec. 1, Xintai 5th ...
...of the following harmonized standards: -. EN55024 -. EN60950-1 RoHS Directive 2002/95/EC on the Restriction of the Use of Conformity We, Acer Incorporated 8F, 88, Sec. 1, Xintai 5th Rd., Xizhi, New Taipei City 221, Taiwan Contact Person: Mr. RU ...assure that production units of ecodesign requirements for the setting of the same product will continue comply with the following EC directives, and that : Product: LCD Monitor Trade Name: Acer Model Number: G196WL;G206HL;G226HQL;G236HL SKU Number: G196WL xxxxxx;G206HLxxxxxx; Acer Incorporated 8F, 88, Sec. 1, Xintai 5th ...
User Manual
Page 25
...of Conformity This device complies with Part 15 of Responsible Party: 333 West San Carlos St. G206HL ;G226HQL;G236HL SKU Number: Name of Responsible Party: G196WL xxxxxx ;G206HL xxxxxx G226HQL xxxxxx ;G236HL xxxxxx ("x" = 0~9, a ~ z, A ~ Z or Blank) Acer America Corporation Address of the FCC... interference that may not cause harmful interference, and (2) this declaration: Product: LCD Monitor Model Number: G196WL; Contact Person: Acer Representative Phone No.: 254-298-4000 Fax No.: 254-298-4147 Acer America Corporation 333 West San Carlos St., San Jose CA 95110, U. S....
...of Conformity This device complies with Part 15 of Responsible Party: 333 West San Carlos St. G206HL ;G226HQL;G236HL SKU Number: Name of Responsible Party: G196WL xxxxxx ;G206HL xxxxxx G226HQL xxxxxx ;G236HL xxxxxx ("x" = 0~9, a ~ z, A ~ Z or Blank) Acer America Corporation Address of the FCC... interference that may not cause harmful interference, and (2) this declaration: Product: LCD Monitor Model Number: G196WL; Contact Person: Acer Representative Phone No.: 254-298-4000 Fax No.: 254-298-4147 Acer America Corporation 333 West San Carlos St., San Jose CA 95110, U. S....


