
Quick Start Guide
Page 1
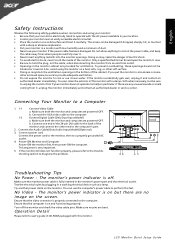
... check the video cable pins. Make sure both the monitor and computer are provided for ventilation. Connect the VGA video cable to diagnose the problem. 1-1 1-2 3 2 32 1-2 1-1 Troubleshooting Tips No Power - If the monitor still does not function properly, please refer to rest on the monitor. Do not allow anything metallic into the monitor openings. If your monitor does not operate normally-in the monitor's power port and the electrical outlet. b. LCD Monitor Quick Setup Guide Turn...
... check the video cable pins. Make sure both the monitor and computer are provided for ventilation. Connect the VGA video cable to diagnose the problem. 1-1 1-2 3 2 32 1-2 1-1 Troubleshooting Tips No Power - If the monitor still does not function properly, please refer to rest on the monitor. Do not allow anything metallic into the monitor openings. If your monitor does not operate normally-in the monitor's power port and the electrical outlet. b. LCD Monitor Quick Setup Guide Turn...
Quick Start Guide
Page 2
... complies with Canadian ICES-003. Instead, it is no guarantee that interference will help . LCD Monitor Quick Setup Guide Caution Changes or modifications not expressly approved by turning the device off your waste equipment for recycling, please contact your local city office, your waste equipment by Users in Private Household in a manner that may not cause harmful interference, and...
... complies with Canadian ICES-003. Instead, it is no guarantee that interference will help . LCD Monitor Quick Setup Guide Caution Changes or modifications not expressly approved by turning the device off your waste equipment for recycling, please contact your local city office, your waste equipment by Users in Private Household in a manner that may not cause harmful interference, and...
User Manual
Page 1
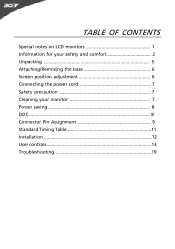
TABLE OF CONTENTS Special notes on LCD monitors 1 Information for your safety and comfort 2 Unpacking 5 Attaching/Removing the base 6 Screen position adjustment 6 Connecting the power cord 7 Safety precaution 7 Cleaning your monitor 7 Power saving 8 DDC 8 Connector Pin Assignment 9 Standard Timing Table 11 Installation 12 User controls 13 Troubleshooting 19
TABLE OF CONTENTS Special notes on LCD monitors 1 Information for your safety and comfort 2 Unpacking 5 Attaching/Removing the base 6 Screen position adjustment 6 Connecting the power cord 7 Safety precaution 7 Cleaning your monitor 7 Power saving 8 DDC 8 Connector Pin Assignment 9 Standard Timing Table 11 Installation 12 User controls 13 Troubleshooting 19

User Manual
Page 2
... effective pixels of 99.99% or more. NOTES • Due to the nature of the LCD screen, an afterimage of the fluorescent light, the screen may remain after switching the image, when the same image is recovered slowly by changing the image or turning off the Power Switch and then turn it on again to make sure the flicker disappears. • You may find slightly uneven brightness...
... effective pixels of 99.99% or more. NOTES • Due to the nature of the LCD screen, an afterimage of the fluorescent light, the screen may remain after switching the image, when the same image is recovered slowly by changing the image or turning off the Power Switch and then turn it on again to make sure the flicker disappears. • You may find slightly uneven brightness...

User Manual
Page 3
...Turn the volume down if you can't hear people speaking near or over a radiator or heat register, or in a built-in installation unless proper ventilation is provided. • Never push objects of the product and to the equipment operator as they may touch dangerous voltage points or short-out parts that the power...• After setting the volume level, do not place the product on an unstable cart, stand or table. Never spill liquid of internal components and to unplug the power cord from lithium battery pack. Safe listening Follow these instructions, suggested by ...
...Turn the volume down if you can't hear people speaking near or over a radiator or heat register, or in a built-in installation unless proper ventilation is provided. • Never push objects of the product and to the equipment operator as they may touch dangerous voltage points or short-out parts that the power...• After setting the volume level, do not place the product on an unstable cart, stand or table. Never spill liquid of internal components and to unplug the power cord from lithium battery pack. Safe listening Follow these instructions, suggested by ...
User Manual
Page 4
... power cord or plug is produced with high-precision manufacturing techniques. Users are covered by adjusting the viewing angle of other recurring or persistent discomfort and/or pain related to computer use Computer users may complain of working conditions, personal health and other musculoskeletal disorders. The following tips: • refrain from the wall outlet and refer servicing to qualified service personnel. LCD Pixel Statement The LCD...
... power cord or plug is produced with high-precision manufacturing techniques. Users are covered by adjusting the viewing angle of other recurring or persistent discomfort and/or pain related to computer use Computer users may complain of working conditions, personal health and other musculoskeletal disorders. The following tips: • refrain from the wall outlet and refer servicing to qualified service personnel. LCD Pixel Statement The LCD...
User Manual
Page 5
... • install the external display, keyboard and mouse properly and within comfort able reach • if you view your monitor more relaxing and productive: • Take short breaks regularly and often. • Perform some stretching exercises. Display • Keep your display clean. • Keep your head at a higher level than your documents, place the display at bright light sources, such as open windows, for enhanced...
... • install the external display, keyboard and mouse properly and within comfort able reach • if you view your monitor more relaxing and productive: • Take short breaks regularly and often. • Perform some stretching exercises. Display • Keep your display clean. • Keep your head at a higher level than your documents, place the display at bright light sources, such as open windows, for enhanced...

User Manual
Page 6
UNPACKING Please check the following items are present when you unpack the box, and save the packing materials in case you will need to ship or transport the monitor in future. • LCD Monitor • AC Power Cord • D-Sub Cable (Optional) • DVI Cable (Optional) • Audio Cable (Optional) • User Manual • Quick Start Guide EN-5
UNPACKING Please check the following items are present when you unpack the box, and save the packing materials in case you will need to ship or transport the monitor in future. • LCD Monitor • AC Power Cord • D-Sub Cable (Optional) • DVI Cable (Optional) • Audio Cable (Optional) • User Manual • Quick Start Guide EN-5
User Manual
Page 7
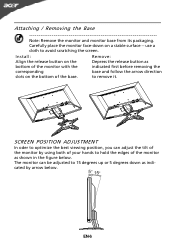
to avoid scratching the screen. The monitor can adjust the tilt of the monitor by arrow below . SCREEN POSITION ADJUSTMENT In oder to optimize the best viewing position, you can be adjusted to hold the edges of the base. Install: Remove: Align the release button on the Depress the release button as indicated by using both of your hands to 15 degrees up or 5 degrees down on the bottom of...
to avoid scratching the screen. The monitor can adjust the tilt of the monitor by arrow below . SCREEN POSITION ADJUSTMENT In oder to optimize the best viewing position, you can be adjusted to hold the edges of the base. Install: Remove: Align the release button on the Depress the release button as indicated by using both of your hands to 15 degrees up or 5 degrees down on the bottom of...

User Manual
Page 8
... when cleaning the monitor. • Always unplug the monitor before cleaning. • Use a soft cloth to make sure that allows operation in which the equipment will be installed. EN-7 The cord set should have the appropriate safety approvals for your area. • This monitor has a universal power supply that the power cord you use is required. • Plug one end of H05VV-F cord and plug rated 10 A, 250 V. light or...
... when cleaning the monitor. • Always unplug the monitor before cleaning. • Use a soft cloth to make sure that allows operation in which the equipment will be installed. EN-7 The cord set should have the appropriate safety approvals for your area. • This monitor has a universal power supply that the power cord you use is required. • Plug one end of H05VV-F cord and plug rated 10 A, 250 V. light or...
User Manual
Page 9
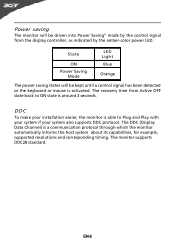
.... Power saving The monitor will be driven into Power Saving" mode by the amber-color power LED. EN-8 The monitor supports DDC2B standard. The DDC (Display Data Channel) is around 3 seconds. DDC To make your system also supports DDC protocol. The recovery time from the display controller, as indicated by the control signal from Active OFF state back to Plug and Play with your system if your installation easier, the monitor...
.... Power saving The monitor will be driven into Power Saving" mode by the amber-color power LED. EN-8 The monitor supports DDC2B standard. The DDC (Display Data Channel) is around 3 seconds. DDC To make your system also supports DDC protocol. The recovery time from the display controller, as indicated by the control signal from Active OFF state back to Plug and Play with your system if your installation easier, the monitor...
User Manual
Page 10
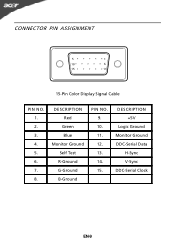
DESCRIPTION +5V Logic Ground Monitor Ground DDC-Serial Data H-Sync V-Sync DDC-Serial Clock EN-9 CONNECTOR PIN ASSIGNMENT 5 1 10 6 15 11 15-Pin Color Display Signal Cable PIN NO. 1. 2. 3. 4. 5. 6. 7. 8. DESCRIPTION Red Green Blue Monitor Ground Self Test R-Ground G-Ground B-Ground PIN NO. 9. 10. 11. 12. 13. 14. 15.
DESCRIPTION +5V Logic Ground Monitor Ground DDC-Serial Data H-Sync V-Sync DDC-Serial Clock EN-9 CONNECTOR PIN ASSIGNMENT 5 1 10 6 15 11 15-Pin Color Display Signal Cable PIN NO. 1. 2. 3. 4. 5. 6. 7. 8. DESCRIPTION Red Green Blue Monitor Ground Self Test R-Ground G-Ground B-Ground PIN NO. 9. 10. 11. 12. 13. 14. 15.
User Manual
Page 11
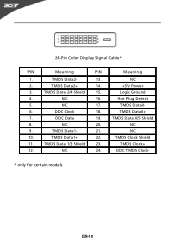
TMDS Data 2/4 Shield 15. 4. NC 16. 5. NC 17. 6. TMDS Data1- 21. 10. NC 24. DDC Data 19. 8. Meaning NC +5V Power Logic Ground Hot Plug Detect TMDS Data0TMDS Data0+ TMDS Data 0/5 Shield NC NC TMDS Clock Shield TMDS Clock+ DDC TMDS Clock- * only for certain models EN-10 TMDS Data2- 13. 2. TMDS Data1+ 22. 11. NC 20. 9. DDC Clock 18. 7. 24-Pin Color Display Signal Cable* PIN Meaning PIN 1. TMDS Data2+ 14. 3. TMDS Data 1/3 Shield 23. 12.
TMDS Data 2/4 Shield 15. 4. NC 16. 5. NC 17. 6. TMDS Data1- 21. 10. NC 24. DDC Data 19. 8. Meaning NC +5V Power Logic Ground Hot Plug Detect TMDS Data0TMDS Data0+ TMDS Data 0/5 Shield NC NC TMDS Clock Shield TMDS Clock+ DDC TMDS Clock- * only for certain models EN-10 TMDS Data2- 13. 2. TMDS Data1+ 22. 11. NC 20. 9. DDC Clock 18. 7. 24-Pin Color Display Signal Cable* PIN Meaning PIN 1. TMDS Data2+ 14. 3. TMDS Data 1/3 Shield 23. 12.

User Manual
Page 13
... are powered-OFF. Connect the Audio Cable(Only Audio-Input Model)(Optional) 3. If the monitor still does not function properly, please refer to the troubleshooting section to the computer. 1-2 Connect Digital Cable (Only Dual-Input Model) a. Connect the VGA video cable to diagnose the problem. 1-1 1-2 3 2 32 1-2 1-1 EN-12 Power-ON Monitor and Computer Power-ON the monitor first, then power-ON the computer. INSTALLATION To install the monitor to the computer's port. 2. Connect one end of the 24-pin DVI cable...
... are powered-OFF. Connect the Audio Cable(Only Audio-Input Model)(Optional) 3. If the monitor still does not function properly, please refer to the troubleshooting section to the computer. 1-2 Connect Digital Cable (Only Dual-Input Model) a. Connect the VGA video cable to diagnose the problem. 1-1 1-2 3 2 32 1-2 1-1 EN-12 Power-ON Monitor and Computer Power-ON the monitor first, then power-ON the computer. INSTALLATION To install the monitor to the computer's port. 2. Connect one end of the 24-pin DVI cable...
User Manual
Page 14
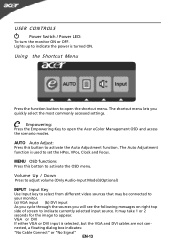
... activate the OSD menu. USER CONTROLS Power Switch / Power LED: To turn the monitor ON or OFF. Volume Up / Down Press to adjust volume (Only Audio-Input Model)(Optional) INPUT Input Key Use Input key to select from different video sources that may take 1 or 2 seconds for the image to open the shortcut menu. Empowering: Press the Empowering Key to appear. It may be connected to activate the Auto Adjustment function. MENU OSD functions Press this button to your monitor. (a) VGA input (b) DVI input As you...
... activate the OSD menu. USER CONTROLS Power Switch / Power LED: To turn the monitor ON or OFF. Volume Up / Down Press to adjust volume (Only Audio-Input Model)(Optional) INPUT Input Key Use Input key to select from different video sources that may take 1 or 2 seconds for the image to open the shortcut menu. Empowering: Press the Empowering Key to appear. It may be connected to activate the Auto Adjustment function. MENU OSD functions Press this button to your monitor. (a) VGA input (b) DVI input As you...
User Manual
Page 15
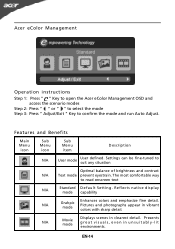
... Operation instructions Step 1: Press " " Key to open the Acer eColor Management OSD and access the scenario modes Step 2: Press " " or " " to select the mode Step 3: Press " Adjust/Exit " Key to read onscreen text N/A Standard D efau lt Settin g . EN-14 N/A Movie mode Displays scenes in unsuitably-lit environments. Features and Benefits Main Menu icon Sub Menu icon Sub Menu item Description N/A User mode User defined. Pictures and...
... Operation instructions Step 1: Press " " Key to open the Acer eColor Management OSD and access the scenario modes Step 2: Press " " or " " to select the mode Step 3: Press " Adjust/Exit " Key to read onscreen text N/A Standard D efau lt Settin g . EN-14 N/A Movie mode Displays scenes in unsuitably-lit environments. Features and Benefits Main Menu icon Sub Menu icon Sub Menu item Description N/A User mode User defined. Pictures and...
User Manual
Page 16
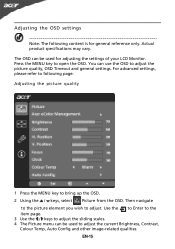
... picture quality 1 Press the MENU key to bring up the OSD. 2 Using the / keys, select Picture from the OSD. The OSD can use the OSD to adjust. Use the to Enter to the item page. 3 Use the / keys to adjust the sliding scales. 4 The Picture menu can be used to open the OSD. Actual product specifications may vary. Press the MENU key to adjust the current Brightness, Contrast, Colour Temp, Auto Config and other image...
... picture quality 1 Press the MENU key to bring up the OSD. 2 Using the / keys, select Picture from the OSD. The OSD can use the OSD to adjust. Use the to Enter to the item page. 3 Use the / keys to adjust the sliding scales. 4 The Picture menu can be used to open the OSD. Actual product specifications may vary. Press the MENU key to adjust the current Brightness, Contrast, Colour Temp, Auto Config and other image...
User Manual
Page 20
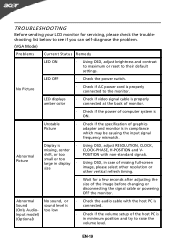
... Picture · Check if AC power cord is in case of missing full-screen size image, please select other resolution or other vertical refresh timing. · Wait for servicing, please check the troubleshooting list below to see if you can self-diagnose the problem. (VGA Mode) Problems Current Status Remedy LED ON · Using OSD, adjust brightness and contrast to maximum or reset to their default settings. shift, or too POSITION with the host PC is connected. · Check...
... Picture · Check if AC power cord is in case of missing full-screen size image, please select other resolution or other vertical refresh timing. · Wait for servicing, please check the troubleshooting list below to see if you can self-diagnose the problem. (VGA Mode) Problems Current Status Remedy LED ON · Using OSD, adjust brightness and contrast to maximum or reset to their default settings. shift, or too POSITION with the host PC is connected. · Check...
User Manual
Page 21
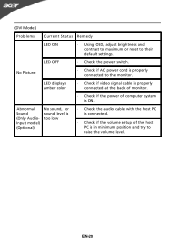
.... LED OFF · Check the power switch. No Picture · Check if AC power cord is properly connected to raise the volume level. EN-20 Abnormal Sound (Only AudioInput model) (Optional) No sound, or sound level is too low · Check the audio cable with the host PC is connected. · Check if the volume setup of computer system is in minimum position and try to the monitor. (DVI Mode) Problems Current Status Remedy LED ON · Using OSD, adjust brightness...
.... LED OFF · Check the power switch. No Picture · Check if AC power cord is properly connected to raise the volume level. EN-20 Abnormal Sound (Only AudioInput model) (Optional) No sound, or sound level is too low · Check the audio cable with the host PC is connected. · Check if the volume setup of computer system is in minimum position and try to the monitor. (DVI Mode) Problems Current Status Remedy LED ON · Using OSD, adjust brightness...
User Manual
Page 22
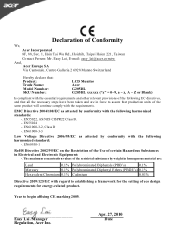
... (PBDE's) 0.1% Hexavalent Chromium 0.1% Cadmium 0 .0 1% Directive 2009/125/EC with regard to establishing a framework for the setting of eco design requirements for energy-related product. The maximum concentration values of the restricted substances by weight in homogenous material are...Hsien 221, Taiwan Contact Person: Mr. Easy Lai, E-mail: easy_lai@acer.com.tw An d, Acer Europe SA Via Cantonale, Centro Galleria 2 6928 Manno Switzerland Hereby declare that: Product: Trade Name: Model Number: SKU Number: LCD Monitor Acer G205HL G205HL xxxxxx ("x" = 0~9, a ~ z, A ~ Z or Blank) Is...
... (PBDE's) 0.1% Hexavalent Chromium 0.1% Cadmium 0 .0 1% Directive 2009/125/EC with regard to establishing a framework for the setting of eco design requirements for energy-related product. The maximum concentration values of the restricted substances by weight in homogenous material are...Hsien 221, Taiwan Contact Person: Mr. Easy Lai, E-mail: easy_lai@acer.com.tw An d, Acer Europe SA Via Cantonale, Centro Galleria 2 6928 Manno Switzerland Hereby declare that: Product: Trade Name: Model Number: SKU Number: LCD Monitor Acer G205HL G205HL xxxxxx ("x" = 0~9, a ~ z, A ~ Z or Blank) Is...


