
User Guide
Page 1
FHD2400 24-inch Widescreen LCD Monitor USERGUIDE ®
FHD2400 24-inch Widescreen LCD Monitor USERGUIDE ®

User Guide
Page 3
... Gateway Flat-Panel Monitor 1 Connecting the monitor 2 Attaching the stand 2 Connecting video inputs 2 Connecting USB cables 4 Setting up the optional speaker bar 5 Connecting power 7 Connecting a security cable 7 Adjusting the stand 8 Rotating the screen 8 Ergonomic guidelines 8 Starting the monitor 9 Turning on the monitor 9 Adjusting monitor ...not sized or centered correctly 20 The monitor has pixels that are always dark or too bright 20 Speaker bar does not work 21 FAQs 22 General 22 How To 22 Technical 23 Video/Display 23 Specifications 24 Video modes 26 Safety...
... Gateway Flat-Panel Monitor 1 Connecting the monitor 2 Attaching the stand 2 Connecting video inputs 2 Connecting USB cables 4 Setting up the optional speaker bar 5 Connecting power 7 Connecting a security cable 7 Adjusting the stand 8 Rotating the screen 8 Ergonomic guidelines 8 Starting the monitor 9 Turning on the monitor 9 Adjusting monitor ...not sized or centered correctly 20 The monitor has pixels that are always dark or too bright 20 Speaker bar does not work 21 FAQs 22 General 22 How To 22 Technical 23 Video/Display 23 Specifications 24 Video modes 26 Safety...

User Guide
Page 5
Using Your Gateway Flat-Panel Monitor • Connecting the monitor • Adjusting the stand • Starting the monitor • Adjusting monitor settings • Changing Windows screen settings • Using the speaker bar • Power management • Maintaining • Troubleshooting • FAQs • Specifications 1
Using Your Gateway Flat-Panel Monitor • Connecting the monitor • Adjusting the stand • Starting the monitor • Adjusting monitor settings • Changing Windows screen settings • Using the speaker bar • Power management • Maintaining • Troubleshooting • FAQs • Specifications 1
User Guide
Page 6
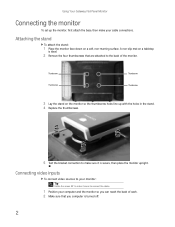
... four thumbscrews that are attached to the back of each. 2 Make sure that you computer is secure, then place the monitor upright. Using Your Gateway Flat-Panel Monitor Connecting the monitor To set up with the holes in the stand. 4 Replace the thumbscrews. 5 Test the bracket connection to make sure .... Thumbscrew Thumbscrew Thumbscrew Thumbscrew 3 Lay the stand on a soft, non-marring surface. Attaching the stand To attach the stand: 1 Place the monitor face-down on the monitor so the thumbscrew holes line up the monitor, first attach the base, then make your computer and the...
... four thumbscrews that are attached to the back of each. 2 Make sure that you computer is secure, then place the monitor upright. Using Your Gateway Flat-Panel Monitor Connecting the monitor To set up with the holes in the stand. 4 Replace the thumbscrews. 5 Test the bracket connection to make sure .... Thumbscrew Thumbscrew Thumbscrew Thumbscrew 3 Lay the stand on a soft, non-marring surface. Attaching the stand To attach the stand: 1 Place the monitor face-down on the monitor so the thumbscrew holes line up the monitor, first attach the base, then make your computer and the...

User Guide
Page 7
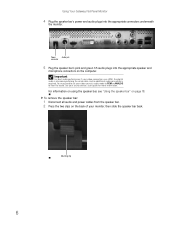
...video cable to the HDMI connector under the back of the display. A cable can be purchased from various Internet retailers and electronic retail stores. - only) or from www.gateway.com (available in the U.S. www.gateway.com 3 If your monitor. Important An HDMI cable has not been included with your ...computer has an HDMI digital audio/video connector, connect an HDMI cable to the white connector under the back of the display. -
...video cable to the HDMI connector under the back of the display. A cable can be purchased from various Internet retailers and electronic retail stores. - only) or from www.gateway.com (available in the U.S. www.gateway.com 3 If your monitor. Important An HDMI cable has not been included with your ...computer has an HDMI digital audio/video connector, connect an HDMI cable to the white connector under the back of the display. -

User Guide
Page 8
...devices. USB in USB 2.0 hub provides only low-speed connections if its own power connection. To use the monitor's USB ports, you want to keep connected most of the time, such as a DVD player, video ... be much easier to a USB port on the back of the stand. Using Your Gateway Flat-Panel Monitor 5 Connect other end of the cable to a USB 2.0 port on your computer. ... (green Y, blue Pb, and red Pr) or HDMI jacks to the corresponding jacks on the back of your monitor (cables not included). 6 Route the cables through the cable clip on your computer. To connect USB cables: Important...
...devices. USB in USB 2.0 hub provides only low-speed connections if its own power connection. To use the monitor's USB ports, you want to keep connected most of the time, such as a DVD player, video ... be much easier to a USB port on the back of the stand. Using Your Gateway Flat-Panel Monitor 5 Connect other end of the cable to a USB 2.0 port on your computer. ... (green Y, blue Pb, and red Pr) or HDMI jacks to the corresponding jacks on the back of your monitor (cables not included). 6 Route the cables through the cable clip on your computer. To connect USB cables: Important...

User Guide
Page 9
...connect the speaker bar to the monitor while the monitor is turned on the left side or back of the monitor. If this happens, turn the monitor off the monitor. Mounting slot Mounting clip 3 Slide the speaker bar onto the bottom of the monitor until it downward. 5 www.gateway.com 2 Connect any USB device... to one of the available USB 2.0 ports on , the speaker bar will not initialize and will not work correctly. You can order a speaker bar from www.gateway.com. USB ports Setting up ...
...connect the speaker bar to the monitor while the monitor is turned on the left side or back of the monitor. If this happens, turn the monitor off the monitor. Mounting slot Mounting clip 3 Slide the speaker bar onto the bottom of the monitor until it downward. 5 www.gateway.com 2 Connect any USB device... to one of the available USB 2.0 ports on , the speaker bar will not initialize and will not work correctly. You can order a speaker bar from www.gateway.com. USB ports Setting up ...
User Guide
Page 10
...Power Audio jack connector 5 Plug the speaker bar's pink and green 3.5 audio plugs into the appropriate connectors underneath the monitor. Using Your Gateway Flat-Panel Monitor 4 Plug the speaker bar's power and audio plugs into the appropriate speaker and microphone connectors on the computer. For ...digital audio is also conveyed along the same cable, and no additional audio connection is required. Important For best audio performance, if your monitor, then slide the speaker bar back. Mounting clip 6 To remove the speaker bar: 1 Disconnect all audio and power cables from the...
...Power Audio jack connector 5 Plug the speaker bar's pink and green 3.5 audio plugs into the appropriate connectors underneath the monitor. Using Your Gateway Flat-Panel Monitor 4 Plug the speaker bar's power and audio plugs into the appropriate speaker and microphone connectors on the computer. For ...digital audio is also conveyed along the same cable, and no additional audio connection is required. Important For best audio performance, if your monitor, then slide the speaker bar back. Mounting clip 6 To remove the speaker bar: 1 Disconnect all audio and power cables from the...

User Guide
Page 11
... the power connector under the back of your monitor from voltage spikes. 3 To make sure that the monitor's power is not connected. www.gateway.com Connecting power To connect power: 1 Position your monitor so you can secure your monitor to your computer desk (or to protect your monitor (cable lock not included). The power icon on...
... the power connector under the back of your monitor from voltage spikes. 3 To make sure that the monitor's power is not connected. www.gateway.com Connecting power To connect power: 1 Position your monitor so you can secure your monitor to your computer desk (or to protect your monitor (cable lock not included). The power icon on...

User Guide
Page 12
...and the tabletop. Screen height The recommended screen height for more clearance between landscape and portrait views. When the display is that you manually rotate the monitor, see "Using landscape and portrait modes" on available scientific literature and published standards. This guideline places the ...For the brightest viewing angle, adjust the screen so that the top of the display should be easily adjustable to accommodate each user's height and preference. Using Your Gateway Flat-Panel Monitor Adjusting the stand Rotating the screen Tip To rotate the screen while the optional...
...and the tabletop. Screen height The recommended screen height for more clearance between landscape and portrait views. When the display is that you manually rotate the monitor, see "Using landscape and portrait modes" on available scientific literature and published standards. This guideline places the ...For the brightest viewing angle, adjust the screen so that the top of the display should be easily adjustable to accommodate each user's height and preference. Using Your Gateway Flat-Panel Monitor Adjusting the stand Rotating the screen Tip To rotate the screen while the optional...

User Guide
Page 13
...prompt you see is not detecting a video source. You will be prompted for the language selection menu settings again. 4 Adjust the tilt of the monitor for the display image to suit individual preference. The power LED on ), then turns amber/orange (standby) if no video source is turned off ) to the ideal.... If you cannot read, do not see "Using the EzTouch menu buttons" on the front of the power button light. • No light-The monitor is not receiving power. www.gateway.com Screen distance from user The screen should be placed at a future time, use the Advanced menu.
...prompt you see is not detecting a video source. You will be prompted for the language selection menu settings again. 4 Adjust the tilt of the monitor for the display image to suit individual preference. The power LED on ), then turns amber/orange (standby) if no video source is turned off ) to the ideal.... If you cannot read, do not see "Using the EzTouch menu buttons" on the front of the power button light. • No light-The monitor is not receiving power. www.gateway.com Screen distance from user The screen should be placed at a future time, use the Advanced menu.
User Guide
Page 14
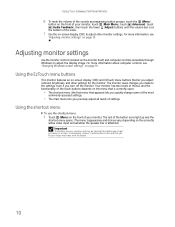
... menu To use the shortcut menu: 1 Touch (Menu) on the front of the scale. 7 Use the on-screen display (OSD) to adjust the display image. Your monitor has two levels of menus, and the functionality of the touch buttons depends on the menu that is currently open: •...; The shortcut menu (the first menu that let you turn off the monitor. To completely "release" a touch button, make to the settings, even if you adjust contrast, brightness, and other monitor settings. Using Your Gateway Flat-Panel Monitor 6 To mute the volume of the sounds accompanying button presses, touch the...
... menu To use the shortcut menu: 1 Touch (Menu) on the front of the scale. 7 Use the on-screen display (OSD) to adjust the display image. Your monitor has two levels of menus, and the functionality of the touch buttons depends on the menu that is currently open: •...; The shortcut menu (the first menu that let you turn off the monitor. To completely "release" a touch button, make to the settings, even if you adjust contrast, brightness, and other monitor settings. Using Your Gateway Flat-Panel Monitor 6 To mute the volume of the sounds accompanying button presses, touch the...

User Guide
Page 15
...when optional speaker bar is connected) Auto (Input Select when optional speaker bar is connected. • Touch (Auto) to automatically adjust your display image to cycle through the available video sources. This option is only available when the optional speaker bar is connected) PIP On PIP Settings ... adjusting a setting's values, you can press and hold touch buttons as you would conventional buttons. www.gateway.com 2 To use an EzTouch menu button, lightly touch its icon. Important If, after the monitor is VGA. • Touch (PIP On) to turn off the button icons and close the menu...
...when optional speaker bar is connected) Auto (Input Select when optional speaker bar is connected. • Touch (Auto) to automatically adjust your display image to cycle through the available video sources. This option is only available when the optional speaker bar is connected) PIP On PIP Settings ... adjusting a setting's values, you can press and hold touch buttons as you would conventional buttons. www.gateway.com 2 To use an EzTouch menu button, lightly touch its icon. Important If, after the monitor is VGA. • Touch (PIP On) to turn off the button icons and close the menu...

User Guide
Page 16
The rest of your monitor. Tip To use the main menu: 1 Touch (Menu) on -screen labels appear next to the buttons to help you identify them. 3 Touch the (Choose Option) ... the OSD is active, on the front of the button icons light up and the shortcut menu opens. The main menu opens. Using Your Gateway Flat-Panel Monitor Using the main menu To use a button, lightly touch its surface. Important The EzTouch menu buttons are very sensitive, and may be "pressed" by...
The rest of your monitor. Tip To use the main menu: 1 Touch (Menu) on -screen labels appear next to the buttons to help you identify them. 3 Touch the (Choose Option) ... the OSD is active, on the front of the button icons light up and the shortcut menu opens. The main menu opens. Using Your Gateway Flat-Panel Monitor Using the main menu To use a button, lightly touch its surface. Important The EzTouch menu buttons are very sensitive, and may be "pressed" by...

User Guide
Page 17
... lowest brightness setting you are comfortable with to its factory settings for the currently displayed input. Gamma-Customizes the gamma level. PIP Settings menu PIP Display-Toggles the display of the monitor backlights. Size-Sets the size of the PIP window on the main screen. ..., where you can adjust color balance, change the OSD language, and display information about current monitor settings. High gamma levels increase white levels and low gamma levels increase contrast. www.gateway.com OSD Menu Description Main menu Auto-Automatically adjusts your computer programs while...
... lowest brightness setting you are comfortable with to its factory settings for the currently displayed input. Gamma-Customizes the gamma level. PIP Settings menu PIP Display-Toggles the display of the monitor backlights. Size-Sets the size of the PIP window on the main screen. ..., where you can adjust color balance, change the OSD language, and display information about current monitor settings. High gamma levels increase white levels and low gamma levels increase contrast. www.gateway.com OSD Menu Description Main menu Auto-Automatically adjusts your computer programs while...

User Guide
Page 18
...menu (VGA input only) Overscan-A video signal is indicated, the resolutions that apply are from the video source. V Position-Moves the display image up and down. Noise Reduction-Uses noise reduction filters that result from composite video signals. ■ MADI-Motion-Adaptive De-Interlacing ensures... apply only to fill the entire screen with black bars on the left and right sides of the display for video images. Using Your Gateway Flat-Panel Monitor OSD Menu Description Video Adjust menu Unless otherwise indicated, these anomalies, turn Overscan on. Sharpness-Adjusts sharpness...
...menu (VGA input only) Overscan-A video signal is indicated, the resolutions that apply are from the video source. V Position-Moves the display image up and down. Noise Reduction-Uses noise reduction filters that result from composite video signals. ■ MADI-Motion-Adaptive De-Interlacing ensures... apply only to fill the entire screen with black bars on the left and right sides of the display for video images. Using Your Gateway Flat-Panel Monitor OSD Menu Description Video Adjust menu Unless otherwise indicated, these anomalies, turn Overscan on. Sharpness-Adjusts sharpness...

User Guide
Page 19
...video can be used for the main display. Information-Displays current screen resolution and input source for analog TV input such as a PIP. UltraResponse-Enables the monitor to completely mute the button tones. ...video from the main to the HDMI video signal and cannot be distorted. www.gateway.com OSD Menu Audio menu (available when optional speaker bar is heard. When ...monitor. LED Mode-Changes the brightness of the OSD. OK OK S-Video OK OK OK OK - - Bass-Adjusts bass tones. Language-Changes the language of the Standby and Power LED to the native LCD...
...video can be used for the main display. Information-Displays current screen resolution and input source for analog TV input such as a PIP. UltraResponse-Enables the monitor to completely mute the button tones. ...video from the main to the HDMI video signal and cannot be distorted. www.gateway.com OSD Menu Audio menu (available when optional speaker bar is heard. When ...monitor. LED Mode-Changes the brightness of the OSD. OK OK S-Video OK OK OK OK - - Bass-Adjusts bass tones. Language-Changes the language of the Standby and Power LED to the native LCD...
User Guide
Page 20
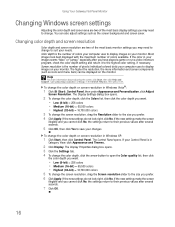
...change the screen resolution, drag the Resolution slider to their previous values after several seconds. 5 Click OK, then click Yes to display images on the monitor. Using Your Gateway Flat-Panel Monitor Changing Windows screen settings Adjusting the color depth and screen area are two of the most basic... display settings you may need to change. Help For more information and screen components (such as icons and menu bars) ...
...change the screen resolution, drag the Resolution slider to their previous values after several seconds. 5 Click OK, then click Yes to display images on the monitor. Using Your Gateway Flat-Panel Monitor Changing Windows screen settings Adjusting the color depth and screen area are two of the most basic... display settings you may need to change. Help For more information and screen components (such as icons and menu bars) ...

User Guide
Page 21
... DVI, or HDMI input (the OSD itself does not rotate into portrait mode). at www.gateway.com) • Change brightness, contrast, and color balance • Change screen geometry • Set the display position and resolution For more information, see the program's CD or the installed program's online ...Video games or other full-screen applications may not be fully compatible. • Some programs are not able to recognize and adapt to your monitor's portrait mode. If you rotate the screen. With EzTune, you control many of the image (landscape to portrait) by just rotating the screen...
... DVI, or HDMI input (the OSD itself does not rotate into portrait mode). at www.gateway.com) • Change brightness, contrast, and color balance • Change screen geometry • Set the display position and resolution For more information, see the program's CD or the installed program's online ...Video games or other full-screen applications may not be fully compatible. • Some programs are not able to recognize and adapt to your monitor's portrait mode. If you rotate the screen. With EzTune, you control many of the image (landscape to portrait) by just rotating the screen...

User Guide
Page 22
... not initialize and will not work correctly. If you connect the speaker bar to the monitor while the monitor is played through the connected headphones. Using Your Gateway Flat-Panel Monitor Using the speaker bar Important If you connected the speaker bar by reducing power consumption during...computer goes into either of headphones. Power management Energy declaration When connected to a computer that supports the VESA Display Power Management Signaling (DPMS) Protocol, the monitor can be reduced to both headphone jacks, and sound plays out of both sets of the speaker bar's ...
... not initialize and will not work correctly. If you connect the speaker bar to the monitor while the monitor is played through the connected headphones. Using Your Gateway Flat-Panel Monitor Using the speaker bar Important If you connected the speaker bar by reducing power consumption during...computer goes into either of headphones. Power management Energy declaration When connected to a computer that supports the VESA Display Power Management Signaling (DPMS) Protocol, the monitor can be reduced to both headphone jacks, and sound plays out of both sets of the speaker bar's ...


