User Manual
Page 3
... into the lens when the lamp is on. Do not place the unit on an unstable surface, cart, or stand. Avoid using the projector. ii - Important: Provides additional information that you enjoy many years of safe use of hazardous situations. These safety and usage instructions will ensure that should...
... into the lens when the lamp is on. Do not place the unit on an unstable surface, cart, or stand. Avoid using the projector. ii - Important: Provides additional information that you enjoy many years of safe use of hazardous situations. These safety and usage instructions will ensure that should...

User Manual
Page 4
... enclosures should pass a certified thermal evaluation to ensure that the surrounding air temperature within the enclosure does not exceed operation temperature while the projector is with the acceptable operation temperature range. - Mininum 500mm (19.69 inch) Mininum 500mm (19.69 inch) Mininum 500mm (19.69... Ensure that the intake vents do not recycle hot air from the exhaust vent. When operating the projector in a horizontal position Do not tilt the projector to the left or right, otherwise light source life could decrease dramatically, and may cause the device to other...
... enclosures should pass a certified thermal evaluation to ensure that the surrounding air temperature within the enclosure does not exceed operation temperature while the projector is with the acceptable operation temperature range. - Mininum 500mm (19.69 inch) Mininum 500mm (19.69 inch) Mininum 500mm (19.69... Ensure that the intake vents do not recycle hot air from the exhaust vent. When operating the projector in a horizontal position Do not tilt the projector to the left or right, otherwise light source life could decrease dramatically, and may cause the device to other...
User Manual
Page 5
...the air outlet is no object blocking air input within 30 cm. Keep the inlet away from other qualified 3-blade (with the Projector should be used. The shutdown process may vary depending on Altitude Mode when located in high altitude areas When installation the bracket,... - In case of any obstruction to ensure proper cooling. Air outlet location should not be in front of the lens of other projector to avoid causing illusions. Keep the outlet at high temperature, insufficient cooling and heavy dust locations. Keep your product away ...
...the air outlet is no object blocking air input within 30 cm. Keep the inlet away from other qualified 3-blade (with the Projector should be used. The shutdown process may vary depending on Altitude Mode when located in high altitude areas When installation the bracket,... - In case of any obstruction to ensure proper cooling. Air outlet location should not be in front of the lens of other projector to avoid causing illusions. Keep the outlet at high temperature, insufficient cooling and heavy dust locations. Keep your product away ...

User Manual
Page 6
...: Unplug the power cord. Allow the lamp to cool for about one hour. Regulatory Warnings Before installing and using the projector, read the regulatory notices in use of separate recycling collection services. - Important Recycle Instructions: Lamp(s) inside this procedure. v - Replacing the ...electronic equipment. Recycle or dispose in injury. For more information, contact the Electronic Industries Alliance at WWW.EIAE.ORG. See Cleaning the Projector on page 53. Allow the lamp to be in the way of foot traffic. Remove the batteries from ...
...: Unplug the power cord. Allow the lamp to cool for about one hour. Regulatory Warnings Before installing and using the projector, read the regulatory notices in use of separate recycling collection services. - Important Recycle Instructions: Lamp(s) inside this procedure. v - Replacing the ...electronic equipment. Recycle or dispose in injury. For more information, contact the Electronic Industries Alliance at WWW.EIAE.ORG. See Cleaning the Projector on page 53. Allow the lamp to be in the way of foot traffic. Remove the batteries from ...
User Manual
Page 7
It is suggested that you only print sections that are relevant to your convenience and to install and operate the DLP projector. Wherever possible, relevant information-such as an illustration and its description-has been kept on one page. About this Manual This manual is both for ...
It is suggested that you only print sections that are relevant to your convenience and to install and operate the DLP projector. Wherever possible, relevant information-such as an illustration and its description-has been kept on one page. About this Manual This manual is both for ...

User Manual
Page 8
... REMOVING THE OPTIONAL LENS ...11 Removing the Existing Lens From the Projector 11 Installing the New Lens ...12 STARTING AND SHUTTING DOWN THE PROJECTOR...13 SETTING AN ACCESS PASSWORD (SECURITY LOCK) ...15 ADJUSTING THE PROJECTOR LEVEL ...17 ADJUSTING PROJECTED IMAGE POSITION USING SHIFT ...18 Adjusting the...39 Remote Setting ...48 Status ...48 MAINTENANCE AND SECURITY ...49 REPLACING THE PROJECTION LAMP...49 Resetting the Lamp Time ...52 CLEANING THE PROJECTOR...53 Cleaning the Lens ...53 Cleaning the Case...53 USING THE PHYSICAL LOCK ...54 Using the Kensington Security Slot ...54 Using the...
... REMOVING THE OPTIONAL LENS ...11 Removing the Existing Lens From the Projector 11 Installing the New Lens ...12 STARTING AND SHUTTING DOWN THE PROJECTOR...13 SETTING AN ACCESS PASSWORD (SECURITY LOCK) ...15 ADJUSTING THE PROJECTOR LEVEL ...17 ADJUSTING PROJECTED IMAGE POSITION USING SHIFT ...18 Adjusting the...39 Remote Setting ...48 Status ...48 MAINTENANCE AND SECURITY ...49 REPLACING THE PROJECTION LAMP...49 Resetting the Lamp Time ...52 CLEANING THE PROJECTOR...53 Cleaning the Lens ...53 Cleaning the Case...53 USING THE PHYSICAL LOCK ...54 Using the Kensington Security Slot ...54 Using the...
User Manual
Page 9
viii - PROJECTION SIZE (XGA)...60 Projection Distance and Size Table...60 TIMING MODE TABLE ...62 PROJECTOR DIMENSIONS ...64 REGULATORY COMPLIANCE...65 FCC WARNING ...65 CANADA ...65 SAFETY CERTIFICATIONS ...65 APPENDIX I...66 FUNCTION COMMAND SUMMARY TABLE:...66 - COMMON PROBLEMS AND SOLUTIONS ...55 TIPS FOR TROUBLESHOOTING ...55 LED ERROR MESSAGES...56 IMAGE PROBLEMS...56 LAMP PROBLEMS ...57 REMOTE CONTROL PROBLEMS ...57 AUDIO PROBLEMS ...57 HAVING THE PROJECTOR SERVICED ...57 HDMI Q & A ...58 SPECIFICATIONS ...59 SPECIFICATIONS...59 PROJECTION DISTANCE VS.
viii - PROJECTION SIZE (XGA)...60 Projection Distance and Size Table...60 TIMING MODE TABLE ...62 PROJECTOR DIMENSIONS ...64 REGULATORY COMPLIANCE...65 FCC WARNING ...65 CANADA ...65 SAFETY CERTIFICATIONS ...65 APPENDIX I...66 FUNCTION COMMAND SUMMARY TABLE:...66 - COMMON PROBLEMS AND SOLUTIONS ...55 TIPS FOR TROUBLESHOOTING ...55 LED ERROR MESSAGES...56 IMAGE PROBLEMS...56 LAMP PROBLEMS ...57 REMOTE CONTROL PROBLEMS ...57 AUDIO PROBLEMS ...57 HAVING THE PROJECTOR SERVICED ...57 HDMI Q & A ...58 SPECIFICATIONS ...59 SPECIFICATIONS...59 PROJECTION DISTANCE VS.
User Manual
Page 10
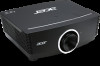
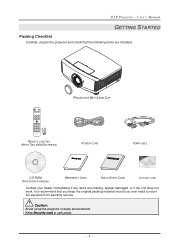
... STARTED Packing Checklist Carefully unpack the projector and check that you keep the original packing material should you ever need to return the equipment for warranty service. Keep Security card in dusty environments. DLP Projector - Caution: Avoid using the projector in safe place. - 1 -... It is recommend that the following items are included: PROJECTOR WITH LENS CAP REMOTE CONTROL (WITH TWO AAA BATTERIES) POWER CORD VGA...
... STARTED Packing Checklist Carefully unpack the projector and check that you keep the original packing material should you ever need to return the equipment for warranty service. Keep Security card in dusty environments. DLP Projector - Caution: Avoid using the projector in safe place. - 1 -... It is recommend that the following items are included: PROJECTOR WITH LENS CAP REMOTE CONTROL (WITH TWO AAA BATTERIES) POWER CORD VGA...

User Manual
Page 11
... lamp module. 11 SEE PAGE 3 18 11 19 20 7 15 49 Important: Ventilation openings on the projector allow for good air circulation, which keeps the projector lamp cool. Adjusts the image position horizontally. Removes cover to loosen the screw before removing the lens. Press...button before lens shift adjustment and tighten up after finished adjustment. - 2 - Receives IR signal from remote control. Adjusts level of projector. For ensure the lens position. Adjusts the image position vertically. Projection Lens. LABEL Function keys Screw Vertical lens shift Lens release button ...
... lamp module. 11 SEE PAGE 3 18 11 19 20 7 15 49 Important: Ventilation openings on the projector allow for good air circulation, which keeps the projector lamp cool. Adjusts the image position horizontally. Removes cover to loosen the screw before removing the lens. Press...button before lens shift adjustment and tighten up after finished adjustment. - 2 - Receives IR signal from remote control. Adjusts level of projector. For ensure the lens position. Adjusts the image position vertically. Projection Lens. LABEL Function keys Screw Vertical lens shift Lens release button ...

User Manual
Page 13
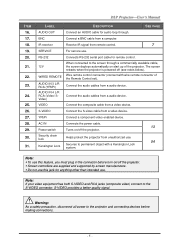
... Green Lamp Lit , System stable Flashing Power on first). Connect the DVI cable from an input device. Connect a DISPLAYPORT cable to place the projector in standby 13 mode. Connect the AUDIO cable from a computer. Press to a DISPLAYPORT source. Connect the RGB cable to a display. (Pass.... Connect 3D IR glasses receiver unit. For USB charge. Connect the AUDIO cable from a computer or a video enabled device. Turns the projector on or off (main power switch must be turned on , Cooling, Error code (See as LED indicator table) Red Over temperature 56 ...
... Green Lamp Lit , System stable Flashing Power on first). Connect the DVI cable from an input device. Connect a DISPLAYPORT cable to place the projector in standby 13 mode. Connect the AUDIO cable from a computer. Press to a DISPLAYPORT source. Connect the RGB cable to a display. (Pass.... Connect 3D IR glasses receiver unit. For USB charge. Connect the AUDIO cable from a computer or a video enabled device. Turns the projector on or off (main power switch must be turned on , Cooling, Error code (See as LED indicator table) Red Over temperature 56 ...
User Manual
Page 14
... . S-VIDEO provides a better quality signal. Warning: As a safety precaution, disconnect all power to permanent object with wire remote connector of the projector. BNC Connect a BNC cable from a video device. Wire remote control connector (connect with a Kensington Lock system. S-VIDEO Connect the S-video ...IR receiver Receive IR signal from a audio device. AC IN Connects the power cable. 13 Power switch Turns on /off the projector. Screen controllers are supplied and supported by screen manufacturers. Do not use this jack for anything other than ...
... . S-VIDEO provides a better quality signal. Warning: As a safety precaution, disconnect all power to permanent object with wire remote connector of the projector. BNC Connect a BNC cable from a video device. Wire remote control connector (connect with a Kensington Lock system. S-VIDEO Connect the S-video ...IR receiver Receive IR signal from a audio device. AC IN Connects the power cable. 13 Power switch Turns on /off the projector. Screen controllers are supplied and supported by screen manufacturers. Do not use this jack for anything other than ...

User Manual
Page 15
... 1. 2. LABEL Tilt adjustor Ceiling support holes DESCRIPTION SEE PAGE Rotate adjuster lever to adjust angle position. 15 Contact your dealer for information on mounting the projector on a ceiling Note: When installing, ensure that you use approved mounting hardware and M4 screws with a maximum screw depth of a suitable shape and strength...
... 1. 2. LABEL Tilt adjustor Ceiling support holes DESCRIPTION SEE PAGE Rotate adjuster lever to adjust angle position. 15 Contact your dealer for information on mounting the projector on a ceiling Note: When installing, ensure that you use approved mounting hardware and M4 screws with a maximum screw depth of a suitable shape and strength...

User Manual
Page 16
... bright fluorescent lighting turned on the remote control. - 7 - If the path between the remote control and the projector. The buttons and keys on the remote control. This user's manual describes the functions based on . Remote Control Parts Important: 1. Certain high-frequency... fluorescent lights can bounce the signal off certain reflective surfaces such as the corresponding buttons on the projector have the same functions as projector screens. 3. Be sure nothing obstructs the path between the remote control and the...
... bright fluorescent lighting turned on the remote control. - 7 - If the path between the remote control and the projector. The buttons and keys on the remote control. This user's manual describes the functions based on . Remote Control Parts Important: 1. Certain high-frequency... fluorescent lights can bounce the signal off certain reflective surfaces such as the corresponding buttons on the projector have the same functions as projector screens. 3. Be sure nothing obstructs the path between the remote control and the...

User Manual
Page 17
...for Remote ID or password setting used. DP 30. 3/USER3 31. 5/FREEZE 32. 6 DESCRIPTION Transmits signals to hide video and audio. Turns the projector on Displays the ASPECT RATIO selections SEE PAGE 13 Toggle on OSD. Menu off : Freezes/unfreezes the on : Number for Remote ID or password setting... number of USER2 on OSD. Menu off : Press the button to operate the on -screen pointer. Menu off : Press the button to projector. Turns the projector off : Hot key function of this remote Use as on -screen pointer. DO NOT POINT IN EYES. Displays the DVI source selection Displays ...
...for Remote ID or password setting used. DP 30. 3/USER3 31. 5/FREEZE 32. 6 DESCRIPTION Transmits signals to hide video and audio. Turns the projector on Displays the ASPECT RATIO selections SEE PAGE 13 Toggle on OSD. Menu off : Freezes/unfreezes the on : Number for Remote ID or password setting... number of USER2 on OSD. Menu off : Press the button to operate the on -screen pointer. Menu off : Press the button to projector. Turns the projector off : Hot key function of this remote Use as on -screen pointer. DO NOT POINT IN EYES. Displays the DVI source selection Displays ...

User Manual
Page 18
...blinks a single instance to reset control code to designate an ID. Connect wire remote to control the projector. Remote Control Operating Range The remote control uses infrared transmission to the projector. It is not necessary to the remote control, move a little closer. The backlight on the remote ...control blinks, then press 01~99 to all, then can control all projector. If the projector does not respond to point the remote directly at the projector. however, the buttons on the top of about 7 meters (23 feet) and 15 degrees above or ...
...blinks a single instance to reset control code to designate an ID. Connect wire remote to control the projector. Remote Control Operating Range The remote control uses infrared transmission to the projector. It is not necessary to the remote control, move a little closer. The backlight on the remote ...control blinks, then press 01~99 to all, then can control all projector. If the projector does not respond to point the remote directly at the projector. however, the buttons on the top of about 7 meters (23 feet) and 15 degrees above or ...

User Manual
Page 19
Caution: 1. Remove the batteries when not using the projector for prolonged periods. - 10 - Insert the battery with the positive side facing up. 3. Dispose of the arrow. Inserting the Remote Control Batteries 1. Replace the cover. Only use AAA batteries (Alkaline batteries are recommended). 2. SETUP AND OPERATION 2. Remove the battery compartment cover by sliding the cover in the direction of used batteries according to local ordinance regulations. 3.
Caution: 1. Remove the batteries when not using the projector for prolonged periods. - 10 - Insert the battery with the positive side facing up. 3. Dispose of the arrow. Inserting the Remote Control Batteries 1. Replace the cover. Only use AAA batteries (Alkaline batteries are recommended). 2. SETUP AND OPERATION 2. Remove the battery compartment cover by sliding the cover in the direction of used batteries according to local ordinance regulations. 3.

User Manual
Page 20
...; Before removing or installing the lens, be disengaged. 5. Rotate the lens counterclockwise. Removing the Existing Lens From the Projector 1. The existing lens will be sure to turn off the projector, wait until the cooling fans stop, and turn off the main power switch. Do not touch the lens... scratching. If you remove and store the lens, attach the lens cap to the projector to keep off the lens surface. Do not scratch the lens surface. Work on the projector or the lens components as shown. 2. Pull and release the top cover to the unlock position...
...; Before removing or installing the lens, be disengaged. 5. Rotate the lens counterclockwise. Removing the Existing Lens From the Projector 1. The existing lens will be sure to turn off the projector, wait until the cooling fans stop, and turn off the main power switch. Do not touch the lens... scratching. If you remove and store the lens, attach the lens cap to the projector to keep off the lens surface. Do not scratch the lens surface. Work on the projector or the lens components as shown. 2. Pull and release the top cover to the unlock position...

User Manual
Page 22
The startup screen will turn red. 3. When connected, the power led will display in approximately 30 seconds. The first time you use the projector, you can select your preferred language from quick menu after the startup screen display. - 13 - Starting and Shutting down the Projector 1. Remove the lens cap. 2. Turn on the lamp by pressing " " button on the rear of the projector or " " on the remote control. The PWR LED will now flash red. Securely connect the power cord and signal cable.
The startup screen will turn red. 3. When connected, the power led will display in approximately 30 seconds. The first time you use the projector, you can select your preferred language from quick menu after the startup screen display. - 13 - Starting and Shutting down the Projector 1. Remove the lens cap. 2. Turn on the lamp by pressing " " button on the rear of the projector or " " on the remote control. The PWR LED will now flash red. Securely connect the power cord and signal cable.

User Manual
Page 23
Be sure to scroll among devices. 5. The projector turns off. DVI: Digital Visual Interface HDMI: High-Definition Multimedia Interface compatible DisplayPort: Digital display interface VGA 1 / 2: Analog RGB 1 / 2 ...Video: Super video (Y/C separated) Composite Video: Traditional composite video Caution: 1. Do not unplug the power cord until the PWR LED stops flashing-indicating the projector has cooled down. - 14 - When the "Power Off? /Press Power again" message appears, press the POWER button. 4. If more than one input device is...
Be sure to scroll among devices. 5. The projector turns off. DVI: Digital Visual Interface HDMI: High-Definition Multimedia Interface compatible DisplayPort: Digital display interface VGA 1 / 2: Analog RGB 1 / 2 ...Video: Super video (Y/C separated) Composite Video: Traditional composite video Caution: 1. Do not unplug the power cord until the PWR LED stops flashing-indicating the projector has cooled down. - 14 - When the "Power Off? /Press Power again" message appears, press the POWER button. 4. If more than one input device is...

User Manual
Page 24
Setting an Access Password (Security Lock) You can use the four (arrow) buttons to select Advanced. - 15 - Press the cursor ▲▼ button to set a password and prevent unauthorized use of the projector. Press the MENU button to the Installation I menu. 3. When enabled, the password must be entered after you power on the projector. (See Navigating the OSD on page 21 and Setting the OSD Language on page 22 for help on using OSD menus.) Important: Keep the password / Security card in a safe place. 1. Press the cursor ◄► button to move to open the OSD menu. 2.
Setting an Access Password (Security Lock) You can use the four (arrow) buttons to select Advanced. - 15 - Press the cursor ▲▼ button to set a password and prevent unauthorized use of the projector. Press the MENU button to the Installation I menu. 3. When enabled, the password must be entered after you power on the projector. (See Navigating the OSD on page 21 and Setting the OSD Language on page 22 for help on using OSD menus.) Important: Keep the password / Security card in a safe place. 1. Press the cursor ◄► button to move to open the OSD menu. 2.


