
TravelMate 5330 and Extensa 5230/5630Z Service Guide
Page 7
... (only for certain models 16 Acer Empowering Technology 17 Launching Acer Empowering Technology 17 Empowering Technology password 18 Acer ePower Management 19 Acer eDataSecurity Management (only for certain models 20 Acer eRecovery Management 21 Acer eSettings Management 23 Windows Mobility Center... Chapter 3 Machine Disassembly and Replacement 51 Disassembly Requirements 51 General Information 52 Pre-disassembly Instructions 52 Disassembly Process 52 External Module Disassembly Process 53 External Modules Disassembly Flowchart 53 Removing the Battery Pack 54 Removing the SD ...
... (only for certain models 16 Acer Empowering Technology 17 Launching Acer Empowering Technology 17 Empowering Technology password 18 Acer ePower Management 19 Acer eDataSecurity Management (only for certain models 20 Acer eRecovery Management 21 Acer eSettings Management 23 Windows Mobility Center... Chapter 3 Machine Disassembly and Replacement 51 Disassembly Requirements 51 General Information 52 Pre-disassembly Instructions 52 Disassembly Process 52 External Module Disassembly Process 53 External Modules Disassembly Flowchart 53 Removing the Battery Pack 54 Removing the SD ...

TravelMate 5330 and Extensa 5230/5630Z Service Guide
Page 109
NOTE: There is no need to remove the antenna unless you really need to replace it. Removing the Web Camera 1. See "Removing the WLAN Board Modules" on page 69. 5. See "Removing the Keyboard" on page 59. 4. See "Removing the LCD ... with the Brackets" on page 57. 3. See "Removing the Lower Cover" on page 94. See "Removing the LCD Module" on page 54. 2. See "Removing the Battery Pack" on page 74. 7. Remove the tapes together holding the antenna in place. 10. Chapter 3 103 See "Removing the Middle Cover" on page 92. 8. See...
NOTE: There is no need to remove the antenna unless you really need to replace it. Removing the Web Camera 1. See "Removing the WLAN Board Modules" on page 69. 5. See "Removing the Keyboard" on page 59. 4. See "Removing the LCD ... with the Brackets" on page 57. 3. See "Removing the Lower Cover" on page 94. See "Removing the LCD Module" on page 54. 2. See "Removing the Battery Pack" on page 74. 7. Remove the tapes together holding the antenna in place. 10. Chapter 3 103 See "Removing the Middle Cover" on page 92. 8. See...
TravelMate 5330 and Extensa 5230/5630Z Service Guide
Page 114
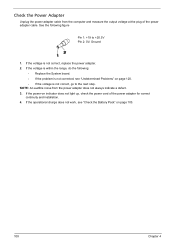
If the voltage is not corrected, see "Check the Battery Pack" on indicator does not light up, check the power cord of the power adapter cable. If the operational charge does not work, see "Undetermined ... the power adapter does not always indicate a defect. 3. If the power-on page 105. 108 Chapter 4 See the following : • Replace the System board. • If the problem is not correct, replace the power adapter. 2. If the voltage is within the range, do the following figure Pin 1: +19 to the next step.
If the voltage is not corrected, see "Check the Battery Pack" on indicator does not light up, check the power cord of the power adapter cable. If the operational charge does not work, see "Undetermined ... the power adapter does not always indicate a defect. 3. If the power-on page 105. 108 Chapter 4 See the following : • Replace the System board. • If the problem is not correct, replace the power adapter. 2. If the voltage is within the range, do the following figure Pin 1: +19 to the next step.
TravelMate 5330 and Extensa 5230/5630Z Service Guide
Page 115
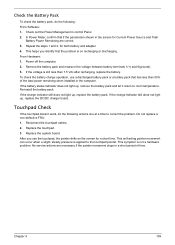
... Chapter 4 109 In Power Meter, confirm that has less than 7.5 Vdc after recharging, replace the battery. Power off the computer. 2. If the battery status indicator does not light up, remove the battery pack and let it return to the touchpad pointer. If the charge indicator still does not... light up , replace the battery pack. If the charge indicator still does not light up , replace the DC/DC charger board. Reconnect the touchpad cables. 2. Replace the system board. Check out the Power Management in the screen for...
... Chapter 4 109 In Power Meter, confirm that has less than 7.5 Vdc after recharging, replace the battery. Power off the computer. 2. If the battery status indicator does not light up, remove the battery pack and let it return to the touchpad pointer. If the charge indicator still does not... light up , replace the battery pack. If the charge indicator still does not light up , replace the DC/DC charger board. Reconnect the touchpad cables. 2. Replace the system board. Check out the Power Management in the screen for...
TravelMate 5330 and Extensa 5230/5630Z Service Guide
Page 117
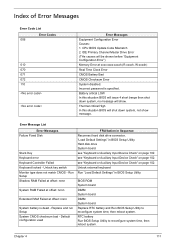
...Keyboard error Keyboard Controller Failed Keyboard locked - Default configuration used FRU/Action in BIOS Setup Utility. RTC battery Run BIOS Setup Utility to reconfigure system time, then reboot system. Replace and run Setup System CMOS checksum bad - Hard disk drive System board see "Keyboard or Auxiliary ...Input Device Check" on page 102. BIOS ROM System board DIMM System board DIMM System board Replace RTC battery and Run BIOS Setup Utility to reconfigure system time, then reboot system. Run Setup Shadow RAM Failed at offset: nnnn System ...
...Keyboard error Keyboard Controller Failed Keyboard locked - Default configuration used FRU/Action in BIOS Setup Utility. RTC battery Run BIOS Setup Utility to reconfigure system time, then reboot system. Replace and run Setup System CMOS checksum bad - Hard disk drive System board see "Keyboard or Auxiliary ...Input Device Check" on page 102. BIOS ROM System board DIMM System board DIMM System board Replace RTC battery and Run BIOS Setup Utility to reconfigure system time, then reboot system. Run Setup Shadow RAM Failed at offset: nnnn System ...

TravelMate 5330 and Extensa 5230/5630Z Service Guide
Page 130
...does not recur, reconnect the removed devices one at a time until you find the failing FRU. 7. If the problem remains, replace the following devices: q Non-Acer devices q Printer, mouse, and other external devices q Battery pack q Hard disk drive q DIMM q CD-ROM/Diskette drive Module q PC Cards 4. Remove or disconnect all attached devices ...do not isolate non-defective FRU). NOTE: Verify that all of the failure is inoperative. Visually check them for damage. If any problems are found, replace the FRU. 3. Do not replace a non-defective FRU: q System board q LCD assembly 124 Chapter 4
...does not recur, reconnect the removed devices one at a time until you find the failing FRU. 7. If the problem remains, replace the following devices: q Non-Acer devices q Printer, mouse, and other external devices q Battery pack q Hard disk drive q DIMM q CD-ROM/Diskette drive Module q PC Cards 4. Remove or disconnect all attached devices ...do not isolate non-defective FRU). NOTE: Verify that all of the failure is inoperative. Visually check them for damage. If any problems are found, replace the FRU. 3. Do not replace a non-defective FRU: q System board q LCD assembly 124 Chapter 4
TravelMate 5330 and Extensa 5230/5630Z Service Guide
Page 151
A AFLASH Utility 48 Antennas 100 Audio 33 B Battery Pack 56 BIOS 29 vendor 29 Version 29 BIOS Utility 37-48 Navigating 38 Onboard Device Configuration 43 Security 41, 42 System Security 47 Board ... 17 External CD-ROM Drive Check 104 External Module Disassembly Flowchart 55 F Index Features 1 Fingerprint Board 84 Flash Utility 48 fpc cable 97 FRU (Field Replaceable Unit) List 127 H Hard disk 31 Hard Disk Drive Module 63 HDD 31 Hibernation mode hotkey 16 Hot Keys 14 I Indicators 11 Intermittent Problems 121...
A AFLASH Utility 48 Antennas 100 Audio 33 B Battery Pack 56 BIOS 29 vendor 29 Version 29 BIOS Utility 37-48 Navigating 38 Onboard Device Configuration 43 Security 41, 42 System Security 47 Board ... 17 External CD-ROM Drive Check 104 External Module Disassembly Flowchart 55 F Index Features 1 Fingerprint Board 84 Flash Utility 48 fpc cable 97 FRU (Field Replaceable Unit) List 127 H Hard disk 31 Hard Disk Drive Module 63 HDD 31 Hibernation mode hotkey 16 Hot Keys 14 I Indicators 11 Intermittent Problems 121...


