
User Manual
Page 4
... or DVD) drive tray 36 Using a computer security lock 36 Audio 37 Adjusting the volume 37 Using the system utilities 38 Acer GridVista (dual-display compatible) 38 Launch Manager 39 Norton Internet Security 40 Frequently asked questions 41 Requesting service 44 International Travelers Warranty (ITW) 44 Before you call 44 Battery pack 45 Battery pack characteristics 45 Maximizing the battery's life 45 Installing and removing the battery pack 46 Charging the battery 47...
... or DVD) drive tray 36 Using a computer security lock 36 Audio 37 Adjusting the volume 37 Using the system utilities 38 Acer GridVista (dual-display compatible) 38 Launch Manager 39 Norton Internet Security 40 Frequently asked questions 41 Requesting service 44 International Travelers Warranty (ITW) 44 Before you call 44 Battery pack 45 Battery pack characteristics 45 Maximizing the battery's life 45 Installing and removing the battery pack 46 Charging the battery 47...
User Manual
Page 5
... your computer 66 Using a computer security lock 66 Using passwords 66 Entering passwords 67 Setting passwords 67 Expanding through options 68 Connectivity options 68 Fax/data modem 68 Built-in network feature 69 Fast Infrared (FIR) 69 Universal Serial Bus (USB) 70 IEEE 1394 port 70 PC Card slot 71 ExpressCard 72 Installing memory 73 BIOS utility 74 Boot sequence 74 Enable disk-to-disk recovery 74 Password 74 Using software 75 Playing DVD movies 75 Power management 76 Acer eRecovery Management 77 Create backup 77
... your computer 66 Using a computer security lock 66 Using passwords 66 Entering passwords 67 Setting passwords 67 Expanding through options 68 Connectivity options 68 Fax/data modem 68 Built-in network feature 69 Fast Infrared (FIR) 69 Universal Serial Bus (USB) 70 IEEE 1394 port 70 PC Card slot 71 ExpressCard 72 Installing memory 73 BIOS utility 74 Boot sequence 74 Enable disk-to-disk recovery 74 Password 74 Using software 75 Playing DVD movies 75 Power management 76 Acer eRecovery Management 77 Create backup 77
User Manual
Page 9
... electrical devices that which came bundled with the supplied power supply cord set , make sure that the new power cord meets the following the operating instructions Note: Adjust only those controls that are covered by the operating instructions, since improper adjustment of this product yourself, as that may expose you need for service • the product does not operate normally after following requirements: detachable type, UL listed/CSA certified, type...
... electrical devices that which came bundled with the supplied power supply cord set , make sure that the new power cord meets the following the operating instructions Note: Adjust only those controls that are covered by the operating instructions, since improper adjustment of this product yourself, as that may expose you need for service • the product does not operate normally after following requirements: detachable type, UL listed/CSA certified, type...
User Manual
Page 16
... Document Format (PDF) and comes preloaded on the computer, simply press and release the power button below the LCD screen beside the easy-launch buttons. See "Front view" on AcerSystem User's Guide will run the Adobe Reader setup program first. poster helps you to be more on such subjects as system utilities, data recovery, expansion options and troubleshooting. Your guides To help you get started with setting up...
... Document Format (PDF) and comes preloaded on the computer, simply press and release the power button below the LCD screen beside the easy-launch buttons. See "Front view" on AcerSystem User's Guide will run the Adobe Reader setup program first. poster helps you to be more on such subjects as system utilities, data recovery, expansion options and troubleshooting. Your guides To help you get started with setting up...
User Manual
Page 19
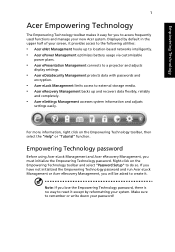
...Empowering Technology password. Displayed by reformatting your screen, it provides access to the following utilities: • Acer eNet Management hooks up to location-based networks intelligently. • Acer ePower Management optimizes battery usage via customizable power plans. • Acer ePresentation Management connects to a projector and adjusts display settings. • Acer eDataSecurity Management protects data with passwords and encryption. • Acer eLock Management limits access to external storage media. • Acer eRecovery Management backs up and recovers data flexibly...
...Empowering Technology password. Displayed by reformatting your screen, it provides access to the following utilities: • Acer eNet Management hooks up to location-based networks intelligently. • Acer ePower Management optimizes battery usage via customizable power plans. • Acer ePresentation Management connects to a projector and adjusts display settings. • Acer eDataSecurity Management protects data with passwords and encryption. • Acer eLock Management limits access to external storage media. • Acer eRecovery Management backs up and recovers data flexibly...
User Manual
Page 22
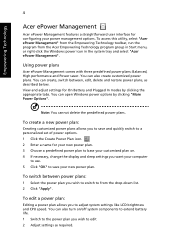
... adjust settings for configuring your power management options. You can also create customized power plans. To create a new power plan: Creating customized power plans allows you to save and quickly switch to a personalized set of power options. 1 Click the Create Power Plan icon. 2 Enter a name for your new power plan. 3 Choose a predefined power plan to from the Acer Empowering Technology program group in Start menu, or right-click the Windows power icon in the system tray and select "Acer ePower Management". Using power...
... adjust settings for configuring your power management options. You can also create customized power plans. To create a new power plan: Creating customized power plans allows you to save and quickly switch to a personalized set of power options. 1 Click the Create Power Plan icon. 2 Enter a name for your new power plan. 3 Choose a predefined power plan to from the Acer Empowering Technology program group in Start menu, or right-click the Windows power icon in the system tray and select "Acer ePower Management". Using power...
User Manual
Page 24
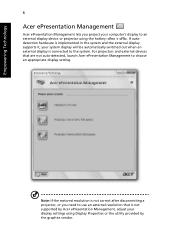
... vendor. Note: If the restored resolution is not correct after disconnecting a projector, or you project your system display will be automatically switched out when an external display is implemented in the system and the external display supports it, your computer's display to the system. If autodetection hardware is connected to an external display device or projector using Display Properties or the utility provided by Acer ePresentation Management, adjust your display settings using the hotkey: + .
... vendor. Note: If the restored resolution is not correct after disconnecting a projector, or you project your system display will be automatically switched out when an external display is implemented in the system and the external display supports it, your computer's display to the system. If autodetection hardware is connected to an external display device or projector using Display Properties or the utility provided by Acer ePresentation Management, adjust your display settings using the hotkey: + .
User Manual
Page 26
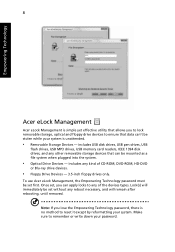
... effective utility that allows you to lock removable storage, optical and floppy drive devices to ensure that can be mounted as a file system when plugged into the system. • Optical Drive Devices - includes USB disk drives, USB pen drives, USB flash drives, USB MP3 drives, USB memory card readers, IEEE 1394 disk drives, and any kind of the devices types. includes any other removable storage devices that data can't be stolen while your password. Lock(s) will remain after rebooting, until removed.
... effective utility that allows you to lock removable storage, optical and floppy drive devices to ensure that can be mounted as a file system when plugged into the system. • Optical Drive Devices - includes USB disk drives, USB pen drives, USB flash drives, USB MP3 drives, USB memory card readers, IEEE 1394 disk drives, and any kind of the devices types. includes any other removable storage devices that data can't be stolen while your password. Lock(s) will remain after rebooting, until removed.

User Manual
Page 31
... service on /off , and a shortcut to fit the situation as you change locations, networks or activities. To launch Windows Mobility Center: • Use the shortcut key < > + • Start Windows Mobility Center from the Control panel • Start Windows Mobility Center from the Accessories program group in one easy-to-find place, so you can quickly configure your Acer system to the Acer user guide, drivers and utilities. Settings include display brightness, power plan, volume, wireless networking on or off , external display settings, display...
... service on /off , and a shortcut to fit the situation as you change locations, networks or activities. To launch Windows Mobility Center: • Use the shortcut key < > + • Start Windows Mobility Center from the Control panel • Start Windows Mobility Center from the Accessories program group in one easy-to-find place, so you can quickly configure your Acer system to the Acer user guide, drivers and utilities. Settings include display brightness, power plan, volume, wireless networking on or off , external display settings, display...

User Manual
Page 38
... 4 AV-in port Accepts input signals from audio/video (AV) devices (for selected models). 5 DC-in jack Connects to an AC adapter. 6 S-video/TV-out Connects to a television or display device (NTSC/PAL) port with S-video input (for selected models). 7 External display Connects to a display device (VGA) port (e.g., external monitor, LCD projector). 8 DVI-D port Supports digital video connections (for selected models). 9 USB 2.0 port Connect to USB 2.0 devices (e.g., USB mouse, USB camera). 10 Ventilation slots Enable the computer to stay cool, even after prolonged use.
... 4 AV-in port Accepts input signals from audio/video (AV) devices (for selected models). 5 DC-in jack Connects to an AC adapter. 6 S-video/TV-out Connects to a television or display device (NTSC/PAL) port with S-video input (for selected models). 7 External display Connects to a display device (VGA) port (e.g., external monitor, LCD projector). 8 DVI-D port Supports digital video connections (for selected models). 9 USB 2.0 port Connect to USB 2.0 devices (e.g., USB mouse, USB camera). 10 Ventilation slots Enable the computer to stay cool, even after prolonged use.
User Manual
Page 41
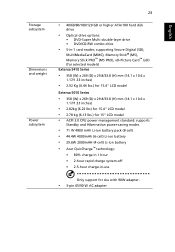
Storage subsystem Dimensions and weight Power subsystem 23 • 40/60/80/100/120 GB or higher ATA/100 hard disk drive • Optical drive options: • DVD-Super Multi double-layer drive • DVD/CD-RW combo drive • 5-in-1 card reader, supporting Secure Digital (SD), MultiMediaCard (MMC), Memory Stick® (MS), Memory Stick PRO™ (MS PRO), xD-Picture Card™ (xD) (for selected models) Extensa 5410 Series • 358 (W) x 269...
Storage subsystem Dimensions and weight Power subsystem 23 • 40/60/80/100/120 GB or higher ATA/100 hard disk drive • Optical drive options: • DVD-Super Multi double-layer drive • DVD/CD-RW combo drive • 5-in-1 card reader, supporting Secure Digital (SD), MultiMediaCard (MMC), Memory Stick® (MS), Memory Stick PRO™ (MS PRO), xD-Picture Card™ (xD) (for selected models) Extensa 5410 Series • 358 (W) x 269...
User Manual
Page 49
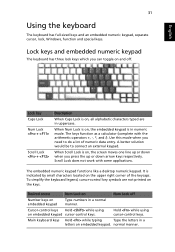
... Number keys on embedded keypad Type numbers in a letters on embedded keypad cursor-control keys. Lock key Caps Lock Num Lock + Scroll Lock + Description When Caps Lock is on the upper right corner of numeric data entry. When Num Lock is on, the embedded keypad is indicated by small characters located on , the screen moves one line up or down arrow keys respectively. Use this mode when you need to connect an external...
... Number keys on embedded keypad Type numbers in a letters on embedded keypad cursor-control keys. Lock key Caps Lock Num Lock + Scroll Lock + Description When Caps Lock is on the upper right corner of numeric data entry. When Num Lock is on, the embedded keypad is indicated by small characters located on , the screen moves one line up or down arrow keys respectively. Use this mode when you need to connect an external...
User Manual
Page 50
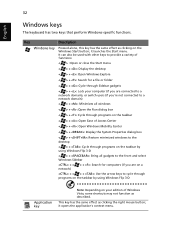
... by using Windows Flip 3-D Application key Note: Depending on your edition of Windows Vista, some shortcuts may not function as clicking on the Windows Start button; it opens the application's context menu. Key Description Windows key Pressed alone, this key has the same effect as described. it launches the Start menu. This key has the same effect as clicking the right mouse button; English 32 Windows keys The keyboard has two keys that perform Windows-specific functions.
... by using Windows Flip 3-D Application key Note: Depending on your edition of Windows Vista, some shortcuts may not function as clicking on the Windows Start button; it opens the application's context menu. Key Description Windows key Pressed alone, this key has the same effect as described. it launches the Start menu. This key has the same effect as clicking the right mouse button; English 32 Windows keys The keyboard has two keys that perform Windows-specific functions.

User Manual
Page 51
...to save power. See "Acer Empowering Technology" on page 1. Switches display output between the display screen, external monitor (if connected) and both. Hotkey Icon + Function Hotkey help + Acer eSettings + Acer ePower Management + + Sleep Display toggle + Screen blank Description Displays help on hotkeys. To activate hotkeys, press and hold the key before pressing the other key in Sleep mode. English 33 Hotkeys The computer employs hotkeys or key combinations to access most of the computer's controls like screen brightness, volume output and the BIOS utility.
...to save power. See "Acer Empowering Technology" on page 1. Switches display output between the display screen, external monitor (if connected) and both. Hotkey Icon + Function Hotkey help + Acer eSettings + Acer ePower Management + + Sleep Display toggle + Screen blank Description Displays help on hotkeys. To activate hotkeys, press and hold the key before pressing the other key in Sleep mode. English 33 Hotkeys The computer employs hotkeys or key combinations to access most of the computer's controls like screen brightness, volume output and the BIOS utility.
User Manual
Page 59
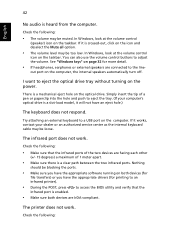
... the Sleep indicator is lit, the computer is a list of your Windows desktop and select Properties to the power outlet. • If it is not lit, no power is not full-screen. English 41 Frequently asked questions The following is in the external USB floppy drive? Easy solutions are using on the power, but the computer does not start or boot up the "Display Properties...
... the Sleep indicator is lit, the computer is a list of your Windows desktop and select Properties to the power outlet. • If it is not lit, no power is not full-screen. English 41 Frequently asked questions The following is in the external USB floppy drive? Easy solutions are using on the power, but the computer does not start or boot up the "Display Properties...
User Manual
Page 60
... 1 meter apart. • Make sure there is enabled. • Make sure both devices (for printing to an infrared printer). • During the POST, press to adjust the volume. The infrared port does not work . In Windows, look at the volume control (speaker) icon on the optical drive. You can also use the volume control buttons to access the BIOS utility and verify that the infrared ports of the two devices are IrDA...
... 1 meter apart. • Make sure there is enabled. • Make sure both devices (for printing to an infrared printer). • During the POST, press to adjust the volume. The infrared port does not work . In Windows, look at the volume control (speaker) icon on the optical drive. You can also use the volume control buttons to access the BIOS utility and verify that the infrared ports of the two devices are IrDA...

User Manual
Page 80
.... You can put the computer in Sleep mode. Moving around or traveling with your computer from external accessories: 1 Save any open files. 2 Remove any media, floppy disks or compact disks from the drive(s). 3 Shut down the computer: Click on Start then click on Shut Down. then press and release the power button. Or: You can now safely take the computer anywhere you are...
.... You can put the computer in Sleep mode. Moving around or traveling with your computer from external accessories: 1 Save any open files. 2 Remove any media, floppy disks or compact disks from the drive(s). 3 Shut down the computer: Click on Start then click on Shut Down. then press and release the power button. Or: You can now safely take the computer anywhere you are...
User Manual
Page 92
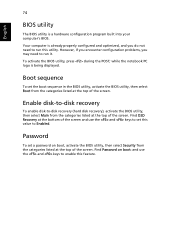
while the notebook PC logo is a hardware configuration program built into your computer's BIOS. Boot sequence To set the boot sequence in the BIOS utility, activate the BIOS utility, then select Boot from the categories listed at the top of the screen. Password To set this value to -disk recovery (hard disk recovery), activate the BIOS utility, then select Main from the categories listed at the top of the screen and use the and keys to enable this utility. To activate the BIOS utility, press...
while the notebook PC logo is a hardware configuration program built into your computer's BIOS. Boot sequence To set the boot sequence in the BIOS utility, activate the BIOS utility, then select Boot from the categories listed at the top of the screen. Password To set this value to -disk recovery (hard disk recovery), activate the BIOS utility, then select Main from the categories listed at the top of the screen and use the and keys to enable this utility. To activate the BIOS utility, press...
User Manual
Page 96
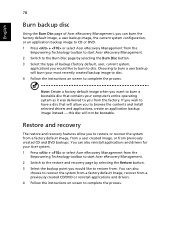
... start Acer eRecovery Management. 2 Switch to the Burn Disc page by selecting the Restore button. 3 Select the backup point you would like to complete the process. You can also reinstall applications and drivers for your most recently created backup image to disc. 4 Follow the instructions on screen to you from the factory. Restore and recovery The restore and recovery features allow you to restore or recover the system from a factory default image, from a user created...
... start Acer eRecovery Management. 2 Switch to the Burn Disc page by selecting the Restore button. 3 Select the backup point you would like to complete the process. You can also reinstall applications and drivers for your most recently created backup image to disc. 4 Follow the instructions on screen to you from the factory. Restore and recovery The restore and recovery features allow you to restore or recover the system from a factory default image, from a user created...

User Manual
Page 110
... xvii audio 37 adjusting the volume 37 troubleshooting 42 B battery pack battery-low warning 48 caring for xviii characteristics 45 charging 47 checking charge level 47 installing 46 low conditions 48 maximizing life 45 optimizing 47 removing 47 using the first time 45 BIOS utility 74 brightness hotkeys 34 C caps lock 31 on indicator 27 care AC adapter xvii battery pack xviii computer xvii CD-ROM ejecting manually 42 troubleshooting 42 charging checking...
... xvii audio 37 adjusting the volume 37 troubleshooting 42 B battery pack battery-low warning 48 caring for xviii characteristics 45 charging 47 checking charge level 47 installing 46 low conditions 48 maximizing life 45 optimizing 47 removing 47 using the first time 45 BIOS utility 74 brightness hotkeys 34 C caps lock 31 on indicator 27 care AC adapter xvii battery pack xviii computer xvii CD-ROM ejecting manually 42 troubleshooting 42 charging checking...


