
TravelMate 4730/4730G Service Guide
Page 7
...12 Windows Keys 13 Hot Keys 14 Special Key 15 Using the System Utilities 16 Acer GridVista (dual-display compatible 16 Hardware Specifications and Configurations 18 System Utilities 25 BIOS Setup Utility 25 Navigating the BIOS Utility 25 Information 26 Main 27 Advanced 28 Security 30 Power 33 Boot 35 Exit 36 BIOS Flash Utility 37 Remove HDD/BIOS Utility 39 Machine Disassembly and Replacement 43 Disassembly Requirements 43 General Information 44 Pre-disassembly Instructions 44 Disassembly Process 44 External Module Disassembly Process 45 External Modules Disassembly...
...12 Windows Keys 13 Hot Keys 14 Special Key 15 Using the System Utilities 16 Acer GridVista (dual-display compatible 16 Hardware Specifications and Configurations 18 System Utilities 25 BIOS Setup Utility 25 Navigating the BIOS Utility 25 Information 26 Main 27 Advanced 28 Security 30 Power 33 Boot 35 Exit 36 BIOS Flash Utility 37 Remove HDD/BIOS Utility 39 Machine Disassembly and Replacement 43 Disassembly Requirements 43 General Information 44 Pre-disassembly Instructions 44 Disassembly Process 44 External Module Disassembly Process 45 External Modules Disassembly...
TravelMate 4730/4730G Service Guide
Page 8
... Port 103 Replacing the Mainboard 105 Replacing the Modem Module 106 Replacing the Bluetooth Board 107 Replacing the Right Speaker Module 107 Replacing the Launch Board 109 Replacing the Finger Print Reader 110 Replacing the Touch Pad Bracket 110 Replacing the Left Speaker Module 111 Replacing the Upper Cover 111 Replacing the LCD Module 113 Replacing the Antenna Cables 115 Replacing the Keyboard 117 Replacing the Switch Cover 117 Replacing the WLAN Module 119 Replacing the Hard Disk Drive Module 119 Replacing the DIMM Modules 120 Replacing the ODD Module 121 Replacing...
... Port 103 Replacing the Mainboard 105 Replacing the Modem Module 106 Replacing the Bluetooth Board 107 Replacing the Right Speaker Module 107 Replacing the Launch Board 109 Replacing the Finger Print Reader 110 Replacing the Touch Pad Bracket 110 Replacing the Left Speaker Module 111 Replacing the Upper Cover 111 Replacing the LCD Module 113 Replacing the Antenna Cables 115 Replacing the Keyboard 117 Replacing the Switch Cover 117 Replacing the WLAN Module 119 Replacing the Hard Disk Drive Module 119 Replacing the DIMM Modules 120 Replacing the ODD Module 121 Replacing...
TravelMate 4730/4730G Service Guide
Page 9
... Problems 141 Undetermined Problems 141 POST Codes Tables 142 Port 80 POST Codes 142 POST Keys and Messages 144 Jumper and Connector Locations 145 Top View 145 Bottom View 146 Clearing Password Check and BIOS Recovery 147 Clearing Password Check 147 BIOS Recovery by Crisis Disk 148 FRU (Field Replaceable Unit) List 149 TravelMate 4730/4730G Exploded Diagrams 150 Main Module 150 LCD Module 151 TravelMate 4730/4730G FRU List 152 Model Definition and Configuration...
... Problems 141 Undetermined Problems 141 POST Codes Tables 142 Port 80 POST Codes 142 POST Keys and Messages 144 Jumper and Connector Locations 145 Top View 145 Bottom View 146 Clearing Password Check and BIOS Recovery 147 Clearing Password Check 147 BIOS Recovery by Crisis Disk 148 FRU (Field Replaceable Unit) List 149 TravelMate 4730/4730G Exploded Diagrams 150 Main Module 150 LCD Module 151 TravelMate 4730/4730G FRU List 152 Model Definition and Configuration...
TravelMate 4730/4730G Service Guide
Page 16
... from external microphones. Enables/disables the 3G/Bluetooth function. (only for a more secure, smarter and easier way to work. Easy-launch buttons Productivity Keys Buttons for launching frequently used programs. Three productivity keys give users one-touch access to audio line-out devices (e.g., speakers, headphones). Turns the computer on and off. Headphones/ speaker/line-out jack Bluetooth communication switch Wireless communication switch Latch Connects to protection and manageability features for certain models). Enables/disables the wireless function. Touch...
... from external microphones. Enables/disables the 3G/Bluetooth function. (only for a more secure, smarter and easier way to work. Easy-launch buttons Productivity Keys Buttons for launching frequently used programs. Three productivity keys give users one-touch access to audio line-out devices (e.g., speakers, headphones). Turns the computer on and off. Headphones/ speaker/line-out jack Bluetooth communication switch Wireless communication switch Latch Connects to protection and manageability features for certain models). Enables/disables the wireless function. Touch...
TravelMate 4730/4730G Service Guide
Page 17
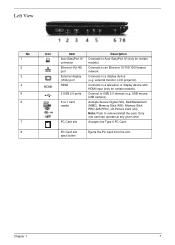
... time. Connect to remove/install the card. Connects to a display device (e.g. Accepts Secure Digital (SD), MultiMediaCard (MMC), Memory Stick (MS), Memory Stick PRO (MS PRO), xD-Picture Card (xD). Connects to a television or display device with HDMI input (only for certain models). USB mouse, USB camera). Left View No. 1 2 3 4 5 6 7 8 Icon HDMI Item Acer EasyPort IV connector Ethernet (RJ-45) port External display (VGA) port HDMI 2 USB 2.0 ports 5-in-1 card reader PC Card slot Description Connects to an Ethernet 10/100/1000-based network. PC Card slot eject button Ejects...
... time. Connect to remove/install the card. Connects to a display device (e.g. Accepts Secure Digital (SD), MultiMediaCard (MMC), Memory Stick (MS), Memory Stick PRO (MS PRO), xD-Picture Card (xD). Connects to a television or display device with HDMI input (only for certain models). USB mouse, USB camera). Left View No. 1 2 3 4 5 6 7 8 Icon HDMI Item Acer EasyPort IV connector Ethernet (RJ-45) port External display (VGA) port HDMI 2 USB 2.0 ports 5-in-1 card reader PC Card slot Description Connects to an Ethernet 10/100/1000-based network. PC Card slot eject button Ejects...
TravelMate 4730/4730G Service Guide
Page 20
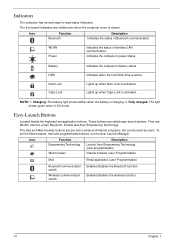
Indicates when the hard disk drive is charging. 2. Lights up when Num Lock is activated. Easy-Launch Buttons Located beside the keyboard are called easy-launch buttons. These buttons are application buttons. NOTE: 1. They are pre-set the Web browser, mail and programmable buttons, run the Acer Launch Manager. Enables/disables the wireless function. 10 Chapter 1 Indicates the computer's power status. Charging: The battery light shows amber when the battery is active. To set to -read status indicators: The front panel indicators are visible...
Indicates when the hard disk drive is charging. 2. Lights up when Num Lock is activated. Easy-Launch Buttons Located beside the keyboard are called easy-launch buttons. These buttons are application buttons. NOTE: 1. They are pre-set the Web browser, mail and programmable buttons, run the Acer Launch Manager. Enables/disables the wireless function. 10 Chapter 1 Indicates the computer's power status. Charging: The battery light shows amber when the battery is active. To set to -read status indicators: The front panel indicators are visible...
TravelMate 4730/4730G Service Guide
Page 24
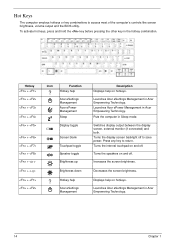
...+ + Icon Function Hotkey help Acer eSettings Management Acer ePower Management Sleep Display toggle Screen blank Touchpad toggle Speaker toggle Brightness up Brightness down Hotkey help Acer eSettings Management Description Displays help on and off. Press any key to access most of the computer's controls like screen brightness, volume output and the BIOS utility. Turns the display screen backlight off . Turns the speakers on hotkeys. Switches display output between the display screen, external monitor (if connected) and both. Puts the computer in Sleep mode.
...+ + Icon Function Hotkey help Acer eSettings Management Acer ePower Management Sleep Display toggle Screen blank Touchpad toggle Speaker toggle Brightness up Brightness down Hotkey help Acer eSettings Management Description Displays help on and off. Press any key to access most of the computer's controls like screen brightness, volume output and the BIOS utility. Turns the display screen backlight off . Turns the speakers on hotkeys. Switches display output between the display screen, external monitor (if connected) and both. Puts the computer in Sleep mode.
TravelMate 4730/4730G Service Guide
Page 35
... menu, user can change boot device without entering BIOS Setup Utility, please set to enter Setup" message is enclosed in square brackets. Read this utility. System Utilities Chapter 2 BIOS Setup Utility The BIOS Setup Utility is subject to enter setup. However, if you encounter configuration problems, you can also press F10 to save any menu, you may need to the Exit menu. • In any changes made and exit the BIOS Setup Utility. Navigation keys for parameters are in the Item Specific Help part...
... menu, user can change boot device without entering BIOS Setup Utility, please set to enter Setup" message is enclosed in square brackets. Read this utility. System Utilities Chapter 2 BIOS Setup Utility The BIOS Setup Utility is subject to enter setup. However, if you encounter configuration problems, you can also press F10 to save any menu, you may need to the Exit menu. • In any changes made and exit the BIOS Setup Utility. Navigation keys for parameters are in the Item Specific Help part...
TravelMate 4730/4730G Service Guide
Page 36
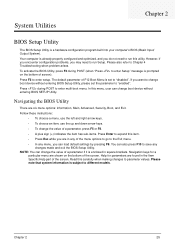
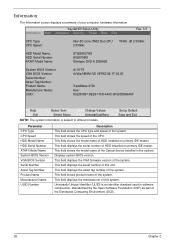
... the model name of HDD installed on primary IDE master. This field displays the manufacturer of your computer hardware information. Information The Information screen displays a summary of this unit. InsydeH20 Setup Utility Information Main Advanced Security Power Boot Exit Rev. 3.5 CPU Type: CPU Speed: Intel (R) Core (TM)2 Duo CPU 2.53GHz T9400 @ 2.53GHz HDD Model Name: HDD Serial Number: ATAPI Model Name: ST9250827AS 5RG01NK8 Slimtype DVD A DS8A2S System BIOS Version: VGA BIOS Version: Serial Number: Asset Tag Number...
... the model name of HDD installed on primary IDE master. This field displays the manufacturer of your computer hardware information. Information The Information screen displays a summary of this unit. InsydeH20 Setup Utility Information Main Advanced Security Power Boot Exit Rev. 3.5 CPU Type: CPU Speed: Intel (R) Core (TM)2 Duo CPU 2.53GHz T9400 @ 2.53GHz HDD Model Name: HDD Serial Number: ATAPI Model Name: ST9250827AS 5RG01NK8 Slimtype DVD A DS8A2S System BIOS Version: VGA BIOS Version: Serial Number: Asset Tag Number...
TravelMate 4730/4730G Service Guide
Page 40
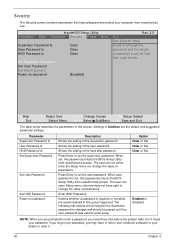
... F9 Setup Default Enter SelectXSubMenu F10 Save and Exit The table below describes the parameters in this password protects the BIOS Setup Utility from unauthorized access. The user can enter Setup menu only and does not have right to enter setup. The user can not either enter the Setup menu nor change the value of parameters. Option Clear or Set Clear or Set Clear or Set Enabled or Disabled NOTE: When you are prompted to set the user password. Press Enter to enter a password...
... F9 Setup Default Enter SelectXSubMenu F10 Save and Exit The table below describes the parameters in this password protects the BIOS Setup Utility from unauthorized access. The user can enter Setup menu only and does not have right to enter setup. The user can not either enter the Setup menu nor change the value of parameters. Option Clear or Set Clear or Set Clear or Set Enabled or Disabled NOTE: When you are prompted to set the user password. Press Enter to enter a password...
TravelMate 4730/4730G Service Guide
Page 41
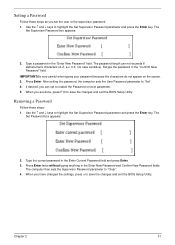
... Enter New Password and Confirm New Password fields. After setting the password, the computer sets the User Password parameter to highlight the Set Supervisor Password parameter and press the Enter key. Removing a Password Follow these steps as you can not exceeds 8 alphanumeric characters (A-Z, a-z, 0-9, not case sensitive). The password length can opt to enable the Password on the screen. 3. When you have changed the settings, press u to save the changes and exit the BIOS Setup Utility. Press Enter...
... Enter New Password and Confirm New Password fields. After setting the password, the computer sets the User Password parameter to highlight the Set Supervisor Password parameter and press the Enter key. Removing a Password Follow these steps as you can not exceeds 8 alphanumeric characters (A-Z, a-z, 0-9, not case sensitive). The password length can opt to enable the Password on the screen. 3. When you have changed the settings, press u to save the changes and exit the BIOS Setup Utility. Press Enter...
TravelMate 4730/4730G Service Guide
Page 42
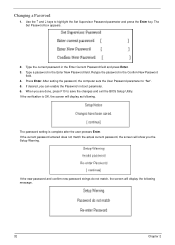
... the Enter key. The password setting is OK, the screen will display the following . Press Enter. If the verification is complete after the user presses Enter. The Set Password box appears. 2. If desired, you are done, press F10 to save the changes and exit the BIOS Setup Utility. Type a password in the Enter Current Password field and press Enter. 3. When you can enable the Password on boot parameter. 6. If the new password and confirm new password strings...
... the Enter key. The password setting is OK, the screen will display the following . Press Enter. If the verification is complete after the user presses Enter. The Set Password box appears. 2. If desired, you are done, press F10 to save the changes and exit the BIOS Setup Utility. Type a password in the Enter Current Password field and press Enter. 3. When you can enable the Password on boot parameter. 6. If the new password and confirm new password strings...
TravelMate 4730/4730G Service Guide
Page 47
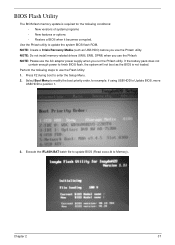
...; New features or options • Restore a BIOS when it becomes corrupted. Chapter 2 37 Use the Phlash utility to enter the Setup Menu. 2. NOTE: Do not install memory-related drivers (XMS, EMS, DPMI) when you use the Phlash. Press F2 during boot to update the system BIOS flash ROM. Execute the IFLASH.BAT batch file to update BIOS (Read xxxxx.fd to finish BIOS flash, the system will not boot as USB HDD) before you use the...
...; New features or options • Restore a BIOS when it becomes corrupted. Chapter 2 37 Use the Phlash utility to enter the Setup Menu. 2. NOTE: Do not install memory-related drivers (XMS, EMS, DPMI) when you use the Phlash. Press F2 during boot to update the system BIOS flash ROM. Execute the IFLASH.BAT batch file to update BIOS (Read xxxxx.fd to finish BIOS flash, the system will not boot as USB HDD) before you use the...
TravelMate 4730/4730G Service Guide
Page 133
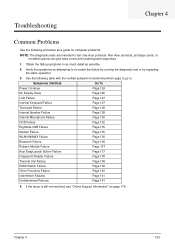
... operation. 3. Use the following procedure as possible. 2. Non-Acer products, prototype cards, or modified options can give false errors and invalid system responses. 1. Symptoms (Verified) Go To Power On Issue Page 124 No Display Issue Page 125 LCD Failure Page 127 Internal Keyboard Failure Page 127 Touchpad Failure Page 128 Internal Speaker Failure Page 128 Internal Microphone Failure Page 130 ODD Failure Page 132 Rightside USB...
... operation. 3. Use the following procedure as possible. 2. Non-Acer products, prototype cards, or modified options can give false errors and invalid system responses. 1. Symptoms (Verified) Go To Power On Issue Page 124 No Display Issue Page 125 LCD Failure Page 127 Internal Keyboard Failure Page 127 Touchpad Failure Page 128 Internal Speaker Failure Page 128 Internal Microphone Failure Page 130 ODD Failure Page 132 Rightside USB...
TravelMate 4730/4730G Service Guide
Page 135
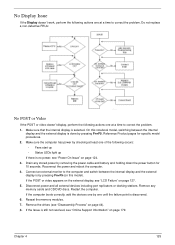
... this notebook model, switching between the internal display and the external display is by removing the power cable and battery and holding down the power button for specific model procedures. 2. Reference Product pages for 10 seconds. Drain any memory cards and CD/DVD discs. Reseat the memory modules. 7. Reconnect the power and reboot the computer. 4. Disconnect power and all external devices including port replicators or docking stations. Chapter 4 125 Do not replace a non-defective FRUs: No POST or Video...
... this notebook model, switching between the internal display and the external display is by removing the power cable and battery and holding down the power button for specific model procedures. 2. Reference Product pages for 10 seconds. Drain any memory cards and CD/DVD discs. Reseat the memory modules. 7. Reconnect the power and reboot the computer. 4. Disconnect power and all external devices including port replicators or docking stations. Chapter 4 125 Do not replace a non-defective FRUs: No POST or Video...
TravelMate 4730/4730G Service Guide
Page 136
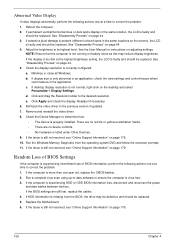
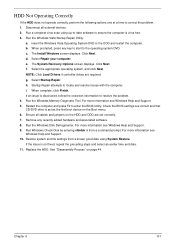
... control/mouse wheel zoom feature in the same location, the LCD is missing from the operating system DVD and follow the onscreen prompts. 11. Roll back the video driver to correct the problem. 1. Random Loss of BIOS Settings If the computer is experiencing HDD or ODD BIOS information loss, disconnect and reconnect the power and data cables between devices. If HDD information is faulty and should be replaced...
... control/mouse wheel zoom feature in the same location, the LCD is missing from the operating system DVD and follow the onscreen prompts. 11. Roll back the video driver to correct the problem. 1. Random Loss of BIOS Settings If the computer is experiencing HDD or ODD BIOS information loss, disconnect and reconnect the power and data cables between devices. If HDD information is faulty and should be replaced...
TravelMate 4730/4730G Service Guide
Page 141
... enter the BIOS Utility. Click Next. The System Recovery Options screen displays. NOTE: Click Load Drivers if controller drives are correct and that CD/DVD drive is virus free. 3. i. f. Restart the computer and press F2 to correct the problem. 1. Remove any key to start to ensure the computer is set correctly. 7. Disconnect all cables and jumpers on the HDD and ODD are set as the first boot device on page 44. Run the Windows Vista Startup Repair Utility...
... enter the BIOS Utility. Click Next. The System Recovery Options screen displays. NOTE: Click Load Drivers if controller drives are correct and that CD/DVD drive is virus free. 3. i. f. Restart the computer and press F2 to correct the problem. 1. Remove any key to start to ensure the computer is set correctly. 7. Disconnect all cables and jumpers on the HDD and ODD are set as the first boot device on page 44. Run the Windows Vista Startup Repair Utility...
TravelMate 4730/4730G Service Guide
Page 150
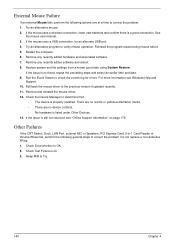
... mouse operation. Remove and reinstall the mouse driver. 12. Other Failures If the CRT Switch, Dock, LAN Port, external MIC or Speakers, PCI Express Card, 5-in-1 Card Reader or Volume Wheel fail, perform the following actions one at a time to correct the problem. 1. Check Test Fixture is properly installed. Swap M/B to the previous version if updated recently. 11. Reinstall the program experiencing mouse failure. 5. External Mouse Failure If an external Mouse...
... mouse operation. Remove and reinstall the mouse driver. 12. Other Failures If the CRT Switch, Dock, LAN Port, external MIC or Speakers, PCI Express Card, 5-in-1 Card Reader or Volume Wheel fail, perform the following actions one at a time to correct the problem. 1. Check Test Fixture is properly installed. Swap M/B to the previous version if updated recently. 11. Reinstall the program experiencing mouse failure. 5. External Mouse Failure If an external Mouse...
TravelMate 4730/4730G Service Guide
Page 151
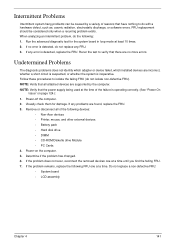
... devices: • Non-Acer devices • Printer, mouse, and other external devices • Battery pack • Hard disk drive • DIMM • CD-ROM/Diskette drive Module • PC Cards 4. Run the advanced diagnostic test for damage. Determine if the problem has changed. 6. If no more errors. Visually check them for the system board in loop mode at a time. Rerun the test to do not replace any error is inoperative. FRU replacement...
... devices: • Non-Acer devices • Printer, mouse, and other external devices • Battery pack • Hard disk drive • DIMM • CD-ROM/Diskette drive Module • PC Cards 4. Run the advanced diagnostic test for damage. Determine if the problem has changed. 6. If no more errors. Visually check them for the system board in loop mode at a time. Rerun the test to do not replace any error is inoperative. FRU replacement...
TravelMate 4730/4730G Service Guide
Page 192
... LCD Failure 127 LCD Module Disassembly Flowchart 88 LCD Panel 93 lower cover 49 M Main Unit Disassembly Flowchart 58 Mainboard 79 media access on indicator 10 MediaTouch Button Failure 138 Memory Check 124 Model Definition 166 Modem Failure 135 Modem Module 78 N No Display Issue 125 Notebook Manager hotkey 14 num lock on indicator 10 O ODD Failure 132 Online Support Information 179 optical drive module 56 P Panel 5 Bottom 9 left 5 PC Card 10 Port 80 POST Codes 142 POST Codes Port...
... LCD Failure 127 LCD Module Disassembly Flowchart 88 LCD Panel 93 lower cover 49 M Main Unit Disassembly Flowchart 58 Mainboard 79 media access on indicator 10 MediaTouch Button Failure 138 Memory Check 124 Model Definition 166 Modem Failure 135 Modem Module 78 N No Display Issue 125 Notebook Manager hotkey 14 num lock on indicator 10 O ODD Failure 132 Online Support Information 179 optical drive module 56 P Panel 5 Bottom 9 left 5 PC Card 10 Port 80 POST Codes 142 POST Codes Port...


