User Guide
Page 3
... cards (only for certain models) Your computer shipped with plastic dummies installed in the slots. When you need to disconnect power to the equipment, be sure to block out noisy surroundings. • Decrease the volume if you can't hear people speaking near you plug the power cord into is easily accessible and located as close to the equipment operator as disconnecting device...
... cards (only for certain models) Your computer shipped with plastic dummies installed in the slots. When you need to disconnect power to the equipment, be sure to block out noisy surroundings. • Decrease the volume if you can't hear people speaking near you plug the power cord into is easily accessible and located as close to the equipment operator as disconnecting device...

User Guide
Page 6
... which could affect performance. Do not pierce, open or disassemble the battery. Batteries may present a risk of another battery may also explode if damaged. Wireless devices may explode. Replacing the battery pack The notebook uses lithium batteries. The full performance of a new battery is left in hot or cold places, such as a coin, clip or pen causes direct connection of the positive (+) and negative (-) terminals of...
... which could affect performance. Do not pierce, open or disassemble the battery. Batteries may present a risk of another battery may also explode if damaged. Wireless devices may explode. Replacing the battery pack The notebook uses lithium batteries. The full performance of a new battery is left in hot or cold places, such as a coin, clip or pen causes direct connection of the positive (+) and negative (-) terminals of...
User Guide
Page 13
... help you use Adobe Reader, access the Help and Support menu. In addition it : 1 Click on Start, All Programs, AcerSystem. 2 Click on the screen to complete the installation. If Adobe Reader is available in the Extensa product series. The printed Extensa Series Generic User Guide contains useful information applying to all models in Portable Document Format (PDF) and comes preloaded on how to use your Acer notebook, we have designed a set of guides: First...
... help you use Adobe Reader, access the Help and Support menu. In addition it : 1 Click on Start, All Programs, AcerSystem. 2 Click on the screen to complete the installation. If Adobe Reader is available in the Extensa product series. The printed Extensa Series Generic User Guide contains useful information applying to all models in Portable Document Format (PDF) and comes preloaded on how to use your Acer notebook, we have designed a set of guides: First...
User Guide
Page 17
... and servicing xv Touchpad 1 Touchpad basics (with fingerprint reader) 1 Touchpad basics (with two-click buttons) 2 Using the keyboard 3 Lock keys and embedded numeric keypad* 3 Windows keys 4 Audio 5 Acer PureZone (only for certain models) 5 Video 5 16:9 display (only for certain models) 5 Using the system utilities 6 Acer Bio-Protection (only for certain models) 6 Acer GridVista (dual-display compatible) 7 Acer Backup Manager 8 Power management 9 Acer eRecovery Management 10 Burn backup discs 11 Restore 12 Restore Windows from backup discs 13 Battery...
... and servicing xv Touchpad 1 Touchpad basics (with fingerprint reader) 1 Touchpad basics (with two-click buttons) 2 Using the keyboard 3 Lock keys and embedded numeric keypad* 3 Windows keys 4 Audio 5 Acer PureZone (only for certain models) 5 Video 5 16:9 display (only for certain models) 5 Using the system utilities 6 Acer Bio-Protection (only for certain models) 6 Acer GridVista (dual-display compatible) 7 Acer Backup Manager 8 Power management 9 Acer eRecovery Management 10 Burn backup discs 11 Restore 12 Restore Windows from backup discs 13 Battery...
User Guide
Page 18
... lock 23 Using passwords 23 Entering passwords 24 Setting passwords 24 Expanding through options 25 Connectivity options 25 Fax/data modem (only for certain models) 25 Built-in network feature 26 Universal Serial Bus (USB) 26 IEEE 1394 port (only for certain models) 27 High-Definition Multimedia Interface (only for certain models) 27 ExpressCard (only for certain models) 28 Installing memory 29 BIOS utility 30 Boot sequence 30 Enable disk-to-disk recovery 30 Password 30 Using software 31 Playing DVD...
... lock 23 Using passwords 23 Entering passwords 24 Setting passwords 24 Expanding through options 25 Connectivity options 25 Fax/data modem (only for certain models) 25 Built-in network feature 26 Universal Serial Bus (USB) 26 IEEE 1394 port (only for certain models) 27 High-Definition Multimedia Interface (only for certain models) 27 ExpressCard (only for certain models) 28 Installing memory 29 BIOS utility 30 Boot sequence 30 Enable disk-to-disk recovery 30 Password 30 Using software 31 Playing DVD...
User Guide
Page 22
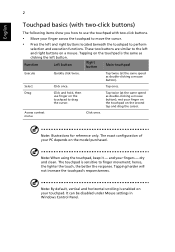
... touchpad's responsiveness. Function Left button Right button Main touchpad Execute Select Drag Access context menu Quickly click twice. and your PC depends on the model purchased. English 2 Touchpad basics (with two-click buttons) The following items show you how to use finger on a mouse. Tap once. dry and clean. The touchpad is enabled on your touchpad. Note: By default, vertical and horizontal scrolling is sensitive to the left button...
... touchpad's responsiveness. Function Left button Right button Main touchpad Execute Select Drag Access context menu Quickly click twice. and your PC depends on the model purchased. English 2 Touchpad basics (with two-click buttons) The following items show you how to use finger on a mouse. Tap once. dry and clean. The touchpad is enabled on your touchpad. Note: By default, vertical and horizontal scrolling is sensitive to the left button...
User Guide
Page 23
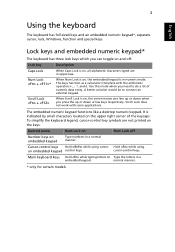
... keys function as a calculator (complete with some applications. Cursor-control keys Hold while using on Type the letters in numeric mode. normal manner. * only for certain models Num Lock + * When Num Lock is on, the embedded keypad is indicated by small characters located on the upper right corner of numeric data entry. Scroll Lock does not work with the arithmetic operators +, -, *, and /). Desired access Num Lock on , the screen...
... keys function as a calculator (complete with some applications. Cursor-control keys Hold while using on Type the letters in numeric mode. normal manner. * only for certain models Num Lock + * When Num Lock is on, the embedded keypad is indicated by small characters located on the upper right corner of numeric data entry. Scroll Lock does not work with the arithmetic operators +, -, *, and /). Desired access Num Lock on , the screen...
User Guide
Page 24
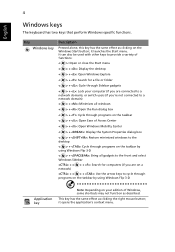
... by using Windows Flip 3-D < > + : Bring all gadgets to a network domain) < > + : Minimizes all windows < > + : Open the Run dialog box < > + : Cycle through programs on the taskbar < > + : Open Ease of Windows, some shortcuts may not function as described. Key Windows key Description Pressed alone, this key has the same effect as clicking the right mouse button; it launches the Start menu. English 4 Windows keys The keyboard has two keys that perform Windows-specific functions. This key has...
... by using Windows Flip 3-D < > + : Bring all gadgets to a network domain) < > + : Minimizes all windows < > + : Open the Run dialog box < > + : Cycle through programs on the taskbar < > + : Open Ease of Windows, some shortcuts may not function as described. Key Windows key Description Pressed alone, this key has the same effect as clicking the right mouse button; it launches the Start menu. English 4 Windows keys The keyboard has two keys that perform Windows-specific functions. This key has...
User Guide
Page 28
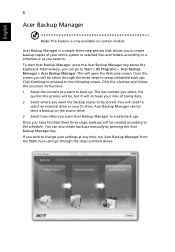
... need to the following screen. You will be taken through the steps outlined above the keyboard. Alternatively, you will open the Welcome screen; The less content you select, the quicker the process will be, but it will increase your settings at any time, run Acer Backup Manager from this screen you can also create backups manually by pressing the Acer Backup Manager key. Acer Backup Manager cannot store a backup on certain models...
... need to the following screen. You will be taken through the steps outlined above the keyboard. Alternatively, you will open the Welcome screen; The less content you select, the quicker the process will be, but it will increase your settings at any time, run Acer Backup Manager from this screen you can also create backups manually by pressing the Acer Backup Manager key. Acer Backup Manager cannot store a backup on certain models...
User Guide
Page 29
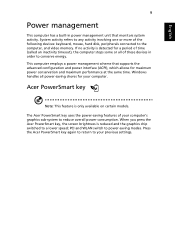
... or more of these devices in power management unit that supports the advanced configuration and power interface (ACPI), which allows for maximum power conservation and maximum performance at the same time. Windows handles all of the following devices: keyboard, mouse, hard disk, peripherals connected to conserve energy. English 9 Power management This computer has a built-in order to the computer, and video memory. If no activity is only available on certain models.
... or more of these devices in power management unit that supports the advanced configuration and power interface (ACPI), which allows for maximum power conservation and maximum performance at the same time. Windows handles all of the following devices: keyboard, mouse, hard disk, peripherals connected to conserve energy. English 9 Power management This computer has a built-in order to the computer, and video memory. If no activity is only available on certain models.
User Guide
Page 33
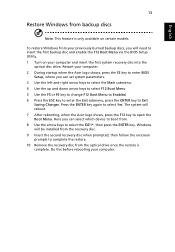
... backup discs, you will need to open the Boot Menu. Restart your computer and insert the first system recovery disc into the optical disc drive. Windows will reboot. 7 After rebooting, when the Acer logo shows, press the F12 key to insert the first backup disc and enable the F12 Boot Menu via the BIOS Setup Utility. 1 Turn on certain models. Here you can select which device to boot from. 8 Use the arrow keys to select Yes. English 13 Restore Windows from backup discs...
... backup discs, you will need to open the Boot Menu. Restart your computer and insert the first system recovery disc into the optical disc drive. Windows will reboot. 7 After rebooting, when the Acer logo shows, press the F12 key to insert the first backup disc and enable the F12 Boot Menu via the BIOS Setup Utility. 1 Turn on certain models. Here you can select which device to boot from. 8 Use the arrow keys to select Yes. English 13 Restore Windows from backup discs...
User Guide
Page 34
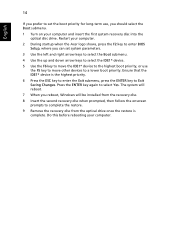
... this before rebooting your computer and insert the first system recovery disc into the optical disc drive. Restart your computer. 2 During startup when the Acer logo shows, press the F2 key to enter BIOS Setup, where you can set the boot priority for long-term use the F5 key to move the IDE1* device to the highest boot priority, or use , you should select the Boot submenu. 1 Turn on your...
... this before rebooting your computer and insert the first system recovery disc into the optical disc drive. Restart your computer. 2 During startup when the Acer logo shows, press the F2 key to enter BIOS Setup, where you can set the boot priority for long-term use the F5 key to move the IDE1* device to the highest boot priority, or use , you should select the Boot submenu. 1 Turn on your...

User Guide
Page 38
... want to turn off the computer. Save all applications. 3. An extra fully charged battery pack is unavailable. Close all necessary files. 3. The AC adapter or a power outlet is available. 1. Warning: Connect the AC adapter as soon as possible after the battery-low warning appears. Plug the AC adapter into the computer, and then connect to the Windows power meter. Replace the battery pack. 5. You...
... want to turn off the computer. Save all applications. 3. An extra fully charged battery pack is unavailable. Close all necessary files. 3. The AC adapter or a power outlet is available. 1. Warning: Connect the AC adapter as soon as possible after the battery-low warning appears. Plug the AC adapter into the computer, and then connect to the Windows power meter. Replace the battery pack. 5. You...
User Guide
Page 39
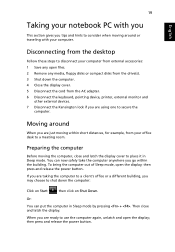
... computer in Sleep mode. If you are ready to secure the computer. Or: You can now safely take the computer anywhere you go within short distances, for example, from the AC adapter. 6 Disconnect the keyboard, pointing device, printer, external monitor and other external devices. 7 Disconnect the Kensington lock if you are using one to use the computer again, unlatch and open the display; When you...
... computer in Sleep mode. If you are ready to secure the computer. Or: You can now safely take the computer anywhere you go within short distances, for example, from the AC adapter. 6 Disconnect the keyboard, pointing device, printer, external monitor and other external devices. 7 Disconnect the Kensington lock if you are using one to use the computer again, unlatch and open the display; When you...
User Guide
Page 43
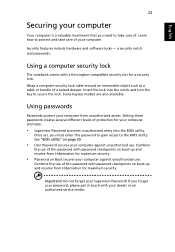
.... Once set, you must enter this password to gain access to secure the lock. If you need to protect and take care of protection for maximum security. • Password on page 30. • User Password secures your computer and data: • Supervisor Password prevents unauthorized entry into the notch and turn the key to the BIOS utility. Using passwords Passwords protect your dealer or an authorized service center...
.... Once set, you must enter this password to gain access to secure the lock. If you need to protect and take care of protection for maximum security. • Password on page 30. • User Password secures your computer and data: • Supervisor Password prevents unauthorized entry into the notch and turn the key to the BIOS utility. Using passwords Passwords protect your dealer or an authorized service center...

User Guide
Page 44
... set passwords using the BIOS utility. Try again and press . • When the User Password is set and the password on the computer again, and try again. Important! Then turn on boot parameter is enabled, a prompt appears at boot-up . • Type the User Password and press to enter a password. If you enter the password incorrectly, a warning message appears. English 24 Entering passwords When a password is set, a password prompt appears in the center of the display screen...
... set passwords using the BIOS utility. Try again and press . • When the User Password is set and the password on the computer again, and try again. Important! Then turn on boot parameter is enabled, a prompt appears at boot-up . • Type the User Password and press to enter a password. If you enter the password incorrectly, a warning message appears. English 24 Entering passwords When a password is set, a password prompt appears in the center of the display screen...
User Guide
Page 45
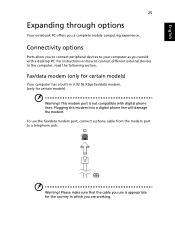
For instructions on how to connect different external devices to a telephone jack. To use is not compatible with a desktop PC. English 25 Expanding through options Your notebook PC offers you would with digital phone lines. This modem port is appropriate for certain models) Warning! Warning! Please make sure that the cable you are working. Connectivity options Ports allow you to connect peripheral devices to your computer as you a complete...
For instructions on how to connect different external devices to a telephone jack. To use is not compatible with a desktop PC. English 25 Expanding through options Your notebook PC offers you would with digital phone lines. This modem port is appropriate for certain models) Warning! Warning! Please make sure that the cable you are working. Connectivity options Ports allow you to connect peripheral devices to your computer as you a complete...

User Guide
Page 50
... screen. To activate the BIOS utility, press during the POST; Enable disk-to-disk recovery To enable disk-to-disk recovery (hard disk recovery), activate the BIOS utility, then select Main from the categories listed at the top of the screen and use the and keys to run it. English 30 BIOS utility The BIOS utility is being displayed. Boot sequence To set a password on boot: and use the and keys to set this value to run this feature. while the notebook PC logo is a hardware configuration...
... screen. To activate the BIOS utility, press during the POST; Enable disk-to-disk recovery To enable disk-to-disk recovery (hard disk recovery), activate the BIOS utility, then select Main from the categories listed at the top of the screen and use the and keys to run it. English 30 BIOS utility The BIOS utility is being displayed. Boot sequence To set a password on boot: and use the and keys to set this value to run this feature. while the notebook PC logo is a hardware configuration...
User Guide
Page 52
...-bootable (non-system) disk in Sleep mode. If pressing a key does not turn the display back on the battery, it is in the external USB floppy drive? Press the display toggle hotkey + to toggle the display back to the computer. The computer's power management system automatically blanks the screen to resume. Look at the volume control icon on the taskbar. Press and release the power button to save power. I turned on , three...
...-bootable (non-system) disk in Sleep mode. If pressing a key does not turn the display back on the battery, it is in the external USB floppy drive? Press the display toggle hotkey + to toggle the display back to the computer. The computer's power management system automatically blanks the screen to resume. Look at the volume control icon on the taskbar. Press and release the power button to save power. I turned on , three...

User Guide
Page 60
... rise to bell tinkle or noise and may not operate. There is no effect on local power, is DTMF tone dialing. Should such problems occur, the user should NOT contact the telecom Fault Service. 8 This equipment may occasionally misfire or appear as wireless LAN and/or Bluetooth modules). LCD pixel statement The LCD unit is produced with high-precision manufacturing techniques.
... rise to bell tinkle or noise and may not operate. There is no effect on local power, is DTMF tone dialing. Should such problems occur, the user should NOT contact the telecom Fault Service. 8 This equipment may occasionally misfire or appear as wireless LAN and/or Bluetooth modules). LCD pixel statement The LCD unit is produced with high-precision manufacturing techniques.


